This chapter contains the following topics:
Printing a Report of Ship-to Addresses
The Ship-to addresses selection enables you to enter ship-to addresses for customers in Customers.
A ship-to address is an address, different from the customer’s billing address, to which customer orders are delivered or at which a service is performed.
These addresses are used in entering invoices and (if interfaced to the Passport Business Solutions Order Entry) in entering orders.
There may be an unlimited number of ship-to addresses for the same customer. You do not have to enter a ship-to address here before you can enter an invoice for that address. Storing them here beforehand is merely a convenience to reduce typing and ensure consistency.
Ship-to addresses may be added on-the-fly when entering invoices, as described in the Invoices chapter.
Select
Ship-to addresses from the Master information menu.
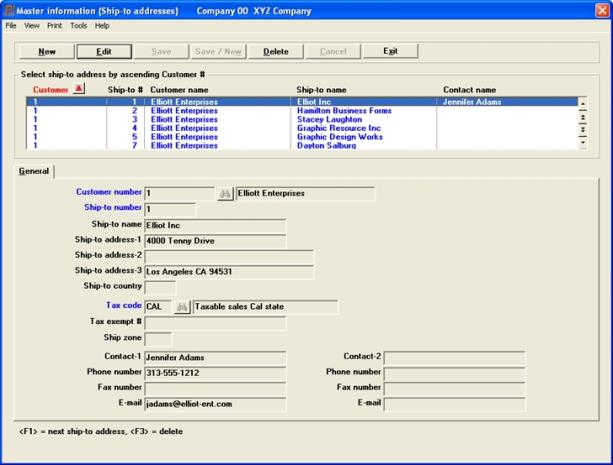
The following screen appears:
Graphical Mode

The list box displays up to 6 ship-to addresses at a time. You may sort the ship-to addresses by ship-to number in ascending or descending order. Only column names in red may be sorted. To select or change the sort field direction, click on the column name or the arrow to the right of the column name or use the View menu options.
To locate an ship-to address, start typing the number or use the arrow keys, <PgDn>/<PgUp>, and <Home>/<End> keys to find the address. The <F1> and <SF1> keys function the same as the up/down arrow keys.
Ship-to addresses that display in the list box are available for changes or deletion. The fields for the selected ship-to address display in the lower part of the screen.
When a ship-to address is found, you may select the <Enter> key or Edit button to start editing.
You have the following options with the buttons and keyboard equivalents:
| Button | Keyboard | Description |
|---|---|---|
|
New |
Alt+n |
For entering a new ship-to address |
|
Edit |
Alt+e |
For editing an existing ship-to address |
|
Save |
Alt+s |
For saving a new ship-to address or for saving the changes to an existing ship-to address |
|
Save/New |
Alt+w |
This is a combination of the Save and New buttons |
|
Delete |
Alt+d |
To delete a ship-to address |
|
Cancel |
Alt+c |
To cancel adding or editing a ship-to address. Your entry will not be saved and the record will revert back to its previous state |
|
Exit |
Alt+x |
To exit the window and return to the menu |
There are several menu selections that are common to every screen and some that are unique to a screen. See the System documentation for a description of the common menu selections. The Print menu selection is unique to this screen as it allows you to print a list of ship-to addresses.
Character Mode

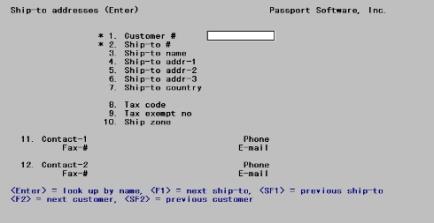
From this screen you can work with both new and existing ship-to addresses. If a ship-to address has already been entered for the customer number and ship-to number you specify, it will appear and be available for changes or deletion.
Enter the following information:
Enter the number of the customer that this ship-to address is for. There must already be an entry for this number in Customers. Miscellaneous customers may not have ship-to locations. A miscellaneous customer is not a real individual customer but a generic category of customers.
Options
You may use one of the options:
|
Blank |
To look up the customer by name |
|
<F1> |
For the next ship-to entry on file, regardless of customer. Information on file for this entry will display and the cursor will be positioned at Field number to change ?. |
|
<SF1> |
For the previous ship-to address |
|
<F2> |
For the next customer, in customer number sequence, regardless of whether or not there is an entry on file for this customer. |
|
<SF2> |
For the previous customer |
Upon entry of a valid customer number, the customer’s name displays to its right.
|
Format |
12 characters |
|
Example |
Type 100 |
Entering Customers By Name
If you have left the customer number blank the cursor moves to the customer name field to allow selection by name. Enter the name, or just the leading characters of the name. Upper / lower case is significant. You may use one of the options:
|
Blank |
To go back to looking up the customer by number |
|
<F2> |
For the next customer, in customer name sequence |
|
<SF2> |
For the previous customer |
|
Format |
25 characters |
|
Example |
(Does not occur in this example because you selected a customer by number). |
Enter a ship-to number code to identify this ship-to address. Where available, you may wish to use the customer’s store number for this purpose. Each one of a customer’s ship-to addresses must have a different code, but the same number may be re-used for different customers. If the customer and ship-to number correspond to an existing entry, that entry displays on the screen and the cursor is positioned at Field number to change ?; otherwise the cursor moves to Field #3.
Note that if you know the customer but not his ship-to codes, <F1> and <SF1> are not available here for paging through the various locations. Use <F9> for this purpose instead.
|
Format |
99999 |
|
Example |
Type 1 |
Options
Enter the name to which shipments are to be made. This may be left blank. You may use the option:
|
<F2> |
To use the customer name as the ship-to name |
|
Format |
20 characters |
|
Example |
Press <F2> |
Ship-to address-1
Ship-to address-2, and
Ship-to address-3
Three lines are provided for the ship-to address. All three are optional. There are no rules about where the city and zip code go; you may wish to adopt your own standard about this.
When printed on the invoice, any blank lines in the address will be closed up so as to leave no gaps.
|
Format |
30 characters at each field |
|
Example |
Type 1550 S. Coastline Blvd. Type Refugio Beach, CA Type 91809 |
Enter the country code. This field is optional.
|
Format |
3 characters |
|
Example |
Press <Enter> |
The sales tax where materials are delivered or services performed may be different from the tax at the customer’s billing address. This field is required, and must correspond to an existing entry in Tax codes. Enter a tax code, or use the option:
|
<F2> |
For the customer’s tax code at his bill-to location |
|
Format |
3 characters |
|
Example |
Press <F2> |
If the customer is exempt from taxes at this location, enter his tax-exemption number.
|
Format |
20 characters |
|
Example |
Press <Enter> to leave this field blank |
Enter an optional shipping zone. This field is informational only and does not display on the totals screen of Invoices (Enter).
|
Format |
2 characters |
|
Example |
Press <Enter> |
Enter the name of the primary and secondary persons to contact at this shipping location.
Each contact has a contact name, an e-mail address, and up to two phone numbers.
| • | Both contacts are optional, and either may be left blank. |
| • | The two fields are independent of one another. |
| • | A contact may have a phone number without a person’s name, and vice versa. |
| • | You may have a secondary contact even though you do not have a primary contact. |
|
Format |
25 characters at each field |
|
Example |
Type Audrey A. Smith for Contact-1 Type Oliver Sutton for Contact-2 |
Enter the phone number of the primary and secondary contact.
|
Format |
25 characters at each field. Lower-case letters are converted to upper-case. There is no default. |
|
Example |
Type 437-555-1246 for Contact-1 |
Enter the Fax number of the two contacts.
|
Format |
25 characters. Lower-case letters are preserved. |
|
Example |
Press <Enter> at each field to leave both contacts blank |
Enter the e-mail address of the two contacts.
|
Format |
25 characters. Lower-case letters are preserved. |
|
Example |
Press <Enter> at each field to leave both contacts blank |
Make any needed changes. Press <Enter>. For an existing entry, you may use one of the options:
|
<F1> |
For the next ship-to entry on file (not necessarily for the same customer) |
|
<SF1> |
For the previous entry |
|
<F3> |
To delete an existing entry |
Practice
For practice, and to provide data to be used in examples in subsequent chapters, enter another address as shown:
|
1. Customer #: |
200 |
|
2. Ship-to #: |
3 |
|
3. Ship-to name: |
Press <F2> |
|
4. Ship-to addr-1: |
84 Avalon Way, Suite 1284 |
|
5. Ship-to addr-2 |
Santa Catalina, CA |
|
6. Ship-to addr-3: |
98809 |
|
7.Ship-to country: |
Press <Enter> |
|
8. Tax code: |
Press <F2> |
|
9. Tax exempt #: |
Press <Enter> |
|
10. Ship zone: |
Press <Enter> |
|
11. Contact-1: |
Press <Enter> at each field |
|
12. Contact-2: |
Press <Enter> at each field |
Select
Ship-to addresses from the Reports, general menu.
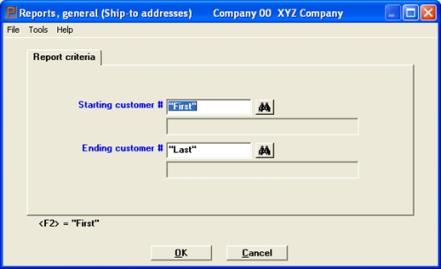
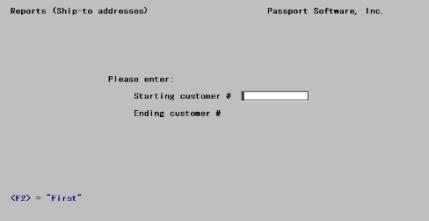
The following screen appears:
Graphical Mode

Character Mode

Enter the following information:
Starting customer #
Ending customer #
Enter the range of customers to be included on the report, or use the option: Enter the name to which shipments are to be made. This may be left blank. You may use the option: Enter the name to which shipments are to be made. This may be left blank. You may use the option:
|
<F2> |
For the First starting customer number or Last ending customer number |
|
Format |
12 characters |
|
Example |
Press <F2> at each field. |
Answer Y to re-enter the screen, or N to print the report. A Ship-To Addresses report example is in the Sample Reports appendix.