This chapter contains the following topics:
Introduction to Invoice Formats
Printing Format Specifications
The Invoice Formats selection enables you to tailor the Passport Business Solutions Accounts Receivable module to work with your invoice forms.
You do not have to change to an unfamiliar or undesirable invoice form in order to use this module, but can configure A/R to print on your current invoice form or nearly any other invoice form you wish.
If you do not use an invoice form, but simply use your blank letterhead, you can tailor A/R to use this also. In Windows or Thin client, you can also merge a graphical file with the file data that contains the lines, logo, different colors, header names and so on.
You can even arrange it so that you can print the same invoice in two or more different formats, to be used for different purposes for instance, one format to send to the customer and another format to use internally.
An invoice format is sometimes referred to as a layout. It is also sometimes called a specification.
The following lists some of the definitions that are used in the invoice tailoring process.
Field location grid
The Field # location grid is a set of vertical and horizontal lines of numbers which you can print on your preprinted invoice form or graphic image file to aid in positioning information so that it matches up horizontally and vertically with the titles and lines already on the form.
Invoice layout worksheet
The invoice layout worksheet is a set of numbered vertical and horizontal lines which you can print on a blank sheet of paper to create your invoice from scratch.
|
|
|
|
|
|
|
|
|
|
Top Margin |
|||
|
|
|
1 |
2 |
3 |
4 |
5 |
6 |
7 |
8 |
9 |
0 |
|
|
|
1 |
|
|
|
|
|
|
|
|
|
|
|
|
Left |
2 |
|
|
|
|
|
|
|
|
|
|
|
|
Margin |
3 |
|
|
|
A |
|
|
|
The location of the letter A is at row 3, column 4 |
|||
|
|
4 |
|
|
|
|
|
|
|
||||
Line or row
Line or row refers to the cells arranged horizontally in a table.
Column
Column refers to the cells arranged vertically in a table.
Location
Location refers to the row and column of the printed information on the page.
Format design kit
Format design kit refers to the appendix Invoice Format Design Kit, which provides the step-by-step procedure to set up a new invoice format.
The invoice format consists of three areas:
|
1 |
Header |
|
2 |
Line item 1 Line item 2 Line item 3 etc. Payment 1 Payment 2 etc. |
|
3 |
Totals |
Header
The Header area is the first part of the invoice and includes information pertaining to the overall invoice: i.e., customer’s name and address, invoice date, invoice number, your company’s name and address, etc.
Line item and Payment
The Line item area is the middle part of the invoice and includes information on all the line items (goods and services) you are billing the customer for: descriptions, quantities, prices, etc. It can also include notes giving additional information about the goods and services.
The line item area also shares the payments if you are using multi-payments. You may assign payment fields to the invoice format. They print are AFTER the last line, service item or note. If there is more than one payment, then the print one after another. In order to print payment information you must be licensed for multi-payments. See the PBS Multi-payment Setup appendix for more information.
Totals
The Totals area is the last part of the invoice and includes the total amount of the invoice, over-all discounts, taxes, miscellaneous charges, etc.
|
Note |
Each of the available fields can be printed in as many as four different locations subject the following overall limits for the different invoice areas. |
In the header area, the maximum number of locations in which you can print fields or text is 100 (including the copies of any of the available header fields printed in up to 4 different locations).
In the line item area, the maximum number of locations in which you can print fields or text is 80.
In the totals area, the maximum number is 80.
The A/R module comes with a number of predefined invoice formats. If one of these is close to the one you want, just make a copy of it and then make changes to the copy. Refer to the Invoice Format Design Kit appendix for guides to modifying invoice formats and for designing invoice formats from scratch.
Passport recommends that you first become familiar with printing invoices in the predefined formats furnished with this module before designing your own.
The remaining parts of this chapter describe the A/R functions you run in accordance with the checklists in the Invoice Format Design Kit appendix.
If you are ready to add a format now, refer to the appropriate checklist in the Invoice Format Design Kit. The checklist will refer you to the parts of this chapter you need to perform the steps for adding formats.
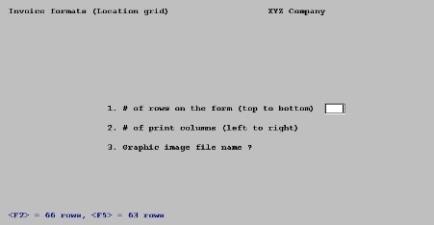
The field location grid is a tool you can use to plan your invoice form when you are using a preprinted invoice form or graphic image file. Print this grid on your invoice form, to see the exact rows and columns of every piece of invoice information on the pre-printed form or file. You will then be able to specify the exact row and column for each piece of information when you create your invoice format.
This grid may also be useful to plan the layout of forms that you design, so you can avoid overlapping fields, a confusing layout, and when using Windows printer or a PDF printer and when merging with a graphical form file.
Select
Location grid from the Invoice formats menu.
The following screen appears:

Enter the information as follows:
1. # of rows on the form (top to bottom)
Enter the number of rows to appear on the grid.
The number you enter corresponds to the number of rows on your invoice form.
|
<F2> |
For 66 rows (8¾ X11 paper with no allowance for top or bottom margins) |
|
<F5> |
For 63 rows (this is the maximum recommended amount if you are using Windows printer.) |
|
Note |
Most laser printers are unable to print on the first 1/6th inch at the top of a page and on the last 1/6th inch at the bottom of a page. Because of this physical limitation, the first row of a location grid will not be printed on a laser printer. The last row will not be printed when it falls within the last 1/6th of an inch of the page. For example, if you enter 66 for # of rows on the form and print on letter size When selecting Windows printer, the print limitations is determined by the printer driver. These limitations can differ per version of the driver. |
2. # of print columns (left to right)
|
Format |
99 |
|
Example |
Press <F2> |
Enter the number of columns to appear across the page on the grid.
Options
The maximum number of columns you can specify is 132.
|
<F2> |
For 80 columns (8¾ X11 paper with º inch allowance for left and right margins) |
|
Format |
99 |
|
Example |
Press <F2> |
Enter the name of the file that will merge with the invoice data. This JPEG or Bitmap file must be present in the top-level PBS directory - IMAGES.
See the Form File Use and Design section in the More on PBS Printing chapter In the PBS Administration documentation to learn more about modifying the PBS graphical file examples or creating your own from scratch.
You may use the option:
|
<F2> |
To not use a graphical image file and print on letterhead |
The file must be present in the IMAGES directory and must be spelled exactly as the file name with the proper extension included. If running in Linux or UNIX Thin client, the file name must be entered with the same (UPPER or lower) case and do NOT use a period as part of the file name.
|
Format |
12 characters, but the extension must be either .jpg or .bmp. |
|
Example |
Enter IV65F1.JPG |
If you want a graphical image file to print on the page, then you must select Windows printer or a Company information PDF printer when you print the grid. In regards to Company information printers, only PDF printers will merge the image file with the data.
When using Windows printer merging with a graphical image is only available when running on Windows or Thin client. Merging with a graphical image when using a Company information PDF printer will work on all operating systems that PBS supports.
Field number to change ?
Make any needed changes, then press <Enter>. The following message is displayed:
Make sure your form is now in the printer, and that the printer will begin printing at the first print position of the very first line of the form.
Type "DONE" when ready.
The printer should always be ready to print in location 1,1 (that is, row 1, column 1).
Type DONE and the location grid will print. A sample location grid appears at the end of this chapter.
After the grid is printed, you are asked whether you want to print it again. If you answer Y, the grid is printed a second time. If you answer N, the following message is displayed:
If you have pre-printed forms mounted on the printer, replace these now with regular paper.
Type “DONE" when ready.
Type DONE and press <Enter>.
The layout worksheet is a tool to help you lay out your invoice on blank paper, continuous-form company letterhead or when using Windows printer and merging with a form file. Whereas the location grid has rows and columns of numbers, the layout worksheet has rows of dotted lines on which you can fill in invoice information in the way you want it printed.
You can also print the layout worksheet on a preprinted form if you wish.
Select
Layout worksheet from the Invoice formats menu.
The following screen appears:
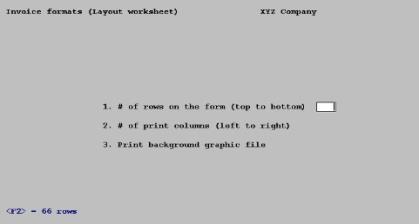
Enter the information as follows:
1. # of rows on the form (top to bottom)
Enter the number of rows to appear in the worksheet.
Options
The number you enter corresponds to the number of rows on your invoice form. If you are using Windows printer, you may have to enter 63, 62 or even less. It depends on what is allowed by your printer model.
|
<F2> |
For 66 rows (8 X 11 paper with no allowance for top or bottom margins) |
|
Note |
There are certain limitations to printers. When printing using a Company information laser printer, it is unable to print on the first 1/6th inch at the top of a page and on the last 1/6th inch at the bottom of a page. Because of this physical limitation, the first row of a location worksheet will not be printed on a laser printer. The last row will not be printed when it falls within the last 1/6th of an inch of the page. For example, if you enter 66 for # of rows on the form and print on letter-size 8¾ X11 paper, row 1 and row 66 will not print. When printing using Windows printer, the limitation may be different per printer model based on margins defined in the printer driver. Generally you have less printable area using Windows printer than when using a printer defined in Company information and your format design should reflect this. For example, a Company information printer setup may allow 66 lines but a Windows printer may only allow 62 lines. Refer to your printers documentation to determine available printable area on the page. |
|
Format |
99 |
|
Example |
Press <F2> |
2. # of print columns (left to right)
Enter the number of columns to appear across the page on the worksheet.
Options
The maximum number of columns you can specify is 132. For Windows printer you may have to enter a number less that 80.
|
<F2> |
For 80 columns (8¾ X11 paper with º inch allowance for left and right margins) |
|
Format |
99 |
|
Example |
Press <F2> |
3. Graphic image file name ?
This field is only available in Windows and Thin client.
Enter the name of the file that will merge with the invoice worksheet. This JPEG or Bitmap file must be present in the top-level PBS directory - Images.
You may use the option:
|
<F2> |
To not use a graphical image file and print on letterhead or plain paper without an image file |
The file name must be spelled exactly as the file name with the proper extension included.
|
Format |
12 characters, but the extension must be either .jpg or .bmp. |
|
Example |
Enter IV65F1.JPG |
If you want a graphical image file to print on the page, then you must select Windows printer when you print the worksheet. The printers defined in company information will not merge the image file with the data.
Merging with a graphical image is only available when using Windows or Thin client.
Field number to change ?
Make any needed changes, then press <Enter>. The following message is displayed:
If you wish to print the worksheet on a pre-printed form, mount your form on the printer now.
Type DONE when ready
The printer should always be ready to print in location 1,1 (row 1, column 1).
Type DONE and the worksheet will print. A sample layout worksheet appears at the end of this chapter.
After the layout worksheet has printed, you are asked whether you want to print it again. If you answer Y, another worksheet will be printed. If you answer N, the following message is displayed:
If you have pre-printed forms mounted on the printer, replace these now with regular paper.
Type “DONE” when ready.
Type DONE and press <Enter>.
Select
General appearance from the Invoice formats menu.
A screen appears for you to either assign a number and description to a new invoice format you want to add or to retrieve an existing format. Enter the following information:
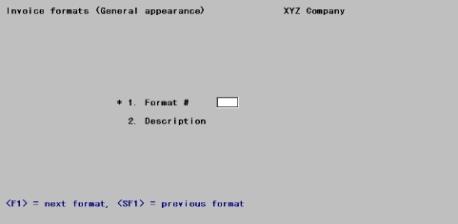
1. Format #
Options
Enter a format number, or use one of the options:
|
<F1> |
For the next format on file |
|
<SF1> |
For the previous format on file |
|
Format |
99 |
|
Example |
Type 11 |
2. Description
Enter a description of the format. This field is required.
|
Format |
25 characters |
|
Example |
Type Example format |
Field number to change ?
Options
Make any needed changes or press <Enter> to continue.
The checklists in the Invoice Format Design Kit describe the exact steps to add a new format or modify an existing format. Briefly, the sequence from this point on is:
| • | Use General appearance to specify the general, over-all appearance of the format: how long, how wide, specifying an image file, etc. |
| • | Use Header area to select which fields or texts to print in the header area of the invoice, where they should print and how they should look. Then use Line item area and Totals area similarly. |
| • | Use Verify to check the format for errors. Make any necessary corrections. |
| • | Use the Sample invoice to confirm that the form is what you want. |
Select
General appearance from the Invoice format menu.
An entry screen will be displayed prompting you for the invoice format number that you want to work with.
Options
Enter a format number, or use one of the options:
|
<F1> |
For the next format on file |
|
<SF1> |
For the previous format on file |
|
Format |
99 |
|
Example |
Type 11 |
The following screen displays for General Appearance:
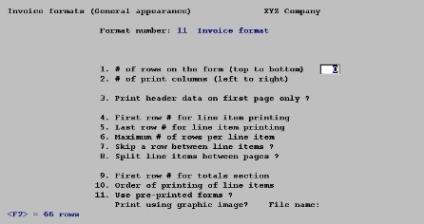
Enter the information as follows:
1. # of rows on the form (top to bottom)
Enter the number of rows on the invoice form or use the option:
|
<F2> |
For 66 rows (six rows per inch on standard 8/11 inch paper) |
|
Note |
If you wish to use a form with more than 66 rows on a laser printer, you must use Company information to set up an Other laser printer with the proper job control codes. To print on legal size paper, you must use the appropriate job control codes to set the text length to 84 rows. For an explanation of the hexadecimal codes used for job control, refer to the Special Forms and Laser Printers section of the Company information chapter in the PBS Administration documentation. |
|
Format |
99 |
|
Example |
Press <F2> |
2. # of print columns (left to right)
Options
Enter the number of columns on the invoice form (up to 132) or use the option:
|
<F2> |
For 80 columns (ten characters per inch on standard |
|
Format |
999, not to exceed 132 |
|
Example |
Press <F2> |
3. Print header data on first page only ?
Answer Y to print the header information, such as customer and customer ship-to addresses, on only the first page of the invoice. Answer N to print it at the top of every page of the invoice.
|
Format |
One letter, either Y or N. The default is Y. |
|
Example |
Press <Enter> |
4. First row # for line item printing
Enter the row number on which you want the first line item to start printing (from 3 to [maximum rows on form minus 4]). As an illustration, if you had specified in Field #1 above that the number of rows on the form was 66, you could enter a number from 3 to 62 (66 minus 4).
Be sure to leave room for the header area, and also for any blank rows to separate the header area from the line items.
|
Format |
99 |
|
Example |
Type 28 |
5. Last row # for line item printing
Enter the row number of the last row in the line item area. Line item information will never print after this row number. This number must be larger than the row on which you want the first line item to start printing (entered in 4 above), but smaller than the maximum rows on the form minus 3. Continuing the illustration above, if you entered 28 for the first row number for line item printing, you could enter a number from 4 to 63 (66 minus 3).
Be sure to leave room for the totals area, and also for any blank rows to separate the totals area from the line items.
|
Format |
99 |
|
Example |
Type 56 |
6. Maximum # of rows per line item
Enter the maximum number of rows to print per line item, from 1 to 12. This number cannot be larger than the difference between the numbers entered in Fields #4 and 5 above, plus 1.
For instance, if you were designing a very short form and had specified above that the first row for line item printing is 9 and the last row is 15, the rows per line item could not be larger than 7 (15 - 9 + 1).
|
Note |
The A/R module allows you to have "services" line items and "notes" line items, each with up to 10 lines of description. Specify enough rows to print the longest note or description of services you want to show on the invoice. This is the maximum number of rows per line item. If a line item consists of less than this, only the lesser number of rows will be printed |
|
Format |
99 |
|
Example |
Type 5 |
7. Skip a row between line items ?
If the number of rows per line item is 1, either answer Y to skip a row between line items (double-space them) or N to print them single-spaced.
|
Format |
One letter, either Y or N |
|
Example |
Type N |
8. Split line items between pages ?
If the number of rows per line item is 2 or more, answer Y to allow line items to be split between pages. Or answer N to keep all information for one line item on the same page.
If the number of rows per line item is 1, (Not applicable) displays.
|
Format |
One letter, either Y or N |
|
Example |
Type N |
|
Note |
If you select N to split line items between pages, the number of unused lines at the bottom of every lines section is equal to the number entered in field 6 Maximum # of rows per line item. If that number is 3 or more you may get better results by allowing to split items between pages. |
9. First row # for totals section
Options
Enter the row number of the first row of the totals section, or use the option:
|
<F2> |
To leave two blank rows after the last line of the last line item printed and then immediately start printing the totals |
These are called floating totals, since the totals area floats two rows below the last line of the last line item instead of being printed at a fixed row number on the form.
|
Format |
99 |
|
Example |
Press <F2> |
10. Order of printing of line items
Enter S to print the line items in sequence number order, or type L to print them in order by line type (goods, services, and notes).
|
Format |
One letter, either S or L. The default is S. |
|
Example |
Press <Enter> |
If this invoice format is to be used with preprinted forms, answer Y; otherwise, answer N. If you answer Y, you will be prompted to mount preprinted forms on the printer during the Print invoices selection.
|
Format |
One letter, either Y or N |
|
Example |
Type N |
Print using graphic image ?
Answer Y to use a graphic image form file to merge with the data or N to print without an image file.
|
Format |
One letter, either Y or N |
|
Example |
Type N |
If you answer Y, then you will be prompted to enter the name of the file.
If you are using a graphical image file, then you must select Windows printer or a -PDF- Company information printer when you print invoices.
File name:
You must make an entry in this field if you select Y to Print using graphic image ?.
Enter the name of the file that will merge with the invoice data. This JPEG or Bitmap file must be present in the top-level PBS directory - IMAGES.
The file must be present in the IMAGES directory and must be spelled exactly as the file name with the proper extension.
|
Format |
12 characters, but the extension must be either .jpg or .bmp. |
|
Example |
Enter INV651.JPG |
If you are using a graphical image form file, then you must select Windows printer or a PDF printer when you print invoices. Other than a PDF printer, the printers defined in company information will not merge the image file with the data.
Field number to change ?
Make any desired changes. If you change Field #4 or 5, you will automatically go to Fields #6, 7, and 8 for you to either confirm or change your entries. The entry for Field #9 must also be confirmed unless Floating totals was selected.
Press <Enter> to continue.
If you are printing line items in sequence number order (as indicated by Field #10), your entries for General appearance are complete.
If you are printing line items in order by line type, the following screen appears:
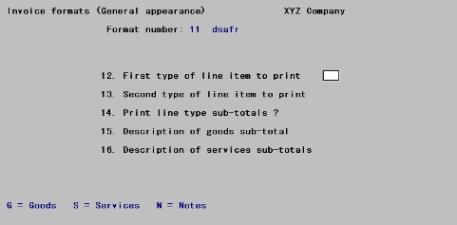
Enter the information as follows:
12. First type of line item to print
Select the type of line item you want to print first on the invoice: G (Goods), S (Services), or N (Notes).
|
Format |
One letter from the list above |
|
Example |
(This screen does not appear in this example because you chose to print invoices by sequence number) |
13. Second type of line item to print
Select the type of line item you want to print next on the invoice (either of the two remaining line types above). Whatever line type is left over automatically becomes the third type of line item to print.
|
Format |
One letter from the list above |
|
Example |
(Does not appear in this example) |
14. Print line type sub-totals ?
Each line item has a line item net amount which is the amount you are billing the customer for that line item. Answer Y to print a sub-total of the net amounts for all Goods after the Goods line items and for all Services after the Services line items.
|
Format |
One letter, either Y or N |
|
Example |
(Does not appear in this example) |
15. Description of goods sub-totals
If you answered N in the 14. Print line type sub-totals ? field, this field displays as (Not applicable) and may not be entered.
Options
Otherwise, enter the description that you want to print on the same row as the Goods Subtotal Amount. You may use the option:
|
<F1> |
For Goods |
|
Format |
12 characters |
|
Example |
(Does not appear in this example) |
16. Description of services sub-totals
If you answered N in Field #14, this field displays as (Not applicable) and may not be entered.
Options
Otherwise, enter the description that you want to print on the same row as the Services Subtotal Amount. You may use the option:
|
<F1> |
For Services |
|
Format |
12 characters |
|
Example |
(Does not appear in this example) |
Field number to change ?
Make any desired changes, then press <Enter> to complete entry of General appearance parameters for this invoice format.
When entering a new invoice format, General appearance must be entered before this selection may be entered.
Here you choose the header fields you want to print on your invoices and/or specify text you want printed in the header area. Field contents are printed, not their titles. For example, selecting the field Customer number containing AB1079 means that AB1079 is printed, not Customer number. To print field names (captions), specify them as text to be printed.
If you want to print a title on the invoice, you must specify a text to print. This is explained in detail below.
Select
Header area from the Invoice formats.
An entry screen will be displayed prompting you for the invoice format number that you want to work with.
Options
Enter a format number, or use one of the options:
|
<F1> |
For the next format on file |
|
<SF1> |
For the previous format on file |
|
Format |
99 |
|
Example |
Type 11 |
A list appears showing the first 10 fields available to you for printing in the header area of the invoice. If you have previously selected any of these fields to print, an asterisk will appear next to the field number
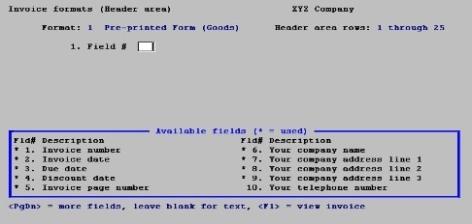
You can press <F1> to see a diagram of the invoice you are adding or editing. This diagram will display all the fields and text you have selected to appear on the invoice in its proper format position.
Use the PgDn and PgUp keys to scroll through the fields that are available for inclusion in the invoice header area.
Use the <F2> key to shift the format to the left and to the right.
Which particular Invoice Fields are available to you is determined by decisions made in the Control information selection of A/R (and sometimes that of other modules); also in the System Manager Company information selection. For example, if your company does not use cost centers or ship-via’s, those fields do not appear.
Invoice fields may be selected and placed on the format in any order.
1. Field #
Options
Enter the number of the invoice field to be placed on the invoice format. You may select an invoice field even though it has already been selected (that is, the same field may appear in more than one place on the invoice). You may also use one of the options:
|
<PgUp> |
To move the display up or down one page. You cannot move up if you are already on the first page, nor down if on the last one. |
|
<F1> |
To view a schematic picture of the invoice, showing all fields defined thus far. |
|
Format |
99 The number entered must be one of those currently showing on the display. You may also leave this field blank to enter text. |
|
Example |
Type 1 to select Invoice number. |
The following screen appears:
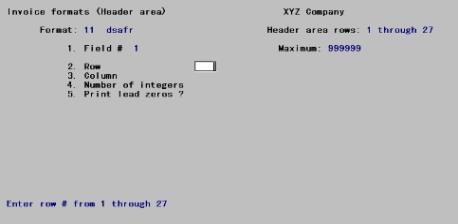
The fields that appear after row and column depend on what kind of information is in the field. There are three different kinds of information:
| • | Alphanumeric (letters, digits, and special symbols) |
| • | Date |
| • | Numeric (digits, decimal point, minus sign, commas, and parentheses) |
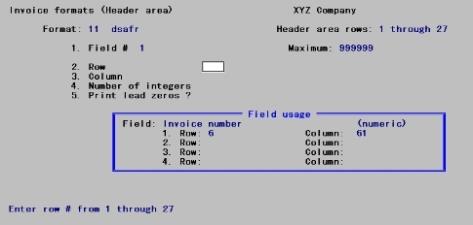
Invoice number is a numeric field and the screen will appear as shown above.
The choices for a numeric field depend on the characteristics of that particular field. For instance, its maximum length, whether negative numbers are allowed, does it have any decimal places, etc.
The Invoice number field cannot be negative. It cannot contain commas or decimal places, so the screen appears as above. An example of a numeric field that can be negative, and can have decimal places and commas, is shown in an example in the Line item area section later in this chapter.
For the Invoice number field, enter the information as follows:
2. Row
Specify in which row to print this field.
|
Format |
99 |
|
Example |
Type 6 |
3. Column
Specify the starting column in which to print this field.
|
Format |
999 |
|
Example |
Type 61 |
4. Number of integers
Enter the number of digits you want printed to the left of the decimal point up to the maximum shown. (In this example, the invoice does not have decimal places, so all digits are considered to be to the left of the decimal point.)
|
Format |
99 The maximum available for this field displays as the default. |
|
Example |
Press <Enter> for the maximum of 6 |
5. Print lead zeros ?
Answer Y to print leading zeroes, or N to suppress leading zeroes. For instance, if the invoice number is 236 and the number of integers is 6, then if you answer Y, the invoice number will print as 000236. If you answer N, it will print as 236.
|
Format |
One letter, either Y or N |
|
Example |
Type Y |
Field number to change ?
Options
Make any desired changes, or use the option:
|
<F1> |
To view a schematic picture of the invoice |
When you press <Enter>, the screen clears for you to enter another field number to select.
This section describes how to make changes to a field you have already specified. You can change the location, delete the entry altogether, or print the field at additional locations in the header area.
When positioned to enter another field or when first displaying an existing format, enter the field number. If the field has already been selected for use on this format, a "Field usage" window appears, showing the row[s] and column[s] where it is currently specified to print.
1. Field #
|
Format |
99 |
|
Example |
Type 1 to reselect the Invoice Number field |
The screen now looks like this:
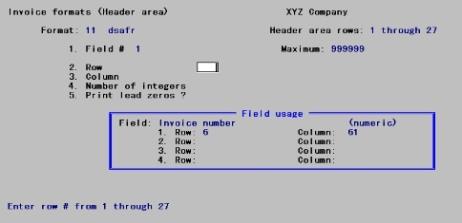
Notice the appearance of the Field usage box, which indicates the places where this field is already used (up to four, and in this case one).
2. Row
3. Column
Enter the same row and column as before:
|
Format |
99 for row 999 for column |
|
Example |
Type 6 for row Type 61 for column |
Field number to change ?
Options
Since this is an existing location on the invoice format, Screen Fields #4 and 5 display automatically and the cursor is positioned here. Your options now are:
|
<F1> |
To view a schematic picture of the invoice |
|
<F3> |
To delete this field from this location of the invoice (without affecting any other location where it may occur) |
Changing a Field Without Changing Its Location
If you want to change how a field appears (length, etc.) in a location you have already specified, select the field number as above.
Enter the row and column of the location you want to change. Make any desired changes.
Changing the Location of a Field
If you want to change where a field prints without otherwise changing its appearance, select the field number as above. Enter the row and column of the location you want to change. Make any changes to its row and/or location from Field number to change ?. When no more changes are required, press <Enter>.
Deleting a Field
If you want to delete a field in a location you have already specified, select the field number as above. Enter the row and column of the location you want to delete. When prompted, press <F3> to delete the field from this location.
If you specified earlier that this field is to be printed in more than one location, the field will be deleted from the current location selected, by not from the other locations.
Printing a Field in More than One Location
You can print any field in up to four different locations in the header area.
Enter the new location (row and column), then specify how to print in the field in the new location.
Date fields are specified as follows:
1. Field #
|
Format |
99 |
|
Example |
Type 2 to select Invoice date |
The screen displays as follows:
2. Row and
3. Column
Enter the row and column in the same way as for a numeric field.
|
Format |
99 for row 999 for column |
|
Example |
Type 6 for row Type 51 for column |
4. Date format to use
Enter one of these choices for how the date is to appear:
|
1 |
= |
MM/DD/YY |
|
2 |
= |
MM/DD |
|
3 |
= |
DD-MMM-YY |
|
4 |
= |
DD-MMM |
|
5 |
= |
Month Fully Spelled |
When you make the choice, the Will look like field on the right side of the screen shows how the date will look. The length of the field displays so you will know how much room this field will occupy on the invoice.
|
Format |
One number from the list above |
|
Example |
Type 1 |
Field number to change ?
Press <Enter> to terminate the date example.
All alphanumeric fields allow the same set of choices, as shown below. The maximum size of the field depends on the particular field you have chosen. You specified the maximum sizes of some fields in Control information; the maximum sizes of other fields are preset by the software.
1. Field #
|
Format |
99 |
|
Example |
Press <PgDn> for the second page of the available field number display. Type 17 to select Customer name as the next invoice field to be added to the format. |
The following screen appears:
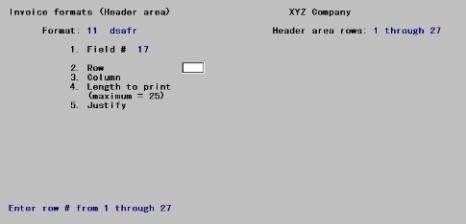
2. Row
3. Column
Enter the row and column in the same way as for a numeric field.
|
Format |
99 for row 999 for column |
|
Example |
Type 15 for row Type 8 for column |
4. Length to print (maximum = nn)
Enter the number of characters you want to print in this field.
The maximum number shown is the size of that field as it is stored in the software, but because of the way you have defined the format the entire length may not be available to you. You may need to experiment a bit with the layout if your previous choices impose limits which you do not want.
|
Format |
99 The maximum for this invoice field displays as the default. |
|
Example |
Press <Enter> for 25 |
5. Justify
Justify means to adjust the spacing of characters within the space allowed.
Enter one of the following options:
|
L |
To left justify |
|
R |
To right justify |
|
N |
No justification. Information prints exactly as entered. |
For instance, you might have already centered your company’s name and address when you entered them in the Company information function. To print them this way, type N.
|
Format |
One letter from the list above. The default is L. |
|
Example |
Press <Enter> |
Field number to change ?
Press <F1> to view the invoice.
You would usually print text next to fields containing information. In particular, if you do not have a preprinted invoice form but print invoices on blank paper, you would specify text (captions) to print alongside or above the actual invoice information.
1. Field #
|
Format |
99 |
|
Example |
Press <Enter>. The word Text will display. |
2. Row
3. Column
Enter the row and column where you want this text to begin.
|
Format |
99 for row 999 for column |
|
Example |
Type 4 for row Type 51 for column |
4. Text
Enter the exact text you want to appear in that row and column. A ruler beneath the field to be entered lets you see exactly in which column each character is entered:
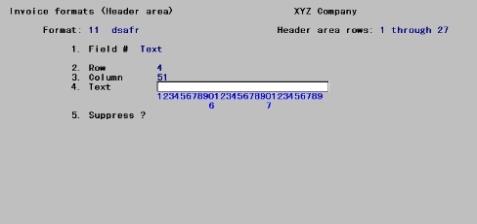
Text length is restricted to forty characters (or less if the right border of the invoice is encountered, as it is in this example). To print longer texts, enter each group of forty characters as a separate text.
|
Format |
40 characters |
|
Example |
Type Invoice |
5. Suppress ?
Answer Y if you want the text to be suppressed (not to print) when some field (to be specified next) is zero or blank. For instance, if you are interfaced to J/C you might not want the caption Job: to print when the job number field is blank (that is, when the invoice is not for a job).
|
Format |
One letter, either Y or N. The default is N. |
|
Example |
Press <Enter> |
Field #
If you answered Y to Screen Field #5, the available header fields display. Enter the number of the field which, when it contains zero or blank, will cause the text not to print.
If this field is not already selected to print on the invoice, you get a warning message, but your choice is still accepted. Make a note to select the field later. The field you select here must also be selected to print on the invoice.
Viewing the Format
Whenever you are at field 1 of the header field selection screen, or are at "Field number to change ?" on a text screen, you can press <F1> to see what the invoice looks like.
The following screen appears:
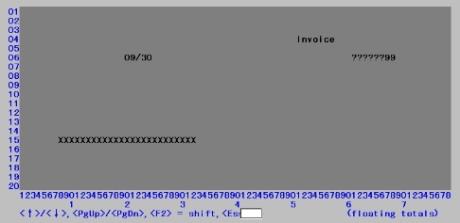
X’s will appear to represent the alphanumeric fields that you have selected for the invoice, and will occupy the length and locations you have selected. 9’s will appear for your numeric fields. ?’s will appear where any of the fields overlap, in which case you need to change the position of a field.
If yours is a color monitor, each portion of the invoice (header, line items, or totals) will be a different color.
Options
To view a different part of your invoice, enter the number of the last line you want to view. You may also use one of the following options:
|
<Up> |
To scroll the invoice up and down by one row at a time. |
|
<PgUp> |
To shift your view of the invoice up and down a screen at a time. |
|
<F1> |
To toggle between displaying service-only fields and goods-only fields. This option appears only if at least one such field has been selected. |
|
<F2> |
To toggle between viewing the leftmost 78 characters or the rightmost 78 characters of the invoice. |
|
<Esc> |
To leave this screen and return to the format header screen. |
|
Format |
99 |
|
Example |
Press <Esc> to return to Field number to change ?. Press <Enter> to return to Screen Field #1. |
Options
Make any needed changes. Your options are:
|
<F1> |
To view a schematic picture of the invoice |
|
<F3> |
(For an existing text only) To delete this text |
If you press <F1> you will observe that unlike data entry (which displays as X’s or 9’s), text entry appears exactly as entered.
Changing or Deleting Text
Changing or deleting text is similar to modifying fields.
To delete a text, or change the location or wording of a text you have entered, get to the text screen by pressing <Enter> at the "Field #" field.
A window will display the Row, Column and Text of texts that have already been entered.:
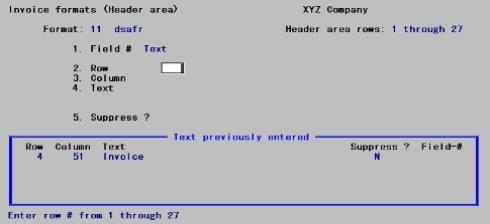
Texts are shown in the order in which they were entered. Five texts are visible at a time; if the format contains more than this, you can page through them:
|
<PgUp> |
To view the previous or next page of texts |
To delete a text, enter its row and column number and press <F3> when prompted to do so.
To change the wording of the text, enter its row and column number, select field 4 and enter new wording. You can also change the "Suppress ?" information by selecting field 5 and entering a new answer or new field number.
To change the row or column in which the text starts, select the text by its current row and column numbers, then change those from Field number to change ?.
When through specifying header fields and text to print, press <Esc> at Field #1.
When entering a new invoice format, General appearance must be entered before this selection may be entered.
Add, change, and delete line item area fields and texts is handled in much the same way as header area fields and texts, except for minor differences
| • | Row refers to a relative row, not the absolute row. That is, line item row 2 means the second row within each line item, not the second row on the invoice form. |
| • | The fields available in the body of the invoice are different from those in the header. |
| • | Where Job Cost is interfaced but Inventory Control is not, the following fields appear: |
|
Job number |
Sub-job number |
|
Job description |
Sub-job description |
| • | Where I/C is interfaced but J/C is not, the following field appears: |
|
Item pricing unit |
| • | Where both I/C and J/C are interfaced, the following fields appear: |
|
Job number |
Job Cost category number |
|
Job description |
Category description |
|
Sub-job number |
Item pricing unit |
|
Sub-job description |
|
| • | If Control information specifies no line item discounts, the fields which mention discounts do not appear, and Extended price appears instead. |
| • | Extended prices (with or without discount) are based on the quantity shipped. |
| • | Back order fields are only available when back ordering is allows in I/C. A/R invoices do not provide for back order control, but these same forms can be used to print an invoice from history which may have used back order control when posted from O/E. |
Select
Line item area from the Invoice formats menu.
An entry screen will be displayed prompting you for the invoice format number that you want to work with.
Options
Enter a format number, or use one of the options:
|
<F1> |
For the next format on file |
|
<SF1> |
For the previous format on file |
|
Format |
99 |
|
Example |
Type 11 |
The following screen displays for line item area:
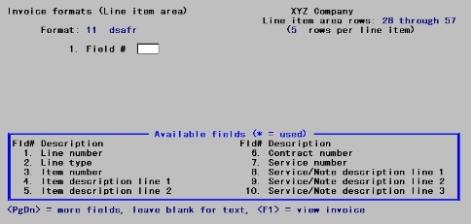
Entering text is the same as for headers, except for the Type field.
1. Field #
Options
Enter the number of an invoice field from the display shown, leave this field blank to enter text, or use one of the options:
|
<PgUp> |
To move the display up or down one page. |
|
<F1> |
To view a schematic picture of the invoice. |
|
Format |
99 |
|
Example |
Press <Enter>. The word Text will display. |
The text screen appears as:
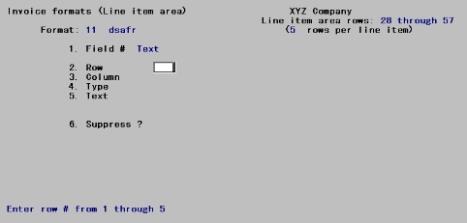
2. Row
3. Column
Enter the row and column where you want the text to begin.
Options
If you have left Field #1 blank and if there are texts already on file for the line-item area, a window will display showing the existing texts. At each screen field from #2 through #5, you may use one of the options:
|
<PgUp> |
To view the previous or next page of texts |
|
Format |
99 for row 999 for column |
|
Example |
Type 1 for row Type 1 for column |
4. Type
Enter S if this text is to appear only for services line items, G if it is to appear only for goods line items, or B if it is to appear for both types.
There is no separate Type for Note line items. It is not possible to print text on a note.
|
Format |
One letter from the list above. There is no default. |
|
Example |
Type B |
5. Text
Enter the exact text which you want to appear for the type of line item specified above.
|
Format |
40 characters |
|
Example |
Type Shipped per your instructions |
6. Suppress ?
Answer Y if you want the text to be suppressed (not to print) when some field (to be specified next) is zero or blank. Answer N if you want the text to always print.
|
Format |
One letter, either Y or N. the default is N. |
|
Example |
Press <Enter> |
Field #
If you answered Y to Screen Field #6, the available line item fields display. Enter the number of the field which, when it contains zero or blank, will cause the text not to print.
Field number to change ?
Options
Make any needed changes. Your options are:
|
<F1> |
To view a schematic picture of the invoice |
|
<F3> |
(For an existing text only) To delete this text |
Press <Enter> to complete this entry. The cursor moves to Screen Field #1.
The following example shows characteristics of numeric fields in addition to those shown by the example in the Header area.
Not all the screen fields described in this example appear for all invoice fields. It is explained in each case when a screen field is optional. The screen fields are always numbered sequentially from one. Depending on which invoice field you select, you may see a screen field numbered differently from that shown here.
Enter the information as follows:
1. Field #
Options
Enter the number of an invoice field from the display shown, leave this field blank to enter text, or use one of the options:
|
<PgUp> |
To move the display up or down one page. |
|
<F1> |
To view a schematic picture of the invoice. |
|
Format |
99 |
|
Example |
Press <PgDn>. Invoice field #19 will appear in the display. Type 19 This will select the Item or service quantity invoice field. |
The screen now appears as:
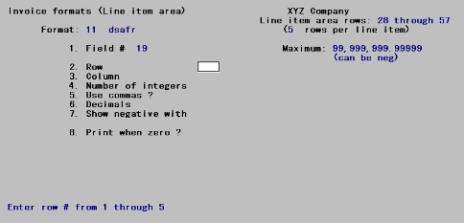
2. Row
3. Column
Enter the row and column where you want this numeric field to begin.
|
Format |
99 for row 999 for column |
|
Example |
Type 2 for row Type 2 for column |
4. Number of integers
Enter the number of integers (digits to the left of the decimal point) you want to print in this field, up to the maximum shown.
|
Format |
(As displayed for the selected field) |
|
Example |
Press <Enter> for the maximum of 8 |
5. Use commas ?
Answer Y to separate digits into groups of three by commas. This option is available only where appropriate (it would not be available for an invoice field such as the line number, which never gets large enough to require commas).
|
Format |
One letter, either Y or N |
|
Example |
Type Y |
5. Print lead zeros ?
Answer N to suppress leading zeros. This options is available only where appropriate. When printing line numbers, for example, this lets you choose between numbering the twelfth line as 12 or 012.
|
Format |
One letter, either Y or N |
|
Example |
(Does not occur in this example) |
6. Decimals
Enter the number of decimal places you want to print, up to the maximum shown. If the number has no decimals places, this choice does not appear.
|
Format |
(As displayed for the selected field) |
|
Example |
Press <Enter> for the maximum of 5 |
7. Show negative with
Enter M to show negative numbers with a minus sign, or P to show them in parentheses.
For numeric fields which do not allow negative values, this selection either does not display, or displays N/A and does not allow you to make an entry.
| • | If you select M, then enter L to have the minus sign on the left or R to have it on the right. |
| • | If you select P, then enter F to display the parentheses in fixed positions, or N to display the parentheses next to the number. For example, if the number were negative 35, typing F would result in “( 35)"; typing N would result in “(35)”. |
|
Format |
One letter at each field |
|
Example |
Type M, then L |
8. Print when zero ?
Answer Y to print a zero when the number is zero, or answer N to leave the field blank when the number is zero.
This screen field only appears for appropriate invoice fields (amounts or quantities).
|
Format |
One letter, either Y or N |
|
Example |
Type Y |
Field number to change ?
An example appears to the right to show what your number will look like when printed. A negative number example is also shown if negative numbers are allowed.
Make any needed changes. Your options are:
|
<F1> |
To view a schematic picture of the invoice |
|
<F3> |
(For an existing text only) To delete this text |
Press <Enter> to complete this entry. The cursor moves to Screen Field #1.
Alphanumeric fields are entered in line items the same way as they are in the header and total area. Be aware that each line of an item description, a service description, or a note is a separate field and must be formatted individually.
Suppose for instance that you wanted to save space by printing nine lines of a Note line-item on three lines of the invoice. You have a space on the form sixty characters wide to hold this information.
| • | You would have to define three entries on the format for Service/Note description line #1 through #3 (Invoice Fields #8 through 10). These would occupy three adjacent 20-character fields on Row #1 of the line-item area. |
| • | You would do likewise for the remaining lines in Row #2 and Row #3. |
| • | You would specify in General appearance that the Maximum # of rows per line item was at least 3. This does not mean that every line item would occupy three lines, since trailing blank rows of a line item are not printed. |
| • | You would specify in Control information that the Service text length was 20. This will prevent an operator from inadvertently entering a line that would be truncated upon printing. |
| • | There is no way to limit the number of lines entered on an invoice, so if an operator inadvertently entered the tenth line of a Note line item (which is the maximum allowed), that line would not be printed on the invoice. |
Payment fields will only print if you are using Multi-payments per the A/R Control information. See the PBS Multi-payment Setup appendix.
Payment field rows must be entered below the line fields. Never put a payment field and a line item field on the same row. The first payment row must be larger number that the last line item row.
If you need three lines for printing the item and service information, one line in between the line items and payments and two lines for printing payments, then in the General appearance set the Maximum # of rows per line item to 6. The first row for the payment field, in this case, is five.
The payments float on the page depending on the number rows used for the last item line.
The payment fields start at 54 and go to 60 as seen in the field list below:

When entering a new invoice format, General appearance must be entered before this selection may be entered.
Adding, changing, or deleting totals area fields and texts is handled in much the same way as for the header area and the line-item area.
Variations in the available invoice fields include:
| • | Where invoice discounts are not used, Invoice discount percent and Invoice discount amount do not appear, and Line item total less discount displays as Line item total. |
| • | Where Control information does not specify that cash is asked for with the invoice, Cash with invoice, Check #, Bank route number and Total invoice amt minus cash do not appear. |
Select
Totals area from the Invoice formats menu.
An entry screen will be displayed prompting you for the invoice format number that you want to work with.
Options
Enter a format number, or use one of the options:
|
<F1> |
For the next format on file |
|
<SF1> |
For the previous format on file |
|
Format |
99 |
|
Example |
Type 11 |
The following screen displays for the Totals area:
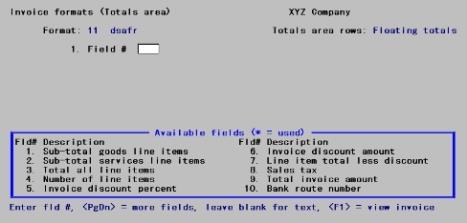
If you selected floating totals (in General appearance), enter a relative row number. For example, type 1 for the first row of the total area.
Otherwise, enter an absolute row number, counting from the top of the page.
When printing an invoice that uses "floating totals", the location of the multi-part label does not float. If you put the Laser multi-part label field at row 10 of the floating totals area, the label will print on the 10th row after the format’s Last row # for line item printing. On the last page of the invoice, this means that the multi-part label will not print on row 10 of the totals area, but on the 10th row after the format’s Last row # for line item printing. For example, in General appearance, if you enter 55 for last row # for item printing and you put the Laser multi-part label field at row 10 of the floating totals area, the label will print on row 65 of each page (55 + 10 = 65).
When printing an invoice, it is possible that a totals field may overlap the fixed location of the Laser multi-part label field. To avoid this, put the Laser multi-part label field on or near the last row of the floating totals area and locate it so that it does not print in the same columns as any other totals area fields. It is also possible to position the Laser multi-part label field so that its printed location (calculated as described above) falls beyond the number of rows on the form. To avoid this, make sure that the row # of the Laser multi-part label field plus the last row # for item printing does not exceed the number of rows on the form.
So that this invoice will print invoice totals and can be verified, enter the data on the following screen:
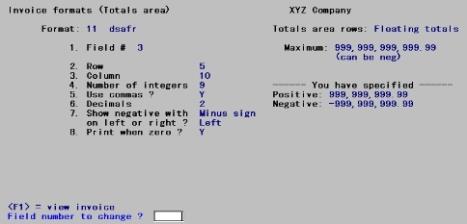
Invoice formats, indeed all A/R formats, must be verified before they can be used. This process diagnoses any errors which could not be detected when the format was entered. You can verify a format as soon as you have entered its General appearance.
Once an invoice has been verified it becomes available for use indefinitely, but as soon as you change it you have to verify it again. If you anticipate having to make extended changes to an invoice it is a good idea to copy it first under some other name, so that you can continue to use the old version while developing the new one.
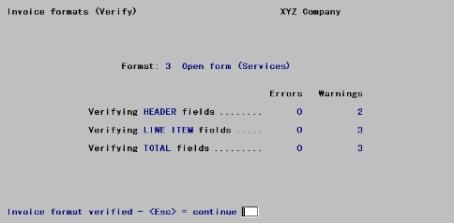
There is no special screen for this selection; the program immediately begins checking the invoice format for errors.
At the end of the verification, an error report is printed. Some messages on the report are warnings and are identified by *WARNING ONLY *.
| • | You can either correct warnings or leave them as they are. |
| • | Errors, however, must be corrected before you can use the format. |
Select
Verify from Invoice formats menu.
An entry screen will be displayed prompting you for the invoice format number that you want to work with.
View a Verify Report example in the Sample Reports appendix.
Options
Enter a format number, or use one of the options:
|
<F1> |
For the next format on file |
|
<SF1> |
For the previous format on file |
|
Format |
99 |
|
Example |
Type 11 |
Unless you have directed the error report to the screen, the following screen displays as the format is verified.:
This selection lets you print a sample invoice after you have verified it. The invoice you enter here must have been verified before you will be allowed to print this sample. If the invoice has not been verified, an informational message will be displayed and you will not be allowed to proceed.
Select
Sample Invoice from the Invoice formats menu.
An entry screen will be displayed prompting you for the invoice format number that you want to work with.
Options
Enter a format number, or use one of the options:
|
<F1> |
For the next format on file |
|
<SF1> |
For the previous format on file |
|
Format |
99 |
|
Example |
Type 10 |
If you are answered Y to Use pre-printed forms ? in General appearance, a screen appears telling you to mount invoice forms on the printer. Mount these forms on the printer, then type DONE.
You may select a Company information printer or Windows printer. The following includes a description of each.
Company Information Laser Printer or PDF Printer
If you are printing the sample invoice on a laser printer, you will be asked to enter Up/down adjustment and Left/right adjustment amounts to adjust the alignment of the laser printer. The values last entered for these amounts are shown. After entering new values or accepting the values shown, the sample invoice is printed.
When using a -PDF- printer, as setup in Company information, the invoice is saved to a PDF file and displayed on screen in Adobe™ Reader™ or Adobe Acrobat™. Within the application you have other options with the invoice such as email, print and so on. The sample or alignment file is named ARI_ALIGNMENT_999999.PDF. Default configurations are provided for PDF files. See the PBS Administration documentation for information on the PDF configuration options and the setup of a Company information PDF printer.
You may view and email statements that have been generated to PDF files at Email/view printed PDFs under the CTL menu selection of PDF form file processing.
Windows Printer
If you selected Windows printer, the alignment starts for the upper left corner of the page. However, you should enter an amount greater than the default margin that displays at the bottom of the screen.
|
Note |
Use the up/down and left/right adjustments for laser alignment to position the sample invoice information so that it exactly aligns with the pre-printed form. Pre-printed forms are produced according to very exact specifications, but the print position of laser printers may vary slightly from model to model or between manufacturers. These adjustment amounts allow you to compensate for the differences between laser printers so that your invoice information can be positioned correctly on the invoice form. (The early models of Hewlett-Packard laser printers, such as the LaserJet+ and more recent ‘Windows only’ printers do not support this adjustment feature. These printers do not respond to certain codes provided by PBS for making alignment adjustments.) |
Press <F1> at any time to stop printing.
After one sample invoice prints, you are asked whether or not you want to print another sample invoice.
Print sample invoice again ?
Answer Y to print the sample invoice again or N to exit this function.
If you select Y you will be positioned to print another invoice form.
If you select N and you are using pre-printed forms, you will be prompted to replace these forms with plain paper. Type DONE to the question Please mount regular paper on printer.
Use this option to print a full list of the exact specifications that define one or more invoice formats. This is different from a sample invoice-a sample invoice shows what the invoice will look like. The format specifications show the location and other properties of all fields entered.
Select
Format specifications from the Invoice formats menu.
The following screen appears:
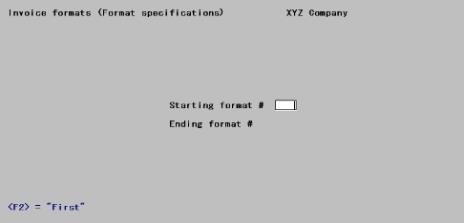
Enter the information as follows:
Starting format #
Ending format #
Enter the range of the formats you want to print. You may use the option:
|
<F2> |
For the First starting format or Last ending format |
|
Format |
99 at each field |
|
Example |
Press <F2> at each field |
Any change ?
Answer Y to re-enter this screen, or N to print the Format Specifications.
If you have already created an invoice format which you want to keep, and you are going to add another similar format, use this option to copy the existing format. Then make changes to the copy.
Select
Copy from Invoice formats menu.
The following screen appears:
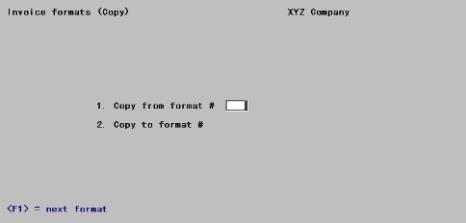
Enter the information as follows:
1. Copy from format #
Options
Enter the number of the format you want to copy from. This must be an existing format, but need not have been verified. Copied formats have the same verification status as the formats they were copied from. You may use the options:
|
<F1> |
For the next format on file |
|
<SF1> |
For the previous format |
Upon entry or selection of a valid format, its name and verification status are displayed.
|
Format |
99 |
|
Example |
Type 11 |
2. Copy to format #
Enter the number you wish to assign to the new format. This may not be an existing format.
|
Format |
99 |
|
Example |
Type 99 |
3. Description
Enter a description for the new format.
|
Format |
25 characters |
|
Example |
Type Copy of format 11 |
Field number to change ?
Make any needed changes, then press <Enter>. There will be a period of processing as the format is copied. You will be notified when this has completed; press <Esc> to return to the menu.
|
Note |
MULTI-COMPANY NOTE: If you use the Passport Business Solutions multi-company feature, you can copy the file containing invoice formats from one company to another using the operating system facilities for copying files. Invoice formats are stored in the IVCFMT00 where "00" is the Company ID. For example, if you have invoice formats for company 00, they reside in the file IVCFMT00.DAT and IVCFMT00.vix. Copy these files to the appropriate folder (directory) replacing "00" within the filename with a new Company ID. Then use the Invoice formats function from within the new company to modify or delete any of the invoice formats for the new company. |
Use this option to delete invoice formats which you no longer want.
Select
Delete from the Invoice formats menu.
The following screen appears:
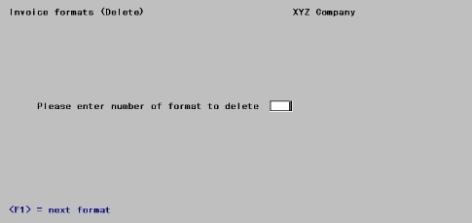
Enter the information as follows:
Please enter number of format to delete
Options
Enter the number of the format you want to delete. This must be an existing format, but need not have been verified. You may use the options:
|
<F1> |
For the next format on file |
|
<SF1> |
For the previous format |
Upon entry or selection of a valid format, its name and verification status are displayed.
|
Format |
99 |
|
Example |
Type 11 |
Any change ?
Answer Y to re-enter this screen, or N to delete the format.
|
Format |
One letter, either Y or N. The default is N. |
|
Example |
Press <Enter> |
There will be a period of processing as the format is deleted. You will be notified when this has completed; press <Esc> to return to this screen for the next format to be deleted.