This chapter contains the following topics:
Introduction to Miscellaneous Charges
Entering Miscellaneous Charges
Manual Distribution (Without Job Cost)
Manual Distribution (With Job Cost)
Printing an Edit List of Miscellaneous Charges
Posting Miscellaneous Charges Entries
The Miscellaneous charges selection enables you to enter miscellaneous charges, credit/debit memos, and sales invoices separately from the invoice process.
This use of the term miscellaneous charge must be distinguished from the field of the same name which occurs in the totals area of invoices and other documents. The latter is a catch-all mechanism to account for charges not related to any individual line item (handling charge, gift-wrap fee, etc).
It is easier to record sales and other transactions using Miscellaneous charges than Invoices. You can use either method or both as applicable to your business. It is important to understand the differences between the two:
| • | Miscellaneous charges produces no printed document that you can send to the customer. The invoices you enter in this selection exist only within the system. |
| • | There are no line items in Miscellaneous charges entries, and no way (other than by the Reference field) to identify what is being sold or returned. Even if you are interfaced to the PBS Inventory Control module, your inventory is not updated by these transactions. |
| • | Invoices or returns entered in Miscellaneous charges are not included in any invoice history reports or View inquiries. |
| • | Both Miscellaneous charges and Invoices generate accounting transactions to the General Ledger, but each is reported from a different journal source. |
| • | The Cash receipts selection is used to apply cash to open items derived from either Miscellaneous charges or Invoices |
| • | Both miscellaneous charges and invoices are included as line items on statements (if you choose to use statements). |
| • | Miscellaneous charges, unlike Invoices, does not allow on-the-fly entry of customers. |
| • | Miscellaneous charges requires that you assign a document number to each entry (unlike Invoices, which does not assign one until the document is printed). You can choose to accept the next available document number automatically assigned by the system. |
| • | Miscellaneous charges honors a miscellaneous customer’s values for terms code, sales representative, and tax code, offering them as the default at each field. (Invoices ignores these values for miscellaneous customers). |
For open item customers, credit and debit memos include an apply-to field in which you enter the document number of the invoice to which they apply. This ties them to that invoice.
Like invoices, miscellaneous charges are processed in two stages: They must be entered, then posted. In between, you can print an edit list of unposted miscellaneous charges.
If you have sales type miscellaneous charges that recur periodically, you may wan to enter them in Recurring sales. See the Recurring Sales chapter.
Batch Controls
Miscellaneous charges may be under batch control, which involves screens not discussed in this chapter. Refer to the Using Batch Controls chapter of the System User documentation.
Select
Enter from the Miscellaneous Charges menu.
Miscellaneous charge entries may be created automatically as well as entered manually. For example, if you charge customers for returned checks, then every time you run Returned checks (Post) you create entries in Miscellaneous charges (Enter).
Graphical Mode
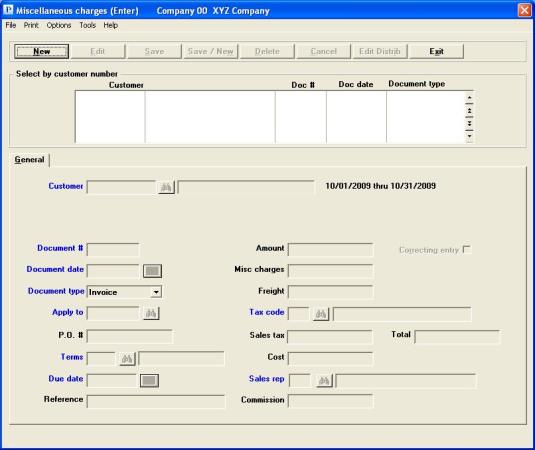
When selected The following screen displays:

There is one general tab. A distributions window and Sales tax window may also display during entry.
From this screen you can work with both new and existing miscellaneous charge entries.
Miscellaneous Charges List Box
The list box displays up to 6 existing documents at a time. You may sort the documents by document number in ascending or descending order. Click on the column name or the arrow to the right of the column name to change the sort or use the View options. Only column names in red may be sorted.
To locate an document, start typing the document number. You may also use the up/down arrows, Page up, Page down, Home and End keys to locate an document. The <F1> and <SF1> keys function the same as the up/down arrow keys.
Documents that display in the list box are available for changes or deletion. The fields for the selected document display in the lower part of the screen.
When an document is found, you may select the <Enter> key or Edit button to start editing.
Miscellaneous Charges Buttons
You have the following options with the buttons:
| Button | Keyboard | Description |
|---|---|---|
|
Alt+n |
For entering a new miscellaneous charge |
|
|
Alt+e |
For editing an existing miscellaneous charge |
|
|
Alt+s |
For saving the addition of the new miscellaneous charge or for saving the changes to an existing miscellaneous charge |
|
|
Alt+w |
This is a combination of the Save and New buttons |
|
|
Alt+d |
To delete a miscellaneous charge |
|
|
Alt+c |
To cancel adding or editing a miscellaneous charge. Your entry will not be saved |
|
|
Alt+i |
To access the distributions of an existing miscellaneous charge for entering, editing or deleting them. Go to either Manual Distribution (Without Job Cost) or Manual Distribution (With Job Cost) for more information |
|
|
Alt+x |
To exit the miscellaneous charges window |
Date Control
If you are using date controls, the allowable date entry range will display in the upper right corner. Date control applies to the Doc date field on this screen. See Date Control in the Control information chapter.
Menu
From this screen you select one of following functions from the menu:
| Menu selection | Sub selection | Documentation link |
|---|---|---|
|
|
Edit list |
|
|
Options |
Post |
|
|
Options |
Sales taxes |
|
| Options | View customers open items | View Customers |
| Options | View invoices | View Invoices |
| Options | View invoice history | View - Graphical Mode |
| Options | View customer history by date | View Customer History by Date |
| Options | View customer history by doc # | View Customer History by Document Number |
Character Mode
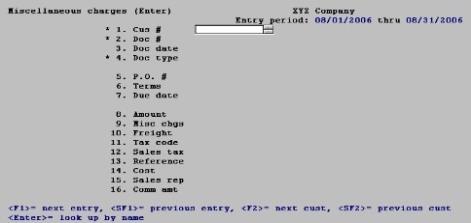
Two screens may be needed for a Miscellaneous charges entry. The first screen appears as follows:
Graphical Mode
Enter the following information:
This is the number of the customer for this entry. This must be an existing customer. It may be a miscellaneous customer (one beginning with an asterisk. See Miscellaneous customers as described in the Customers chapter.)
Options
Enter the customer number, or use one of these options:
|
<F2> |
For the next customer in customer number order |
|
<SF2> |
For the previous customer, in customer number order |
|
<F6> |
For the same customer as the previous entry (this option is not available on the first entry of a session) |
|
blank |
To look up by customer name |
The <F2> and <SF2> options skip past miscellaneous customers. These must be entered explicitly, or via the <F8> look-up.
Upon entry or selection of a valid customer number, the customer name and address displays (unless this is a miscellaneous customer), and the cursor moves to Customer name field.
|
Format |
12 characters |
|
Example |
Type 200 |
Options
If you left the customer number blank, enter the name (or just the leading characters of the name) for this entry. You may use one of the options:
|
<F2> |
For the next customer, in customer name order |
|
<SF2> |
For the previous customer, in customer name order |
|
blank |
To return to selection by customer number |
If you entered a miscellaneous customer number, you must also enter the customer’s name. The name may not be left blank, and no options are available.
|
Format |
25 characters |
|
Example |
(displays automatically because you entered a customer number) |
This document number is used as part of the unique identification for each invoice, charge, or credit/debit memo.
The entry of a document number is free form. A prompt suggests the format you should use. A default document number format is specified in Control Information in the Default document # format field.
If you defined numeric characters for the entire field or only the right side of the default document number format, the next document number will display in sequence following the entry of the second or more documents in a session.
|
Note |
Numeric document numbers (e.g., 898980) will appear before alphanumeric document numbers (e.g., I-8080) on reports which are sorted by document number. |
|
Format |
8 characters |
|
Example |
Type C-003002 |
Enter the document date. The date entered is used as the aging date on the Aging Report and Collections Report when you age these reports by invoice date.
|
Format |
MMDDYY. The default is the date of the last document entered this session, except that for the first entry of a session the default is the current (system) date. |
|
Example |
Type 30105 |
You may be warned or stopped against entering a date that is outside the allowed date range. For more information, read about Date Control in the Control information chapter.
There are four valid document types:
|
Invoice |
|
Debit Memo |
|
Credit Memo |
|
Finance Charge |
The first four fields, Customer, Document #, Document date and Document type, fully identify an entry, so if there is already an entry with those values, the information for that entry displays and the other fields fill-in automatically.
There is no separate document type for writing off bad debts. You can use a credit memo for the purpose (otherwise the items remain open forever and can never be purged). Consult with your accountant about the proper account distribution.
|
Format |
One letter from the list above. The default is the same as the last document entered this session, except that for the first entry of a session the default is the Credit memo. |
|
Example |
Press <Enter> |
|
Note |
If you want to cancel a previously posted finance charge, you must enter a new finance charge with a negative amount, so that all files/tables will be correctly updated. |
This field appears on the screen only if this is a debit or credit memo for an open-item customer.
Enter the apply-to number. This is usually the invoice number to which the credit or debit memo is to be applied.
If you enter a document number which does not exist, you are so warned but you can override the warning.
For credit memos, you may leave this field blank; Open will display to indicate that this is an open credit on account (not applied to a specific invoice).
For debit memos, the apply-to number cannot be zero. If you press <Enter> without entering a specific number, the apply-to number automatically becomes the same as the debit memo’s document number.
You do not enter an apply-to number for an invoice or finance charge, since it is the same as the document number. It may be changed later through Change apply-to number or due date. See the Change Apply-to Number or Due Date chapter.
|
Format |
8 characters. There is no default. |
|
Example |
Press <Enter> for Open |
Enter the customer’s purchase order number. This field is optional.
|
Format |
15 characters |
|
Example |
Type 146 |
For balance forward customers, the customer’s terms code is displayed automatically and cannot be changed.
Options
The default terms fills in automatically. If you changed the terms from the default to something else and you want to use the default instead, use the option:
|
<F2> |
For the customer’s default terms code from Customers |
|
Format |
3 characters |
|
Example |
Press <F2> |
Enter the due date.
|
Format |
MMDDYY For an invoice, the default is the date calculated from the terms code entered in the previous field; for all other types of document, the default is the system date. |
|
Example |
Press <Enter> |
This field is optional.
The reference can be printed on the customer’s statement if referenced in the statement format and if the customer is either balance forward, or statements are not being printed by apply-to number.
|
Format |
25 characters |
|
Example |
Type Special order |
Enter the amount of the invoice, credit/debit memo, or finance charge. Do not enter a minus sign for credit memos.
|
Format |
9,999,999,999.99- or 999,999,999.99 if interfaced to J/C |
|
Example |
Type 300 |
For a finance charge, this field is automatically set to zero and may not be changed.
Otherwise, enter any miscellaneous charge that applies to this document. Do not enter a minus sign for credit memos.
|
Format |
99,999,999.99- |
|
Example |
Type 25 |
For a finance charge, this field is automatically set to zero and may not be changed.
Otherwise, enter any freight charge which applies to this document. A minus sign is not required for credit memos.
|
Format |
9,999,999.99- |
|
Example |
Press <Enter> |
For a finance charge, this field is automatically left blank and may not be entered.
Options
You may use the option:
|
<F2> |
For the customer’s default tax code |
Otherwise, enter a valid tax code, or use the option:
|
Format |
3 characters |
|
Example |
Press <F2> |
If the tax code is changed for a transaction entered previously, you must re-enter the sales tax amount as described next.
For a finance charge, this field is automatically set to zero and may not be changed.
Otherwise, the taxable amount is calculated and displayed, based on the tax code entered in the Tax code field.
Options
You may use the option:
|
<F2> |
For the sales tax calculated from the tax code entered and from the amount (including miscellaneous and freight charges if so specified in Control information) |
Enter the amount of the sales tax or use the option:
|
Format |
99,999,999.99- |
|
Example |
Press <F2> |
If you enter a non-zero amount different from the calculated sales tax, and the tax code that applies to this sale specifies distribution to two or more accounts, the following screen appears:
Graphical Mode
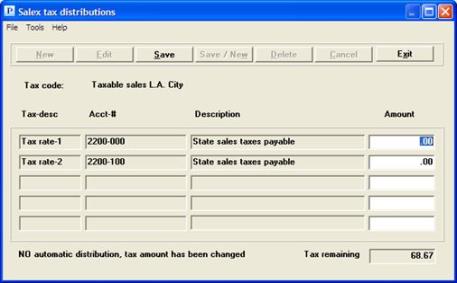
Enter the sales tax Amount field.
Character Mode
The following screen appears:
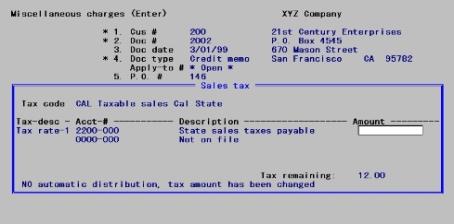
Any time you use this window, you will create an entry on the Sales Tax Exception Report.
This screen identifies the tax code and shows a separate line for each tax rate within it (up to five of them), with the description, account number, and taxable amount for each tax rate. You cannot change the tax code from this screen; if the tax code is wrong, <Esc> from this screen and back up to the tax code field to enter a different code.
The amount you have entered for the sales tax must be completely distributed among the tax rates shown. The cursor moves in succession through the amount fields of each tax rate. The tax remaining to distribute displays continuously.
Enter the following information:
Enter the amount of the tax to be distributed to each tax rate.
Options
If each tax rate in the tax code has the same tax brackets, at the first tax rate you may use the option:
|
<F2> |
To pro-rate the sales tax entered in the same proportion as the original calculation for this miscellaneous charge. The cursor will move to Any change ?. |
Options
At the last tax rate you may use the option:
|
<F2> |
To apply the entire amount remaining to distribute to this tax rate. The cursor will move to Any change ?. |
|
Format |
99,999,999.99- |
|
Example |
(Does not occur in this example) |
If you answered N to Is cost-of-sales used ? in Control information, this field cannot be entered.
For a finance charge, this field is left blank and may not be entered.
Otherwise, enter the cost associated with the entry. A minus sign is not required for credit memos.
|
Format |
999,999,999.99- |
|
Example |
Type 172.50 |
If you answered N to Are sales reps used ? in Control information, this field cannot be entered.
For a finance charge, this field is left blank and may not be entered.
Options
Otherwise, this field is required. Enter the sales representative, or use the option:
|
<F2> |
For the customer’s default sales representative |
|
Format |
3 characters |
|
Example |
Press <F2> |
If you unchecked the Use commissions field in Control information, this field cannot be entered.
For a finance charge, this field is left blank and may not be entered.
Otherwise, this is the commission payable to the sales rep. A minus sign is not required for credit memos.
Options
Enter the commission amount, or use the option:
|
<F2> |
For the commission amount calculated from the default commission percentage and method for this customer or this sales representative (whichever source is specified in Control information) |
|
Format |
99,999,999.99- |
|
Example |
Press <F2> |
Options
Make any needed changes, then press <Enter>. You may use one of the options:
|
To toggle between flagging this as a correcting entry and not doing so. In Graphical Mode you may also select the Correcting entry check box field.
This option is only available if interfaced to the PBS General Ledger and if specified in G/L Control information. |
|
|
<F7> |
To view or change the sales tax distribution. |
Options
For an existing entry you may also use:
|
<F1> |
For the next entry |
|
<SF1> |
For the previous entry |
|
<F3> |
To delete this entry |
When you press <Enter>:
| • | If the document is a finance charge, this terminates the transaction. The screen clears for another miscellaneous charge entry. |
| • | If the document is an invoice or a debit memo, and you have checked (yes) the Do credit checking field in Control information, the customer’s credit is checked at this point. The total charges (sales + freight + miscellaneous + tax) are added to the existing unpaid balance. If the result would exceed the customer’s credit limit, you are informed of that credit limit and unpaid balance, and of the amount and date of the customer’s last payment. You are then asked, Override customer credit limit ?. The default is No. Answer No to cancel this entry, or Yes to continue. |
| • | If you do not manually distribute the various sales amounts, this completes the transaction. This would be the case if you have unselected (no) in Control information to all three of the fields, Distribute sales, Distribute miscellaneous charges and Distribute freight. Amounts are distributed automatically to the default accounts in Control information. |
| • | Otherwise: |
If this is a new entry, a new distributions screen appears as described in the next section.
| • | If this is an existing entry, the distribution screen appears automatically if you have changed any of the following: the amount, freight charge, miscellaneous charge, tax code, or tax amount. |
| • | If this is an existing entry and you have not changed any fields subject to distribution, you are asked, Any change to optional distributions ?. Answer N to complete this transaction, or Y to proceed to the next screen. |
There are two formats for the distribution screen, one allowing distributions to jobs and one not. They vary considerably, so each is described separately.
If you are not interfaced to the PBS Job Cost, this section describes the only screen you will need.
If you are using Job Cost, you will need both screens. Balance-forward customers use the screen described here (because their Miscellaneous charges entries may not be distributed to jobs).
The following screen appears:
Graphical Mode
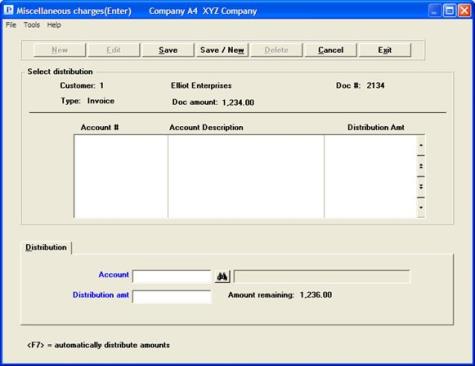
You may enter unlimited distributions for each entry. These appear in the list box at the top of the screen. Up to 6 distributions will display. You may use the arrow keys, Page Up, Page Down, Home and End keys to locate an existing distribution.
Character Mode
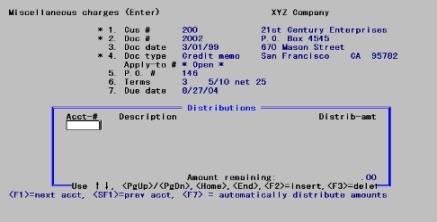
The distribution screen consists of an unlimited number of rows, divided into columns identifying how much of the amount to be distributed goes to each account.
| • | If this is a new entry, the cursor is initially positioned at the first row. As you enter each new line, the cursor proceeds to the next. When you reach the bottom of the window, you remain there rows previously entered scroll upwards and out of sight (but are not lost). |
| • | If this is an existing entry, the row you are currently on is highlighted. |
| • | You can select the row you want using <Up>, <Down>, <PgUp>, <PgDn>, <Home>, and <End>. |
| • | You can add a new row at the existing location by pressing <F2>. The remaining rows scroll down by one line to make room for the insertion. If you change your mind press <Esc> to cancel the insertion and close up the gap. |
| • | You can delete the existing row with <F3>. The remaining rows scroll up by one line. |
Both Character and Graphical Modes
Entries are not required to be in any particular sequence, but you may not specify more than one entry for the same account.
A running total shows the amount remaining to distribute. Data entry does not terminate automatically when this amount reaches zero (it can in fact go negative). The amount to be distributed includes miscellaneous and/or freight charges only if so specified in Control information (otherwise those charges are automatically distributed to their respective default accounts).
Enter the distribution information as follows:
Options
Enter the account number of this distribution. This must be a valid entry in the System Manager (Ctl) Valid G/L accounts selection. You may use one of the options:
|
F1> |
For the next valid G/L account |
|
<SF1> |
For the previous G/L account |
|
<F7> |
(Available only for the first distribution of a new entry) To distribute the entire amount to the default sales account (and cost center, if applicable) defined in Control information. |
|
<Esc> |
To exit from the distribution process. You can do this from the first column of any row, but (unless you wish to cancel the entire entry) you can only do so when no amount remains to be distributed. |
|
Format |
Your standard account number format, as defined in Company information |
|
Example |
Press <F7>, then press <Esc> |
Description
The description of this account displays automatically and is not entered.
Options
Enter the amount to be distributed to this account, or use the option:
|
<F2> |
For the entire amount remaining to distribute |
|
Format |
999,999,999,999.99- |
|
Example |
(Skipped in this example because you pressed <F7> in the first column) |
There are two formats for the distribution screen, one allowing distributions to jobs and one not. This section describes the one for jobs. Note that this screen allows distributions to jobs but does not require it you can still distribute an entry wholly or partly to accounts unrelated to a job.
If you are not using Job Cost, or this is a balance-forward customer, this section does not apply. Refer to the Manual Distribution (Without Job Cost) section.
The amount to be distributed does not include miscellaneous charges or freight charges. When J/C is interfaced, these are automatically distributed to their respective default accounts.
Graphical Mode
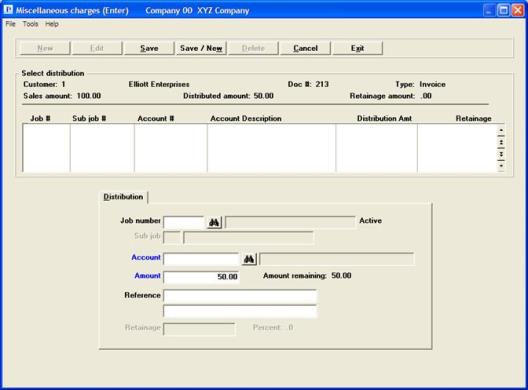
You may enter unlimited distributions for each entry. These appear in the list box at the top of the screen. Up to 6 distributions will display. You may use the arrow keys, Page Up, Page Down, Home and End keys to locate an existing distribution.
Character Mode
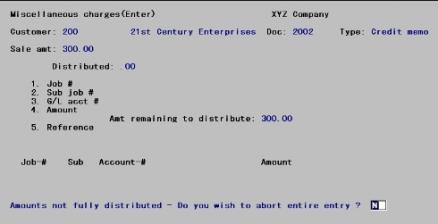
There can be an unlimited number of distributions for each entry. These appear as a table occupying the bottom portion of the screen. Each row represents one distribution. The columns identify what account or job you are distributing it to, and how much has been distributed to each.
| • | The table contains only the three most recent entries. The others are still exist, they are just not visible. |
| • | You do not enter information directly into this table. Instead, your entries in the Fields #1 through 5 are displayed in the table as they are entered. |
| • | The table is initially empty and fills from the top as you make new entries. |
| • | If this is a new entry, each new distribution is entered by filling in Fields #1 through 5 and ratifying the result at Field number to change ?. This adds one new row to the table. |
| • | If this is an existing entry, you can either add new rows as above, or you can press <F1> to view the next existing distribution. Once you have done this you can change or delete this existing distribution, or simply confirm that it is correct by pressing <Enter> at Field number to change ?. It is important to realize that if you do not press <F1> for any existing distribution, that distribution is still there and continues to contribute to the total even though the system has not shown it to you. Therefore, when changing existing distributions you should press <F1> until no more existing distributions remain to be processed. |
Both Character and Graphical Modes
You can have more than one entry for the same job and sub-job provided the accounts are different, and vice versa. Also, some distributions can be to jobs and some not. However you cannot have two different entries for the same job, sub-job, and account number.
Entries are not required to be in any particular sequence.
A running total shows the amount remaining to be distributed.
Enter the distribution information as follows:
For an open item customer, if this distribution is not to a job, leave this field blank. The cursor will skip to the Account field.
Miscellaneous charge entries for miscellaneous customers can be distributed to jobs provided that the miscellaneous customer is an open-item one.
Options
If this distribution is to a job, enter the job number or use one of the options:
|
Down arrow or <F1> |
For the next distribution on file for this entry |
|
Up arrow or <SF1> |
For the previous distribution on file |
|
<F2> |
For the next job on file. The job must be in Job Masters and its status must be active or closed. Only active and closed jobs are shown. The description and status of the job display automatically. |
|
<SF2> |
For the previous job |
|
<Esc> or Exit button |
To exit from distributions. You cannot do this if any amount remains to distribute, unless you wish to cancel the entire entry. |
The description of the then displays.
|
Format |
7 characters |
|
Example |
(Does not occur in this example because not using Job Cost) |
This field may not be entered if:
| • | You select the Job from the Job lookup in Graphical mode because the sub-job is auto entered, or |
| • | You did not enter a job number, or |
| • | You entered a job number, but this job does not have sub-jobs, or |
| • | The job has sub-jobs, but does not permit billing for the sub-jobs. |
Otherwise, enter the sub-job number for this transaction. The sub-job must already exist for the job. The description of the sub-job then displays.
|
Format |
999 |
|
Example |
(Does not occur in this example because not using Job Cost) |
Options
Enter the number of the G/L account for this distribution. This must be a valid entry in the System Manager (Ctl) module’s Valid G/L accounts selection. You may use the option:
|
<F2> |
For the job’s default billing account (if the distribution is for a job) |
|
|
For the default sales account (and cost center, if applicable) defined in Control information (if the distribution is not for a job) |
|
Format |
Your standard account number format, as defined in Company information |
|
Example |
(Does not occur in this example because not interfaced to J/C) |
Options
Enter the amount of this distribution, or use the option:
|
<F2> |
For the entire amount remaining to distribute |
|
Format |
999,999,999,999.99- |
This field is blank and may not be entered if this distribution is not for a job.
If this is a distribution for a job, enter any reference or comment. This field is optional.
|
Format |
Two lines of 25 characters each |
|
Example |
(Does not occur in this example because not interfaced to J/C) |
This field can only be entered if you answered Y to Use retainage receivable ? in J/C Control information. This feature applies primarily to the construction industry.
Enter the amount of retainage being paid with this payment. It cannot exceed the total amount entered in the Amount field.
|
Format |
999,999,999.99- |
|
Example |
(Does not appear in this example because you are not interfaced to J/C.) |
Make any needed changes. You cannot change the job number, sub-job number, or G/L account number. If you wish to do this, you must delete then re-enter the distribution.
Press <Esc> to cancel this distribution (it will not be added to the table displayed). Press <Enter> to accept the distribution, add it to the table displayed, and allow entry of a new distribution.
Options
You may also use either of the following options; if you do, the current entry is accepted and added to the table before the next / previous distribution is displayed.
|
<F1> |
For the next distribution on file for this entry |
|
<SF1> |
For the previous distribution on file |
Note the absence of <F3> for deletions. Delete individual distributions by changing their amount to zero.
This selection is optional. It lets you print a list of unposted entries in Miscellaneous charges.
Select
Edit list from the Miscellaneous charges menu.
No selection menu appears because all entries are printed unconditionally. You will be asked to select a printer. The report may be printed to disk or displayed on the screen.
When you have verified that the miscellaneous charge entries are correct and complete, as shown on the Miscellaneous charges Edit List, you are ready to post them to the permanent A/R files/tables.
A sample Miscellaneous Charges Journal is in the Sample Reports appendix.
Select
Post from the Miscellaneous charges menu.
No selection menu appears because all entries are posted unconditionally. You will be asked to select a printer. The report may be printed to disk but not displayed on the screen.
In a multi-user environment not using batch controls, you will not be allowed to post while any other another user is accessing certain A/R files/tables. Once you begin posting, other users will not be able to enter other transactions until posting is complete.
|
Note |
If you are also using the PBS Job Cost module, skip to the Posting Job Distributions section below. |
The transactions are posted and the Miscellaneous Charges Journal is printed. Except for the title, this is identical to the Edit List which appears at the end of this chapter. The full amount of each transaction is posted to A/R Distributions as a net change to accounts receivable.
The various amounts that were automatically and/or manually distributed to accounts are posted to A/R Distributions to G/L. The commission due amounts are posted if commissions are paid upon receipt, and fields in Customers are updated, along with the customer’s account (Open Items). If the document date is in the next period, the amounts are stored internally in Customers until Close a period is run.
If you are not using the PBS Job Cost module, you are through with Miscellaneous charges.
Follow the screen instructions. The Miscellaneous Charges Journal is printed, then transactions are posted.
| • | If there is no retainage for a transaction, the full amount of each transaction is posted to A/R Distributions to G/L as a net change to accounts receivable, using the accounts receivable account number specified in A/R Control information. |
| • | If a transaction has retainage, the net change to accounts receivable will be equal to the total amount, less the retainage. The retainage will be posted to the retainage receivable account specified in Job Cost Control information. |
|
Note |
If there was any retainage on the transaction, this retainage is not included in the A/R open amount due when the transaction for a job is posted to A/R Open Items. |
The amounts that were automatically and/or manually distributed to various accounts are posted to update A/R Distribution to G/L at this time. The commissions due amounts are also posted, and Customers is updated along with A/R Open Items.
When the job is complete and the full retainage is then due, you should issue a separate invoice for the total retainage due. At the time you do this, you must enter one distribution for it in exactly this way:
| • | Job # must be blank. |
| • | G/L acct # is your retainage receivable account number. |
| • | Amount is the full amount of the retainage now due. |
| • | Reference is skipped. |
| • | Retainage is skipped. |
All other files/tables in the Job Cost module were already properly updated with the retainage amount. It is only A/R Open Items that is handled in this special way.
This separate entry to handle the retainage credits the retainage receivable account and debits the accounts receivable account, thereby turning the retainage receivable into a regular accounts receivable.
When posting is complete, Posting complete - press <Esc> to exit is displayed. Pressing <Esc> returns you to the A/R menu.
Posting To Jobs
When transactions are posted to the A/R files/tables, any transactions for jobs are also posted at the same time to these jobs. They are shown the next time you run the Profitability report in Job Cost.
Because of this, you should not post billings for jobs in the next period until after you have run the Profitability report for the current period.
Select
Data import from the Miscellaneous charges menu.
Data Import is licensed separately and may not be available on your system. For information on using data import see the Data Import documentation or contact your PBS provider.