This chapter contains the following topic:
The Cash history selection enables you to print a Cash History Report. This lists, and optionally purges, posted cash receipts.
Select Cash History Report to view a sample report in the Sample Reports appendix.
Select
Cash history from the Reports, general menu.
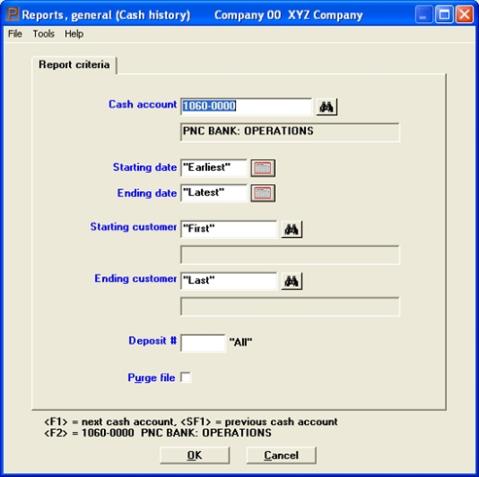
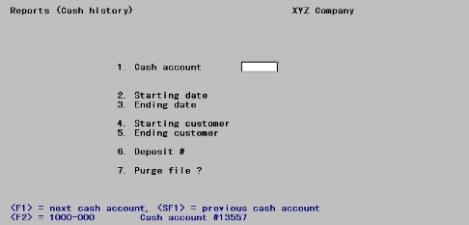
The following screen appears:
Graphical Mode

Character Mode

Enter the cash account you want to show on the report. This must be a valid entry in the Cash accounts selection of the System Manager (CTL) menu. You may use one of the options:
Options
|
<F1> |
For the next entry in Cash accounts. If only one entry is on file, neither <F1> nor <SF1> is available. |
|
<SF1> |
For the previous cash account |
|
<F2> |
For the default cash account from Control information |
|
Format |
Your standard account number format, as defined in Company information |
|
Example |
Press <F2> |
Enter the range of dates to include in the report. You may use the option:
|
<F2> |
For the Earliest starting date or Latest ending date |
|
Format |
MMDDYY |
|
Example |
Press <F2> at each field for earliest through latest |
Starting customer and
Ending customer
Specify the range of customer numbers to include. You may use the option:
|
<F2> |
For the First starting customer number or Last ending customer number |
|
Format |
12 characters |
|
Example |
Press <F2> at each field for first through last. |
Enter the number of the deposit for which to show cash receipts, or use one of the options:
Options
| Character | Graphical | Description |
|
<F5> |
<F5> |
For All deposits |
|
blank |
<F2> |
For only those cash receipts that are not yet assigned to a deposit slip |
In graphical mode the selected option displays to the right of the field. That is intentional.
|
Format |
999999 |
|
Example |
Press <F5> |
If you check the box or answer Y, all cash receipts shown on the report will be purged from the file or table.
Exception: If you are interfaced to Check Reconciliation, deposits and cash receipts not yet transferred to Check Reconciliation will not be purged.
If you leave the field unchecked or answer N, no purging occurs.
In either event, a Cash History Report will be printed.
|
Format |
Graphical: Check box where checked is yes and unchecked is no. The default is unchecked Character:One letter, either Y or N. The default is N |
|
Example |
Press <Enter> |
Make any changes and click on OK to continue. If you selected to purge the data, you are asked whether you are sure you wish to purge. If you click on Yes, the data is purged.
Character Mode
Make any needed changes from Field number to change ?, then press <Enter> to continue. If you selected to purge data, you are asked whether you are sure you wish to purge. If you answer Y, the data is purged.