This chapter contains the following topics:
Introduction to Invoice History
Printing the Invoice History Report
The Invoice History selection enables you to print or view invoices in Invoice History.
To print individual invoices from Invoice History, use the Invoices (Reprint) selection. See Reprinting Invoices from the Invoices chapter.
If you are interfaced to the PBS Order Entry, be aware that Invoice History may contain invoices from both modules, depending on your responses to the question Keep invoice history in each module’s Control information. Either module’s View and Reports selections allow you to access invoices from both modules.
This selection lets you view invoices in Invoice History. Other view selections are available and are documented in the View chapter.
Select
Invoice history from the View menu.
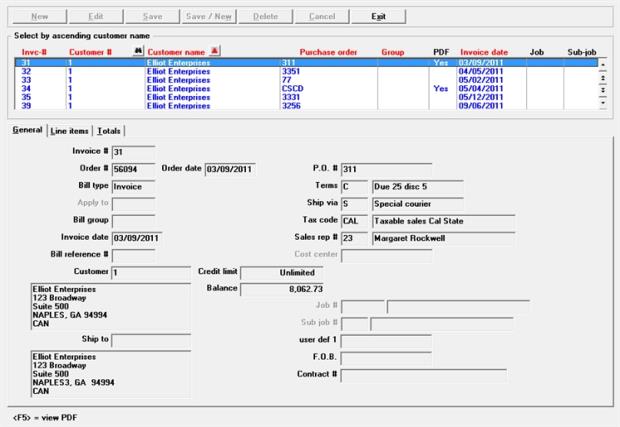
The following screen displays:

The list box displays up to 6 existing historical invoices and credit memos at a time. The default view allows you to sort the invoices by invoice number, customer number, customer name, group and invoice date all in ascending or descending order. Click on the column name or the arrow to the right of the column name to change the sort or use the View options. Only column names in red may be sorted. The default sort is by customer name.
You may also select a customer using the customer lookup, just to the right of the Customer number column header. Within the lookup you also have the option of selecting a customer by Sales rep or Zip code.
Depending on the sort field selected, type the number or name to locate the invoice.
You may also use one of these options to locate an invoice by customer name:
|
Down arrow or <F1> |
For the next invoice, in customer name sequence |
|
Up arrow or <SF1> |
For the previous invoice |
|
Page Down |
For the next group of six invoices |
|
Page Up |
For the previous group of six invoices |
|
End |
For the last invoice |
|
Home |
For the first invoice |
View Menu Selections
When you first access this screen, the default view option is to sort by customer number.
From the View menu there are two main selections with several invoice history sort options for each. These are the View invoices options:
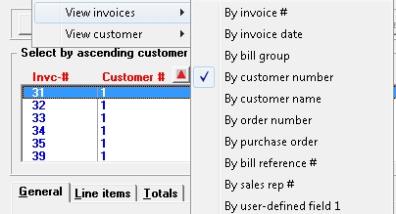
These are the View customer options:
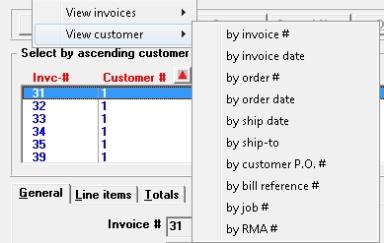
Each View customer option provides different sets of displayed fields and sort fields in the list box. After selecting a View customer option, it sorts and searches on the data for that customer only.
You may go beyond the customer's data by using the mouse or the keyboard options listed above.
You may revert back to the View invoices options to see all invoices.
Options Menu Selections
For general users, the menu selections can and may be restricted by the assigned menu. Also, if Order Entry is not licensed or not installed then the Order Entry menu selections will not be available for any user. The Options menu selections include:
| Options main menu selection | Sub menu selection | Documentation |
|---|---|---|
|
View accounts receivable |
Customers open items |
|
|
View accounts receivable |
Invoices |
|
|
View accounts receivable |
Customer history by date |
|
|
View accounts receivable |
Customer history by doc # |
|
|
View order entry |
Orders |
See O/E user documentation |
|
View order entry |
Full order inquiry |
See O/E user documentation |
|
View order entry |
Orders for an item |
See O/E user documentation |
|
View order entry |
Invoice history by customer |
See O/E user documentation |
|
View order entry |
Invoice history by invoice |
See O/E user documentation |
|
View order entry |
Invoice history by item |
See O/E user documentation |
|
View PDF |
|
See the next paragraph |
In order to view a PDF invoice, it must have been generated as a PDF during the printing of invoices. A Yes in the PDF column indicates the invoice has been generated as a PDF file. If you select an invoice that has been generated as PDF file, you will have an option to select <F5> to display the PDF file or access it from the Options menu View PDF.
The invoice history view consists of 3 or 4 tabs: General, Line items and Totals. The Payments tab displays only if using per A/R Control information.
The default tab is General which displays the invoices number, customer address, ship-to address, purchase order number and other header fields.
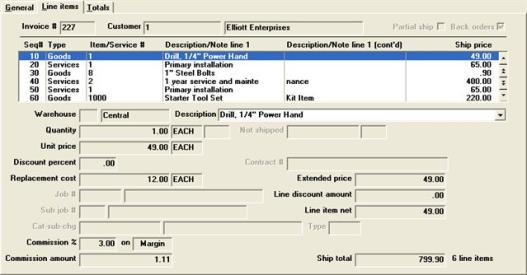
The list box on the line items tab displays up to 6 goods, services and notes lines at a time.
You may sort the lines by sequence number in ascending or descending order. Only Red fields may be sorted. Click the arrow to the right of the column name to change the sort or use the View options.
To find a lines you may type the sequence number or you may use the up/down arrows, Page Up, Page Down, Home and End keys to select any good, service or note.
The details for the selected good, service or note display in the fields below the list box.
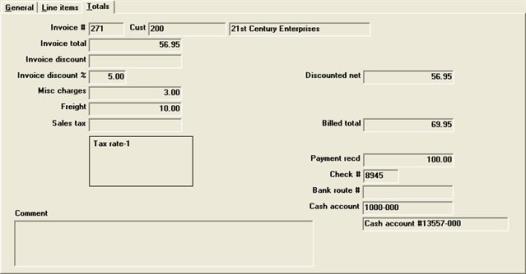
The totals tab includes fields for miscellaneous charges, discounts, taxes, freight, and payment information.
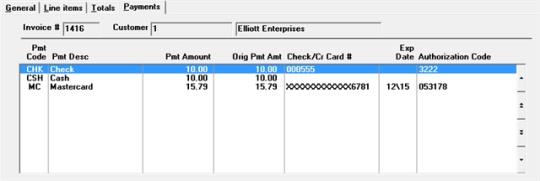
If you are using multi-payments, per A/R Control information, then the payments tab displays. Multi-payments is licensed separately. For more information, see the PBS Multi-payment Setup appendix. Payments can only be seen in Graphical Mode.
The tab shows the payments made for the invoice. The payment code, payment description, payment amount, original payment amount, check number, last 4 digits of the credit card number, credit card expiration date and authorization code display.
If you are using O/E and you have entered an order (O type transaction only), there can be a difference between the original credit card payment amount on the order and the final payment amount charged to the credit card when selecting the order for billing. It all other situations the payment amount and original payment amount will be the same.
Here is an example of the tab:
The following screen displays:
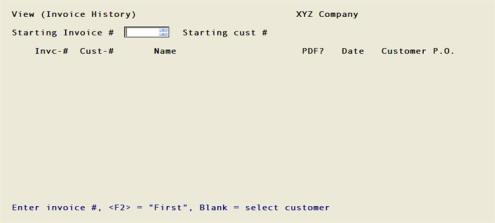
You can view invoices by invoice number, by customer number, or by customer name.
Starting invoice #
Enter first invoice number want to view, or use one of the options:
Options
|
<F2> |
To start from the First invoice |
|
blank |
To view invoices by customer |
|
Format |
999999 |
|
Example |
Press <F2> |
Starting customer #
If you left the invoice number blank, enter the starting customer number for the invoices you want to view, or use one of the options:
Options
|
<F2> |
For the First customer number with invoices |
|
blank |
To select customer by name |
Customer name
|
Format |
12 characters |
|
Example |
Press <F2> |
If you left the customer number blank, enter the name (or just the leading characters of the name) of the first customer you want to view, in customer name sequence. Upper / lower case is significant. You may use one of the options:
Options
|
<F2> |
For the First customer name with invoices |
|
blank |
To return to selection by invoice number |
|
Format |
25 characters |
|
Example |
(displays automatically because you pressed <F2> for customer number) |
The screen now appears as:
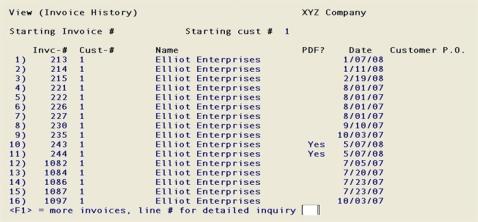
The invoices are listed on the screen.
The PDF? column indicates if the invoice has been generated as a PDF file. If you select the PDF generated invoice, you will have the option of displaying the PDF file.
To display more detail of an invoice, enter the screen line number (the number to the left of the invoice number). You may also use one of the options:
Options
|
<Esc> |
To start a new selection of invoices |
|
<F1> |
To view additional invoices |
|
<SF1> |
To view previous invoices (This is only available after you select <F1> additional invoices) |
|
<F2> |
(only if interfaced to Job Cost) To toggle between viewing job numbers or purchase order numbers |
|
Format |
99 |
|
Example |
Type 1 |
The full header information for the selected invoice displays:
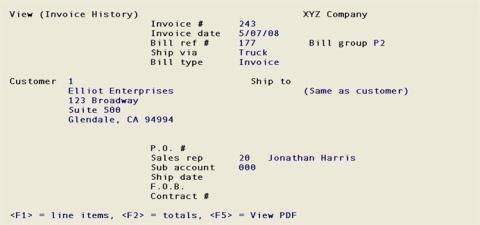
When you are finished viewing this screen, use one of the options:
Options
|
<Esc> |
To select another invoice |
|
<F1> |
To view line items for this invoice |
|
<F2> |
To view totals |
|
<F5> |
To view the PDF in the PBS browser. This option is only available if a PDF record exists in the PDF master file. A PDF file may only be viewed in Windows and Thin client. |
|
Format |
(Only option key input is accepted) |
|
Example |
Press <F1> to view line items. |
If you press <F1>, the following screen appears:
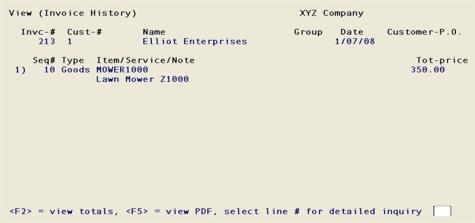
Select the screen line number (to the left of the line number) for detailed inquiry into one of the line items shown.
Options
You may use one of the options:
|
<Esc> |
To return to the previous screen |
|
<F2> |
To view totals |
|
<F5> |
To view the PDF in the PBS browser. This option is only available if a PDF record exists in the PDF master file. A PDF file may only be viewed in Windows or Thin client on a UNIX/Linux system. |
|
Format |
99 |
|
Example |
Type 1 to select screen line number 1. |
The screen below is for a goods line item.
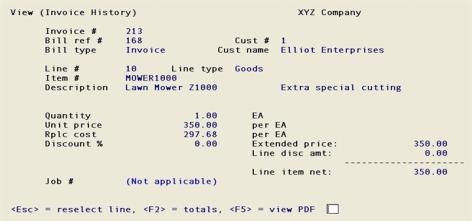
Options
Use one of the options:
|
<Esc> |
To select another line |
|
<F2> |
To view totals |
|
<F5> |
To view the PDF in the PBS browser. This option is only available if a PDF record exists in the PDF master file. A PDF file can only be viewed in Windows and Thin client on a UNIX/Linux system. |
|
Format |
(Only option key input is accepted) |
|
Example |
Press <F2> |
After selecting <F2> the following screen appears:
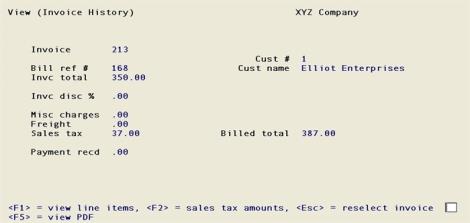
To end viewing this invoice, press <Esc>.
Options
On the totals screen you can use one of the following options:
|
<Esc> |
To select another invoice |
|
<F1> |
To return to viewing line numbers for this invoice |
|
<F2> |
To view sales tax for this invoice, showing each tax rate of the applicable tax code |
|
<F5> |
To view the PDF in the PBS browser. This option is only available if a PDF record exists in the PDF master file. You may only view a PDF file in Windows and Thin client. |
|
Format |
(Only option key input is accepted) |
|
Example |
Press <Esc> |
Use this selection to print a report of invoices by customer, invoice number, bill group, item number and sales rep ranges.
Invoices that do not have any lines will not print on the report.
You have the option of purging invoices.
Select
Invoice history from the Reports, general menu.
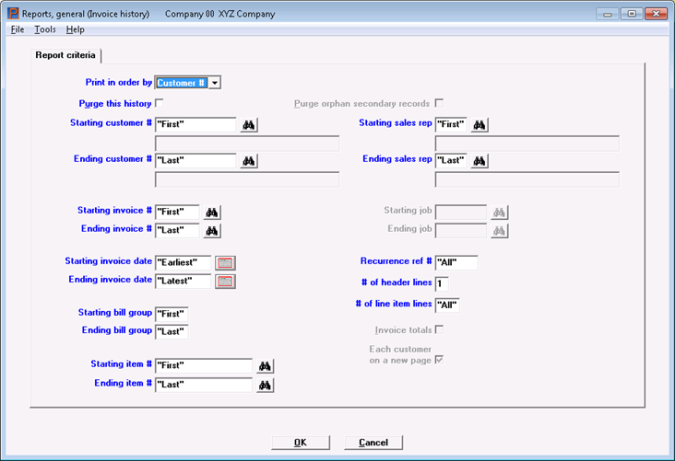
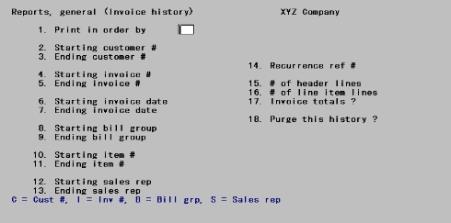
The following screen appears:
Graphical Mode
Character Mode
Enter the following information:
Enter the order in which to show the invoices:
| Character | Graphical | Character | Graphical |
|
C |
Customer # |
S |
Sales rep (if sales reps are used) |
|
I |
Invoice # |
T |
Item # |
|
B |
Bill group |
J |
Job # (if you use Job Cost) |
|
Note |
If you select to print in order by invoice number, grand totals will not appear on the report. |
|
Format |
Graphical: Drop-down list Character: One letter from the list above |
|
Example |
Type C or select Customer # |
Check this box or type Y to purge the selected invoices from the Invoice History, or press <Enter> to leave them. In character mode this is one of the last fields on the screen.
This selection purges the invoice history header and associated lines, auxiliary and serial numbers data.
If you select all eixsting invoices for purging, the data is cleared and the file/table size is reduced to zero. Selecting to purge only some of the invoices does not reduce the size of the file/table; the invoices selected only become inaccessible.
If you want to purge some invoices to recover disk space from data files, after you purge here use Export a file and Restore from an export file on the invoice history header, lines, auxiliary and serial numbers to regain the disk space. Refer to the Data Recovery Utilities appendix in the PBS Administration documentation. Note that this will not be effective for reducing an SQL table size.
In Character mode you have the option to enter B for purging both history and orphan records. See the next field or an explanation of orhpan records.
|
Format |
Graphical: Check box, where checked is Yes and unchecked is No Character: One letter, either Y, N or B |
|
Example |
Press <Enter> for No |
Purge orphan secondary records
This field is available in Graphical mode only and cannot be entered unless the Purge this historyfield is checked.
The primary record is the invoice history header. Secondary records are the invoice history lines, auxiliary and serial numbers. Secondary records cannot be printed with this report when the primary header record is missing.
Check this field if you suspect that you have orphan secondary records. Under normal operation this will not happen. After you upgrade from an older version, or if you have had to recover invoice history data it would be a good time to select this option.
Secondary records print on the report when they are purged.
Orphaned records will not purge unless there are other invoices with headers that are in the range selected.
|
Format |
Graphical: Check box, where checked is Yes and unchecked is No Character: One letter, either Y or N |
|
Example |
This option is not available because you selected No in the previous field |
Starting customer # and
Ending customer #
Enter the range of customers for whom to show invoices.
Options
You may also use the option:
|
<F2> |
For First starting customer number or Last ending customer number |
|
Format |
12 characters for each field |
|
Example |
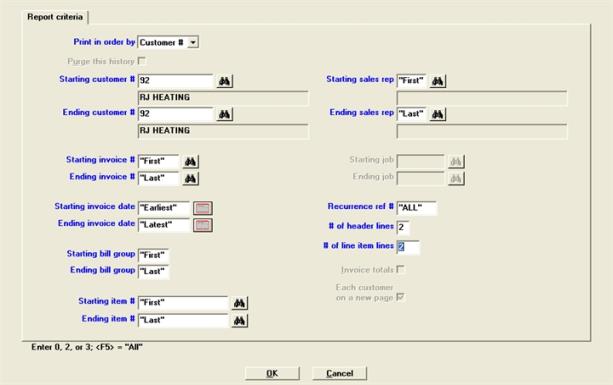
Type 99 at both fields. |
Starting invoice # and
Ending invoice #
Enter the range of invoice numbers for which to show invoices. You may also use the option:
|
<F2> |
For First starting invoice number or Last ending invoice number |
|
Format |
999999 for each field |
|
Example |
Press <F2> at both fields. |
Starting invoice date and
Ending invoice date
Enter the range of invoice dates for which to show invoices. You may also use the option:
|
<F2> |
For Earliest starting date or Latest ending date |
|
Format |
MMDDYY for each field |
|
Example |
Press <F2> at both fields |
Starting bill group and
Ending bill group
Enter the range of bill groups for which to show invoices. You may also use the option:
|
<F2> |
For "First" starting bill group or "Last" ending bill group |
|
Format |
3 characters for each field |
|
Example |
Press <F2> at both fields. |
Starting item # and
Ending item #
If you are printing in invoice order (in Print in order by field), these fields cannot be entered.
The entire invoice will be printed if any goods line item of the invoice matches this range. The invoice will only be printed once, even if more than one line item of the invoice lies within the range.
Enter the range of item numbers for which to show invoices. You may also use the option:
|
<F2> |
For First starting item or Last ending item |
|
Format |
15 characters at each field |
|
Example |
Press <F2> at both fields. |
Starting sales rep and
Ending sales rep
These display only if you use sales reps in your business, as specified in A/R Control information.
Enter the range of sales rep for which to show invoices. You may also use the option:
|
<F2> |
For First starting sales rep or Last ending sales rep |
|
Format |
3 characters for each field |
|
Example |
Press <F2> at both fields. |
Enter the recurrence reference number (if any) of the invoices you want to show, or use one of the options:
Options
|
<F5> |
To show invoices for All recurrence reference numbers |
|
blank |
For None |
Selecting a recurrence reference number here allows you to show all invoices that were the result of a specific recurring bill.
|
Format |
6 characters |
|
Example |
Press <F5> |
Enter the number of header lines to show for each invoice: 1 or 2.
|
Format |
9 |
|
Example |
Type 2 |
Type 2 to show 2 line per line item, 3 for 3 lines, or 0 for no line item information.
Options
You may also use the option:
|
<F5> |
For All information for each line item |
|
Format |
One digit, either 2, 3, or 0 |
|
Example |
Type 2 |
If you are printing in customer number or item number order ( in Print in order by field), or if you have entered 0 for # of line item lines, this field cannot be entered.
Otherwise, check this box or type Y to show the dollar total information for each invoice and for all invoices selected; otherwise, leave it unchecked (type N). If you have an invoice with no line items, totals for that invoice will not be shown.
|
Format |
Graphical: Check box, where checked is Yes and unchecked is No Character: One letter, either Y or N |
|
Example |
Check the box or type Y |
|
Note |
The remaining fields on the screen appear only in the circumstances explained in each case. |
|
|
{customer} |
|
|
|
{invoice} |
|
|
Each |
{bill group} |
on a new page? |
|
|
{item} |
|
|
|
{sales rep} |
|
|
|
{job} |
|
The text within the braces corresponds to whatever you entered for the Print in order by field. Furthermore, there are two cases in which this field cannot be entered:
| • | You selected a range in which the starting entry is the same as the ending one. |
| • | You chose in # of line item lines field not to print detail line items. |
Otherwise, do you want a page break at each break in the sequence of customers, jobs, etc. Check the box or enter Y to begin each such entry on a new page, or leave it unchecked, enter N, if you do not want the page breaks to reflect these breaks.
Invoices that have no line items will not be forced to a new page regardless of what is entered here.
|
Format |
Graphical: Check box, where checked is Yes and unchecked is No Character: One letter, either Y or N |
|
Example |
Leave it unchecked or type N |
These fields appear only if you are interfaced to Job Control and have chosen to print in job sequence. Even then, they may be renumbered if some of the intervening fields have been skipped.
Enter the range of jobs to show. Follow the screen instructions.
|
<F2> |
For First starting job or Last ending job |
|
Format |
7 characters for each field |
|
Example |
(These two fields do not display since Job Cost is not interfaced.) |
The completed screen follows:
Graphical Mode:
Character Mode:
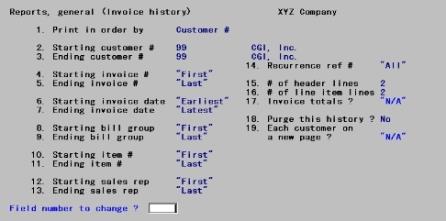
Make any needed changes, or press <Enter> to print the report.