This chapter contains the following topics:
Creating and Controlling Budgets
Printing a Change Log of Budgets
The Budgets selection enables you to create budgets. In addition, you can:
| • | Print budgets. |
| • | Generate budgets. |
| • | Purge budgets. |
| • | Print Budget Change Log (if you chose in Company information to use change logs). |
In Passport’s Passport Business Solutions General Ledger system, a budget is defined as the targeted plan for an upcoming period.
Budgets may be stored for an unlimited number of years, accounts, and budget types.
A budget type is a code which is used to group logically similar budget entries. For example, you might have budget types established for best case sales conditions, worst case sales conditions, budgets approved by the board of directors, or other situations.
Budget types must be defined before a budget can reference them.
For example, if sales of a specific product line are targeted for $10,000 for each period of the fiscal year, the correct budget information for the account for this product’s sales is a $10,000 credit (with a minus sign) for each period’s budget amount as follows:
Budgets
|
Period-1 |
10,000- | |
|
Period-2 |
10,000- | |
|
Period-3 |
10,000- | |
|
Period-4 |
10,000- |
Similarly, the projected telephone expense for a particular phone line might be set at $5,000 per period. The correct budget information to record this expense is a $5,000 debit (no minus sign) for each period for the account.
Budgets can also be used for balance sheet items. If Accounts Receivable is targeted for a $5,000 decrease (credit) during each period of the fiscal year, the budget amount for each period is a $5,000 credit as follows:
Budgets
|
Period-1 |
5,000- |
|
|
Period-2 |
5,000- |
|
|
Period-3 |
5,000- |
|
|
Period-4 |
5,000- |
|
Note |
All budget information for one company resides on a single Budgets file/table. There is not a separate file/table for each fiscal year or each budget type. |
Select
Enter from the Budgets menu or directly from the Chart of accounts (Enter) selection, as described in that chapter.
Graphical Mode
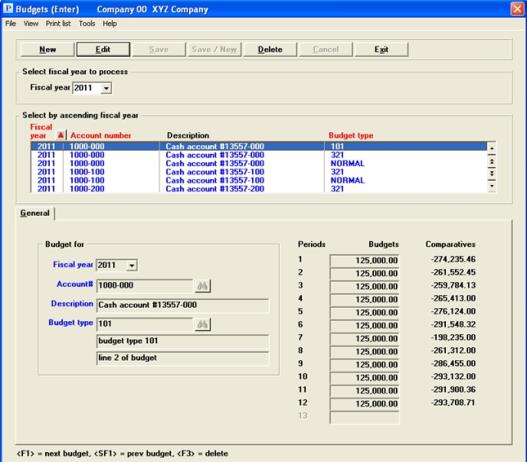
The following screen appears:

The list box displays up to 6 existing budgets at a time. You may sort the budgets by fiscal year, account number or budget type all in ascending or descending order. To select a field or change the sort order, click on the column name or the arrow to the right of the column name or use the View options. Only column names in red may be sorted.
To locate a budget, start typing a fiscal year, account number or budget type depending on which sort field is selected. You may also use the up/down arrows, Page up, Page down, Home and End keys to locate a budget. The <F1> and <SF1> keys function the same as the up/down arrows.
Budgets that display in the list box are available for changes or deletion. The fields for the selected budget display in the lower part of the screen.
When an budget is found, you may select the <Enter> key or Edit button to start editing.
When you are adding or editing an existing budget, you have the following buttons, with keyboard equivalent options:
|
Button |
Keyboard |
Description |
|
New |
Alt+n |
To enter a new budget |
|
Edit |
Alt+e |
To edit an existing budget |
|
Delete |
Alt+d |
To delete an existing budget. You may also select the <F3> key to delete a budget |
|
Save |
Alt+s |
To save a new or edited budget |
|
Save/New |
Alt+w |
To save a new or edited budget with the program ready to enter another new budget |
|
Cancel |
Alt+c |
To cancel the entry of a new budget or cancel the editing of an existing budget |
|
Exit |
Alt+x |
To cancel editing or return to the menu. You may also select the <Esc> key to exit the window |
Menu Selections
Menu selections are available starting at the top left of the screen. Most of these are the similar from screen to screen. If a menu selection is grayed out you will not be able to access it. The selection that is unique to this screen is explained here:
Select Print list to print a list of the budgets. See Listing Budgets
Character mode
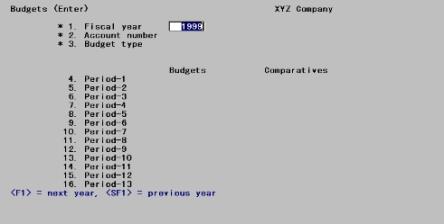
The following screen appears:
General tab
From this screen you can work with both new and existing budgets.
Enter the following information:
Options
Enter the fiscal year for the budget you are creating.
|
<F1> |
For the next fiscal year |
|
<SF1> |
For the previous fiscal year |
|
Format |
9999 All four digits are required. The default is the current year. |
|
Example |
Press <Enter> |
Options
Enter the account number for the budget. This may be any valid account in Chart of accounts. You may use one of the options:
|
<F1> |
For the next account |
|
<SF1> |
For the previous account |
|
<F8> |
Use the Lookup window to find the account |
|
<Enter> |
Lookup the account by description. Selecting <Enter> a second time returns the cursor to the Account number field where you can lookup by account number |
|
Note |
The account number can be changed only when you selected Enter Budgets from the main menu. If you choose Enter Budgets from Chart of Accounts (More options), you may only enter budgets for that one account. |
|
Format |
Your standard account number format, as defined in Company information |
|
Example |
Enter account 4010-000 |
Enter the budget type. This must already have been defined in Budget types. You may also use one of the options:
|
<F1> |
For the next budget type |
|
<SF1> |
For the previous budget type |
The description of the budget will display next to the budget type upon selection.
|
Format |
15 characters. Lower-case is converted to upper. |
|
Example |
Press <F1> |
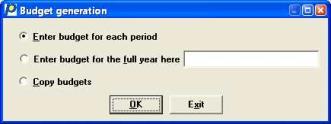
Enter budget generation method
Options
This window only appears if this is a new entry (for an existing entry, the cursor is positioned at the first budget period.. Your choices are:
| Character Mode | Graphical Mode | Description |
|
1 |
Enter budget for each period |
The cursor will move through each field in turn. |
|
2 |
Enter budget for the full year here |
To enter a single amount for full year’s budget . This will be divided equally among the valid periods. |
|
3 |
Copy budgets |
To copy budgets. This option is only available if there are budgets amounts to copy |
|
Format |
Radio fields |
|
Example |
Select Enter budget for each period |
These fields constitute a table showing both the budget amounts and the comparative amounts for that year, in parallel columns. The comparatives are for your information only and cannot be changed (by this selection).
Credit amounts must have a minus sign.
Up to thirteen periods are shown, but the cursor does not move to any period not defined for the current fiscal year (typically, this would be the thirteenth period). If the fiscal year you are entering uses more or fewer periods than your current structure, you will have to temporarily alter your Accounting periods in order to maintain that year’s budgets.
Options
Enter the amount for each period. If this is a new entry, after you have entered the first period you may also use one of the options:
|
<F1> |
For the previous period’s amount |
|
<F2> |
To use the previous period’s amount for all remaining valid periods. |
|
Format |
999,999,999,999- |
|
Example |
Type 20000 at Period 1 |
Options
Make any needed changes. You can change any period individually, even when the budget has been entered a year at a time, or copied from another entry. You may also use one of the options:
|
<F1> |
For the next budget type |
|
<SF1> |
For the previous budget type. |
|
<F3> |
To delete this entry |
|
<F2> |
To adjust the budget amounts. |
The first three options are available only if this is an existing budget entry.
Budget generation
<F2> is available for both new and existing entries. When this is pressed a window displays where you can select the Budget generation method. There are up to three radio button options. They are the following:
This takes you back to the entry screen where you can enter a budget for each period.
|
Format |
Radio button, checked means yes and uncheck is no |
Enter budget for full year here
You are asked this only if you entered 2 at the field, Enter budget generation method.
|
Format |
Radio button, checked means yes and uncheck is no |
If you checked the radio button, the amount you enter is automatically divided equally (without rounding) among all valid accounting periods.
|
Format |
999,999,999,999- |
Select this button to copy budgets.
|
Format |
Radio button, checked means yes and uncheck is no |
After you selected the budget generation method, select the OK button to continue. Also you may select Exit if you want to return to the previous screen.
Copy Budgets Window
This window appears only if you selected to copy budgets in the Budget generation window.
You can copy a year’s budget for this account from the any other year or budget type (or both). You cannot copy another account’s budget. You can adjust the copied budget by a percentage or dollar amount.
Note that (if this is an existing entry) you can copy it from itself, which is a convenient way to adjust the entry by a percent or an amount.
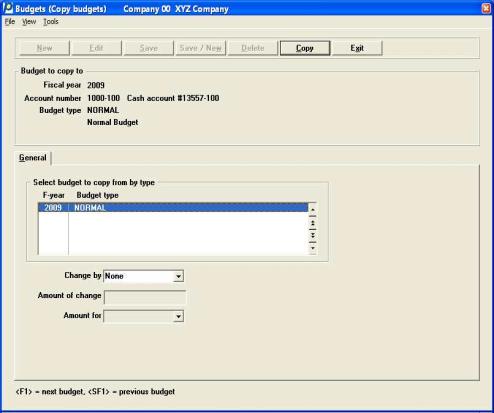
The list box displays the years and budget types from which you can make the copy. Use one of the options to select a year
|
<F1> or Down arrow |
to select the next budget |
|
<SF1> or Up arrow |
To select a previous budgets |
|
Page Down |
To select the next group of budgets |
|
Page Up |
To select the previous group of budgets |
|
Enter |
To start the copy |
After you selected a budget to copy, you may enter the following fields:
Options
Choose one of the following:
|
Percentage |
to adjust by percent |
|
None |
for no adjustment |
|
Amount |
to adjust by dollar amount |
|
Format |
Drop down list, The default is None |
|
Example |
Select Percentage |
If you choose no adjustment, you may not enter this field. Otherwise, enter either the dollar amount or the percentage of change.
|
Format |
9999999- for dollar amount change 999.99- for percent change |
|
Example |
Type 10 to indicate 10% |
|
Note |
A positive percent is used to increase the magnitude of a budget amount whether it is a debit or a credit. A negative percent is used to decrease the magnitude of the amount whether it is a debit or a credit. |
|
Percent |
Copied budget |
Resulting amount |
|
10 |
100,000 |
110,000 |
|
10- |
100,000 |
90,000 |
|
10- |
100,000- |
90,000- |
|
10 |
100,000- |
110,000- |
If you choose percentage or no adjustment, this field cannot be entered. Otherwise, specify whether the amount you entered is to be applied separately to each period, or the whole year which is divided amongst all valid periods.
|
Format |
Drop down list, the default is each period. |
|
Example |
(Does not occur in this example because you specified percent in the previous field) |
Entry complete
Select the Copy button to make the changes and return to the main screen for this entry or select Exit to return the budgets window.
This selection lets you print the Budget List, which is a list of the budgeted amounts for a single budget type. The list can be restricted to a range of accounts or of fiscal years.
| • | For a list of all the budget types (without any amounts), refer to the Budget Types chapter. |
| • | For a report comparing budget amounts for more than one budget type, refer to the Actuals, Budgets, and Comparatives chapter. |
| • | See a sample Budget List in the Sample Reports appendix. |
Select
Budgets from the Reports (Lists) menu.
Graphical Mode
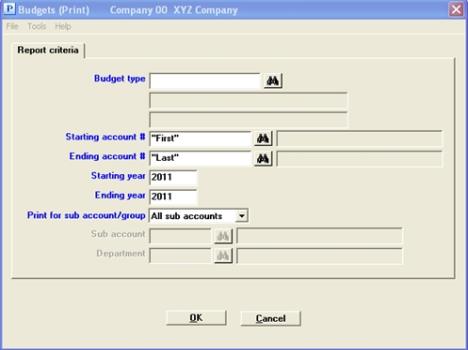
Character Mode
The following screen appears:
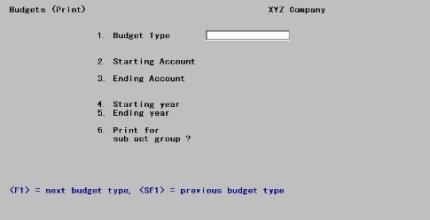
Enter the following information:
Options
Enter the budget type you wish to print.
|
<F1> |
For the next budget type |
|
<SF1> |
For the previous budget type |
|
Format |
15 characters |
|
Example |
Press <F1> |
Ending account #
Options
Enter the range of account numbers to be printed. Only the main account is entered (if you use cost centers (or subaccounts), you can define them at Field #6). You may also use one of the options:
|
<F1> |
For the next account |
|
<SF1> |
For the previous account |
|
<F2> |
For the First starting account or the Last ending account |
Upon selection or entry of an account, the description of the first account number on file with that main and subaccount displays below the account number.
|
Format |
Your standard account number format, as defined in Company information |
|
Example |
Press <F2> at each field |
Ending year
Options
Enter the range of years to print, or use one of the options.
|
<F1> |
For the next year |
|
<SF1> |
For the previous year |
|
<F2> |
For the Earliest starting year or the Latest ending year |
|
Format |
9999. The default is the current fiscal year. |
|
Example |
Press <Enter> at each field |
Print for cst ctr (or sub acct group)
This field appears if you are using cost centers (or subaccounts). Subaccounts may be used as cost centers for your financial statements, but not for report selection purposes.
Options
Enter one of the following:
| Character Mode | Graphical Mode | Description |
|
P |
Sub account or Cost center |
Use for cost center (or subaccount) |
|
G |
Sub account group or Cost center group |
Use for cost center group (or subaccount) |
|
A |
All sub accounts or All cost centers |
Use for all cost centers (or subaccount) |
|
Format |
Graphical: Drop down list. Select one from above Character: One letter from the list above |
|
Example |
Select All sub accounts or type A for All. |
Options
If you selected Sub account (answer P), you will be prompted to enter a valid cost center (or subaccount). If there is more than one cost center segment, each one must be entered separately. You may also use one of the following options:
|
<F1> |
For the next cost center (or subaccount) |
|
<SF1> |
For the previous cost center (or subaccount) |
|
<F5> |
For All cost centers (or subaccounts) |
|
Format |
Your standard cost center (or subaccount) format, as defined in Company information |
|
Example |
(Does not occur in this example because you have chosen A for All) |
Options
If you selected Sub account group (answer G), enter the cost center group (or subaccount). This must previously have been defined. You may use one of the following options:
|
<F1> |
For the next cost center group (or subaccount) |
|
<SF1> |
For the previous cost center group (or subaccount) |
|
<F5> |
For All cost center groups (or subaccount) |
|
Format |
Eight characters |
|
Example |
(Does not occur in this example because you have chosen A for All) |
If you selected All sub accounts (answer A), you may print for all cost centers.
|
Note |
Printing all groups is not the same thing as printing all cost centers or subaccounts (since some cost centers or subaccounts may not belong to any group, or may belong to more than one group). |
Make any needed changes. Select OK to print the report.
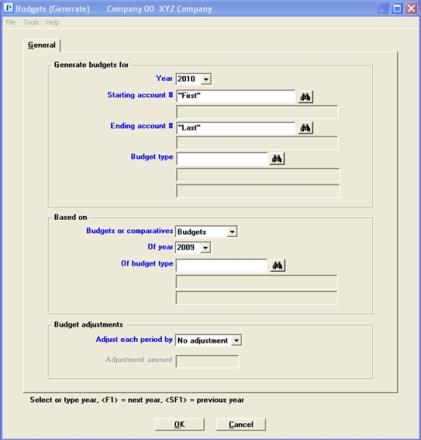
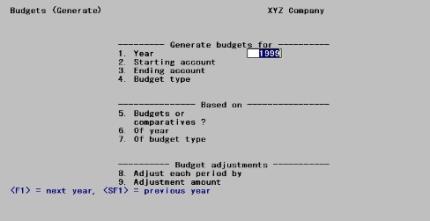
This selection lets you create new budget entries by applying systematic changes to existing entries.
Generate is similar to the Copy budgets option described in this chapter, with the additional feature that:
| • | You can copy an entire range of accounts, not just a single one. |
| • | You can copy from comparatives as well as from budgets. |
Any existing entries in the targeted budget are overlaid.
The resulting budget can be fine-tuned as needed by changing individual accounts and periods in Budgets (Enter).
This selection can be used to modify an existing budget (that is, the target budget can be the same as the source budget).
Select
Generate from the Budgets menu.
Graphical Mode
The following screen appears:
Character Mode
The following screen appears:
Enter the following information:
Generate budgets for
These questions are to determine which budget entries will be created or replaced (the target).
Options
Enter the year for which you wish to generate a budget, or use one of the options:
|
<F1> |
For the next year |
|
<SF1> |
For the previous year |
|
Format |
9999. The default is the current fiscal year. |
|
Example |
Press <Enter> |
Ending account #
Options
Enter the range of account numbers for which you wish to generate a budget. The account numbers, and even the cost centers, need not be valid; but the range must enclose at least one valid account number. You may use one of the options:
|
<F1> |
For the next account |
|
<SF1> |
For the previous account |
|
<F2> |
For the First starting account or the Last ending account |
|
Format |
Your standard account number format, as defined in Company information |
|
Example |
Press <F2> at each field |
Options
Enter the budget type of the budget you wish to generate. This budget type must already be in existence.
|
<F1> |
For the next budget type |
|
<SF1> |
For the previous budget type |
|
Format |
15 characters. Lower-case is accepted but is converted to upper-case. |
|
Example |
Press <F1> |
Based on
These questions are to determine the entries from which the copies will be made (the source).
Specify whether this new budget will be based upon an existing budget or upon a comparative.
| Character | Graphical |
|
B |
Budgets |
|
C |
Comparatives |
|
Format |
Character: One letter, either B or C Graphical: Drop down list, either Budgets or Comparatives |
|
Example |
Select Budgets |
Options
Enter the year that will be used as the basis for generating this budget, or use one of the options:
|
<F1> |
For the next year |
|
<SF1> |
For the previous year |
|
Format |
9999. All four digits are required. The default is the year before the current fiscal year. If you have entered C in Field #5, only past years are allowed. |
|
Example |
Press <F1> to change from previous year to current year. |
If you have entered Comparatives in the Budgets or comparatives field, this field may not be entered.
Options
Otherwise, enter the budget type you wish to use as a basis for the new budget. This must be an existing budget type. You may use one of the options:
|
<F1> |
For the next budget type |
|
<SF1> |
For the previous budget type |
|
Format |
15 characters |
|
Example |
Press <F1> |
These questions are to determine the changes to be made in transforming the source entry into the target entry.
Options
Choose one of the following:
| Character | Graphical | Description |
|
P |
Percent |
to adjust by percent |
|
N |
No adjustment |
for no adjustment |
|
A |
Dollar amount |
to adjust by dollar amount |
|
Format |
Character; One letter from the list above Graphical: Drop down list using the list above |
|
Example |
Select Percent |
or
Adjustment amount
Using graphical mode, if you selected Percent, enter a percentage in this field. If you selected Dollar amount, enter a whole dollar amount here. This field will not display at all if you entered No adjustment.
In Character mode, if you selected P for percentage, enter a percentage in this field. If you selected A for dollar amount, enter a whole dollar amount here. If you selected N for no adjustment, (Not applicable) displays in this field and no entry is allowed.
|
Format |
9999999- for dollar amounts 999.99- for percentages |
|
Example |
Enter 10 to adjust by +10% |
Field number to change ?
Field number to change is only available from the character mode screens. Make any needed changes. Press <Enter> to generate the budget.
In graphical mode select the OK to generate budgets or Cancel to return to the menu.
There will be a period of calculation while the new budget is calculated.
There must be at least one entry for the source within the account range specified for the year specified.
The source may have entries for accounts not present in the target, and vice versa — either because you did not specify a budget for that account in the source or the target, or because the account existed in one year but not in the other.
| • | Unmatched entries in the source are added to the target. |
| • | Unmatched entries in the target are not deleted or otherwise altered, nor are you warned that an account has been skipped. Therefore, do not assume that every account in the target has been updated unless you are certain that there are no gaps in the source. |
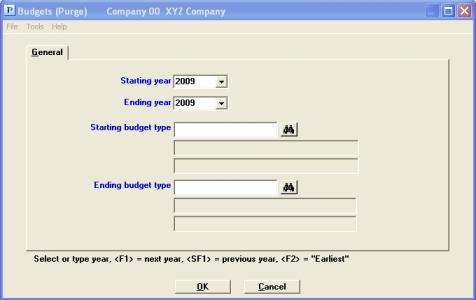
The Purge function enables you to delete budgets you no longer need. You can purge more than one budget at a time, but each budget is purged in its entirety (you cannot use this selection to delete a range of accounts).
Budgets for the current fiscal year or for future years cannot be purged.
Select
Purge from the Budgets menu.
Graphical Mode
The following screen appears:
Character Mode
The following screen appears:
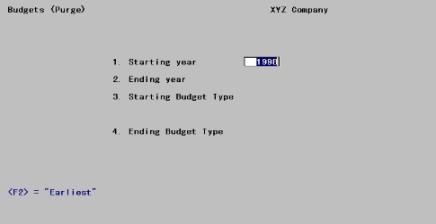
Enter the following information:
Ending year
Options
Enter the range of prior years to purge, or use one of the options.
|
<F1> |
For the next year |
|
<SF1> |
For the previous year |
|
<F2> |
For the Earliest starting year or the Latest ending year |
|
Format |
9999 The default is the previous fiscal year. |
|
Example |
Press <F2> for the starting year |
|
|
Type 2000 for the ending year |
Ending budget type
Options
Enter the range of budget types you want to purge, or use one of the options.
|
<F1> |
For the next budget type |
|
<SF1> |
For the previous budget type |
|
<F2> |
For the First starting budget or the Last ending budget |
|
Format |
15 characters |
|
Example |
Press <F2> at each field to purge all budgets for the selected years |
Field number to change ?
In character mode change any fields as necessary and press <Enter> to save.
Select OK to purge or Cancel to return to the menu without purging.
There will be a period of processing as budgets are deleted.
No report of the purged information is printed, so if you wish to retain a hard copy for historical reasons, use the Print selection for this purpose before purging. To print see Listing Budgets.
If use of change logs has been specified in Company information, you can print the Budgets Change Log identifying who has changed your budgets and what the changes were.
See a sample Budgets Change Log in the Sample Reports appendix.
Select
Budgets change log from the Reports (lists) menu.
A screen with the following field displays:
Check the box, answer Y, to purge the change log, or leave it unchecked, answer N, to print the changes but leave them on file (so they can appear on subsequent change logs).
|
Format |
Graphical: Check box where checked is yes and unchecked is no. The default is unchecked Character: One letter, either Y or N. The default is N |
|
Example |
Press <Enter> |
Select OK to proceed or Cancel to return to the menu.
This report can be displayed on the screen only if you have chosen not to purge.