This chapter contains the following topics:
Recurring Payables and Receivables
Making Recurring Journal Entries
Selecting Recurring Entries for Use
Printing a Selection List of Recurring Entries
The purpose of the recurring journal is different from the standard journal. Here is how each works:
The standard journal contains debits and credits which are to be posted to G/L Transactions (the permanent G/L file).
The entries are posted once per accounting period.
All of the debits and credits in the standard journal are posted. You cannot individually select entries to post.
Standard journal entries are left on file in Standard Journal Transactions for use in the next accounting period.
The recurring journal contains entries which work in a fashion similar to Recurring payables (A/P) and Recurring bills (A/R). If you are just using G/L, you may use this selection for recurring receivables or payables, copy them (on a recurring basis) to the distributions journal.
Recurring journal entries are entered, selected for use, and then the selected entries are copied to the Distributions Journal Transaction file. From there, they are posted to the GL Transaction file.
Recurring journal entries may recur at any interval you want. These intervals do not have to align to your accounting periods. This is useful for such items as payroll.
Recurring journal entries may be either individually selected or selected in batches.
Recurring journal entries can include:
| • | A date range over which the recurring entry will be used |
| • | A maximum number of times it can be used |
You may automatically distribute recurring journal entries by percentage. In other words, you may debit an account and then balance the entry by allocating a percentage of the entry to a set of accounts. For example, one account is debited, and then ten other accounts are credited, each for 10% of the overall debit.
Setting up a recurring journal does not commit you to posting journals when a certain time interval falls due. It merely simplifies the process of creating such journals, and ensures consistency and accuracy for them.
The menu selections and step sequence for generating a transactions from an entered recurring journal include:
| Main menu | Sub Menu | Description | Frequency |
|---|---|---|---|
|
Recurring journal |
Enter |
Enter your journal account, amount, discount and recurring frequency |
Once per recurring payable |
|
Recurring journal |
Edit list |
To optionally print the entered recurring journal |
As needed to verify the recurring journal accounts are entered properly and when due |
|
Recurring journal |
* Select for use |
Select those recurring journal accounts that will be posted. This may be done automatically or you may manually select and edit the journal |
Per period when due |
|
Recurring journal |
Selection list |
To optionally print an edit list of the selected recurring journal accounts |
Print as needed to verify those selected for use |
|
Recurring journal |
* Use selected |
Generate the journal |
Per period when due |
|
Distributions |
Enter, Edit list and Post |
Use as needed to edit the journal entries and eventually post |
Per period when due |
* You still have to select the recurring journal before posting using them as regular transactions. This is a two-stage process; selection is one step and using is another. This allows you to review your selections before committing to them.
Select
Recurring journal from the G/L menu and select Enter.
Graphical Mode:
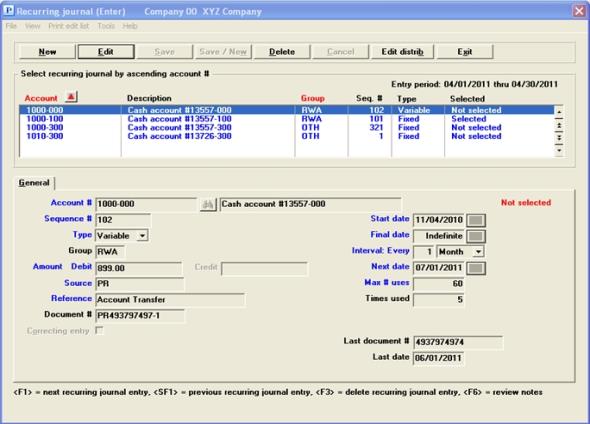
A screen similar to the following appears:

The list box displays up to 6 recurring journal records at a time. You may sort the recurring journal entries by type/account number in ascending or descending order. To select a field or change the sort order, click on the column name or the arrow to the right of the column name or use the View options. Only column names in red may be sorted.
To locate a recurring journal record, start typing a account number or entry sequence depending on which sort field is selected. You may also use the up/down arrows, Page up, Page down, Home and End keys to locate a recurring journal. The <F1> and <SF1> keys function they same as the arrow keys.
Recurring journal records that display in the list box are available for changes or deletion. The fields for the selected recurring journal record display in the lower part of the screen.
When a recurring journal record is found, you may select the <Enter> key or Edit button to start editing.
When you are adding or editing existing recurring journals, you have the following button and keyboard equivalent options:
|
Button |
Keyboard |
Description |
|
New |
Alt+n |
To enter a new recurring journal record |
|
Edit |
Alt+e |
To edit an existing recurring journal record |
|
Delete |
Alt+d |
To delete an existing recurring journal record. You may also use <F3> to delete |
|
Save |
Alt+s |
To save a new or edited recurring journal record |
|
Save/New |
Alt+w |
To save a new or edited recurring journal entry with the program ready to enter another new recurring journal record |
|
Cancel |
Alt+c |
To cancel the entry of a new recurring journal record or cancel the editing of an existing recurring journal record |
|
Edit distrib |
Alt+b |
To edit the distributions for offsetting the main recurring account. See Graphical Mode Distributions |
|
Exit |
Alt+x |
To exit the screen. The <Esc> key may also be used |
Print and Options Menu Selections
Menu selections are available starting at the top left of the screen. Most of these are the same from screen to screen. If a menu selection is grayed out you will not be able to access it.
The selection that is unique to this screen is Print edit list. You may use this to print a list of all the recurring journal entries on file. See Printing an Edit List
Character Mode:
The following screen appears:
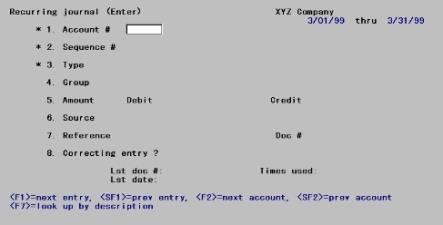
From this screen, you can work with both new and existing recurring journal entries.
On the Account # field you have the following options:
Enter the number of the account to which this recurring entry applies, or use one of the options:
|
<F1> |
For the next entry |
|
<SF1> |
For the previous entry |
|
<F2> |
For the next account, in account number sequence |
|
<SF2> |
For previous account |
|
<F6> |
For the same account number as the previous entry. This option is not available on the first entry. |
|
<Enter> |
To find the account by its name instead of its number |
Options
If you choose <Enter>, the cursor moves to the account description field. Enter the account description, or its leading characters. Upper/lower case is significant. Your options at this point are:
|
<F2> |
For the next account, in account description sequence |
|
<SF1> |
For the previous account |
|
<Enter> |
To return to finding the account by its number |
Enter the following information:
Options
Enter the number of the account to which this recurring entry applies, or use one of the options:
|
<F1> |
For the next entry |
|
<SF1> |
For the previous entry |
|
<Enter> |
To find the account by its name instead of its number |
|
Format |
Your standard account number format, as defined in Company information |
|
Example |
Enter account 1000-000 |
Options
Using graphical mode, if you choose <Enter>, the cursor moves to the account description field. Enter the account description, or its leading characters. Upper/lower case is significant. Your options at this point are:
|
<F1> |
For the next account, in account description sequence |
|
<SF1> |
For the previous account |
|
Blank |
To return to finding the account by its number |
|
Format |
30 characters |
|
Example |
(Not used in this example because you entered the account by number) |
Options
This field allows two entries on the same recurring journal to have the same account number. Enter the sequence number which identifies this recurring entry, or use one of the options:
|
<F1> |
For the next entry for this account |
|
<SF1> |
For the previous entry |
|
Format |
Six characters |
|
Example |
Type 1 |
This designates the type of the recurring entry, which can be either fixed or variable.
Options
Enter either:
| Character mode | Graphical mode | Description |
|
F |
Fixed |
A fixed recurring entry has the same debit or credit amount each period. An example is rent. |
|
V |
Variable |
A variable recurring entry has a variable amount from period to period. An example is a telephone bill. |
For either type, you can still change the amount when you select the recurring entry for use, using manual selection. (See the section called Selecting Recurring Entries for Use.)
|
Format |
Graphical mode: Drop down list, select Fixed or Variable Character mode: One letter, either F or V |
|
Example |
Graphical mode: Select Fixed Character mode: Type F |
Automatic and Manual Selection
When you select recurring entries for use, you will be able to choose between automatic and manual selection.
In manual selection, you may enter changes to the amount due, as above. This is most suitable for variable recurring entries, since you would usually want to make such changes.
In automatic selection, the recurring entry (fixed or variable) is selected as is. This is most suitable for fixed recurring entries, which usually require no changes.
See Selecting Recurring Entries for Use
In the next field (Group), you could set up separate groups for fixed and variable recurring entries. Then you could choose the fixed group in Select for use and use automatic selection on them. Similarly, you could choose the variable group and use manual selection for them so that you could enter the varying information.
You may set up groups of any kind here, so that you may later select a group of recurring entries from which to create distributions journal entries.
Options
Enter the group to which this recurring entry is to be assigned or use the option:
|
<Enter> |
To not assign this recurring entry to any group |
|
Format |
Three characters |
|
Example |
Type FXD |
The cursor is initially positioned for entering either a debit or a credit, depending on the parentheses control you defined for this account (in Chart of accounts).
Options
Enter the amount or use the option:
|
<Enter> |
For the opposite type (debit or credit) |
If you enter zeros for both debit and credit amounts, you are asked if this is correct. If you answer Y, you may proceed with the entry.
|
Format |
999,999,999,999.99 |
|
Example |
Type 500 |
Enter the source of this entry.
You may not enter ACCRUE as a source. Accrual reversal is not allowed. (For more information on accrual refer to the Accrual Reversal field in the Distributions chapter.)
The source is a code used to sort entries when the Source Cross Reference Report is prepared (refer to the Source Cross Reference chapter).
Options
Enter a source, or use the option:
|
<F2> |
For the previous source entered (if you chose in Control information not to re-display sources) |
|
Format |
Ten characters. If you chose in Control information to re-display sources, the previous source entered (if any) displays as the default; it can be accepted by pressing <Enter> or cleared by pressing <Ctrl>+<X>. |
|
Example |
Type CSHDIS |
Options
Enter a reference or description for the entry, or use the option:
|
<F2> |
For the previous reference entered (if you chose in Control information not to re-display references) |
|
Format |
25 characters. If you chose in Control information to re-display references, the previous reference entered (if any) displays as the default; it can be accepted by pressing <Enter> or cleared by pressing <Ctrl> + <X>. |
|
Example |
Type Mortgage payment |
The document number is an additional reference. Entering a document number is optional.
Options
Enter a document number, or use the option:
|
<F2> |
For the previous document number entered (if you chose in Control information not to re-display document numbers) |
|
Format |
15 characters. If you chose in Control information to re-display documents, the previous document entered (if any) displays as the default; it can be accepted by pressing <Enter> or cleared by pressing <Ctrl>+<X>. |
|
Example |
Press <Enter> |
If this entry is to be used to correct a previous entry, you can mark this as a correcting entry. This information is used in preparing the Expanded Cash Flow Statement (in Financial statement layouts). See Build Financial Statement Layouts
|
Format |
Graphical: Check box where checked is yes and unchecked is no. The default is unchecked. Character: One letter, either Y or N. The default is N. |
|
Example |
Press <Enter> |
|
Note |
Only the debit or credit shown on this screen are marked as a correcting entry. The distributions entered on the next screen are never marked as correcting entries. If you are using the recurring journal entry to allocate to a set of accounts, you would normally mark the debit or credit on this screen as a correcting entry. Consult with your accountant, as needed, regarding this. |
Using graphical mode continue at Start date.
Using character mode, press <Enter> for the second screen:
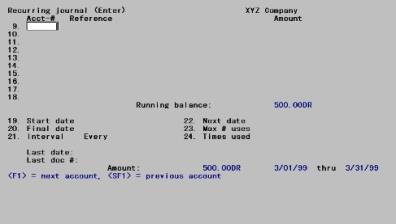
Character Mode Expense Distributions
Expenses may be distributed to as many as ten accounts, corresponding to Fields #9 through 18. Within each field the cursor moves through all three columns (in the forward direction only) to allow entry at each subfield.
| • | In add mode, the cursor moves through these fields in succession until the amount remaining to distribute is zero. The cursor then moves automatically to Field #19. |
| • | In change mode, you can alter the distributions from Field number to change ?: |
To add a new distribution (provided there are not ten already), enter the field number of an unused field.
To change an existing distribution, enter its field number. All three subfields will clear.
To delete an existing distribution, use <F3>.
Options
Once the entry is completed you may make any needed changes, or use one of the options:
|
<F1> |
To toggle between displaying account description or reference for each distribution |
|
<F6> |
To enter or review notes about this recurring entry |
For more on distributions and entering the fields see Expense Distributions later in this section.
Options
Enter the date on which this recurring entry will start being used, or use the option:
|
<F2> |
For none (no specified start date) |
|
Format |
MMDDYY |
|
Example |
Press <F2> |
Options
Enter the final date to use this recurring entry, or use the option:
|
<F2> |
For indefinite (no specified final date) |
|
Format |
MMDDYY |
|
Example |
Press <F2> |
Options
This specifies the time interval between usages of this recurring entry. Enter a number and then a time period. For instance, the interval could be every two weeks. Enter a one- or two-digit number and select one of these time periods:
| Character Mode | Graphical Mode |
|
D |
Day |
|
W |
Week |
|
M |
Month |
|
Format |
99 One character |
|
Example |
Type 1. Select Months (type M), meaning that the entry recurs every one month. |
Enter the next date the recurring entry should be activated. If this is not known exactly, enter the approximate date.
|
Format |
MMDDYY The default is one of the following:
|
|||||||||
|
Example |
Type 31505 |
The next date is automatically advanced by the time interval entered above each time a distributions journal entry is created from this recurring journal entry (by running Use selected).
Options
Enter the maximum number of times this recurring entry can occur (later, you will be warned if this recurring entry is selected more than this many times), or use the option:
|
<F2> |
For indefinite (no maximum number of uses) |
|
Format |
99,999 |
|
Example |
Type 24 |
When first setting up a recurring entry, enter the number of times this entry has already been used. If you had been making this entry before you began using General Ledger, you would enter the number of times here. In this case, you would set the maximum number of uses above to include these times.
For instance, if you were paying off a loan in 30 installments and had already made five payments, you would enter 30 in the Max # uses field and 5 here.
|
Format |
99,999 |
|
Example |
Press <Enter> |
The last document number, last date, and times used information is automatically updated by the software.
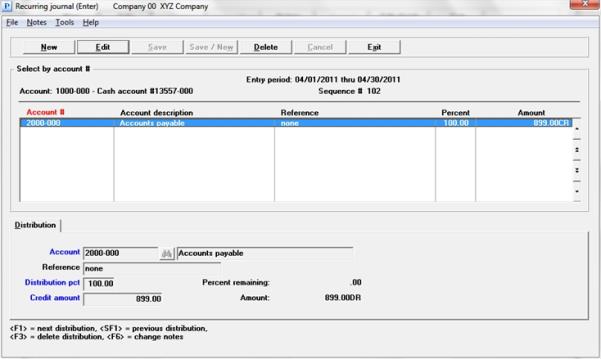
Existing distributions display in the list box.
When you are adding or editing existing distributions, you have the following button options:
|
Button |
Keyboard |
Description |
|
New |
Alt+n |
To enter a new distribution |
|
Edit |
Alt+e |
To edit an existing distribution |
|
Delete |
Alt+d |
To delete and existing distribution record. You may also use <F3> to delete. |
|
Save |
Alt+s |
To save the new or edited distribution |
|
Save/New |
Alt+w |
To save the new or edited distribution entry with the program ready to enter a new recurring journal record |
|
Cancel |
Alt+c |
To cancel the entry of the new recurring journal record or cancel the editing of an existing distribution record |
|
Exit |
Alt+x |
To exit the screen. The <Esc> key may also be used |
The amount remaining to distribute displays continuously as Running balance. Whether in add mode or change mode, you cannot exit the distribution process until this amount is zero (unless you wish to cancel the entire entry). The distributions screen operates the same whether entering a new recurring journal or manually selecting an existing recurring journal.
Enter the account number to which all or a portion of the entry will be distributed. The account must already exist in the Chart of Accounts.
Options
You may also use one of the options:
|
<F1> |
For the next account in Chart of accounts |
|
<SF1> |
For the previous account |
|
<F2> |
(When changing an existing distribution) For the same account number as was previously present for this distribution |
|
<F3> |
(When accessing an existing distribution) To delete this distribution |
|
Format |
Your standard account number format, as defined in Company information |
|
Example |
Enter account 1000-000 |
Enter a reference for this distribution. This field is optional.
Options
In change mode (only), you may also use the option:
|
<F2> |
For the same reference as was previously present for this distribution |
|
Format |
25 characters |
|
Example |
Type Sample entry |
For a fixed amount entry:
Options
Enter the amount of the distribution to this account, or use one of the options:
|
<F1> |
To enter an amount to off-set (counter-balance) the Running balance. This option is not present if the balance is already zero. |
|
<F2> |
To toggle between entering a debit or credit amount |
The amount entered cannot be negative or zero.
|
Format |
999,999,999,999.99 |
|
Example |
Type 500 |
Options
For a variable amount entry:
|
<F1> |
To use the percent remaining to distribute, as displayed on the screen |
Both the percent remaining and the amount remaining display.
The percent entered cannot be negative or zero.
|
Format |
999.99 |
|
Example |
[Does not occur in this example because this is a fixed amount entry] |
The purpose of notes for a journal entry is to allow you to annotate the entry with descriptive information. It is an assist to the audit trail so that the full and exact purpose of a particular debit or credit can be understood when someone reviews the Register at a later time.
The notes appear on the Recurring Journal Edit List.
The notes are retained with the recurring journal entry and may be revised after each use of the entry.
|
Format |
Ten lines of 60 characters each |
Using character mode, this selection uses Passport’s text editing function. For further instructions, refer to the Using Notes section of the Use of Function Keys, Tool bar and Windows chapter in the System User documentation.
The Recurring Journal Edit List shows all recurring journal entries that are on file.
See a Recurring Journal Entry Edit list example in the Sample Reports appendix.
Select
Edit list from the Recurring journal menu.
Graphical Mode:
The following screen appears:
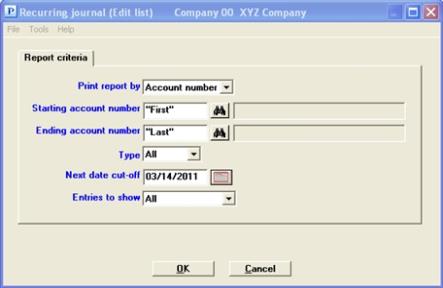
Character Mode:
The following screen appears:
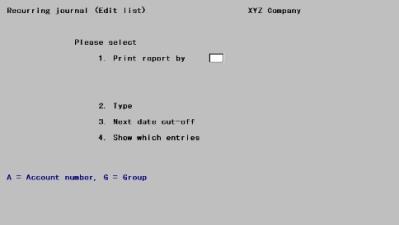
Enter the following information:
Select whether to print the report in order by Account number or Group. Follow the screen instructions.
|
Format |
Graphical: Drop down list, select Account number or Group Character: One letter, either A or G |
|
Example |
Select Group or type G |
Ending account or group
Options
Enter the range of accounts or groups to be included in the list. You may use one of the options:
|
<F1> |
For the next account in Chart of accounts or the next group in either Cost center groups or Sub account groups, whichever is applicable |
|
<SF1> |
For the previous account or group |
|
<F2> |
For the First starting entry or Last ending entry |
|
Format |
For an account: Your standard format for account numbers, as defined in Company information For a group: three characters |
|
Example |
Press <F2> for each field for a range from First to Last. |
Options
Select Fixed (type F) to print fixed recurring entries only, select Variable (type V) for variable recurring entries only, or use the option:
|
<F5> |
To print "All" recurring entries |
|
Format |
Graphical: Drop down list Character: One character or the option |
|
Example |
Press <F5> |
This selection allows you to show only recurring entries from which a distributions journal entry is to be produced by a certain date. Only recurring entries with a next date on or before this date will be shown.
Options
You may enter a date, or use the option:
|
<F2> |
For the Latest date on file. All recurring entries which meet the other criteria will be included |
|
<F4> |
To use the date selector. You may also click on the calendar button |
|
Format |
MMDDYY. The default is the system date. |
|
Example |
Press <F2> |
Options
Select which entries are to appear on the edit list:
| Character Mode | Graphical Mode | Description |
|
A |
All |
All entries |
|
E |
Expired only |
Only expired entries |
Expired entries are those recurring entries which either:
| • | Have been selected more than the maximum number of uses, or |
| • | Have a final date before the current date. |
|
Format |
Graphical: Drop down list. The default is All Character: One character |
|
Example |
Select All or type A |
Select OK to view a list of printers. Select a printer to print the report.
Select Cancel to return to the menu without printing the edit list.
Here you select which recurring entries are to become distributions journal entries.
To create a distributions journal entry from a recurring journal entry, you must select it for use here first. Then run the Use selected function below to transfer it to General Ledger transactions, where it becomes just like any other distributions journal entry.
You may choose either automatic or manual selection.
Select
Select for use from the Recurring journal menu.
Graphical Mode:
The following screen appears:
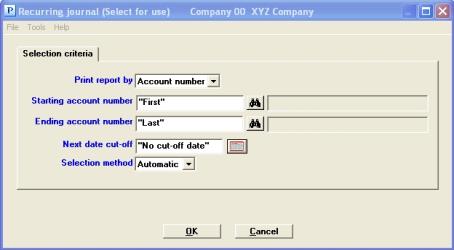
Character Mode:
The following screen appears:
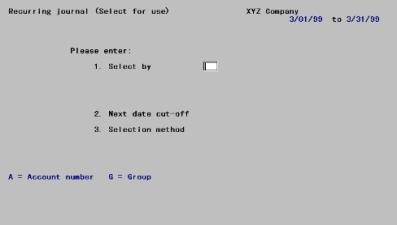
Enter the following information:
Specify whether to select entries by Account number or Group.
|
Format |
Graphical: Drop down list. The default is Account number Character: One letter, either A or G |
|
Example |
Select Group or type G |
Ending account or group
Options
Enter the range of accounts or groups to be selected. You may use one of the options:
|
<F1> |
For the next account in Chart of accounts or the next group in either Cost center groups or Sub account groups, whichever is applicable |
|
<SF1> |
For the previous account or group |
|
<F2> |
For the First starting entry or Last ending entry |
|
Format |
For an account: Your standard format for account numbers, as defined in Company information For a group: three characters |
|
Example |
Press <F2> at each field for a range of First to Last |
If you want to select only recurring entries with a next due date on or before a specific date, enter that date here. Or use the option:
|
<F1> |
For the Latest date on file. All recurring entries which meet the other criteria will be included. |
|
Format |
MMDDYY |
|
Example |
Press <F1> |
Choose Automatic or Manual selection of recurring entries. Automatic selection causes recurring entries to be selected based on the criteria entered above with no further intervention by you. Manual selection causes recurring entries meeting the criteria entered above to be presented one by one for you to approve, disapprove, or modify them.
|
Format |
Graphical: Drop down list. The default is Automatic Character: One character, A or M |
|
Example |
Select Manual or type M |
Make any needed changes. Press <Enter> and what happens next depends on whether you chose automatic or manual selection.
A period of processing occurs while the recurring entries that you have specified are selected automatically by the computer. The Recurring Journal Entries Automatic Selection Edit List is printed to show you which recurring entries have been selected. The recurring entries that are selected will become distributions journal entries in Distributions Journal Transactions when you run Use selected (See Using Selected Recurring Entries later in this chapter).
Graphical Mode
A screen similar to the following appears:
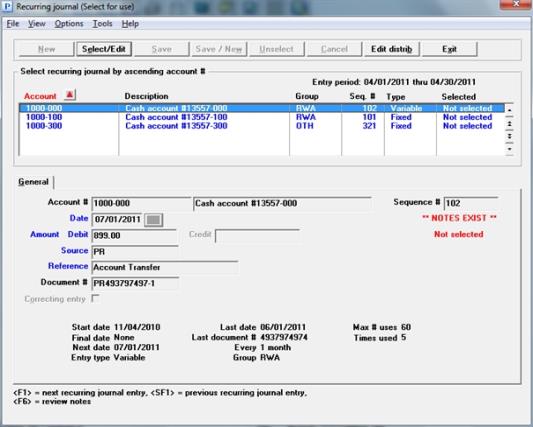
The list box displays up to 6 recurring journal records at a time. You may sort the recurring journal entries by account number or group in ascending or descending order. To select a field or change the sort order, click on the column name or the arrow to the right of the column name or use the View options. Only column names in red may be sorted.
To locate a recurring journal record, start typing a account number or group depending on which sort field is selected. You may also use the up/down arrows, Page up, Page down, Home and End keys to locate a recurring journal. The <F1> and <SF1> keys function they same as the arrow keys.
Recurring journal records that display in the list box are available for changes. The fields for the selected recurring journal record display in the lower part of the screen.
When a recurring journal record is found, you may select the <Enter> key or Edit button to start editing.
When you are adding or editing existing recurring journals, you have the following button and keyboard equivalent options:
|
Button |
Keyboard |
Description |
|
Select/Edit |
Alt+e |
To select and edit an existing recurring journal record |
|
Unselect |
Alt+u |
To unselect a recurring journal that was previously selected |
|
Save |
Alt+s |
To save the new or edited recurring journal record |
|
Cancel |
Alt+c |
To cancel the selection of a recurring journal record |
|
Edit distrib |
Alt+b |
To edit the distributions for offsetting the main recurring account. See Graphical Mode Distributions |
|
Exit |
Alt+x |
To exit the screen. The <Esc> key may also be used |
The New and Save/New buttons cannot be selected and remain grayed out on this screen.
Options Menu Selections
Menu selections are available starting at the top left of the screen. Most of these are the same from screen to screen. If a menu selection is grayed out you will not be able to access it. The selections that are unique to this screen is explained here:
From the Options menu you may select to view Notes, Print edit list to print all the recurring journal entries on file and Use selected to transfer the selected entries to the General Journal.
Character Mode
The following screen appears:
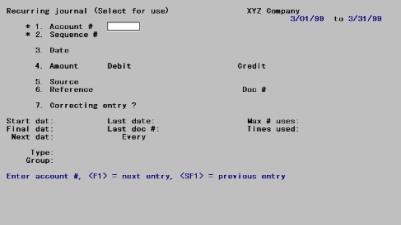
Entries which are selected here are used to create distributions journal entries when you run Use selected.
Character Mode
Enter the following information:
Account #
Options
In character mode, to find the recurring entry you want, enter the account number or use one of the options:
|
<F1> |
For the next entry matching the parameters entered on the previous screen. |
|
<SF1> |
For the previous entries |
|
Format |
Your standard format for account numbers, as defined in Company information |
|
Example |
Press <F1> |
Sequence #
Options
Enter the sequence number of the desired recurring entry, or use one of the options:
|
<F1> |
For the next recurring entry for this account |
|
<SF1> |
For the previous recurring entry |
|
Format |
999 |
|
Example |
[Does not occur in this example because you chose manual selection] |
You are asked: Select this entry?.
| • | If you answer N, the screen clears for you to select a different recurring entry. |
| • | If you answer Y to Select this entry ? and the entry is not currently selected, the recurring entry is selected. Continue at Processing a selected entry below. |
| • | If you answer Y and the entry is currently selected, you asked whether you now want to deselect it. |
Answer Y to deselect the entry. The screen clears for you to proceed to the next recurring entry.
Answer N to make changes to this selected entry.
This screen, and the distribution screen that follows, are almost identical to the corresponding screens for the Recurring journal (Enter) selection described earlier in the Making Recurring Journal Entries section of this chapter. Only the differences will be noted.
The Type and Group fields do not appear on this screen (these cannot be changed), but the Date field does display as it can be changed. In character mode the field numbers will be different.
Also in character mode, if this is a variable recurring entry, you are initially positioned at the amount field to enter an amount. For a fixed recurring entry, you are initially positioned at Field number to change?. In either case you can change fields at will.
Except for the Account # and Sequence #, the following screen shows the fields that may be edited:

The Next date stored in the recurring entry is displayed for the date.
The date must be in the current fiscal year.
|
Format |
MMDDYY |
|
Example |
[No change is needed in this example.] |
Enter the amount or use the defaulted amount.
|
Format |
999,999,999.99 The amount originally entered for this recurring entry appears as the default. |
|
Example |
[No change is needed in this example.] |
Leave the entry as is, or enter a different source in this field.
You may not enter ACCRUE as a source. Accrual reversal is not allowed. (For more information on accrual refer to the Accrual Reversal field in the Distributions chapter.)
The source is a code used to sort entries when the Source Cross Reference Report is prepared (refer to the Source Cross Reference chapter).
|
Format |
Ten characters. If you chose in Control information to re-display sources, the previous source entered (if any) displays as the default; it can be accepted by pressing <Enter> or cleared by pressing <Ctrl>+<X>. |
|
Example |
No change for this example |
You may leave the reference as is or enter a different reference or description for the entry.
|
Format |
25 characters. If you chose in Control information to re-display references, the previous reference entered (if any) displays as the default; it can be accepted by pressing <Enter> or cleared by pressing <Ctrl> + <X>. |
|
Example |
No change for this example |
Accept the entry as is or enter a new or different document number as an additional reference. Entering a document number is optional.
|
Format |
15 characters. If you chose in Control information to re-display documents, the previous document entered (if any) displays as the default; it can be accepted by pressing <Enter> or cleared by pressing <Ctrl>+<X>. |
|
Example |
Press <Enter> |
If this entry is to be used to correct a previous entry, you can mark this as a correcting entry. This information is used in preparing the Expanded Cash Flow Statement (in Financial statement layouts). See Build Financial Statement Layouts.
|
Format |
Graphical: Check box where checked is yes and unchecked is no. The default is unchecked. Character: One letter, either Y or N. The default is N. |
|
Example |
Press <Enter> |
Options
Make any desired changes, or use the option:
|
<F6> |
To view or change notes for this recurring entry |
Graphical Mode
Select Save and the distribution screen displays:
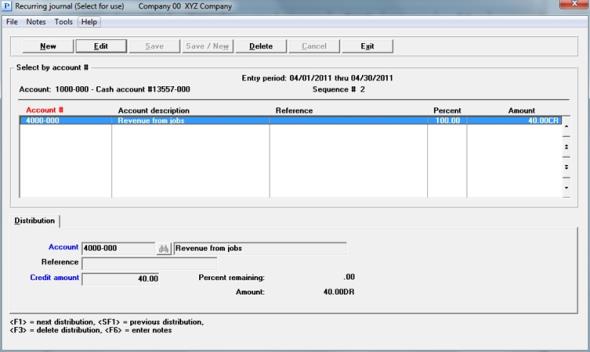
Processing Distributions
You can change, add, or delete distributions. For field by field information, see the section called Expense Distributions.
Character Mode
Press <Enter> for the distribution screen:
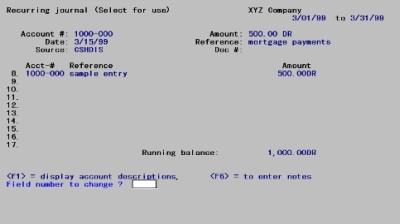
However, if this is a previously-selected variable recurring entry, and if you have changed the amount, you are first asked whether you wish to recalculate the distributions.
| • | If you respond Y, upon reaching the distribution screen you will find it to be already in balance. The individual distributions will have been pro-rated according to the percentages, so as to add to the new amount. You can then fine-tune them if desired. |
| • | If you respond N, upon reaching the distribution screen the old distributions will still be present and will not add up to the new amount. You will have to change them individually. |
Processing Distributions
You can change, add, or delete distributions. For field by field information, see the section called Expense Distributions.
When you have finished making changes, the screen clears for you to select the next recurring entry.
This list shows every recurring entry that has been selected. It shows exactly what entries will be created when Use selected is run next. Use this list to verify and edit your selections.
See a Recurring Journal Selection List example in the Sample Reports appendix.
Select
Selection list from the Recurring journal menu.
Only a printer selection screen appears because all selected entries are printed unconditionally.
When you have verified that your selection of recurring entries is correct and complete, you are ready to create distributions journal entries for those recurring entries selected.
Select
Use selected from the Recurring journal menu.
Graphical Mode
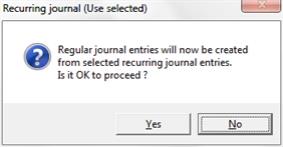
The following screen appears:
Character Mode
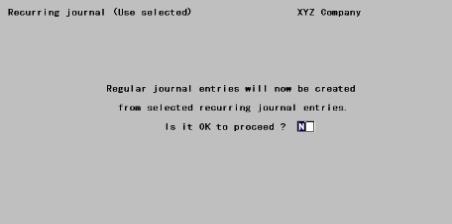
Select Yes (enter Y) to proceed or No (N) to cancel.
|
Format |
Graphical Mode: Yes/No buttons Character mode: One letter, either Y or N |
|
Example |
Select Yes |
The document number for the distributions journal entry, if left blank, is filled in by the software using the sequence number and date of the recurring entry.
The Next date is moved ahead to the next period.