This chapter contains the following topics:
Making Distributions Entries (With (J/C)
The Distributions selection is used primarily to handle distribution entries transferred to G/L from other modules. Once distribution entries have been entered and verified as correct (with the help of the edit list), you can post them to General Ledger Transactions, the permanent G/L file/table.
Transactions normally entered in General Journal can be entered using this selection if preferred; however, a Distributions requires a separate screen for each transaction whereas General journal supports multi-line entry. Also, distributions must be posted before you can run Get distributions. General journal entries may remain on file as long as you need.
Select
Enter from the Distributions menu.
Distributions processing can differ significantly depending on whether or not you have interfaced your General Ledger module to the Job Cost module.
If your General Ledger module is interfaced with Job Cost, skip to the Making Distributions Entries (With (J/C).
Graphical Mode
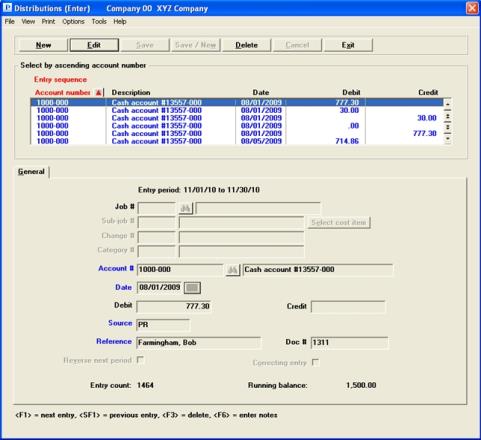
The following screen appears:

The dates displayed at the top of the tab indicate your current accounting period.
If you see the message Click here to import distributions, as seen below, a file is ready to be imported. For details on importing a file, see the Importing External Cross-Reference Distributions section.

The list box displays up to 6 distribution records at a time. You may sort the accounts by account number or Entry sequence both in ascending or descending order. To select a field or change the sort order, click on the column name or the arrow to the right of the column name or use the View options. Only column names in red may be sorted.
To locate a distribution record, start typing a account number or entry sequence depending on which sort field is selected. You may also use the up/down arrows, Page up, Page down, Home and End keys to locate a checking account.
Distribution records that display in the list box are available for changes or deletion. The fields for the selected distribution record display in the lower part of the screen.
When a distribution record is found, you may select the <Enter> key or Edit button to start editing.
When you are adding or editing existing distributions, you have the following button options:
|
Button |
Keyboard |
Description |
|
New |
Alt+n |
To enter a new distribution |
|
Edit |
Alt+e |
To edit an existing distribution |
|
Delete |
Alt+d |
To delete an existing distribution. You may also use the <F3> key |
|
Note |
If you delete an entry that is linked via the distribution history feature, the link will be lost. To adjust distributions that are linked to the distribution history, enter new distributions offsetting the old ones. |
|
Save |
Alt+s |
To save a new or edited distribution |
|
Save/New |
Alt+w |
To save a new or edited distribution with the program ready to enter another new distribution |
|
Cancel |
Alt+c |
To cancel the entry of a new distribution or cancel the editing of an existing distribution |
|
Exit |
Alt+x |
To cancel editing or to exit to the menu when not editing. You may also use the <Esc> key |
Print and Options Menu Selections
From the Print menu you may print an Edit list. See Printing an Edit List. From the Options menu you may select Account notes and Post the distributions. See Using notes and Posting Distributions Entries.
Character Mode
The following screen appears:
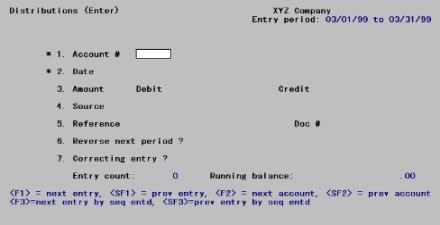
The dates displayed in the upper right-hand corner show your current accounting period.
|
<F1> |
For the next entry in account number order |
|
<SF1> |
For the previous entry in account number order |
|
<F3> |
To delete the entry selected in the list box |
|
<F6> |
To access notes |
General Tab
Note that an Entry count and Running balance are kept as you make distributions entries. When the running balance is zero, all entries which have been made are in balance (debits equal credits). You can still exit if the Running balance is not zero.
You can work with both new and existing entries on this screen.
| • | Since Distributions is primarily used for processing transactions transferred from other modules, you will normally be working only with existing entries and only to correct errors. |
| • | For example, other modules use the Valid G/L Accounts, instead of the Chart of Accounts, to validate account numbers. By inconsistent maintenance of these two files/tables, you might create a situation in which an invalid account number is transferred from some other module. This would prevent posting of the distributions until you had corrected the error. |
| • | If an entry has already been made for the information you specify, that entry appears and is available for changes or deletion. |
Enter the following information:
You can change or delete existing entries that are not yet posted to the General Ledger. Entries that have already been posted are not accessible through this selection.
Options
Enter a valid account number, or use one of the options:
|
<F1> |
For the next account number in Chart of Accounts, in account number sequence |
|
<SF1> |
For the previous account number |
| <F8> | Find an account number via the Lookup |
|
Blank |
To find the account by its name instead of its number |
|
Format |
Your standard account number format, as defined in Company information |
|
Example |
Enter account 1000-100 |
Options
If you choose <Enter>, the cursor moves to the account description field. Enter the account description, or its leading characters. Upper/lower case is significant. Your options at this point are:
|
<F1> |
For the next account, in account description sequence |
|
<SF1> |
For the previous account |
|
Blank |
To return to finding the account by its number |
|
Format |
30 characters |
|
Example |
(Not used in this example because you entered the account by number) |
To find a specific entry, enter the account number and entry date. Then press <F1> at the Amount field to scan through the entries which match the account number and entry date.
If an entry is changed, it is filed in the Distributions Transactions, and the Running balance is updated to reflect any change in the amount.
This is the date to be used for distribution to the General Ledger Transactions.
You may enter a date outside the current period, but you receive the warning message below and a warning will print on the Distributions Entry Edit List and Distributions Entry Register.

In most cases when you enter a date outside the accounting period fiscal year date range you will receive this message and the entry will not be allowed.

|
Note |
When using Get distributions records that are pulled in may have dates that are outside the acceptable fiscal year range. In this case the edit list will report this and posting will not be allowed until the dates are corrected. |
The following Date not in current fiscal year warning message will display when:
| • | You enter a balance sheet account with a date that is 30 days less than the first fiscal year period in accounting periods. This is an exception to the Date outside the acceptable fiscal year range control. |
| • | You enter any account that is in the range of the accounting period fiscal years, however it is not in the selected Current fiscal year. |
In either case the entry is accepted.

|
Format |
MMDDYY The default is the date of the previous entry, if there is one. If this is the first entry of this session the default is the system date. |
|
Example |
Use the default of the system date |
The cursor is initially positioned for entering either a debit or a credit, depending on the parentheses control you defined for this account (the Paren control code field in Chart of Accounts). In this case, a credit is the expected entry type.
You may either enter the amount, or press <Enter> to move to the opposite column and then enter the amount there.
If you enter zeros for both debit and credit amounts, you are asked if this is correct. If you answer Yes, you may proceed with this entry. If you select No then the cursor goes back to the Amount field.
Options
Enter an amount, or use one of the options:
|
<F1> |
For the next entry which matches the account number and entry date |
|
<F2> |
To enter an amount to off-set (counter-balance) the running balance (if non-zero) |
For example, if the running balance is a debit of $700.00 and you press <F2>, a credit of $700.00 is entered as the amount.
|
Format |
999,999,999,999.99 |
|
Example |
Press <F2> |
Options
The source is a code used to sort entries when the Source Cross Reference Report is prepared (refer to the Source Cross Reference chapter). Enter a source. If you chose in Control Information to re-display sources, you may use the option:
|
<F2> |
For the previous source entered |
|
Format |
Ten characters. If you chose in Control information to re-display sources, the previous source entered appears as the default. |
|
Example |
Type Cash |
|
Note |
A source code is automatically assigned if G/L is interfaced with one or more modules and Get distributions is run to transfer entries into G/L distributions. |
If the source entered is ACCRUE, accrual reversal is allowed.
Accrue is used to record and adjust expenses, liabilities, revenues, etc., that must be partially accounted for during the current period, but cannot be fully accounted for until the next accounting period.
If you enter ACCRUE here and then select the check mark (Yes) to the Reverse next period field, a reversing entry dated with the starting date of the next period, but opposite in sign, is automatically created when this entry is posted.
This lets you enter an accrual entry which is automatically reversed as of the beginning of the next accounting period.
For example, if a weekly pay period crossed over between monthly accounting periods, you could make entries for the part of the week’s payroll that is to accrue to the current period, and the software automatically creates reversing entries at the start of the new period. (Then in the next period, you would make entries for the full week’s payroll when the payroll week was over.)
If you enter ACCRUE as the source, you must also make the counter-balancing entry with ACCRUE as the source, so that the accounts remain in balance in this accounting period.
If the expected date of the reversal is after the second fiscal year in accounting periods you will not be able to enter ACCRUE in the field. An "Accrual reversal (ACCRUE) Source is not allowed" message displays which like this:

Click on OK and enter a record with a different date or a different Source.
Options
Enter a reference. If you chose in Control information not to re-display references, you may use the option:
|
<F2> |
For the previous reference entered |
|
Format |
25 characters. If you chose in Control information to re-display references, the previous reference entered appears as the default. |
|
Example |
Type Cash |
Entering a document number is optional. This is an additional reference.
Options
Enter the document number. If you chose in Control Information not to re-display document numbers, you may use the option:
|
<F2> |
For the previous document number entered |
|
Note |
When entries originating in other modules are interfaced to G/L, a document number is automatically assigned. For example, a miscellaneous charge entry from Accounts Receivable has the invoice number as the document number. |
|
Format |
15 characters. If you chose in Control information to re-display document numbers, the previous document number entered appears as the default. |
|
Example |
Press <Enter> to leave blank |
Duplicate entries
When you make a new journal entry and an entry already exists for the same account number, date, amount (debit or credit), source, and reference, you will be given a warning to this effect. You are not prohibited from making this new entry, but you should verify that entering this duplicate is correct.
If ACCRUE was entered in the Source field, you can allow automatic reversal of an accrual entry upon posting.
If ACCRUE was not entered, this field can not be entered and is skipped.
|
Format |
Check box, the default is unchecked. |
|
Example |
(This field is skipped.) |
If you select to reverse the entry in the next period, the Running balance will be the same as it was before the entry. The reason for this is the accrual reversal also reverses the entry you made. However, you are still required to make the counter-balancing entry in order for entries to balance within the period.
This box can be checked only if Control Information specifies that correcting transactions are allowed.
If this entry corrects some other previous entry that was incorrect, you can mark this as a correcting entry. This information is used in preparing the Expanded Cash Flow Statement (in Financial Statement Layouts).
|
Format |
Check box, the default is unchecked. |
|
Example |
Check the box to make it a correcting entry |
Options
Make any needed changes. You may also use one of the following options:
|
<F3> or Delete button |
To delete this entry (only available if this is an existing entry) |
|
<F6> or Menu option Account notes |
To enter notes about this entry (or view or change existing notes). |
The purpose of notes for a journal entry is to allow you to annotate the entry with descriptive information. It is an assist to the audit trail so that the full and exact purpose of a particular debit or credit can be understood when someone reviews the Register later.
The notes will always appear on the Distributions Entry Register and you may choose to have them appear on the Edit List as well.
The notes are not saved after posting.
|
Format |
Ten lines of 60 characters each |
Examples
For practice, and to provide test data for subsequent chapters in this documentation, enter several distributions until the running balance is zero.
If you have not installed the Job Cost module or have not interfaced G/L to J/C, skip this section and use the Making Distribution Entries (Without J/C) instead.
Graphical Mode
The following screen appears:
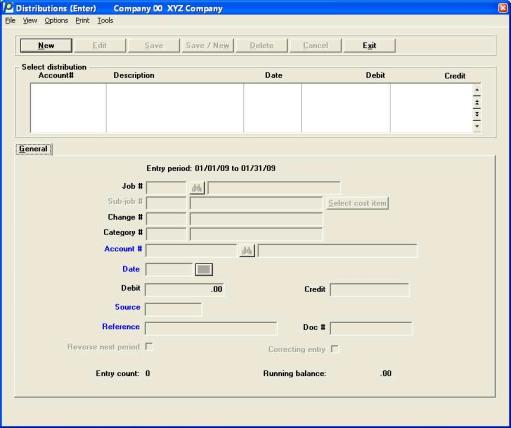
The dates displayed at the top of the tab show your current accounting period.
If there any existing distributions, up to 6 will display in the list box near the top of the screen. The first distribution entry is highlighted and will display in the fields below.
The default sort is By account. On the View menu you can change the sort to be By entry sequence. When a distribution is found, select the <Enter> key to start editing the account or select a different distribution.
Options
To locate an existing distribution you may start typing the account number or use one of these options:
|
Down arrow |
To select the next distribution |
|
Up arrow |
To select the previous distribution |
|
Page Down |
To display the next group of distributions |
|
Page Up |
To display the previous group of distributions |
|
End |
To move to the last distribution |
|
Home |
To move to the first distribution |
Options
When there are existing entries, you have the following button options:
|
New |
To enter a new distribution |
|
Edit |
To edit an existing distribution |
|
Delete |
To delete and existing distribution . See the note below |
|
Note |
If you delete an entry that is linked via the distribution history feature, the link will be lost. If you edit the entry the amount may no longer match distribution history. To adjust distributions that are linked to the distribution history, enter new distributions offsetting the old ones. |
When you are adding or editing existing distributions, you have the following button options:
|
Save |
To save the new or edited distribution |
|
Save/New |
To save the new or edited distribution with the program ready to enter a new distribution |
|
Cancel |
To cancel the entry of the new distribution or cancel editing an existing distribution |
From the Print menu you may print an Edit list. See Printing an Edit List. From the Options menu you may select Account notes and Post the distributions. See Using notes and Posting Distributions Entries.
Character Mode
The following screen appears:
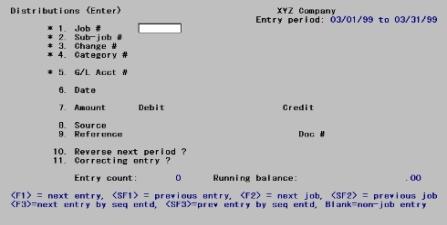
The current accounting period date range displays.
You can work with both new and existing entries at this screen. Existing entries may be edited or deleted.
General Tab
Note that an Entry count and Running balance are kept as you make Distributions entries. When the running balance is zero, all entries which have been entered are in balance (debits equal credits). (You can still exit if the Running balance is not zero, but you can not post.)
Enter the following information:
Options
This is the number of the job for this entry. If this is not an entry for a job, press <Enter> and the cursor moves to Account # field. Otherwise, enter a job number or use one of the options:
|
<F2> |
For the next job |
|
<SF2> |
For the previous job |
|
Blank |
For a non-job entry |
The job must exist in the Job Cost system, and can be an active or closed job. It cannot however be a job in the Inactive Job file/table. The job description is displayed automatically.
There are two types of entries for a job: cost and recognized-profit:
| • | Costs apply to individual cost items of a job, so for these entries you must enter the Job #, Sub-job #, Change # and Category # fields. |
| • | Recognized profit applies to a job or sub-job as a whole, not to any of its cost items; so the Change # and Category # fields do not apply for this type of entry. |
In both cases:
| • | The Sub-job # field is entered only if this particular job allows sub-jobs; otherwise it is automatically set to zero. In the case of a recognized-profit entry, this field is skipped unless the job bills for sub-jobs separately. |
| • | The Change # field is automatically set to zero if J/C does not use change orders. |
| • | The absence of an entry in Category # field is what tells the system that this is a recognized-profit entry rather than a cost entry. |
|
Format |
Seven characters |
Selecting this button displays the cost item lookup.
|
<F8> |
To access the Lookup |
|
Format |
Button |
The Lookup appears like the following:
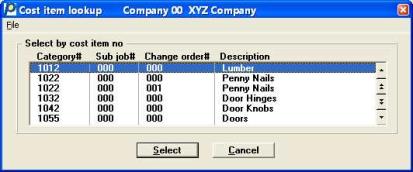
Selecting a cost item fills in the Sub job # (if applicable), Change # and Category # fields.
Use the Select cost item button to fill in this field. This field can only be edited if you finished the entry of the distribution.
This field is not filled in by the Lookup entry if the job entered does not have sub-jobs, or (in the case of recognized profit), it has them but does not bill them separately. The sub-job number entered must exist for the job.
|
Format |
999 |
Use the Select cost item button to fill in this field. This field can only be edited if you finished the entry of the distribution.
The change order must be on file for the job. If you do not use change orders at all in your Job Cost system, this field is skipped automatically. If this entry is not for a change order, leave the field blank to skip it.
|
Format |
999 |
Use the Select cost item button to fill in this field. This field can only be edited if you finished the entry of the distribution.
Regarding the cost category:
| • | If this is a profit recognized entry, leave this field blank to skip it. |
| • | If this is a cost entry, the category number, along with the sub-job and change order numbers entered above, must correspond to a cost item for the job. This cost item must be a direct cost for the job. |
|
Format |
9999999 |
Account #
Options
Enter the number of the account where this entry will be posted, or use one of the options:
|
<F1> |
For the next account in Chart of accounts, in account number sequence |
|
<SF1> |
For the previous account |
|
<F2> |
For the default cost account for the cost item (only available if this entry is for a job) |
|
<F7> |
To find the account by its name instead of its number |
|
Format |
Your standard account number format, as defined in Company information |
Account description
Options
If you choose <F7>, the cursor moves to the account description field. Enter the account description, or its leading characters. Upper/lower case is significant. Your options at this point are:
|
<F1> |
For the next account, in account description sequence |
|
<SF1> |
For the previous account |
|
Blank |
To return to finding the account by its number |
|
Format |
30 characters |
Date
Enter the date that is used for distribution to General Ledger Transactions (permanent G/L data). You can enter a date outside the current period, but you receive a warning message and a warning prints on the Distributions Entry Edit List and Distributions Entry Register.
It is theoretically possible for more than one item to be on file for the same cost item, account number, and date. If this happens, the fields from Job # to Date are not sufficient to identify which entry you want to access. You can still use the next / previous function keys to locate the desired entry. Such an event will often be a data entry error, but it may be legitimate.
|
Format |
MMDDYY. The default is the date of the previous entry, if there is one. If this is the first entry of this session the default is the system date. |
Debit
Credit
The cursor is initially positioned for entering either a debit or a credit, depending on how the Paren control code field is defined in Chart of accounts.
You may either enter the amount, or press <Enter> to move to the opposite column and then enter the amount there.
If you enter zeros for both debit and credit amounts, you are asked if this is correct. If you answer Y, you may proceed with the entry.
Options
Enter an amount, or use one of the options:
|
<F1> |
For the next entry which matches the account number and entry date |
|
<F2> |
To enter an amount to offset (counter-balance) the running balance (if non-zero) |
For example, if the Running balance is a debit of $700.00 and you press <F2>, a credit of $700.00 is entered as the amount.
|
Format |
999,999,999,999.99 |
|
Note |
The remaining fields on the screen, though differently numbered, are entered identically whether Job Cost is used or not. |
Source
For a recognized profit entry, the source defaults to PFTREC, and you cannot change it.
|
Format |
Ten characters |
Reference
Reverse next period ?
|
Format |
Check box |
Correcting entry ?
|
Format |
Check box |
Make any changes and select the Save button. For other button options see Distribution Buttons.
Character Mode
Field number to change ?
Options
Make any needed changes. You may also use one of the following options:
|
<F3> |
To delete this entry (only available if this is an existing entry) |
|
<F6> |
To enter notes about this entry (or view or change existing notes). |
The Edit list selection enables you to print the Distributions Entry Edit List.
See a sample Distribution Edit List report in Sample reports appendix.
Select
Edit list from the Distributions menu.
Graphical Mode
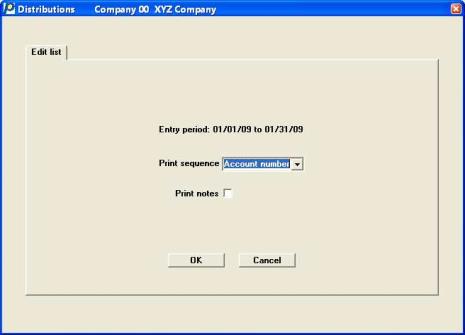
The following screen appears:
Character Mode
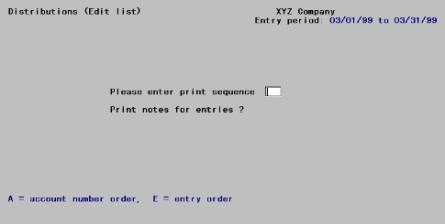
The following screen appears:
Enter the following information:
Select Account number (A) to print the report in account number order, or Entry order (E) to print entries in the order in which they were entered.
|
Format |
Graphical: Drop down list Character: 1 letter, either A or E |
|
Example |
Graphical: Select Entry order Character : Enter E |
Select the <Space bar> to include the notes on the report, or <Enter> key to omit them.
|
Format |
Graphical: Check box, default is unchecked Character: Enter Y or N. The default is N |
|
Example |
Select the <Space bar> to check the box and print the notes. |
OK or Cancel
Make any changes or select the OK button to print. Select the Cancel button to go back to the menu.
|
Format |
Two buttons, OK to print and Cancel to not |
|
Example |
Select OK |
The Post selection enables you to post distribution entries to General Ledger Transactions and prints the Distributions Entry Register.
See a Distributions Register example in Sample reports.
Select
Post from the Distributions menu.
Graphical Mode
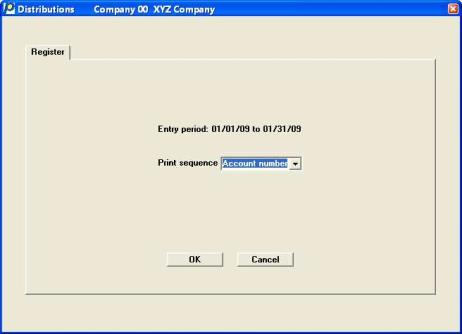
The following screen appears:
Character Mode
The following screen appears:
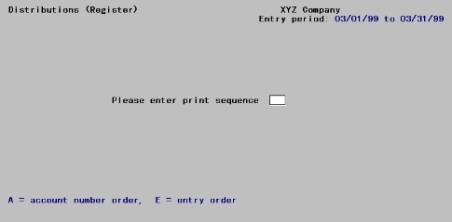
Enter the following information:
Select Account number to print the report in account number order, or Entry order to print entries in the order in which they were entered.
|
Format |
Drop down list, the default is Account number |
|
Example |
Select Entry order |
Make any changes or select the OK button to post and print the register or select the Cancel button to return to the menu.
|
Format |
Two buttons, OK or Cancel |
|
Example |
Select OK |
The Distributions Entry Register shows every entry that is to be posted, exactly as they will appear in General Ledger Transactions.
The report number and journal name are used to form a unique journal number. Later, when you want to refer to a Distributions Entry Register, you can do so by using GJ (distributions) plus this report number. For example, Distributions Entry Register number 0005 could be referred to as GJ0005.
While the register is being printed, the entries are checked to see if there are any invalid accounts or if any periods are out of balance.
If invalid accounts are referenced, you are not allowed to post. To continue, either delete the entries with invalid accounts and then re-enter them with valid accounts, or enter the accounts into the Chart of Accounts.
If any periods are out of balance (total of debits does not equal total of credits), you are also not allowed to post. To continue, make another entry to bring the periods into balance.
If any of the records are oustide the acceptable fiscal year range the following message displays and you are not allowed to post:
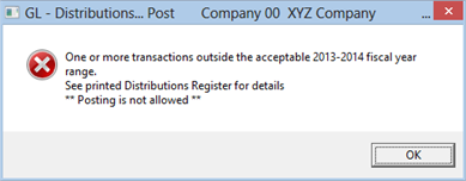
To continue change the delete the entries that are outside the range and re-enter them with acceptable dates.
Assuming no invalid accounts, no periods are out of balance and there is an acceptable date range, the software posts the distributions entries as General Ledger Transactions.
This function sets the Running balance and Entry count to zero and clears the Distributions Transactions so that new entries can be made.
|
Note |
You can display the entries from any journal by running Source cross reference in journal order, using the journal number as both the starting and ending journal number. |
When distributions entries are posted, the debits and credits posted for each accounting period must be in balance. As a result of this requirement, the General Ledger Transactions (which contains your posted journal entries) will always be in balance.
The Get Distributions selection lets you transfer information from the Accounts Receivable, Accounts Payable, Check Reconciliation, Payroll, Inventory Control, Job Cost, and Fixed Assets distributions to General Journal Transactions (G/L Distribution Transactions).
This is also referred to as interfacing G/L to other modules.
Before running Get distributions, any entries in the Distributions Transactions must first be posted to the General Ledger Transactions.
|
Note |
It is recommended that, before running this selection, you make a backup copy of the data you are about to transfer. |
The Distributions to G/L data contains debits and credits (created by transactions posted in the particular module) that must be transferred to the PBS General Ledger from that module. Accounts Receivable, Accounts Payable, Check Reconciliation, Inventory Control, Payroll, and Job Cost each contain their own individual Distribution to G/L files. (Refer to the additional notes below regarding Fixed Assets or External Cross-reference.) Data from the manufacturing modules are moved into PBS differently. For specific information, see the manufacturing documentation.
If you are using Canadian payroll, a setup is required before you may get distributions. See Canadian Payroll Setup and Notes.
Distributions to G/L Report
Prior to running Get distributions, you should first print the Distribution to G/L Report. All accounts should be printed. The date range should be from Earliest to the date which is the end of your accounting period. Do not specify that the file is to be purged! If you purge distributions before transferring them, you will have to enter these distributions again manually using Distributions. This defeats the purpose of the Get distributions selection.
The purpose of printing the Distribution to G/L Report is to obtain an accurate list of the debits and credits that are to be transferred to G/L.
You may want to print the report to disk and then obtain a printed copy using Print reports from disk. In this way, you can retain a copy of the report on the hard disk in case a spare copy of the report should be needed.
After printing the report, you should then back up your data files and run Get distributions. When running this selection, you should specify that the distributions are to be purged as they are copied to Distributions Transactions. If a power failure (and computer crash) should occur while running Get distributions, simply restore your backup and repeat the procedure.
Getting Distributions
Once Get distributions is run, you may then print a Distributions Entry Edit List and compare this report with the Distribution to G/L Report to verify that all debits and credits have been transferred. (The debits and credits will only be comparable if you have purged the distributions each period. If you have not purged Distribution in a previous period, the reports will not be comparable.
An alternative procedure is as follows:
|
Step |
Description |
|
1 |
Back up your data files. |
|
2 |
Run Get distributions, specifying that distributions are not to be purged. |
|
3 |
Run Distributions to G/L, specifying that the file/table is to be purged and only interfaced distributions are to be purged. |
|
4 |
Print the General Journal Entry Edit List. The debits and credits printed on the edit list should be comparable to the debits and credits on the Distributions to G/L Report, provided that you have followed this procedure each period. If you have not purged the Distributions in a previous period, the reports are not comparable. |
Note that if you specify that distributions are not to be purged by Get distributions, and you run Get distributions again for the same module, you will never transfer the same distribution from the module to G/L more than once. Get distributions prevents this. Thus, if after step (2) in the alternate procedure above, you discover additional transactions for the accounting period which have not yet been entered into the module, simply enter and post these transactions in the module, and repeat the alternate procedure starting with step (1).
If distributions are transferred for accounts that are not defined in Chart of Accounts, you have to either add these accounts to the Chart of Accounts before these entries can be posted, or delete the entries and then re-enter them for a different (valid) account.
Since the program does not check the validity of the information being transferred, we recommend that you verify that all accounts in the Valid G/L Account are also in your Chart of Accounts.
Select
Get distributions from the Distributions menu.
If there are unposted entries in Distributions, you will get a message indicating this. You will either have to post or delete the entries.
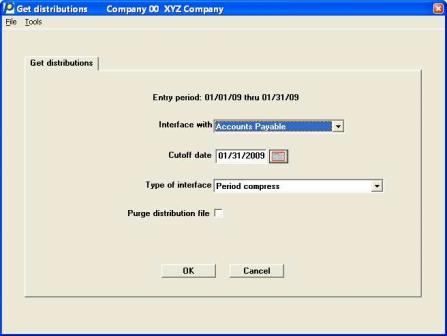
Graphical Mode
Otherwise, the following screen appears:
Character Mode
The following screen displays:
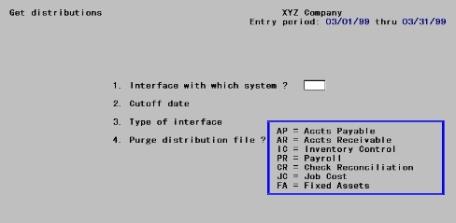
Enter the following:
Options
Select the system (module) from which information is to be transferred. Select one of the following:
|
Character Mode |
Graphical Mode |
More Information |
|
AP |
Accounts Payable |
|
|
AR |
Accounts Receivable |
|
|
CR |
Check Reconciliation |
|
|
IC |
Inventory Control |
|
|
JC |
Job Cost |
|
|
PR |
Payroll |
|
|
KP |
Canadian Payroll |
|
|
FA |
Fixed Assets |
|
|
EX |
External Cross-reference |
Only the modules actually present in your system appear on the display.
FA and EX are not defined modules. They allow distributions to be interfaced from another external source. EX appears on the screen only if you have authorized the Cross-reference file in Company information.
Enter the system (module) from which information is to be transferred.
|
Format |
Graphical: Drop down list Character: 2 characters |
Enter the last date for which entries will be transferred from the other system’s distribution file to the Distributions Transaction file, or use the option:
|
Format |
MMDDYY. The default is the ending date of the current accounting period. |
Options
This determines the method of compression that will be used during transfer. Refer to the explanation in the Summarize General Ledger chapter.
|
Note |
For A/P accounts, the distribution details are recorded in the Navigator Distribution file and may be viewed through View accounts. See the View Source Transaction section of the View Accounts chapter. Whether it is A/P or any other module, summarizing the G/L may not be necessary. View Accounts and the Trial Balance allow you to summarize your detailed data on-the-fly by day, period, source or document number. |
Enter either:
| Character Mode | Graphical Mode | Description |
|
P |
Period compress |
Compress by period |
|
D |
Date compress |
Compress by date |
|
N |
No compress |
Not available with the payroll interface |
|
G |
Compress, using account compress code |
Not available with the payroll interface |
|
C |
Compress using Payroll control code |
Payroll only |
| • | If you select Period compress, a maximum of two summarized entries are created for each account for each accounting period. |
| • | If you select Date compress, a maximum of two summarized entries are created for each account for each separate date. (The journal number is also retained). Refer to the Summarize General Ledger chapter for a discussion of why a maximum of two entries are created. |
| • | If you select No compress, all entries are transferred in full detail with no summarization. |
These three choices apply for all accounts. The fourth choice applies on an account-by-account basis:
| • | If you select Compress using account compress code, summarization is done according to the compression code in the Chart of Accounts record for each account. See the Compression code field in the Chart of Accounts chapter. |
|
Format |
Graphical: Drop down list Character: On letter from the list above |
This field is checked automatically (set to Y) automatically when interfacing to Fixed Assets External cross reference and cannot be changed.
Otherwise, this determines whether distributions will be purged (completely removed) from the distributions in the other module as they are being transferred to G/L Distributions.
If you do not want to purge the distributions during the interface, you can still purge the distributions at a later time from within the module from which information is being transferred.
Check this box (answer Y) to purge the distributions in the other module, or leave it unchecked (N) to keep them on file in the other module. The default is to not purge.
|
Format |
Graphical: Check box, checked is yes and unchecked is no Character: Either Y or N |
Use (vendor name/reference) from A/P distributions
This field is available for entry only if A/P is being interfaced and either No compress or Compress, using the account compress code is selected in the Type of interface field.
For each payable, both the vendor’s name and a reference are stored in A/P distributions, so you may choose which one to transfer to G/L Distributions.
| • | Transferring the reference lets you see what was purchased (provided you have been using the reference field for that purpose). |
| • | Transferring the vendor name lets you see from whom the purchase was made. |
You should consult with your accountant on which one should be used.
Enter Reference to transfer the reference or Vendor name to transfer the vendor’s name.
|
Format |
Drop down list, either reference or vendor name |
Cross-reference
This field is available for entry only if you chose EX as the module being interfaced. EX stands for external cross-reference. It lets you capture distributions from a foreign (non-PBS) module, even though that module uses a different account number structure. You must already have equated the foreign accounts to the Passport Business Solutions accounts (using the Cross-reference Account file described in the System User documentation).
This field identifies which cross-reference account is used when converting the 40-character free-format account number to the standard four-segment account number.
Select either 1st external cross-reference account (1), or the 2nd external cross-reference account (2).
|
Format |
Graphical: Drop down list Character: One digit, either 1 or 2 |
You may select the Cancel button to not get distributions. Otherwise, make any needed changes and select the OK button to process. There will be a period of processing as distributions are transferred. When done, press <Esc> to return to the main G/L menu. No report is produced by this selection, however printing the Distributions Edit list will show the results.
For what to do next, see After Interfacing.
This section contains the setup and some additional notes for a Canadian Payroll interface.
Canadian Payroll Setup
If you are using Canadian payroll and you want to get distributions from it, you must first enter a line in the cblconfi file. If you are using multiple companies with Canadian payroll, you must enter this line for each company. The line is:
PASS_KPXX_FIL_LOC Where XX = company id.
Then the option to get Canadian payroll will display in the Interface with field. Also, enter the location of the payroll distribution file at the end of the line. Here is an example with a company number of 00:
PASS_KP00_FIL_LOC "C:\CANADA PR\DATA\PR00\"
The double quotes are only needed if there is a space in the path.
Additional Notes
When processing the Canadian Payroll distributions there are a couple of differences from the current Payroll distributions.
| 1. | The employee name will come from the Canadian Payroll distribution record since we do not have the employee file to open and read. If the employee name is spaces in the Canadian Payroll distribution record, Interface from K/P will be put into the G/L distribution reference field. |
| 2. | The compression code is not present in the Canadian Payroll distribution record. If the Type of interface is set to Compress using payroll control code; then the program to reads the G/L Chart of Accounts to get the compression code and process as specified. If the user selects Period compress or Date compress, this will take precedence over the compression code in the G/L Chart of Accounts. |
The fixed assets option is not available on the PBS system. However there may be a third-party provider for PBS that has this module.
The Fixed Assets Distribution file contains debits and credits that must be transferred to the Passport Business Solutions General Ledger.
Prior to running Get distributions, you should back up your PBS and Fixed Assets data files, and then follow the procedures your Fixed Asset software provider. The procedure below may be different than your Fixed Asset provider requires.
The name of the file PBS can import is FADIST??.ASC.
| • | This file is not under Pathfinder control. The program expects it in the same directory as the General Journal Transactions. When it is SQL, it expects it in GLXX with the XX representing the Company number. |
| • | ?? is the company code. |
| • | UNIX equivalent is fadist??. |
At this point, run Get distributions, choosing to interface with Fixed Assets. When running this selection, distributions are automatically purged as they are copied to the Distributions Transaction file. If a power failure (and computer crash) should occur while running Get distributions, simply restore your backup and repeat the procedure.
If distributions are transferred for accounts that are not defined in the Chart of Accounts file, you have to either add these accounts to the Chart of Accounts file before these entries can be posted, or delete the entries and then re-enter them for a different (valid) account.
Since the program does not check the validity of the information being transferred, we recommend that you verify that all accounts entered in the Fixed Asset System are also in your Chart of Accounts.
An external cross-reference distribution file contains debits and credits that must be transferred to General Ledger. These distributions come from modules or systems other than those supported directly by Passport. These may have been created by another module, by your MIS department, from a external billing system, or some other source. One common source is CounterPoint®.
Import File Layout
To use this feature, create your file with the following format:
|
Field |
Type |
Size |
Format |
|
User ID |
Alpha |
3 |
|
|
*Account Number |
Alpha |
40 |
|
|
Date |
Numeric |
8 |
YYYYMMDD |
|
Journal Number |
Alpha |
6 |
|
|
Correcting Flag |
Alpha |
1 |
Y or N |
|
Sequence Number |
Numeric |
6 |
|
|
Amount |
Numeric |
15 |
999999999999V99+ |
|
|
|
|
V represents an implicit decimal point and takes up no space in the file. |
|
|
|
|
+ represents a plus or minus sign. |
|
Source |
Alpha |
10 |
Source is optional, but recommended |
|
Reference |
Alpha |
25 |
|
|
Document Number |
Alpha |
15 |
|
* The Account number must be entered exactly the same way it is entered in CTL > Account links, followed by trailing spaces (enough to fill the 40 characters allowed). Account links are created by entering or automatically generating the accounts in the CTL > Account links menu selection. See the External Cross References chapter in the PBS System documentation.
All fields are plain ASCII text. The file name must be EXDIST??.ASC.
| • | This file is not under Pathfinder control. The program expects it in the same directory as the General Journal Transaction file for the company you are currently running. If your company is 00, the file must be in GL00 (depending on how your path is setup). |
| • | Any errors detected in processing will be written to a log file, EXDERR??.DAT, in the top-level directory. |
| • | In both cases, ?? is the company code. |
| • | Linux equivalents are exdist?? and exderr?? respectively. |
Running Get Distributions
Before you run Get distributions, you should back up your PBS data and external cross-reference file, and then follow the procedures established for your external system to obtain a permanent record of the debits and credits for the period.
At this point, run Get distributions, choosing to interface with an External cross-reference. When running this selection, distributions are automatically purged as they are imported as Distribution transactions. If a power failure (and computer crash) should occur while running Get distributions, simply restore your backup and repeat the procedure.
Select OK to import the external distributions.
Import File Handling
If there is data in the import file with dates after the Cutoff date, a backup file is created that includes this data only. This file is moved to the (top-level PBS)\BACKUP\00\ and the file is named EXDIST00.ASC (00 stands for the Company ID. Substitute it for your actual company). It can be imported at a later time assuming that you are using a Cutoff date that is after the dates in the file. The program will import data from the backup folder.
When an import is run and the full data from the file is imported, the EXDIST00.ASC file is copied to \BACKUP\00, the program imports that file and a backup file is created. Whether there are errors or not, the file is moved to the \BACKUP\00 folder. The file is copied and named to something like this EXDIST00-2013022011283696.ASC. This EXDIST00-2013022011283696.ASC file name is the original name plus the date and time the import was run.
If distributions are transferred for accounts that are not defined in Chart of Accounts, an error message displays and a reported is printed.
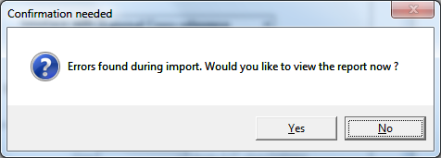
Whether you print the report or not, this message displays next.
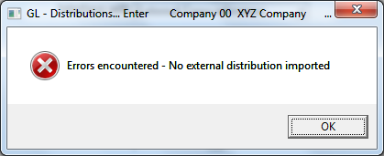
You cannot import the data until you make changes and re-import. You may either add the missing account to the Chart of Accounts and cross -references (if that is the error) or edit the import file to correct the data and import again.
WARNING: If there were errors in the file, you did not import and you have fixed the errors and want to re-import, do not copy the EXDIST00.ASC from the BACKUP folder to the top-level PBS folder and re-import. You may move it, but do not copy it. If you copy it the program will merge and import both the EXDIST00.ASC from the top-level and the one from BACKUP.
For those accounts which do not appear in the cross-references see the External Cross References chapter of the PBS System documentation for further information about entering them.
Use Distributions Enter to change, delete, or print an edit list of the entries transferred. Post the entries to General Ledger Transactions when you are satisfied they were transferred correctly.
|
Note |
Whether compressed or not, the details for the A/P distributions are stored in the navigator distributions file and can be accessed from the graphical View accounts screen.
Any amounts that are changed or deleted are not updated in the navigator distributions file. When you change or delete entries it will effect the viewing of distribution history. |
Entries transferred to General Ledger using Get distributions are easily recognized:
| • | The journal number: |
If compressed by date, the original journal number is retained. Compression is not really by date alone, but by date within journal.
If compressed by period, the journal number is lost.
If not compressed, the original journal number is retained.
| • | The source field contains the name of the module from which the entry was transferred. |
| • | The reference field contains a description of the original entry: |
If compressed by date, this is NET CHANGE FOR mmddyy/jrnl where mmddyy is the date and jrnl is the journal number.
If compressed by period, this is NET CHANGE FOR THE PERIOD
If not compressed, this varies by module as shown in the table below.
| • | The document number depends on the compression: |
If compressed (by date or period), the document number is blank.
If not compressed, this varies by module as shown in the table below:
|
Module |
Reference |
Document number |
|
AP |
Vendor name or reference, depending on your choice in field 5 |
Invoice number for expenses and new A/P added; check number for payments and discounts |
|
AR |
Customer name |
Document number used in A/R (typically, invoice number) |
|
CR |
Payee/Comment |
[blank] |
|
IC |
Type 1 = Income |
Document number used in transaction |
|
|
Type 2 = Cost of goods sold |
|
|
|
Type 3 = Inventory adjustment |
|
|
|
Type 4 = Inventory liabilities |
|
|
|
Type 5 = Inventory value |
|
|
JC |
From Job Cost |
[blank] |
|
PR |
Employee name |
Check number |
|
FA |
Depreciation-period 99 where 99 is the period specified in the Fixed Assets program. |
|
|
EX |
From the distribution file |
From the distribution transaction file |
Select
Data import from the Distributions menu.
Data Import Manager is licensed separately and may not be available on your system. You may also use Data Import Manager to import files for A/P payables, A/R miscellaneous charges, Check Reconciliation data, I/C transactions, payroll time worked entries and more.
For information on the configuration and use of data import, see the Data Import Manager documentation.