This chapter contains the following topic:
The Trial Balance selection enables you to print the G/L Trial Balance for a range of selected accounts within an accounting period or non-standard reporting period for any fiscal year on file. You may compress entries by date, period, document number or to match the compression method in the chart of accounts.
You can print the trial balance in either summary or detail (showing individual entries). You can create the report as a CSV output.
The trial balance is usually run after all entries have been entered and posted for the specified period. However, it can be run at any time during General Ledger processing.
When the Accounting Period data is set up for entering and reporting on the next (right side) fiscal year and you are reporting on the next fiscal year, the report generates balance brought forward information.
The default reporting period used is the period defined in Accounting periods for the year entered.
See a General Ledger Trial Balance example in Sample reports.
Select
Trial balance from the Reports menu.
Graphical Mode
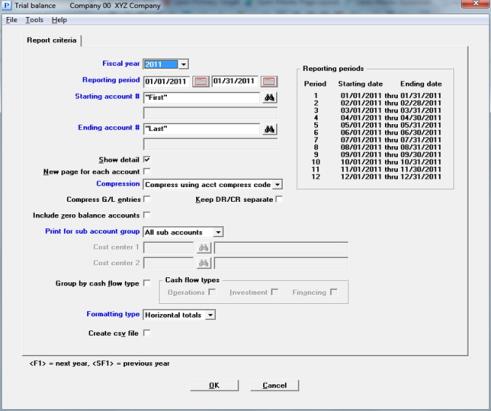
The following screen appears:

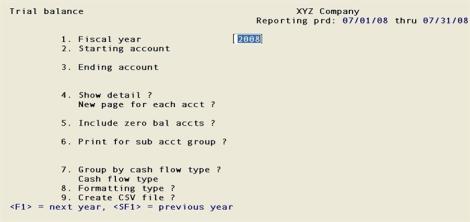
This screen has an option to compress the data. The character screen does not have this option.
Character Mode
The following screen appears:

Enter the following information:
Options
Enter the year that you want to report, or use the option:
|
<F1> |
For the next year |
|
<SF1> |
For the previous year |
The default is the most recent fiscal year in accounting periods.
|
Format |
Drop down list |
|
Example |
Select 2011 |
Enter the range of dates to be included on the trial balance.
To help you determine the range to report, the reporting periods display in a box on the right side of the screen. You may enter a reporting period date range or any range outside of any period as long as it is in the same fiscal year. The default is the current reporting period selected in Accounting periods.
|
Format |
MMDDYY The default range is the reporting period in accounting periods file. |
|
Example |
Type 32711 |
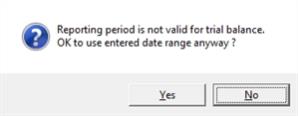
If the reporting period range is outside of the Fiscal year, the following message displays:

Select Yes to use the date range or No to enter a different range.
Due to certain data entry errors, a transaction date year may not be the same as the fiscal year. If you suspect this has happened, in order to find it, you can enter a date range that does not match the fiscal year. If you find such records, you may enter offsetting entries in the general journal. Be aware that balance brought forward transactions on December 31st (last day of a fiscal year) contain amounts for the next fiscal year and these are normal.
Options
Enter the range of accounts to be included on the trial balance. These are only the main account and if defined the subaccount; cost centers, if any, are specified later. You may use one of the options:
|
<F1> |
For the next main account in Chart of accounts, in account number sequence. After entering an account in the Starting account field and when selecting <F1> on the Ending account field, the next account after the starting account field will be used. |
|
<SF1> |
For the previous account. |
|
<F2> |
For the “First” starting account or “Last” ending account. |
Upon entry or selection of a valid account, the description is displayed of the first entry in Chart of accounts with that main account and subaccount.
|
Format |
Your standard format for main account as defined in Company information |
|
Example |
Press <F2> at each field |
Detail refers to individual transactions in a G/L account. A trial balance that shows individual transactions may be called a detailed trial balance. A trial balance without detail (shows only account totals) may be called a summary trial balance. The default is checked for show detail. You must select the <Space bar> to uncheck it to show only totals.
|
Format |
Check box, the default is checked. |
|
Example |
Select <Enter> for the default |
This question only applies if you checked the box for the Show detail field (otherwise you may not enter this field).
Select the <Space bar> to check the box and put a page break after each account, or select <Enter> for the default of unchecked to have the program fill the pages.
|
Format |
Check box, the default is unchecked. |
|
Example |
Select <Enter> for the default |
This question only applies if you checked the box for the Show detail field (otherwise you may not enter this field).
Enter the compression type for viewing the data. The options are:
| Character mode | Graphical mode | Description |
|
N |
No compress |
All entries are displayed in full detail with no compression applied to the account. |
|
D |
Date compress |
A maximum of two (four, if you have correcting entries) summarized amounts are filtered for each account for each separate date. (The journal number is also retained). |
|
P |
Period compress |
A maximum of two (four, if you have correcting entries) summarized amounts display for each account for each accounting period. |
|
C |
Compress using acct compress code |
Summarization is done according to the compression code in the Chart of Accounts record. |
|
O |
Doc #/Date compress |
A summary by document number is done. The list is sorted first by document number and then by date. Because MLE entries (from General journal) do not have a document number, they are summarized by journal number. |
|
T |
Date/Doc # compress |
A summary by date is done. The list is sorted first by date and then by document number. Because MLE entries (from General journal) do not have a document number, they are summarized by journal number. |
|
A |
Date/Source compress |
The list is sorted and compressed by date and then by source. |
|
R |
Period/Source compress |
The list is sorted and compressed by period and then by source. |
|
Format |
Graphical mode: Drop down list. Select one the options above |
|
Example |
Select No compress |
This selection is only available if you selected something other than No compress for the Compression field above.
Select the <Space bar> to check the box or <Enter> to accept the default of unchecked. Checking the box compresses any entries made in General Ledger, such as in distributions (GJ journals) and general journal transactions (ML).
|
Format |
Check box, the default is unchecked. |
|
Example |
Select <Enter> for the default |
This selection is only available if you selected something other than No compress for the Compression field above.
Select the <Space bar> to check the box or <Enter> to accept the default of unchecked. Checking the box separates the debits and credits for the type of compression selected .
|
Format |
Check box, the default is unchecked. |
|
Example |
Select <Enter> for the default |
Include zero balance accounts ?
Select the <Space bar> to check the box or <Enter> to accept the default of unchecked to include accounts with zero balance.
|
Format |
Check box, the default is unchecked. |
|
Example |
Select <Enter> for the default |
Print for cst ctr (or subaccount) group
If your account number format has only one segment (the main account number), this field may not be entered.
Options
Otherwise, enter Sub account, Sub account group, or All sub accounts using these account number formats:
If your account number format has the following applies:
|
|
1 or 2 cost center segments |
No cost center segments |
|
Sub account |
Print for cost center |
Print for subaccount |
|
Sub account group |
Print for cost center group |
Print for subaccount group |
|
All sub accounts |
Print for All cost centers |
Print for All subaccounts |
|
Format |
Drop down list with one of the three selections above. |
|
Example |
Select All sub accounts |
Options
| • | If you answer Sub account, you will be prompted to enter a valid cost center (or sub account). |
|
<F1> |
For the next cost center segment (or sub account) |
|
<SF1> |
For the previous cost center segment (or sub account) |
|
<F5> |
For "All" accounts regardless of subaccount (same as entering A) |
|
Format |
Your standard format, as defined in Company information |
|
Example |
(Does not occur in this example because you have chosen All sub accounts |
Options
| • | If you answer Sub account group, enter the group code. This must previously have been defined in Cost center groups or Sub-account groups. You may use one of the options: |
|
<F1> |
For the next group |
|
<SF1> |
For the previous group |
|
Format |
8 characters |
|
Example |
(Does not occur in this example because you have chosen All sub accounts |
| • | If you answer All accounts, all accounts are selected without regard to cost center or subaccount. |
If you check the box and then indicate one or more types, the trial balance is grouped by cash flow type. If you use the default of unchecked, cash flow types are ignored and the trial balance is grouped by account number. (For an explanation of cash flow types, refer to the Chart of Accounts chapter for the Cash flow type field.)
|
Format |
Check box, the default is unchecked. |
|
Example |
Press <Enter> |
Options
If you did not select to Group by cash flow type, you are through with this question. If you checked the box, you must identify the specific cash flow types to show on the trial balance. Enter one or more of these choices:
| Character mode | Graphical mode | Description |
|
O |
Operations |
Include operations types |
|
I |
Investment |
Include investment types |
|
F |
Financing |
Include financing types |
|
Format |
Check box. One to three entries each with a check box. |
|
Example |
Does not occur in this example because you did not select to Group by cash flow type |
If one or more cash flow types are entered, the following occurs:
| • | All accounts related to each cash flow type are printed in their own section totals. |
| • | When accumulating total debits and total credits, credit entries marked as correcting entries are added to total debits, and debit entries marked as correcting entries are added to total credits. |
Select a format; either printing the account totals and grand totals horizontally or vertically.
| Character Mode | Graphical Mode | Description |
|
1 |
Horizontal totals |
The debit/credit sub-totals, net change and ending balance amounts are printed horizontally, which takes less paper |
|
2 |
Vertical totals |
The DR/CR sub-totals, net change and ending balance amounts are printed vertically, which may be considered easier to read |
|
Format |
Graphical mode:Drop down box, Horizontal totals is the default Character mode: Select 1 or 2. There is no default |
|
Example |
Select <Enter> for the default |
This field is only available if you selected the horizontal totals format type in the Formatting type field (Field 7 in character mode).
Select the <Space bar> to create a CSV text file or select <Enter> for default to not create a file.
CSV is short for Comma-Separated Values and is also know as comma-delimited. With this type of data file format, each field is separated by a comma. The commas separate the data into columns when you view the report in Excel or other spreadsheet compliant applications.
|
Format |
Check box where checked is yes and unchecked is no. The default is unchecked |
|
Example |
Select the <Space bar> to check the box |
If you selected to create a CSV file, you must also select to either print to a printer, print to disk, or display the report.
In Windows and Thin client, when you select to create a CSV file, a save-as window will display. In this window a default report name is provided but you can change this.
Here is an example for company 00.
00TB2253.CSV
The first two characters are the company number. The TB represents Trial Balance and the other digits are the report number.
Using PBS on a Linux server the report is saved to the top-level PBS directory. The program provides the report name, explained above, and it cannot be changed until after it is created.
Make any needed changes. Select the <OK> button to print the trial balance. The trial balance shows the beginning and ending balance, total debits, total credits, and net change. To return to the menu without printing the report select the <Cancel> button.
Miscellaneous Information
If trial balance subtotal levels were entered in Chart of accounts, they will be used in printing the trial balance.
If you get the message Incorrect access rights to TRXDAT\(filename) . Contact your administrator., you must get the proper credentials to create a file in the TRXDAT folder. If you are working in the next accounting periods fiscal year, a temporary "close a year" file is generated to get the balance brought forward records from the first year. For a full explanation see Temporary Close a Year from the Financial Statements chapter.
The detailed form of the report also shows all entries for each account, unless Summarize general ledger has been run and the detail is no longer available. See Summarize General Ledger.
|
Note |
Summarizing the G/L may not be necessary. View accounts and the Trial balance allow you to compress and summarize your data as needed. |