This chapter contains the following topic:
Viewing Activity for a G/L Account
The View accounts selection lets you view all activity for a specific G/L account for a specified fiscal year within a specified range of dates.
Select
View accounts from the G/L menu.
Graphical Mode
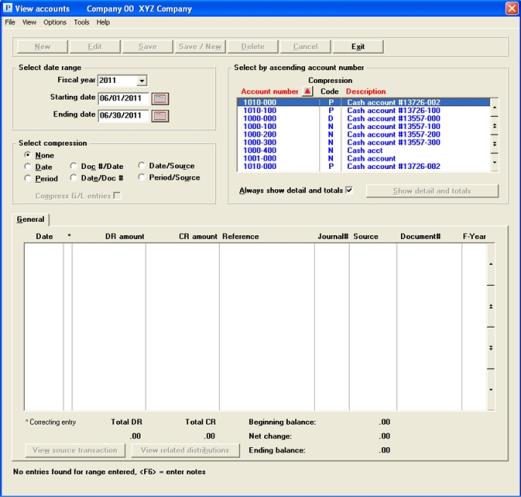
The following screen appears:

At any time you view or enter notes for the selected G/L account by selecting <F6> or Accounts notes from the View menu.
Character Mode
The following screen appears:
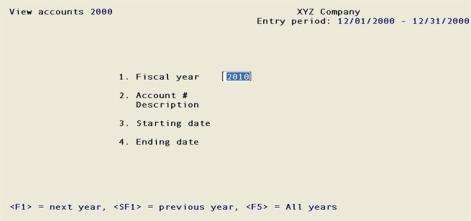
Enter the following information:
Check the box to show detail and totals and uncheck the box to not show it. When you uncheck the box, scrolling through the accounts in the list box is generally faster, depending on how much data you have.
If you uncheck the box, the Show detail and totals button is available.
|
Format |
Check box where checked is yes and unchecked is no. The default is checked |
|
Example |
Leave it unchecked |
If you left the previous field unchecked, this button is available. Click on the button to temporarily show details and totals for an account.
|
Format |
Push button |
|
Example |
Grayed out and not available in this example |
Options
Enter the year that you want to view, or use the option:
|
<F5> |
For “All” years |
|
Format |
CCYY, You may also select an option from the drop-down list box. The default is the current fiscal year in Accounting periods |
|
Example |
2010 |
Options
Enter a range of dates to view entries. These need not correspond with an accounting period or be within a fiscal year. You may use the option:
|
<F2> |
For the "Earliest" starting date or "Latest" ending date |
|
Format |
MMDDYY at each field. The defaults are the starting and ending dates of the current entry period. |
|
Example |
Press <F2> at each field |
|
Note |
You can use this view screen to identify entries made to the wrong fiscal year. If your fiscal year is 2010, but you suspect entries were made with dates that were entered with have the year of 2011, you can identify these entries here. Once identified you can then produce offsetting entries to correct them. |
This field can only be accessed in graphical mode.
Select the compression type for viewing the data. The radio button choices are:
|
None |
All entries are displayed in full detail with no compression applied to the account. |
|
Date |
A maximum of two (four, if you have correcting entries) summarized amounts are filtered for each account for each separate date. (The journal number is also retained). |
|
Period |
A maximum of two (four, if you have correcting entries) summarized amounts display for each account for each accounting period. |
|
Doc #/Date |
A summary by document number is provided. The list is sorted first by document number and then by date. Because MLE entries (from General journal) do not have a document number, they are summarized by journal number. |
|
Date/Doc # |
A summary by date is provided. The list is sorted first by date and then by document number. Because MLE entries (from General journal) do not have a document number, they are summarized by journal number. |
|
Date/Source |
The list is sorted and compressed by date and then by source. |
|
Period/Source |
The list is sorted and compressed by period and then by source. |
|
Format |
Radio buttons with the seven choices listed above |
|
Example |
No compress |
The View Source Transaction and View Related Distributions buttons are not available when you compress your data by either Date, Period, or Doc #. The non-compressed data is required for these features to function properly.
This selection is only available if you selected something other than None for the Compression field above.
This check box determines if journal # starting with GJ or ML are compressed. Leave unchecked for not compressed.
|
Format |
Check box where checked is yes and unchecked is no. The default is unchecked |
|
Example |
Leave it unchecked |
This selection is only available if you selected something other than None for the Compression field above.
Select the <Space bar> to check the box or <Enter> to accept the default of unchecked. Checking the box separates the debits and credits for the type of compression selected .
|
Format |
Check box, the default is unchecked. |
|
Example |
Select <Enter> for the default |
Account #, Cpr and Description
There are three columns in the Chart of Accounts list box: Account #, Cpr (Account compression code) and Description.
Cpr
The middle column represent the compression code type used in the Chart of Accounts. There are up to three possible compression types:
|
Type |
Description |
|---|---|
| N | No compression |
| D | Date compression |
| P | Period compression |
For a more detailed description, see the Compression code field in the Chart of Accounts chapter.
Options
In the list box select the account you want to view. You have the following options:
|
<F1> or <Dn Arrow> |
For the next account |
|
<SF1> or <Up Arrow> |
For the previous account |
|
Page down |
For the next group in the list |
|
Page up |
For the previous group in the list |
|
Home |
For the first account |
|
End |
For the last account |
|
Format |
Your standard account number format, as defined in Company information |
|
Example |
Enter account 1000-000 |
The entries for the account display in the General tab. Here is an example:
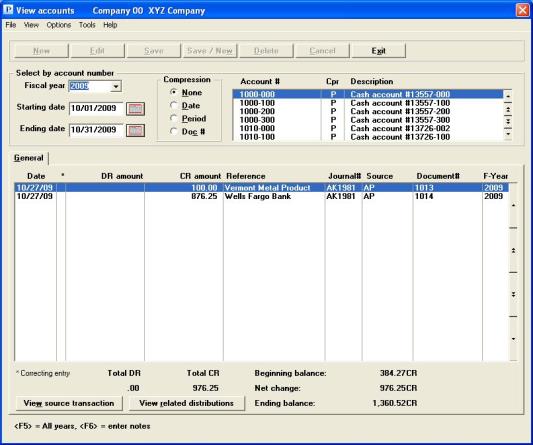
The fields below the list box display the total debits, credits, beginning balance, net change and ending balance.
Up to 21 entries display in the list box. To find additional entries you have the following options:
|
<F1> or <Dn Arrow> |
For the next entry |
|
<SF1> or <Up Arrow> |
For the previous entry |
|
Page down |
For the next group of entries in the list |
|
Page up |
For the previous group of entries in the list |
|
Home |
For the first entry |
|
End |
For the last entry |
Options
On this screen there are two button options to View Source Transaction and View Related Distributions.
Character Screen
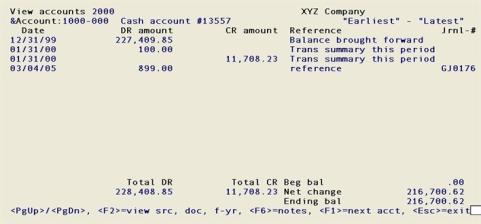
In character mode, once you have selected the fields on the first screen, press <Enter> for the next screen:
Options
In character mode there are up to fourteen entries can be shown on the screen at once. The current entry is highlighted.If there are more entries than this, you can use <Up>, <Down>, <Left>, <Right>, <PgUp>, and <PgDn> to move around. You also have these options:
|
<F1> |
To select next account |
|
<F2> |
To toggle between viewing the source, document number and fiscal year, or the reference and journal number |
|
<F6> |
To view or enter any notes for this G/L account |
|
<Esc> |
To exit back to the menu screen |
There is no limit to the number of pages that may be viewed when paging forward. However, you cannot back up more than nine pages.
If there are no entries for this account, in the lower left corner of the screen you are so informed in the message "No entries found for range entered".
On the screen containing the last entry on file, the total debits, total credits, beginning balance, net change, and ending balance are shown if one year is selected. If “All” years are selected, the total debits, total credits, beginning balance, net change, and ending balance display as (Not applicable).
If you press <F6> or select Account notes from the Options menu, you may enter an unlimited number of notes about the selected account. Each note is given a date / time stamp so that you can scan through the notes in time sequence later. Notes are an exception to the general rule that View transactions allow you to see information without changing it.
This selection uses the PBS text editing function. For further instructions, refer to the Using Notes section of the Use of Function Keys, Tool Bar and Windows chapter in the PBS System documentation.
|
Format |
Ten lines of 77 characters each |
|
Example |
Press <Esc> |
A source transaction is the voucher, invoice, check or other transaction type from which the G/L account entries originated.
Selecting this button will access the PBS application where the transaction originated. Therefore the appearance of this screen is different, depending on the original application. In this example we will be viewing a voucher from the Accounts Payable application.
Select
the View source transaction button from the View accounts window.
You will see a screen similar to the following:
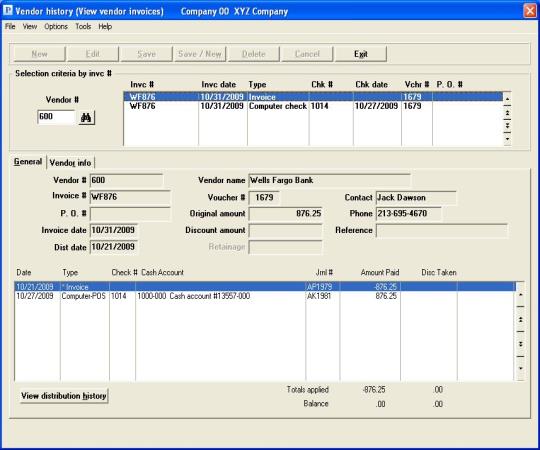
The fields for the source transaction displays. In the example above it is voucher 1593.
From here you can select the View distribution history button to see all the account information related to the voucher. You will see a screen similar to the following:
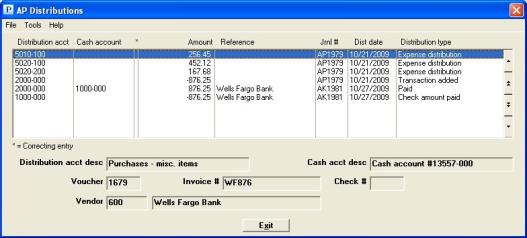
Each row in this list box represents a single G/L account entry. The details for the entry display in the fields at the bottom of the screen.
One screen can accommodate ten account entries and you can view more items with the function keys. Select the account entry you wish to view. You may use one of the options:
|
<F1> or Down arrow |
For the next account entry on file |
|
<SF1> or Up arrow |
For the previous account entry on file |
|
<Page Down> |
To move to the next group of account entries |
|
<Page Up> |
To move to the previous group of account entries |
|
End |
To move to the last account entry |
|
Home |
To move to the first account entry |
Columns
The columns are:
This is the valid G/L account number.
This is the cash account number. If there was no cash posted with the voucher, this field will be empty.
*
Indicates a correcting entry.
Amount
The amount of the distribution.
Reference
The reference for the distribution.
Jrnl #
This is the journal number assigned at the time of posting in A/P.
Dist date
This is the date of the distribution.
Distribution type
This is the type of distribution.
The distribution types are:
| Type | Description |
|---|---|
|
Expense Distribution |
An expense distribution |
|
Transaction Added |
The vendor G/L account number |
|
Check Amount Paid |
The Cash account |
|
Discount Taken |
Discount taken on the invoice |
|
Paid |
The offsetting vendor account and cash account |
Fields
The fields at the bottom of the window are:
Distribution acct desc
This description of the account corresponds to the number in the Distribution acct column.
Cash acct desc
This description of the cash account corresponds to the number in the Cash account column.
Voucher
This is the voucher number.
Invoice #
This is the invoice number associated with the distribution.
Check #
This is the check number. It will be populated when it was an immediate invoice.
Vendor
This is the number associated with the distribution.
(Vendor name)
This is the vendor name associated with the distribution.
When finished viewing the distribution history, select the <Esc>key or click on the Exit button.
A related distribution is an amount posted to another account that has the same Journal number. For a description of the fields and the screen, see the View Distribution History above.