This chapter contains the following topic:
Reporting Actuals, Budgets, and Comparatives
The Actuals, Budgets, & Comparatives selection enables you to create reports showing the differences between the company actuals, budgets, and comparatives.
The report allows up to six columns and lets you specify any budget, actual, or comparative amount for each column, as well as allowing differences between columns to be shown.
Select
Actuals, Budgets, & Comparatives from the Reports menu.
Graphical Mode
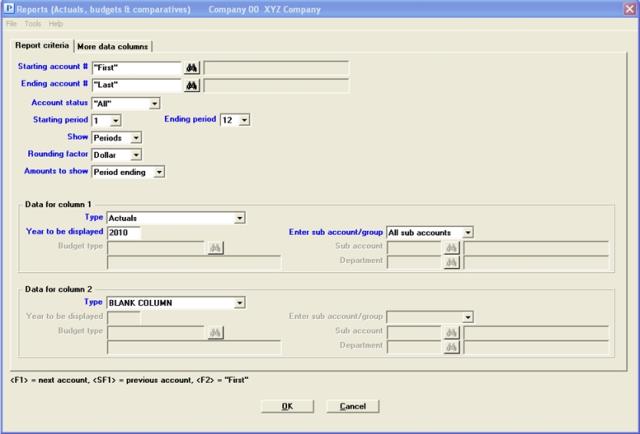
A screen similar to the following appears:

Character Mode
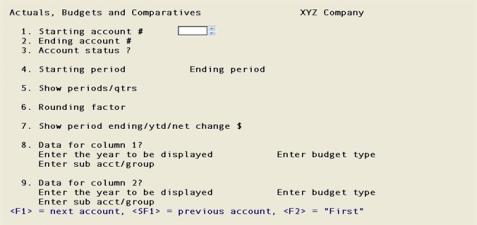
The following screen appears:

Ending account #
Options
Enter the range of accounts for which you want to print a report.You may also use one of the options:
|
<F1> |
For the next account |
|
<SF1> |
For the prior account |
|
<F2> |
For the First starting account or the Last ending account |
|
Format |
Your standard main account format, as defined in Company information |
|
Example |
Press <F2> at both fields |
You may determine if you want to report on active, inactive or both accounts.
If there are G/L transactions for the current fiscal year, the status will be active.
Options
Enter either:
| Character Mode | Graphical Mode | Description |
|
A |
Active only |
Active accounts |
|
I |
Inactive only |
Inactive accounts |
|
<F5> |
"All" |
For “All” types of accounts |
Accounts that have been active in previous years, but are not needed for the current fiscal year are inactive accounts. By making them inactive, they cannot be used for entry but they can be reported on.
|
Format |
Graphical: Drop down list using one of the choices in the table above. The default is "All" Character: Either A, I or <F5> for “All” |
|
Example |
Active only or type A |
Starting period and Ending period
Specify the range of accounting periods you want in this report.
|
Format |
A non-zero number not greater than the number of accounting periods defined in the Accounting periods selection |
|
Example |
Type 1 and then type 3 |
Options
This question determines the level of detail which will show on the report. Your choices are:
| Character mode | Graphical mode | Description |
|
P |
Periods |
To show periods. All periods with their totals will be printed. |
|
Q |
Quarters |
To show quarters. Periods will be summarized by fiscal quarters. Periods are grouped into quarters by threes, regardless of the period beginning and end dates; if there are thirteen periods, the last period is assigned to the fourth quarter. |
|
Format |
One selection from above |
|
Example |
Select Quarters or type Q |
Options
Select either:
|
N |
For no rounding |
|
D |
To round to nearest dollar |
|
Format |
One character |
|
Example |
Type D |
Options
Choose one of the following:
| Character mode | Graphical mode | Description |
|
P |
Period ending |
Show the period-end dollar amount of each account |
|
Y |
Year-to-date |
Show the year-to-date dollar amount of each account |
|
N |
Net change |
Show the dollar amount of net change during the period |
|
Format |
One selection from the list above |
|
Example |
Type Y |
Options
Select the column content. Choose one of the following:
| Character mode | Graphical Mode | Description |
|
1 |
Actuals |
For actuals |
|
2 |
Budgets |
For budgets |
|
3 |
Comparatives |
For comparatives |
|
(Blank) |
BLANK COLUMN |
Do not use this column. Other than column 1, you can skip a column and still put data in the columns to its right. If you choose this option, the cursor will move to the Type field for the next column |
|
Format |
One selection from the list above |
|
Example |
Select Budgets or type 2 |
Enter the year of the actuals, comparatives or budgets. For actuals it should be the current or next year. For comparatives this should be a past year. Budgets can be for any past, current, or future year.
Of course, you cannot specify a past year which you have already purged, nor a future year for which you have not yet created a budget.
If an invalid actual year is entered then the following message will display:
Only current or next year allowed for ACTUALS.
|
Format |
9999 |
|
Example |
Type 2009 |
Options
If you have selected budgets, enter the budget type or use one of the following options:
|
<F1> |
For the next budget type |
|
<SF1> |
For the previous budget type |
|
Format |
15 characters |
|
Example |
Press <F1> |
Options
Select one of the following:
|
Character mode |
Graphical mode - Cost centers |
1 or 2 cost center segments |
Graphical mode - Sub accounts |
No cost center segments |
|
P |
Cost center |
Print for cost center |
Sub account |
Print for sub-account |
|
G |
Cost center group |
Print for cost center group |
Sub account group |
Print for sub-account group |
|
A |
All cost centers |
Print for <All> cost centers |
All sub accounts |
Print for <All> sub-accounts |
|
Format |
One selection from the list above |
|
Example |
Select All sub accounts or type A for All. |
Options
| • | If you answer P, you will be prompted to enter a valid cost center (or sub account). |
|
<F1> |
For next |
|
<SF1> |
For previous |
|
<F5> |
For All accounts regardless of sub-account |
|
Format |
Your standard sub-account format as defined in |
|
Example |
(Does not occur in this example because you have chosen A for All) |
Options
| • | If you answer G, enter the group code. This must previously have been defined in Cost center groups or Sub-account groups. You may use one of the options: |
|
<F1> |
For the next group |
|
<SF1> |
For the previous group |
|
<F5> |
For All groups. Note this is not the same as answering A, because some accounts may belong to more than one group, and some may not belong to any. An account which is present in two groups will not be counted twice in the report. |
|
Format |
Eight characters |
|
Example |
(Does not occur in this example because you have chosen A for All) |
| • | If you answer A, all accounts are selected without regard to cost center or sub-account. |
Follow the instructions for column 1 to specify the contents of column 2.
Check the screen and change any fields as necessary. Press <Enter> for the next screen. Two screens are needed to specify all six columns. The second screen appears even if you have only specified one column on the first screen (since blank spacer columns are allowed between data columns).
Graphical mode
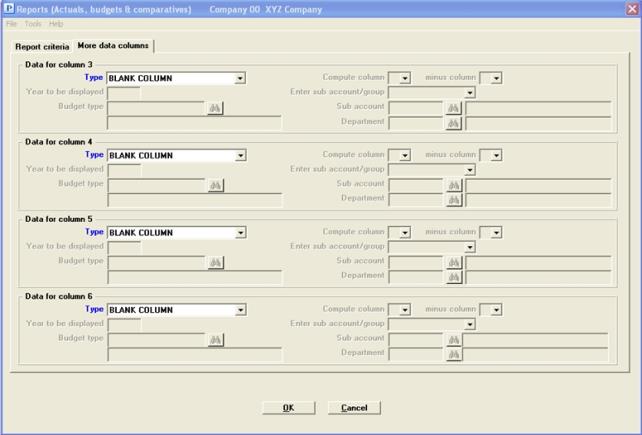
The following screen appears:

Character Mode
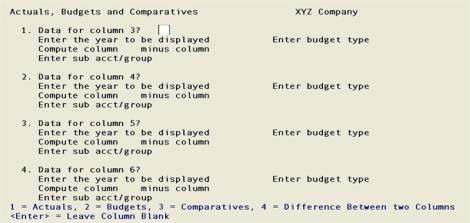
The following screen appears:

This second tab/screen lets you define the remaining four columns.
This screen also enables you to request an additional type of column, one that shows the differences between preceding columns. For example, if you specify Budgets in column 1 and Actuals in column 2, column 3 can show the difference between Budgets and Actuals:
|
Column 1 |
Column 2 |
Column 3 |
|
Budget |
Actual |
Difference |
|
$10,000 |
$5,000 |
$5,000 |
You could therefore, specify Actuals, Budgets, and Comparatives in columns 1, 2, and 3 and then specify differences in columns 4, 5, and 6. You have the flexibility to design the report according to your needs.
Data for columns 3, 4, 5 and 6
Options
Select the column content from the table below:
| Character mode | Graphical Mode | Description |
|
1 |
Actuals |
For actuals |
|
2 |
Budgets |
For budgets |
|
3 |
Comparatives |
For comparatives |
| 4 | Difference between two columns | For the difference between two columns. See Difference |
|
(Blank) |
BLANK COLUMN |
For not using this column. Other than column 1, you can skip a column and still put data in the columns to its right. If you choose this option, the cursor will move to the Type field for the next column |
|
Format |
One character from the list above |
|
Example |
For this screen, enter the fields shown in the illustration above. |
Actual, budget, comparative, and blank columns have already been explained when describing Field #7 of the preceding screen.
Compute column nn minus column nn
This field only applies if you chose 4 (differences) for this column; otherwise column numbers cannot be entered.
The year, budget type, and cost center / group fields are all skipped for difference columns. All that is necessary is to identify which two columns you want to subtract from each other.
Column entry is positional. nn above represents a column number from 1 through 6. In character mode this is not the same as the field number. You can specify column 1 or 2 even though these were entered on the preceding tab/screen.
The column you are subtracting can be either left or right of the column you are subtracting it from, but both these columns must be to the left of the column where you put the difference. You cannot subtract a column from itself.
|
Format |
Two column numbers, each in the range of 1 through 6 |
|
Example |
(not used in this example) |
Make any needed changes. Upon pressing OK the report will be printed. In character mode select <Enter> to print the report.
This is not an audit trail report so it may be viewed on the screen.