
This chapter contains the following topics:
Control information is where you enter I/C controls. Control information contains key information about the inventory control requirements of your business and key information about your business operation. Is is called Control information because it controls certain program functions such as your inventory valuation method and default values.
Select
Control information from the Master information menu.
Graphical Mode
The following tab displays:
If you are entering Control information for the first time, the cursor will be at the first field. As you are accessing a single record, only certain buttons are active:
|
New |
Not active |
|
Edit |
For editing a Control information record |
|
Save |
For saving a new record or changes to an existing record |
|
Save/New |
Not active |
|
Cancel |
To cancel the editing or adding a record |
|
Exit |
To exit the screen. Exit works like cancel when you are adding or editing an item. |
Character Mode
The following screen displays:
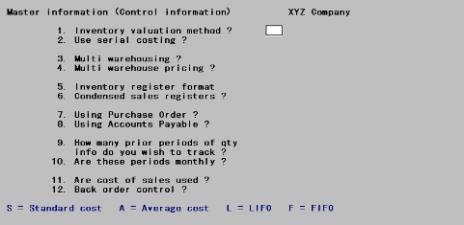
Enter the Control information as follows:
Inventory Control will track the value of your inventory in one of four ways:
| 1. | by standard cost with average cost assumption |
| 2. | by average cost with or without serial cost |
| 3. | by the last in-first out (LIFO) method |
| 4. | by the first in-first out (FIFO) method. |
Select one of the following:
| Character | Graphical | Description |
|
S |
Standard cost |
to select standard cost |
|
A |
Average cost |
to select average cost |
|
L |
LIFO |
to select LIFO |
|
F |
FIFO |
to select FIFO |
Refer to the Cost Inventory Methods appendix for a detailed discussion of each valuation method.
This documentation presents examples using the Average cost method, without serial costs (see below). Special notes are included, as appropriate, for other valuation methods.
Regardless of the valuation method you select, use the transaction processing instructions in the Inventory under Average Cost chapter.
The LIFO/FIFO Cost Valuation Appendix describes the differences in transaction processing under LIFO. If you wish to select FIFO, also read the discussion on FIFO in that Appendix.
If you select standard cost, also refer to the Standard Cost Valuation Appendix.
If you need to change valuation methods, be sure to review the Changing Valuation Methods Appendix for the proper procedures prior to making this change.
An entry in this field is allowed only if the Average cost method is specified in field number 1.
Check this box if you wish the real cost of a serialized item to be used (instead of the average cost) when processing the item. Otherwise, press <Enter> for the default of unchecked.
If you specified a valuation method other than A in field number 1, this field is skipped.
Check this box if you have more than one location where inventory is kept, and inventory control is desired at each location.
Leave it unchecked if just one location for storage is used or if multiple site control is not needed.
For multiple warehousing, inventory levels (the status of items) are tracked for each item in each warehouse.
When multi-warehousing is in effect under LIFO or FIFO costing, a history of the cost of each item is kept with regard to warehouse. Check this box to track LIFO or FIFO by warehouse; otherwise leave it unchecked.
|
Note |
If you wish to change your warehousing method once you’ve completed setting up control information, refer to the Changing Valuation Methods appendix. |
If you checked the box to Multiple warehousing, check this box if you wish to have the ability to price your items differently for each warehouse. Otherwise, leave it unchecked for no.
This field cannot be entered if you left the Multiple warehousingunchecked.
Select Detail for a detail format or Summary for a summary format.
The detail format of the Inventory Register shows all detail for each transaction to be posted.
For average or standard costing, both the summary and the detail format will provide full audit information on the register.
For LIFO or FIFO, the summary format does not give details of layers added, layers removed, or negative layers created. It does show the total cost correction resulting from a transaction that removes one or more negative layers.
If selected, the summary format should be reviewed by your company’s accountant to be sure that it meets the audit requirements of your company. If there is any question as to which format to use, select the detail format.
Check this box to print a condensed format of the Inventory Register when inventory transaction posting is originated by Order Entry invoice posting.
Your answer here does not affect the register format selected in the Inventory register format field when inventory transaction posting is originated by the Inventory (Post) selection.
The condensed format shows one line of information for each item by transaction type, warehouse, and transaction date.
If you leave it unchecked, the register format selected in the Inventory register format field is printed when inventory transactions are posted, regardless of the selection used to initiate posting.
Check this box if you intend to use the PBS P/O application. This causes I/C to display and print the quantity on order for each item. Purchase Order is licensed separately and can be added to your system if you are not licensed for it.
Check this box if you intend to use the Accounts Payable module. Accounts Payable is licensed separately and can be added to your system if you are not licensed for it.
Number of prior periods to track quantity info
You may track quantities for up to 24 prior periods. Enter the number of periods in your accounting year, from 1 to 24.
Quantities sold, used, sold + used and returned is the status information tracked by item by warehouse by period. This information can be viewed in the Status menu selection and may optionally print on the Status reports.
When Close a Period is run then the quantity information is moved down to a prior period.
If you are not sure, then an entry of 24 is recommended. This can be reduced to a smaller number at any time.
Check this box if your accounting periods are monthly. Otherwise, leave it unchecked.
If they are monthly, then the period labels will display and print as month plus year. If they are not monthly then they will be Prior prd # 9 with 9 being the month number.
Check this box if you wish to report on cost of sales in Sales Analysis. If you leave it unchecked, data pertaining to cost of sales will not be reported in Sales Analysis.
Regardless of your answer here, cost of sales figures are available for viewing and reporting in Inventory Control. If you have the A/R module, your answer to this question should be the same as it is in the A/R Control information selection.
Check this box if you wish to use back order control. You must also check this box if you wish to track committed inventory quantities. Leave it unchecked if you are not using back order control or tracking committed quantities for your items.
If LIFO/FIFO is being used, or if you intend to use serialized items, back order control must be set to checked.
Your answer here is used in the formatting of various reports and in setting up items in the Items menu selection.
Graphical Mode
After entering the last field the next tab displays:
Character Mode
After you have pressed <Enter> at Field number to change ?, a second screen appears:
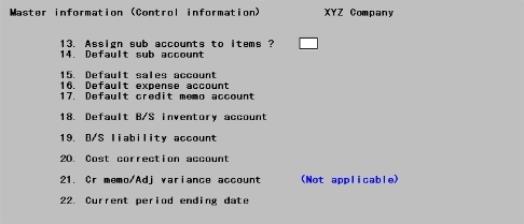
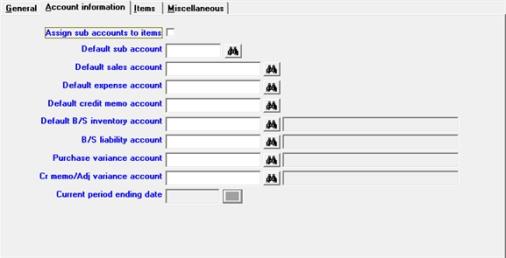
Enter the following fields:
Assign cost centers (or sub-accounts) to items
Entry in this field and the next is allowed only if Company information specifies that cost centers (or sub-accounts) are to be used (i.e. the size of the sub-account number is not zero). Otherwise, they cannot be entered.
You have a choice of assigning cost centers (or sub-accounts) either to the inventory items themselves or have each inventory item use the default Cost Center as defined in the next field.
Check this box if you want to assign cost centers (or sub-accounts) to items. In this case, the default cost center (or sub-account) in the next field is displayed as a default when entering items.
If you check this box, an item’s cost center will be used as a default for sales and credit memo transactions for the item in the Inventory selection.
Leave this box unchecked if you do not want a cost center (or sub-accounts) to be assigned to each inventory item.
Default cost center (or sub-account)
If you checked the box for the previous field, the cost center (or sub-accounts) entered here is used as the default when entering inventory items (using Items).
If you left the previous field unchecked, this cost center (or sub-account) is used as a default when entering inventory transactions (using Inventory (Enter)). When entering accounts in Items, the cost center (or sub-account) must exist for the main account you are entering.
Enter the default cost center (or sub-account) or press <Enter> to use a Cost Center (or sub-account) of all zeros.
For the next three fields, you enter only the main account number to use as the default for new items (in Items). You will specify the cost center (or sub-account) when you enter transactions in Inventory.
The account you enter here is used as a default for the Sales acct # field when entering an inventory item using Items.
The Sales acct # for an item is used by Accounts Receivable, Order Entry and Point of Sale when posting sales of this item.
If Cost Centers (or sub-accounts) are used, the Sales acct # is combined with a cost center in order to obtain the G/L account to be used for the posting.
In Accounts Receivable, Order Entry and Point of Sale the cost center (or sub-account) , is determined by an option specified in A/R, O/E and P/S Control information.
The account you enter here is used as a default for the Expense acct # (cost of goods sold) field when entering an inventory item using Items.
The Expense acct # for an item is used when posting sales transactions using Inventory. A sales transaction removes an item from inventory and reflects its cost in cost of goods sold.
If cost centers (or sub-accounts) are used, the Expense acct # is combined with the cost center (or sub-account) entered for the sales transaction in order to obtain the G/L account to be debited for the sale transaction. The item’s inventory account is credited.
The account you enter here is used as a default for the Credit memo acct # field when entering an inventory item using Items.
The Credit memo acct # for an item is used when posting credit memo transactions using Inventory. These credit memo transactions are used to handle goods returned by a customer.
If cost centers are used, the Credit memo acct # is combined with the cost center for the credit memo transaction in order to obtain the G/L account to be credited for the credit memo transaction. The item’s inventory account is debited.
Each item is assigned a balance sheet inventory account that is used for all posting for that item.
Enter the inventory account (as entered using Inventory accounts) that you wish to use as a default for the Inventory acct # field when entering an inventory item using Items. You should enter the most frequently used inventory account here in order to speed up data entry for items.
If you are not using Accounts Payable:
Enter the number of the account that is to serve as the balance sheet liability account.
When receivings for an item are posted, the item’s balance sheet inventory account is debited and the account you enter here is credited.
This account may be your accounts payable account. However, you should consult with your accountant as to the exact account that should be used for your business.
If you are using Accounts Payable:
Receiving transactions debit the item’s inventory account and credit the B/S liability account that is entered here.
Later, your vendor will send you an invoice for the receiving and you will enter it into A/P. If you set the expense distribution of the A/P invoice voucher to be the same account that was originally credited at the time of the receivings in I/C (i.e., the B/S liability account), the net effect will be to debit inventory and credit accounts payable.
At the time of I/C receiving posting:
| • | Debit item’s B/S inventory account |
Credit B/S liability account
At the time of A/P voucher posting:
| • | Debit B/S liability account (as the expense distribution) |
Credit Accounts Payable
The net effect is:
| • | Debit Item ’s B/S inventory account ’s B/S inventory account |
Credit Accounts Payable
At the end of an accounting period, the net amount in the B/S liability account represents inventory that has been received but that has not yet been posted as a payable in A/P. (If all bills are received by the end of a period, this account balance will be zero.) The B/S liability account will also reflect any errors or discrepancies between entries made in I/C and entries made in A/P.
The B/S liability account may be a clearing account. It can also be a liability account called Uninvoiced receivings. You should consult with your accountant to determine the exact account to be used.
If LIFO, FIFO, or Average was selected as the valuation method, field number 20 appears as follows:
(Average, LIFO, or FIFO only)
Enter the number of the account that is to serve as the average or LIFO/FIFO cost correction account. If using standard cost see the Purchase variance account field.
Cost corrections occur under average cost, LIFO or FIFO if an item’s quantity on hand is negative and a later receiving of the item arrives.
When the quantity on hand goes negative, the replacement cost is used in posting, because the LIFO or FIFO cost is no longer known.
When the later receiving arrives, the actual cost of the item’s negative quantity on hand becomes known, and any difference between this cost and the cost that was posted while the item was negative is posted to the cost correction account.
At the end of your accounting period, any remaining balance in this account should be charged to the cost of goods sold account.
|
Note |
In certain situations, cost correction can also occur when a kit is assembled from components. Refer to the Inventory Transactions chapter. |
If Standard Cost was selected for the valuation method, field number 20 appears as follows:
(Standard cost only)
Enter the account number of the account that is to serve as the purchase variance account.
Cost variances occur when an item is purchased at an actual cost that is different from the standard cost specified for the item in Items. The amount of any variance is posted to the purchase variance account.
This variance is actually a purchase price variance, and it allows you to assign variance responsibility to the purchasing or sales department within your company.
At the end of an accounting period this purchase price variance must be allocated between cost of goods sold and ending inventory, for financial statement presentation purposes.
See the appendix titled Standard Cost Valuation for more details concerning the assignment of responsibility within departments and the transactions involving the purchase variance account.
(Standard cost only)
Enter the number of the account that is to serve as a variance account for credit memos and adjustments. If you are using LIFO, FIFO, or Average, this field cannot be entered.
This is the ending date of your current accounting period. It is used during transaction posting to determine whether the transaction applies to the current period.
Graphical Mode
After entering the last field the following tab displays:

Character Mode
After pressing <Enter> at Field number to change ?, a third screen appears.
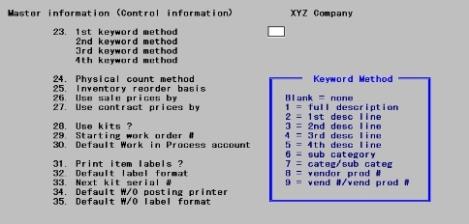
Enter the information as follows:
1st/2nd/3rd/4th keyword method
A keyword is a word or piece of information about an item that can be used to search for an item.
Enter up to four keyword methods to be used when searching for items, in the order in which they will be used. The 1st keyword method is the default method used to search for items. Refer to the table below for keyword method choices.
|
Method |
Description |
|
1 |
Full description |
|
2 |
Description line 1 |
|
3 |
Description line 2 |
|
4 |
Description line 3 |
|
5 |
Description line 4 |
|
6 |
Sub-category |
|
7 |
Category/sub-category |
|
8 |
Vendor item # |
|
9 |
Vendor #/vendor item # |
Press <Enter> to specify None for any method.
When Items is used to enter or change item information that is used as a keyword method, the item keywords are updated in Keywords.
If you select Full Description as a keyword method, each separate word of two or more characters (separated by a space or comma) in any line of an item’s description is considered a keyword, and is stored in Keywords.
If you change a keyword method after setting up your items, you must run Rebuild item keywords on the I/C data utilities menu to rebuild the Keywords.
The keyword search method is used in Order Entry order lines and I/C View > Items to help you search for an item. In graphical mode, it can also be accessed anywhere where the item lookup is available by clicking on the Keyword button.
Select Normal or Expanded from the drop down list.
In Inventory Control, you can perform the physical inventory counting process in one of two ways: the normal way or the expanded way.
The normal way allows you to print physical count worksheets for the items to be counted. When the physical count is complete, you must manually calculate and enter adjustments (using the Inventory selection) to align the item quantities on hand with the physical count quantities.
If you select normal, follow the instructions in the Physical Count Worksheets chapter.
The expanded method takes a picture of inventory levels for the items to be counted. Physical count worksheets may be printed for these items. When the physical count is complete, you enter the counted quantities, which are then compared to the picture inventory levels. Adjustments can be automatically calculated and created for items with different picture and counted quantities.
If you select expanded, follow the instructions in the Expanded Physical Count chapter.
Select Net quantity, or Quantity on hand from the drop down list.
Inventory Control allows you to report on items that need to be reordered or that are out of stock in one of two ways: based on net quantity or based on quantity on hand.
If you select Net quantity, an item is determined to be below reorder level or out of stock, based on the following formula:
Net quantity = quantity on hand-quantity committed-quantity on back order+quantity on work orders+quantity on order
If you select Quantity on hand, only the Quantity on hand field (in Items or Statuses) is used to determine if an item needs to be reordered.
Reports that show items needing reorder are the Purchasing Advice Report, Stock Status Report, and Valuation Reports.
A sale price is a price in effect for an item, or a group of items, for a specific period of time.
Enter up to three types of sale prices to be used when selling items through Accounts Receivable or Order Entry.
Check the box Item if you intend to set up sale prices by item, check Category for sale prices by item category, and/or Sub-category for sale prices by item sub-category. Leave any or all unchecked if you do not use them.
An item sale price is a price that applies to a specific item. A category sale price is a price that applies to all items with the same category. A sub-category sale price is a price that applies to all items with the same sub-category. (The category and sub-category of an item are defined in the Items selection.)
Use the Sale prices selection to set up sale prices by item, by category, or by sub-category.
When an item is sold in Accounts Receivable or Order Entry, sale prices are used only for the sale price types specified here. In addition, sale prices are printed on the Item Price List and Actual Customer Price List only for the sale price types specified here.
You may read more about this in the Entering Sale Prices section of the Prices chapter.
A contract price is a price in effect for an item, or a group of items, for a specific customer.
Enter up to three types of contract prices to be used when selling items through Accounts Receivable or Order Entry.
Check the box Item if you intend to set up sale prices by item, check Category for sale prices by item category, and/or Sub-category for sale prices by item sub-category. Leave any or all unchecked if you do not use them.
An item contract price is a price to a specific customer that applies to a specific item. A category contract price is a price to a specific customer that applies to all items with the same category. A sub-category contract price is a price to a specific customer that applies to all items with the same sub-category. (The category and sub-category of an item are defined in the Items selection.)
Use the Contract prices selection to set up contract prices by item, by category, or by sub-category.
When an item is sold to a customer in Accounts Receivable or Order Entry, contract prices are used only for the contract price types specified here. In addition, contract prices are printed on the Actual Customer Price List only for the contract price types specified here.
Because the number of types entered here has an effect on system performance in Accounts Receivable and Order Entry, you should only specify the contract price types you actually plan to use.
You may read more about this in the Entering Contract Prices section of the Prices chapter.
This field determines if you will be printing labels when receivings are posted.
The following applies if you have the Purchase Order module installed and you have checked the box for the Using Purchasing order field. In Purchase Order, when posting a receiving, the question Print item labels ? displays. Check this box to print item labels in Purchase Order. If you leave it unchecked, then the P/O posting entry program will skip the field.
The format used for printing of item labels is determined by the answer provided here.
On initial entry you will be asked to select a printer. Once selected it will display in parentheses. If you do not select a default printer, you will be prompted to select one when labels are printed. Select <F6> to change a default printer for this field.
These fields are user defined. You may define up to 2 quantity, 2 description and 2 date fields.
After you enter the last field, then the following tab displays:
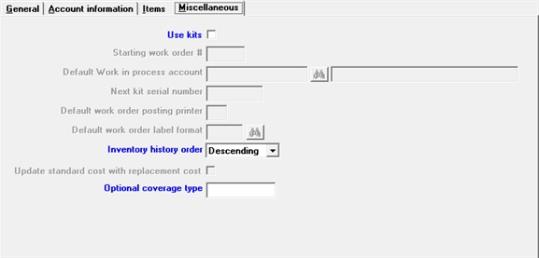
Kits are inventory items that are assembled from other inventory items. Check this box if you assemble kits from items that you stock.
Leave it unchecked if kit assembly is never used. Read more about the use of kits in the Kits chapter.
This field cannot be entered if you are not using kits.
Kits can be assembled by entering, printing, and issuing work orders. Enter the number to be assigned to the next work order entered. Each time a new work order is entered, this number is automatically incremented by 1. See the Work Orders chapter.
Default Work in process account
This field cannot be entered if you are not using kits.
Enter the usual work in process account to which distributions for components items should be posted while a work order is being assembled. This account is used as a default when entering work orders.
The entered account must exist in Inventory Accounts.
This field is numbered automatically for serialized kit items. It will assign sequential serial numbers for kit items.
Default work order posting printer
You may assign a default printer in this field. If you do not select a default printer, you will be prompted to select one when labels are printed.
If you need to change the printer select <F6> to assign a new one.
Default work order label format
This field determines if you will be printing kit labels automatically when Work Orders are complete.
This selection determines sort order when viewing inventory history. You can specify ascending or descending order.
Update standard cost with replacement cost
This option is only available if Standard Costing is used. It allows you to specify that the standard cost of an item will be overwritten with the replacement cost generated at the time of a receiving.
This field allows you to specify a coverage type in addition to the four pre-defined coverage types available in Coverages. You may read more about Coverage Types in the Master information chapter.