This chapter contains the following topics:
This chapter describes the Status load selection.
Because an inventory can contain several thousand items, this selection is provided as an alternative method of loading a large number of status records very quickly.
Status load is of primary benefit to a company with multiple warehouses. If a company were to add an additional warehouse, Status load would rapidly do a partial set-up for that warehouse.
This selection can also be used by companies that do not use multiple warehouses, although the benefit is more limited.
For single-warehouse companies, a check is made of each item record to ensure that a status record is present for it. If the status record does not exist, a record will be created. All quantities and amounts in the status record will be set to zero.
For multi-warehouse companies, a check is made of each item within a range of items or item descriptions that you specify. When an item in this range is found, a check is made to see if a status record exists for the warehouse you specified. If the status record is not found, a record will be created with all quantities and amounts set to zero.
For either single or multi-warehouse companies, an additional option exists that allows you to add location codes for each new status record.
When you select this option, you must remain at your computer terminal while this selection is running. When a new status record is being created, you are asked for the location code, which should be included in the status record.
If you choose not to assign location codes at the time when new status records are being created, you can let the Status load selection run unattended. After the load has been completed, use the Status selection to make any changes.
The normal sequence of events using Status Load functions is this:
| 1. | Enter Status Load Requests |
| 2. | Print Edit List |
| 3. | Run Status Load |
Select
Status load requests from the Utility menu.
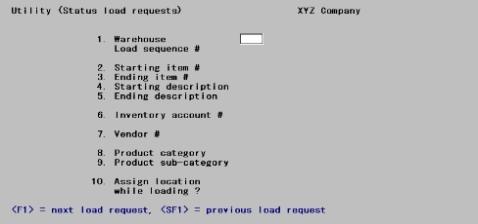
The following screen displays:
From the Selecting Status Load screen you can work with both new and existing status load requests.
Status load requests are identified by a load sequence number assigned when you originally enter the request. If a status load request with the warehouse or load sequence number you enter exists, the information on it appears and is available for changes or deletion.
Enter the following information:
For an existing Status load request
*1. Warehouse
Options
Enter the warehouse and load sequence number or use one of the options.
|
<Enter> |
For the Central warehouse |
|
<F1> |
For the next load request |
|
<SF!> |
For the previous load request |
|
Format |
Enter up to two characters |
|
Example |
Press <Enter> for Central warehouse. |
For a new Status load request
Enter a warehouse code, or use the option.
The warehouse code must have been defined previously using Warehouses.
Load sequence #
Enter the sequence in which this load request will be used to load items (in relation to other load requests you may have entered for this warehouse).
On subsequent load requests, you may either enter another number or press <Enter> to use the default number shown (1 greater than the preceding load sequence number).
You can specify the range of the items to be loaded as being either from a starting to an ending item number, or from a starting to an ending item description.
|
Format |
Up to two digits |
|
Example |
Type: 1 |
Specifying a range of item numbers
Enter the starting and ending item numbers, then press F1 in the Starting description and Ending description fields to leave the description range wide open.
Specifying a range of item descriptions
Press <F1> in the Starting item # and Ending item # fields to set them to First and Last. This leaves the item number range wide open. You can then narrow down the range by specifying a starting and ending item description.
2. Starting item # and
3. Ending item #
Specify the range of item numbers for which you wish to load status records.
|
Format |
Up to 15 digits or use the option |
|
Example |
Press <F2> for the First and Last item numbers |
4. Starting description and
5. Ending description
Specify the range of item descriptions for which you wish to load status records.
|
Format |
Up to 25 digits or use the option |
|
Example |
Press <F2> for the First and Last item numbers |
6. Inventory account #
Options
Enter the inventory account for which you wish to load status records, or use one of the options:
|
<F1> |
For the next inventory account |
|
<SF1> |
For the previous inventory account |
|
<F2> |
For the default Control information inventory account |
|
<F5> |
For All inventory accounts |
|
Format |
Defined in Company information |
|
Example |
Press <F5> for All |
7. Vendor#
Enter the vendor number to load item status records for only one vendor, or press <F5> to include All vendors.
|
Format |
six characters |
|
Examples |
Press <F5>. |
8. Product category
Enter the product category to load item status records for only one product category, or press <F5> to include All product categories.
|
Format |
five characters |
|
Examples |
Press <F5>. |
9. Product sub-category
Enter the product sub-category to load item status records for only one product sub-category, or press <F5> to include All product sub-categories.
10. Assign location while loading?
Answer Y or N. If you answer N, Status load will run unattended and the location codes will be left blank. If you answer Y, you are asked for a location code before each new status record is added.
|
Format |
One letter (either Y or N). The default is N. |
|
Example |
Press <Enter> to accept the default |
Use this selection to print a current list of status load requests.
Select
Status load list from the Utility menu.
The Status File Load List prints to the printer you select. No entry parameters are requested. All load requests are printed on the report.
Select
Status load from the Utility menu.
A message displays, asking whether it is OK to load the status information specified above into Statuses.
Answer Y, or press <Enter> to default to N. If you answer Y, the Status is loaded.
While loading, a screen displays, showing the load activity.
Options
Use these options:
|
<F1> |
To stop loading at any time |
|
<F2> |
To resume loading |
|
<Esc> |
To exit from loading |