This chapter contains the following topics:
Item labels may be printed in Inventory Control or under the CTL and the menu selection Labels. Read this chapter for printing the labels in Inventory Control or read the PBS Administration documentation for setting up and printing labels under CTL.
This selection allows you to create inventory labels of your own design. You can specify which inventory information (fields) to show on the label and the exact arrangement (layout) of that information on the label.
Although you will probably use Item labels most of the time to create labels that attach to and identify your inventory items, it can also be used to create an index of your inventory on 3" x 5" index cards, inventory fact sheets, and customized lists of inventory information.
Usually, you would follow these steps in creating an item label:
|
Step |
Description |
|
1 |
Use Location grid to print a grid on top of your labels form (or sheet), and sketch the layout of your label on it. |
|
2 |
After you have an idea of what your label will look like, use the Layout selection to first describe its general appearance, and then to select each field and specify where it will print on the label. |
|
3 |
Use Layout list to print a list of your layout specifications. This step will indicate any problems in your layout. |
|
4 |
Use Test to try your new label layout. |
|
5 |
After you are satisfied with the label layout, use the Print selection to print your item labels for the items and warehouses that you designate. Refer to theItems chapter. |
|
6 |
Use the Copy function to create another layout if it is similar to the label already designed. (Use Layout to tailor the new (copied) layout rather than creating the label from scratch.) |
This chapter describes how to create a label in the same sequence as outlined above.
Select
Item labels from the I/C menu.
Although Location grid is not the first selection on the menu, it is normally the first function to use when you begin designing a new item label.
A location grid consists of column and row markers printed on top of one of your labels (or one of your label sheets), to be used as an aid in laying out the overall design of the label.
Use the location grid as a worksheet to help you to establish the exact location (the row and column) of each field and piece of text that you intend to print on the label. Mark the positions of your fields and text on the grid and, later, use it as a guide when entering the label layout.
Select
Location grid from the Item labels menu.
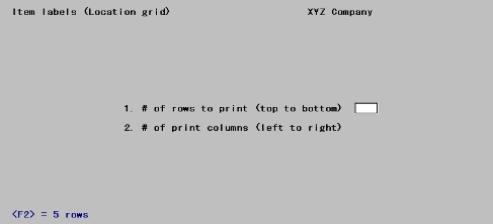
The following screen displays:
Enter the information as follows:
1. # of rows to print (top to bottom)
Enter the number of rows you want to print on the grid, or press <F2> for five rows on each label.
|
Format |
99 |
|
Example |
Press <F2> for five rows. |
2. # of print columns (left to right)
Enter the number of columns you want printed on the grid, or press <F2> for 35 print columns on each label.
|
Format |
99 |
|
Example |
Press <F2> for 35 columns. |
Make any needed changes and press <Enter> to print the label grid. Insert your label or label sheet in the printer. Follow the screen instructions to print the location grid.
The Layout selection allows you to enter all of the specifications needed to define the size of your labels, the number of labels across the label sheet, and which I/C Item fields will print on the label.
To assist you in answering some of the questions in the following screens, use the location grid on which you have designed your label.
Two screens are used:
| 1. | A single screen to describe the general appearance of the label. |
| 2. | A separate screen to describe each field on the label. |
Select
Layout from the Item labels menu.
The following screen displays:

On this screen you identify this label layout with a number and description, and define its general appearance.
From this screen you can work with both new and existing label layouts. If a label layout exists for the label number you specify, that label layout appears and is available for changes or deletion.
Enter the following information:
1. Label #
Enter a number to identify this label layout.
Options
You may also use one of the options:
|
<F1> |
For the next layout |
|
<SF1> |
For the previous layout |
|
Format |
Three characters |
|
Example |
Type: A |
2. Description
Enter a description for this label layout.
|
Format |
30 characters |
|
Example |
Type: Sample inventory item |
3. # of labels across page (max 4)
|
Format |
A single digit from 1 to 4 |
|
Example |
Type: 3 |
Enter the number of labels to print across the page (label sheet), up to 4 labels.
4. # lines per label (max 66)
Enter the number of lines (rows) to print on a label, up to 66 lines.
|
Format |
99 |
|
Example |
Type: 10 |
5. # lines between labels
Enter the number of lines to skip between labels. (For most labels this is 1 line.)
|
Format |
99 |
|
Example |
Type: 1 |
6. # columns per label (max 132)
Enter the number of columns (at 10 cpi) to print for a label, up to 132 columns.
|
Format |
999 |
|
Example |
Type: 33 |
7. Starting column for 1st label
Enter the starting column number for the first label. This column number determines the distance from the left the printing will start on your label sheet.
|
Format |
99 |
|
Example |
Type: 1 |
Fields eight, nine, and ten display only if you entered 2, 3, or 4 (respectively) at field # 3.
8. Starting column for 2nd label
This field only appears if you specified (in field #3 above) that more than one label is to be printed across the sheet.
Enter the starting column for the second label. This column number must be at least the starting column for the first label, plus the number of columns per label (field #6 above) plus 1.
|
Format |
999 |
|
Example |
Type: 34 |
9. Starting column for 3rd label
This field only appears if you specified (in field #3 above) that more than 2 labels are to be printed across the sheet.
Enter the starting column for the third label. This column number defaults to the starting column for the second label, plus the number of columns per label (field # 6 above).
|
Format |
999 |
|
Example |
Press <Enter> for 67 |
10. Starting column for 4th label
This field only appears if you specified (in field #3 above) that four labels are to be printed across the sheet.
Enter the starting column for the fourth label. This column number defaults to the starting column for the third label, plus the number of columns per label (field #6 above).
|
Format |
999 |
|
Example |
Not applicable in this example. |
Press <Enter> to terminate the description of the label as a whole, and start the description of the individual fields.
Located at the bottom of this screen is a window showing the first 10 fields available for you layout. To view the remainder, press <PgDn>.
It makes no difference in what order you enter information into the fields. A field must be visible in the window before it can be entered. Each field is entered on a separate screen. When all a label’s fields have been defined, press <Esc> to return to the menu.
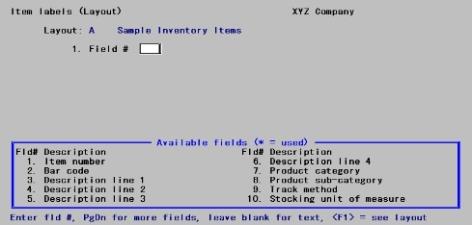
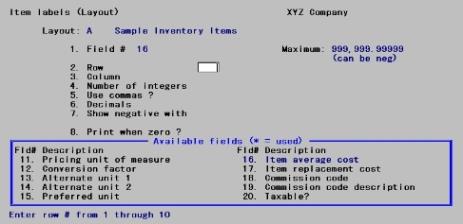
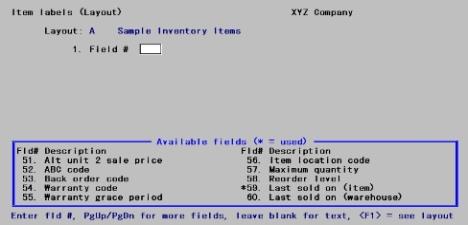
The exact format of this screen will vary depending upon the nature of the field currently being described. Examples of all formats are shown below:
1. Field #
|
Format |
99 |
Enter the number of the field name that you want to select for the label.
Options
You may also use one of the following options:
|
<Blank > |
To enter text instead of a field number. Refer to Inserting Label Text. |
|
<F1> |
To display the label |
|
<PgUp> or <PgDn> |
To scan through additional item fields |
|
Format |
99 |
|
Example |
Type: 1 for Field # to select item number. |
Some fields are optional and may not be present for your company; those not present are omitted from the window seen on the screen, and the remainder are renumbered.
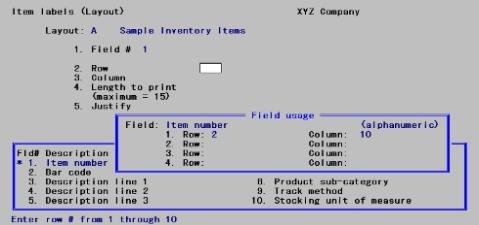
The screen now displays as follows:
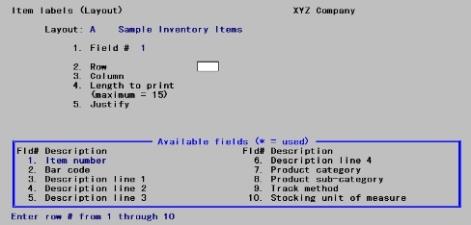
This screen enables you to specify where to print the selected field (item number) and how you want it to look when it is printed.
The appearance of this screen below Row and Column depends on what type of field you have selected. A field will be one of three types, depending on the type of information that it contains:
may contain any combination of letters, digits, and special symbols.
Date fields
only contain dates.
only contain digits, along with any decimal points, minus signs or parentheses (for negative numbers), and commas.
Numeric fields only contain digits, along with any decimal points, minus signs or parentheses (for negative numbers), and commas.
Date fields only contain dates.
Enter the information for an alphanumeric field as follows:
2. Row
Specify the row in which to print this field.
|
Format |
99 |
|
Example |
Type: 2 |
3. Column
Specify the starting column in which to print this field.
|
Format |
999 |
|
Example |
Type: 10 |
4. Length to print (maximum = nn)
Enter the number of characters you want to print in this field, up to the maximum number shown, or press <Enter> for the maximum length of the field allowed by the software.
|
Format |
99 |
|
Example |
Type: 15 |
5. Justify
Justify means to adjust characters within the space allowed. Enter one of the following:
|
L |
To left-justify the characters. The characters will be aligned with the left-hand margin of the space for this field. |
|
R |
To right-justify the characters. The characters will be aligned with the right-hand margin of the space for this field. |
|
N |
For no justification. The characters will be printed exactly as entered. |
|
Format |
One character from the list above |
|
Example |
Press <Enter> for left justification |
The screen now displays as follows:
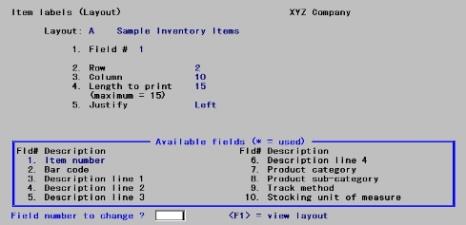
When you press <Enter> at Field number to change ?, you are returned to Field # for selection of another field.
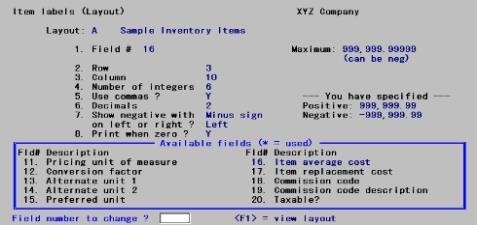
Next, we will use the Item average cost. Select this by entering 16, and the screen now displays as follows:
The choices for a numeric field depend on the characteristics of that particular field (for example, its maximum length, if negative numbers are allowed, if it has any decimal places, etc.).
Item average cost is a numeric field.
Fields #5 through #7 appear only as needed. For example, Item average cost allows fractional and negative values. Vendor lead time, however, does not, so fields #6 and #7 do not appear.
|
Example |
Enter a row of 3 and a column of 10. After specifying the row and column, specify the remainder of the information as follows: |
4. Number of integers
Enter the number of integers (digits to the left of the decimal point) you want to print in this field, up to the maximum shown, or press <Enter> for the maximum shown.
|
Format |
99 |
|
Example |
Press <Enter> for the maximum |
5. Use commas?
If commas are not appropriate for a particular field, you are not given the option of using commas.
Answer Y to use commas when printing this field on a label.
|
Format |
One character, either Y or N |
|
Example |
Type: Y |
6. Decimals
If the field has no decimal places, this choice does not appear.
Enter the number of decimal places you want to print, up to the maximum shown, or press <Enter> for the maximum shown.
|
Format |
9 |
|
Example |
Type 2 to show cost only cents (instead of the default five digits) |
7. Show negative with
If this field cannot contain a negative value, this choice displays (Not applicable.)
Options
Enter one of the following:
|
M |
To show negative numbers with a minus sign |
|
P |
To show them in parentheses |
on left or right?
If you select to show negative numbers with a minus sign
Options
Enter one of the following:
|
R |
To place the minus sign on the right. (-1234) |
|
L |
To place the minus sign on the left. (1234-) |
Print where?
If you select to show negative numbers with parentheses.
Options
Enter one of the following:
|
F |
To place the parentheses in fixed positions (Parentheses enclose the entire size of the field regardless of the numbers.) |
|
N |
To them next to the number. (Parentheses enclose the numbers, stripping out leading spaces.) |
8. Print when zero?
Answer Y to print a zero when the number is zero. Answer N to leave the field blank when the number is zero.
|
Format |
One character, either Y or N |
|
Example |
Type: Y |
The screen now displays as follows:
Now press <Enter> at Field number to change ?, so that you are back at Field #, ready to select another field. Select Last sale on (item). First you will first have to press <PgDn> until this field is visible.
The following screen displays:
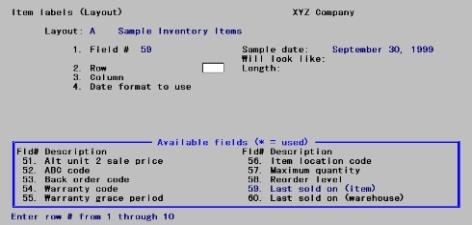
If you select a date field, such as Last sale on (item), the screen will have the above appearance.
Enter the row and column in the same way as for an alphanumeric field.
Then specify the format to use when printing the date:
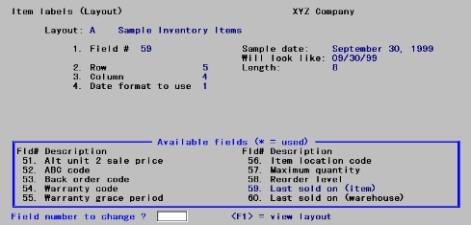
4. Date format to use
Enter one of these choices for how the date is to be printed:
|
1 |
MM/DD/YY |
|
2 |
MM/DD |
|
3 |
DD-MMM-YY |
|
4 |
DD-MMM |
|
5 |
Month fully spelled |
MM represents the month number. (January = 1, December = 12). MMM represents the month abbreviation (January = JAN).
When you enter your choice, the Will look like: field on the right side of the screen shows how the date will look. The length of the field displays so you will know how much room this field will occupy on the label.
|
Format |
One digit from the above list |
|
Example |
Type: 1 |
The screen now displays as follows:
While entering the label layout, you can press <F1> to view a picture of the label. This will give you an idea of the appearance of your label.
The width of the label is your entry for # columns per label, and the number of lines is your entry for # lines per label.
| • | X’s appear to represent the alphanumeric fields that you selected, in the length and location you specified. |
| • | 9's appear for numeric fields. |
| • | Dates are represented differently, depending on the format you have chosen for the date. |
| • | ?'s appear where any of the fields overlap, in which case you need to change the position of a field. |
Press <F1> to view your label. A screen similar to this displays:
Options
Use one of the following options:
|
<Up> or |
To scroll your label up and down one row at a time. This is useful to bring a row to the bottom of the screen to be near the column numbers, where you can more easily judge a field's column position. |
|
<PgUp> or <PgDn> |
To shift your view of the label up and down by a screen-full at a time. This is useful when your label size is large than can be displayed on the screen. |
|
<F2> |
To shift your view to the right edge of the label. This option only appears when your label is wider than the screen. Press <F2> again to shift back to the left. |
|
<Esc> |
To exit the View label screen and return to the layout screen. |
Press <Esc> and then press <Enter> to display the following screen:
You can enter text and position it where you want it to print on each label. For instance, you would probably want to print the text Item #: next to the Item number field on each label. You can also use this option to print dashed lines (---------------) or symbols on your labels.
To insert text, press <Enter> at Field #.
This enables you to enter text and position it where you want it to print for each label. For instance, you might want to print the caption Item #, next to the item number field on each label.
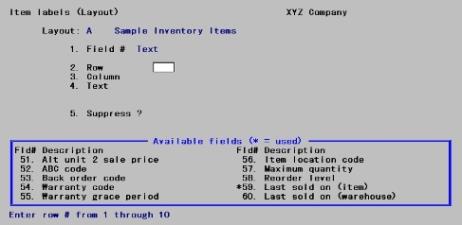
Enter text information as follows:
1. Field #
Text appears in this field, to indicate that you are working with text rather than fields.
2. Row
Enter the row in which you want the text to print.
|
Format |
99 |
|
Example |
Type: 2 |
3. Column
Enter the column in which you want the text to begin printing.
|
Format |
99 |
|
Example |
Type: 5 |
A ruler appears, with numbers starting at the column you specified above, and extending up to 40 columns. The ruler stops at the right-hand edge of your label, and thus may be shorter than 40 columns.
|
Format |
40 characters |
|
Example |
Type:Item # |
4. Text
Enter the exact text you want to appear in that location.
5. Suppress ?
Answer Y if you want the text to be suppressed (not printed) when some field (to be specified next) is zero or blank. Answer N if you want to suppress the text.
|
Format |
One character, either Y or N. The default is N. |
|
Example |
Press <Enter> for N. |
For example, suppose you had specified that the text Vendor-# would be printed next to the Vendor number field value on your label. To prevent the Vendor-# text from printing for items that have no vendor, you would answer Y here.
Field #
If you answered Y to Suppress?, enter the number of the field that, when zero or blank, will cause the text not to print.
If you have not already selected this field to print on the label, you get a warning message. However, your choice is still accepted. Make a note to select the field later. The field you select here must also be selected to print on the label.
To delete a text entry, or change the location or wording of text you have entered, display the text screen by pressing <Enter> at Field #.
A screen similar to this displays:
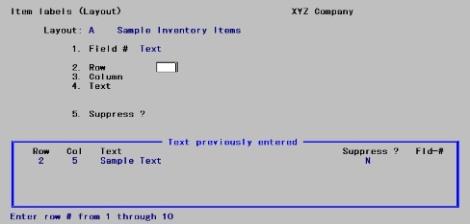
A window shows information on the text entries already entered.
To delete a text entry, enter its row and column number, then press <F3>.
To change the wording of the text, enter its row and column number, select field #4, and enter the new wording. You can also change the Suppress? information by selecting field #5 and entering a new answer or new field number.
To change the row or column in which the text starts, enter its current row and column numbers. Then select field number 2 or 3 and enter the new row or column number.
|
Example |
Press <Enter> at Field number to change ? to leave the text unchanged. |
Sometimes you may need to change the appearance or print location of a field that you have already selected to appear on your label. This section describes how to change a field's appearance or location, delete it, or print it in additional locations on the label.
The first step is to select the field you want to modify by entering its number at Field #.
|
Format |
99 |
|
Example |
Type: 1 to reselect the item number field. |
The screen now displays as follows:
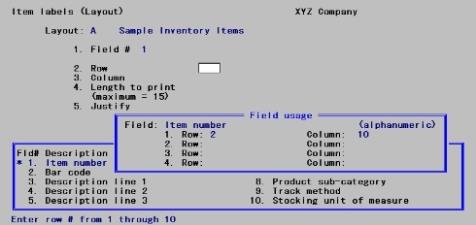
The Field usage window shows how many times you have used this particular field in your label and where you have used it. You can use each field up to four times. In this example, Item number has only been used one time -- in row 2, column 10.
Now select the usage of the field you wish to modify by entering its row in Row, and its column number in Column.
|
Format |
99 in each field |
|
Example |
Enter 2 for Row, then enter 10 for Column. |
For instance, if you choose Row 2, Column 13 in this example and change the column to column 16, the screen displays similar to this:
Use Field number to change ? to change any of the information about this field,
Options
You may also use the options:
|
<F1> |
To view the label |
|
<F2> |
To delete this particular usage. Any other usages will not be affected. |
|
Example |
Enter 3 at Field number to change ? to enter a new column. Enter 11 for column so that the Item number field will now print in column 11 of the label. Press <F1> if you want to view the change in location for Item number. |
After making changes, press <Enter> at Field number to change ? and you will be back at Field # ready to select another field.
You can print any field in up to 4 different locations on the label.
To use a field again, enter its number at Field #.
|
Example |
Type: 1 to reselect the Item number field. |
The screen now displays similar to the following:
Enter the new location (row and column), and the remaining information to specify how to print the field in its new location. When you print your labels, this field will print in all of the locations that you have specified.
|
Example |
Enter 5 for Row and 16 for Column. Press <Enter> to accept the defaults for Length to print and Justify. Then press <F1> to view both usages of Item number on your label. Press <Esc> so that this second usage is not saved. |
This selection prints a report that lists the label layouts you have entered for one or more labels. For each label layout listed, it shows you the label's general appearance information and the information specifying the appearance and location of each field on the label.
After you have entered all of the layout information for your label, we recommend that you print this report so that you can view all of the layout specifications together at once. Based on the information in the report, you can make adjustments and corrections to your label layout before using Test to print a test label.
Select
Layout list from the Item labels menu.
The following screen displays:
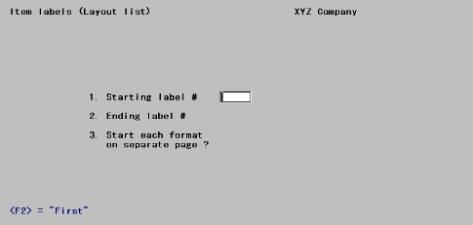
1. Starting label # and
2. Ending label #
Enter the range of label numbers for which to print the list. Follow the screen instructions.
|
Format |
Three characters |
|
Example |
Press <F2> at each field for First and Last. |
3. Start each format on separate page ?
Answer Y to print each format on a new page. Otherwise, answer N.
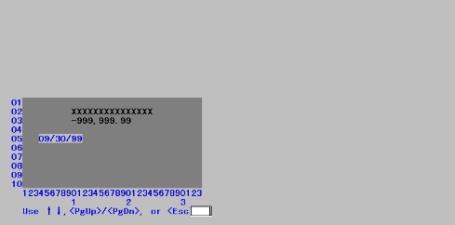
Use this selection to test your label layout. It will print a test label, substituting X’s for each field that you have selected to print on the label.
For example, if you have selected the Item number field to appear in row 1 at column 12, and to print its full length of 15 characters, the test label will have XXXXXXXXXXXXXXX printed on row 1, starting at column 12.
This feature is useful for verifying a new label layout prior to actual use and for checking printer alignment.
Select
Test from the Item labels menu.
The following screen displays:
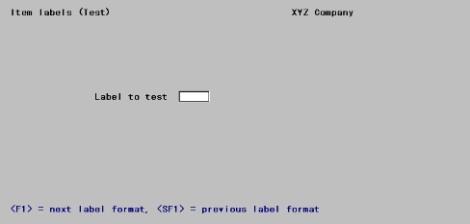
Enter the following information:
Label to test
Enter the number of the layout you want to test.
Options
You may also use the options:
|
<F1> |
For the next layout |
|
<SF1> |
For the previous layout |
|
Format |
Three characters |
|
Example |
Type: A to access the layout example previously created. |
You will be prompted with Any change?. Make any needed change. If you enter N, the test label will print.
This selection copies a label layout to a new one.
You can use this selection to quickly produce a new label layout by copying an existing layout that is similar to the new one. After copying the label, tailor the new layout as described in the Modifying Fields section.
Select
Copy from the Item labels menu.
The following screen displays:
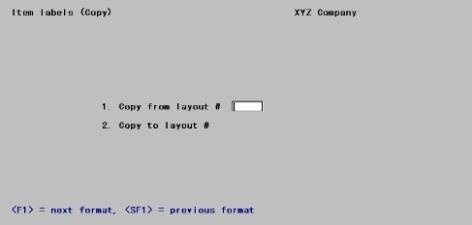
Enter the following information:
1. Copy from layout #
Enter the number of the layout you wish to copy.
Options
You may also use the following options:
|
<F1> |
For the next layout |
|
<SF1> |
For the previous layout |
|
Format |
Three characters |
|
Example |
Type: A to access the layout example previously created. |
2. Copy to layout #
Enter the number to assign to the new layout. You may not copy over an existing layout.
|
Format |
Three characters |
|
Example |
Type: B to create a new layout. |
Make any needed changes. When you press <Enter>, the layout is copied. A message informs you that processing is occurring.