This chapter contains the following topics:
Introduction to Inventory Transactions
Entering Inventory Transactions
Entering Sales and Credit Memos
Kit Assembly EntriesKit Assembly Entries
Entering Component Usage Transactions
Entering Job Usage Transactions
Importing Receivings and Transfers
Posting Inventory Transactions
Distributions to General Ledger
Hardware Failure During Posting
Use this selection to enter inventory transactions, or to import receiving or transfer transactions from an external disk file. Once the transactions are entered (or imported) and verified to be correct, you can post them to the permanent I/C files or tables.
There are eight different types of transactions that can be processed in Inventory:
| • | Receivings |
| • | Sales |
| • | Credit memos |
| • | Adjustments |
| • | Transfers (under multi-warehousing) |
| • | Kit assembly (if kits are used) |
| • | Component usage (if kits are used) |
| • | Job usage (if Job Cost is used) |
Processing of inventory transactions varies depending upon whether you have selected Average cost, LIFO or FIFO, or Standard cost in your I/C Control information.
Average cost is discussed in this chapter. Additional information on processing inventory transactions under LIFO, FIFO, and standard cost can be found in the appendix titled LIFO/FIFO Cost Valuation. The standard cost method itself is documented in the appendix titled Standard Cost Valuation.
There are other transaction sources besides Inventory. Kit assembly and component usage are generated from work orders and are not entered here. Adjustments can be generated by expanded physical count. Sales and credit memos can be generated from Order Entry and Accounts Receivable. Receivings can also be generated from Purchase Order.
Note that references to warehouses apply only when multi-warehousing is being used.
When inventory transactions are entered for serialized or lot-controlled items, related serial transactions are automatically created. The serial transactions are automatically posted when the associated inventory transactions are posted. (These serial transactions are not accessible through the Serial numbers selection.)
Correcting entries: You can press <F5> at the Field number to change ? question to mark any inventory transaction that will be passed to G/L as a correcting entry. Refer to the Control Information chapter in the G/L User documentation for more information.
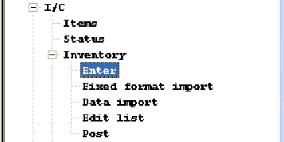
Select
Inventory from the I/C menu.
A screen displaying the following five Passport Business Solutions inventory selections will be displayed:
| • | Enter enables transactions to be entered and (until they are posted) modified or deleted. |
| • | Fixed format import does the receiving and transfer of transactions that can be automatically imported into Inventory Transactions from a file that is not normally part of the Inventory control system. The Fixed format import is included with the I/C system. |
| • | Data import allows you to import any file that is a fixed length or csv format. It is a separate product and requires that you license Data Import Manager. |
| • | Edit list produces a list of the transactions prior to posting. Edit lists are optional and can be printed as often as desired until the entries are posted. |
| • | Post does the actual posting of the transactions and prints a permanent register. |
You can work with both new and existing transactions.
Select
Enter from the Inventory menu.
Graphical Mode
The list box displays up to 6 inventory transactions at a time. You may sort the transactions by item number in ascending or descending order. Only column names in red may be sorted. To change the sort direction or field either click on the column name or the arrow to the right of the column name or use the View menu options.
To locate an inventory transaction, start typing the item number. You may also use the up/down arrows, Page up, Page down, Home and End keys to locate an item. The <F1> and <SF1> keys function the same as the up/down arrow keys.
Inventory transactions that display in the list box are available for changes or deletion. The fields for the selected item display in the lower part of the screen.
When an inventory transaction is found, you may select the <Enter> key or Edit button to start editing.
Inventory Transaction Buttons
The buttons at the top of the screen and keyboard equivalents do the following:
| Button | Keyboard | Description |
|
New |
Alt+n |
For adding a new inventory transaction |
|
Edit |
Alt+e |
For editing an existing inventory transaction |
|
Save |
Alt+s |
For saving a new item or changes to an existing inventory transaction |
|
Save/New |
Alt+w |
This button combines the Save and New buttons by first saving the item and then starting a new inventory transaction |
|
Cancel |
Alt+c |
To cancel the editing or adding of an inventory transaction |
|
Exit |
Alt+x |
To exit the screen. Exit works like cancel when you are adding or editing an inventory transaction |
Character Mode
The following screen displays:
Enter the following information:
Item number
Entering the Item for a New Transaction
Enter the item number or select <Enter> to lookup the item by description.
Options
You may also use the options:
|
<F2> |
For the next item in item number order |
|
<SF2> |
For the previous item number |
|
<F8> or click on binoculars button |
To look up the item by number or on the description field by description |
If you are using multi-warehousing, the cursor moves to the Warehouse field.
For an Existing Transaction in Character Mode Only
Enter the item number, warehouse code (if you are using multi-warehousing), and transaction type for the transaction you wish to change.
Options
You can also use the options:
|
<F1> |
To find the next transaction |
|
<SF1> |
For the previous transaction |
If there is no matching transaction, continue entry as if this were a new transaction.
This field appears only if you are using multi-warehousing.
Specify which warehouse is involved in the transaction. Enter the warehouse, or press <Enter> for the Central warehouse.
If this is a transfer, enter the warehouse code of the sending warehouse (the one the item is being sent from), or press <Enter> for the Central warehouse.
Enter one of the following transaction types:
|
Receiving |
Receivings must be entered here unless you are licensed for Purchase order. See the Purchase order documentation for more information. |
|
Sale |
Sales can be entered here, but are normally handled through A/R Invoicing, O/E orders or P/S transactions |
|
Credit memo |
Credit memos can be entered here, but are normally handled through A/R Invoicing, O/E orders or P/S transactions |
|
Transfer |
Available only if using multi-warehousing |
|
Adjustment |
Adjustment |
|
Kit assembly |
Available only if using kits |
|
Component usage |
Available only if using kits |
|
Job usage |
Available only if using Job Cost with I/C |
After the first transaction is entered, for subsequent transactions, this field defaults to the type entered for the prior transaction.
The fields to be entered from this point forward depend on the transaction type you specify in this field. Each of the types is shown in the following sections.
If you are using Purchase Order, receivings should be entered alternatively using the Receivings selection in P/O. When the receivings are posted in P/O, inventory receivings transactions are generated automatically.
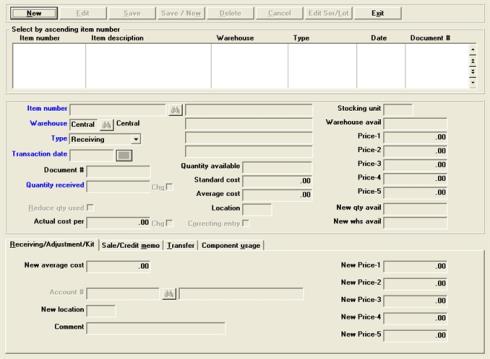
Graphical Mode
After you select Receiving, the following screen displays:
![]()
The ReceivingAdjustment/Kit tab displays.
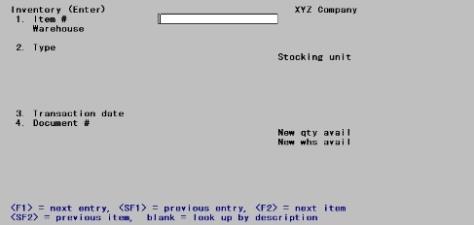
Character Mode
After you select R for Receivings, the following screen displays:
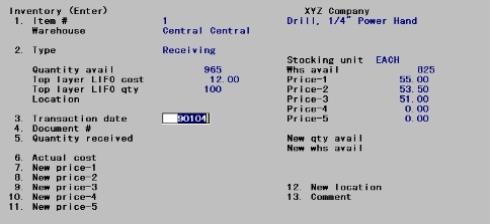
A receiving enables you to enter additions to your inventory.
Adjustments are explained in this section as well, because of their similarity to receivings, but receivings will be considered first.
This section will be the only one to describe each field on the screen. Subsequent sections avoid much repetition by describing only what is different about the transaction type. Anything stated here about any field on the receivings screen applies to the same field on the other transaction types. Exceptions are noted as they occur.
|
Note |
If you are using Purchase Order, receivings may be entered using this Inventory selection, but are normally entered using the Receivings selection in P/O. When these receivings are posted in P/O, inventory receivings transactions are generated automatically and posted. |
This is the sum of the quantities at all warehouses.
This is the computed average actual cost for all items currently in inventory, as reported at the time of receipt. If serialized unit costing is in effect (for which refer to the Serial Inventory chapter), the average cost does not reflect the individual unit costs.
The Replacement cost displayed is that found in Items. Refer to Replacement cost in the Items chapter for a definition. This field does not display when Standard cost is the inventory valuation method.
This displays the quantity available at the warehouse. There may be more stocking item.
Price-1, Price-2, Price-3, Price-4, Price-5
These show the prices charged.
Enter the information as follows:
The current date is displayed for the first transaction. For subsequent transactions, the last date entered is displayed.
Enter the date for this transaction or press <Enter> to use the date shown.
It is important to make any necessary change to Transaction date as the transaction is being added. The transaction date cannot be changed in an existing transaction.
|
Format |
MMDDYY, or use the option |
|
Example |
Press <Enter> to accept the system date |
For the first transaction, you must type in the document number you wish to use. For subsequent transactions, it displays the last document number entered.
Enter a document number and press <Enter> to accept the default.
Options
You may also use the options:
|
<Enter> |
To use the previously entered document number. |
|
<F1> |
For the next entry matching the item, type, and transaction date entered. |
This is the quantity received, where Unit represents the unit defined for this item. (Each, Gal, Tons etc.)
Enter the number of stocking units received, or press <F2> for an item with alternate units defined, to enter the quantity in an alternate unit.
If you press <F2>, a window displays for you to enter the quantity and actual cost per alternate unit. Press <F2> again to switch to a different alternate unit or stocking unit for the item.
If you enter the quantity and actual cost as an alternate unit, the equivalent number of stocking units and the cost per stocking unit is also displayed in the window. Upon leaving the window, the stocking unit equivalents are displayed.
The name of this field varies depending on the entry type, and will appear on different screens as quantity adjusted, quantity credited, etc. It is entered as a positive value in all cases, except that Adjustments and Job Usage permit either positive or negative entries.
Enter the number of units received.
You cannot enter zero in this field. A negative quantity or a decimal quantity may be entered for items that are not serialized or lot-controlled.
For serialized items zero and negative quantities are not accepted, nor can the unit be changed. The unit should be Each and the quantity should not be fractional (that is, there should be no digits to the right of the decimal).
The new total quantity available and the new quantity available at this warehouse are updated automatically.
After entering a receiving the New qty avail field is updated. However this is temporary.
|
Format |
99999999.99999 |
|
Example |
Type: 40, and then press <Enter> |
Actual cost per (stocking unit)
Enter the actual cost of this item per your stocking unit or press <F2> to default to the replacement cost.
If the item's quantity on hand and average cost are zero in Items, the average cost you enter here is automatically updated in Items when you complete entry of the receiving.
If you entered Quantity received in an alternate unit, the Actual cost is also entered per alternate unit.
|
Format |
99999999.99999 |
|
Example |
Press <F2> |
Check this box if this is a correcting entry. Leave it unchecked if it is not.
|
Format |
Check box where checked is yes and unchecked is no |
|
Example |
Select <Enter> to leave it unchecked |
This field initially displays the location. Changes to these fields can be made when Field number to change ? displays.
When this transaction is posted, any new prices and location you have entered here update the applicable fields in the item record.
|
Format |
Enter up to four characters |
|
Example |
Press <Enter> for Central warehouse |
Enter any comment you wish about this receiving.
|
Form |
Enter up to 25 characters |
|
Example |
Type: Partial Receiving |
New Price-1 through New Price-5
These five fields initially displays the new prices. Changes to these fields can be made when the Field number to change ? prompt appears.
|
Format |
99999999.99999 |
If you entered Quantity received in an alternate unit, specially formatted text about the alternate unit automatically displays here.
Make any needed changes or press <F5> to flag this entry as a correcting entry or to remove that flag if present.
For an existing transaction for a serialized item, you are then asked if you wish to change the related serial number information.
If you answer Y, or if you are entering a new transaction for a serialized item, a window appears for entry of information for each serial number.
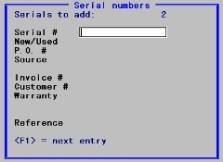
The window appears similar to this:
Graphical Mode
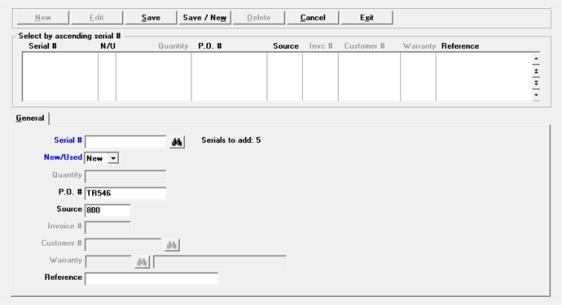
The cursor will be at the Serial # field.
Character Mode
A window displays similar to this:
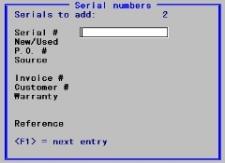
A serial number must be specified for each unit received prior to posting the transaction.
The number of serial numbers remaining to be entered displays at the top of the window.
Enter the information as follows:
For new serial entries
Enter the serial number of the first item, or press <Esc> to terminate serial number entry prior to entering a serial number for each unit received.
|
Format |
Enter up to 15 digits |
Options
If the quantity received is greater than 1, after entering the first serial number, you may use one of these options:
|
<F1> |
To display the next serial number already entered for this transaction |
|
<F2> |
To automatically increment the previous serial number (the next consecutive serial number) |
|
<F5> |
To automatically increment the previous serial number by one for each remaining unit received.
When assigning consecutive serial numbers (alpha or numeric), the system will assign the numbers only until the significant specified digits are used. For example, start with #10 as the first serial number and receive 100 assigning consecutive numbers. The system stops at 99 because only two digits are specified. |
|
<Esc> |
To terminate serial number entry prior to entering a serial number for each unit received |
If you press <Esc> to terminate serial number entry prematurely, a message informs you that all serial numbers are not entered. You are then given three choices:
Continue
Resume serial number entry for this transaction.
Exit
Terminate serial number entry for this transaction, even though all serial numbers are not entered. To complete serial number entry prior to posting a transaction, refer to the For an existing serial entry instructions below.
Abort
The entire inventory transaction is canceled and removed. The Inventory screen appears to enter a new transaction.
When the receivings are posted, the serial numbers entered here are recorded in Serial numbers with an unsold status.
For existing serial entries
To change a serial number, enter the serial number for which information is to be changed, or press <F1> to display the next serial number for this transaction.
To add a serial number, enter the serial number in the normal manner. The screen shows the number of Serials to add if the Quantity received is greater than the serial numbers already entered.)
To delete a serial number, enter the serial number to be deleted or press <F3> to delete the serial number for this transaction.
When the serial number to be deleted is displayed, press F3 to delete it. You are asked to confirm the deletion.
Press <Enter> to default to N if the item is new, or type U to indicate this item is used.
After the first serial number has been entered, you may also press <F2> to assign the same values as the prior serial number to this and the remaining fields.
Enter the purchase order number under which this item was bought, press <Enter> for the first serial number, to default to the Document # entry. For subsequent serial numbers, to default to the P.O. number entered for the prior serial number.
|
Format |
Up to 15 digits or use the option |
|
Example |
Press <Enter>. |
If your inventory is financed, you may use this field to identify the finance company for this serial number.
Enter the source from which this serial number was obtained, or press <Enter> for the first serial number to default to the vendor number for the item.
For subsequent serial numbers, to default to the Source entry for the prior serial number.
This field is used when printing the Flooring Report. If your inventory is financed, you may use this field to identify the finance company for this serial number.
Enter any remark you wish for this specific serial number.
Options
You may also use the options:
|
<Enter> |
To leave this field blank |
|
<F1> |
For the first serial number, to default to the first 20 characters of the Comment field. For subsequent serial numbers, to default to the Reference entry for the prior serial number. |
|
Format |
Up to 20 digits or use the option |
|
Example |
Press <Enter> |
Make changes as usual. The serial fields then clear for entry of the next serial number. Press <Esc> at Serial # when completed entering the serial numbers for the receiving.
|
Example |
Enter these four serial numbers to complete the receiving: DS4558, DS4559, DS4560, DS4599. Press <F2> at New/Used for each to default the remaining fields to the same entries as the prior serial number |
For an existing transaction for a lot-controlled item, you are then asked if you wish to change the related lot number information.
If you answer Yes, or if you are entering a new transaction for a lot-controlled item, a window appears for entry of information for each lot number.
For lot-controlled items, the quantity received must be fully allocated to one or more lot numbers prior to posting the transaction. The quantity allocated cannot exceed the quantity received.
The quantity remaining to be allocated displays at the top of tab.
Enter the information as follows:
For new lot number entries
Enter the first lot number, or press <Esc> to terminate lot number entry prior to fully allocating the quantity received.
Options
If the quantity received is allocated to more than one lot number, after entering the first lot number, you may use one of these options:
|
<F1> |
To display the next lot number already entered for this transaction |
|
<F2> |
To automatically increment the previous lot number (next consecutive lot number) |
|
<Esc> |
To terminate lot number entry prior to fully allocating the quantity received |
Character Mode
If you press <Esc> to terminate lot entry prematurely, a message informs you that lot allocation is incomplete. You are then given three choices:
Continue
Resume lot number entry for this transaction.
Exit
Terminate lot number entry for this transaction, even though the quantity received has not been fully allocated. To complete lot number allocation prior to posting a transaction, refer to the For an existing lot number entry instructions below.
Abort
The entire inventory transaction is canceled and removed. The Inventory screen appears to enter a new transaction.
For existing lot number entries
To change a lot number, enter the lot number for which information is to be changed, or press <F1> to display the next lot number for this transaction.
To add a lot number, enter the lot number in the normal manner. The screen shows the Qty to allocate if the Quantity received is greater than the lot number allocations already entered.
To delete a lot number, enter the lot number to be deleted or press <F1> to display the next lot number for this transaction.
When the lot number to be deleted is displayed, press <F3> to delete it. You are asked to confirm the deletion.
Enter the quantity received of this lot number, or press <F1> to use the remaining quantity to allocate.
|
Format |
99999999.99999 |
|
Example |
Enter the quantity or use the option |
The Qty to allocate is updated automatically.
Enter the purchase order number under which this item was bought.
Options
You may also use the options:
|
<Enter> |
For the first lot number, to default to the Document # entry. For subsequent lot numbers, to default to the P.O. number entered for the prior lot number |
|
<F2> |
To default this field and the remaining fields to the values entered for the prior lot number |
Enter the source from which this lot number was obtained, or press <Enter> to default to the vendor number for the item. For subsequent lot numbers, to default to the source entered for the prior lot number.
|
Format |
Up to six characters or use the option |
|
Example |
Press <Enter> |
Enter any remark you wish for this specific lot number.
Options
You may also use the options:
|
<Enter> |
To leave this field blank |
|
<F1> |
For the first lot number, to default to the first 20 characters of Comment. For subsequent lot numbers, to default to the Reference entry for the prior lot number |
Make changes as usual. Click on the Save button or select <Alt+s>.
Press <Esc> at Lot number when completed entering the lot numbers for the receiving.
|
Example |
Type 834W for the next lot number, press <F1> at Quantity to use the remaining 20 gallons, press <Enter> at P.O. # and Source to accept previous values, and type 20 Gal rec'd as the reference text for this lot number |
When completed entering the receivings, exit the Enter screen, print an edit list, and post the transactions. Return to Inventory (Enter) and this point in the documentation when posting completes.
An adjustment allows the quantity-on-hand values to be adjusted so that they reflect the actual physical count in your inventory.
In this way you can account for beginning inventory, breakage, theft, losses, incorrect receiving, over shipment, etc. Adjustments can increase or decrease the quantity on-hand of any item in your inventory.
Adjustments are entered only through this selection; unlike many of the other Inventory transactions they are never automatically generated by some other function.
|
Note |
Fields already described above for Receivings are not repeated here except where some difference exists. |
With graphical mode, select Adjustment for the Type field. Using character mode begin by typing A for adjustment in field #1. Continue as follows:
For LIFO/FIFO, you will be asked, Adjust a specific layer?. When you select Yes, for the layer record to be found the following fields must match: Item number, Warehouse, Lot or Serial number (When used), Layer date, Cost and Document #.
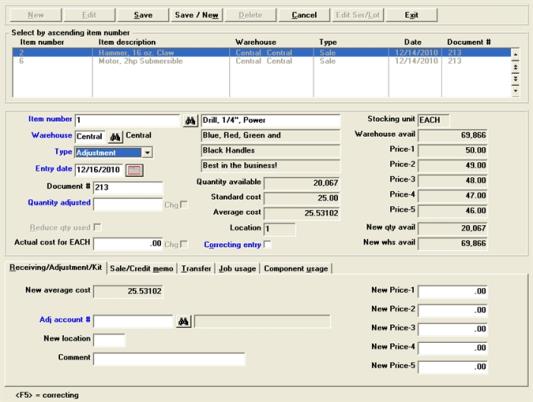
The following screen appears:
Graphical Mode
The ReceivingAdjustment/Kit tab displays.
Character Mode
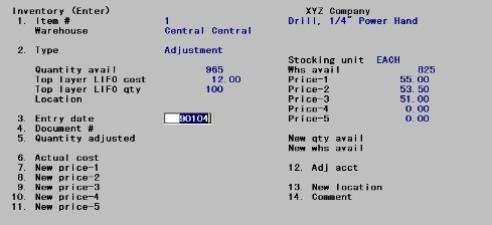
For LIFO/FIFO this field is called Layer date for adjustments to a specific layer.
Enter the document number, just as for a receiving.
|
Format |
Up to ten digits |
Enter a positive or negative quantity.
|
Note |
If the item is serialized, (1) Whole numbers are required (fractional quantities are not allowed, and (2) the quantity can be adjusted downwards only to the extent that the number of serialized units does not exceed quantity on hand. |
|
Format |
99999999.99999- |
This field only appears if:
| • | Control information specifies that kits are used, and |
| • | You have entered a positive value in the preceding field. |
This feature is provided to enable disassembly of kits after posting. If you are doing this, check this box or enter Y. In all other cases unchecked the box or enter N.
You may also use the disassembly option when entering a Quick work order. Posting a quick work order dissasembly reduces the kit quantity and increases the component quantities. See Quick Work Orders in the Work Orders chapter.
|
Format |
Check box, checked is yes and unchecked is no |
|
Format |
99999999.99999 |
|
Example |
Type 11.22 |
These fields display current prices.
In character mode, they can be changed from Field number to change ?.
Enter the adjustment account number. This must be a valid G/L account number.
Enter the new location for the item. This field is optional.
This field allows entry of up to 25 characters for comments. This field is optional.
Average cost is an attribute of the stocking item but cannot be changed through Items. Average cost is also not affected by Sales.
If it becomes necessary to change an average cost, do so through entries in Inventory. You may use upward or downward adjustments, or use receiving and credit memo entries.
The following equation determines the new average cost:

Changing Average Cost
A simple way to change Average Cost is to use two entries in two separate posting runs:
| • | The first entry would adjust the quantity to zero. |
| • | The second entry would adjust the quantity to the correct amount, and the average cost would become the cost entered for the second entry. |
Because of their similarity, both sales and credit memo transactions are described in this section. A sale will be entered first, then a credit memo.
|
Note |
If you are using Accounts Receivable, sales and credit memos may be entered using this Inventory selection (if for some reason an invoice document is not desired), but are normally entered through the Invoices selection in A/R. |
For an inventory transaction, type S. The following screen displays:
Graphical Mode
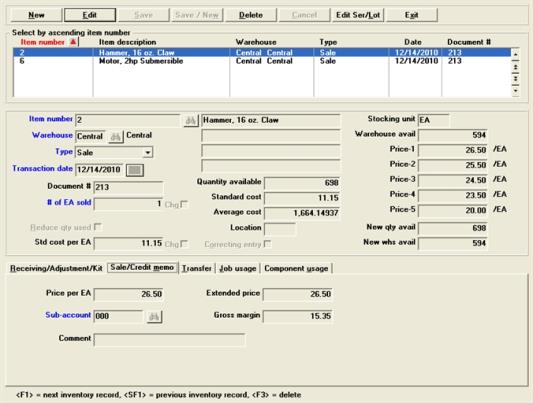
The Sales/Credit memo tab displays.
Character Mode

Enter the information as follows:
Enter the date of the transaction, just as for a receiving.
It is important to make any necessary change to the Transaction date field as the transaction is being added. The transaction date cannot be changed in an existing transaction.
|
Format |
MMDDYY |
Enter the document number, just as for a receiving.
|
Format |
Up to ten digits |
# of (unit of measure) sold or
Quantity sold
Enter the quantity of this sale. When you enter this quantity, the new quantity available is automatically calculated and displayed.
Negative and zero quantity transactions are not allowed for sales.
|
Format |
99999999.99999 |
Enter the unit price, or press <F2> to use Price-1 for this item.
|
Note |
Because I/C does not do conversions between stocking and pricing units, all sale quantities and prices must be entered in stocking units. |
|
Format |
9999999.999 |
|
Example |
Type the price or use the option |
Actual cost for (overstocking unit)
No entry is allowed in this field for sales. The average cost for the item is automatically displayed.
If you are using serial costs (as specified in the I/C Control information) and this transaction is for a serialized item, the sale is costed at the specific serial item cost from Serial numbers (if available), rather than the average cost from Items.
Enter any comment you wish about this sale.
|
Format |
Type up to 25 characters |
Serialized Items
For an existing sale transaction for a serialized item, you are then asked if you wish to change the related serial number information.
If you answer Y, or if you are entering a new transaction for a serialized item, a window appears for entry of information for each sold serial number.
Entry is similar to entries to Receivings except for a sale you may also enter the Invoice #, Customer # and Warranty fields.
Upon posting invoices in A/R, O/E and P/S, sales and credit memo inventory transactions are generated automatically and immediately posted to Inventory. They are therefore not available for modification or viewing by this selection.
Returned merchandise entered via the RMA selection of the O/E module are ultimately transferred as credit memos to the A/R module, and are processed by Inventory no differently from any other A/R or P/S credit memos.
Fields already described in the preceding Receivings and Adjustments section are not repeated here except where some difference exists.
To illustrate adding sales and credit memos under average cost, enter the information as follows through the Enter screen: Begin by selecting Sale for the Type field.
|
Example |
Type: S for Sale |
Price and Quantity Information
The software equates the selling item to its associated stocking item, and displays:
| • | The stocking unit |
| • | The total quantity available at all warehouses |
| • | Prices 1 through 6, with their selling unit |
| • | The average cost (as computed from previous receivings) |
| • | The replacement cost (as defined in Items) |
| • | For LIFO/FIFO, the cost and quantity available from the top layer of history, as of the last posting. If no layers exists a statement displays to that effect. |
| • | For Standard cost, standard cost displays. |
Whs avail
The quantity available at that location displays as Whs avail.
The section Entering Adjustments shows a Sale resulting from your entries. The screen for a Credit Memo is identical except that:
| • | Field #3 is named Transaction date rather than Entry date. |
| • | Field #5 is named Quantity credited rather than Quantity sold. |
Continue entering information as follows:
|
Example |
Press <Enter> to use the current date. Type: 155216 for Document # |
Continue entering information as follows:
Quantity sold or Quantity credited
One or the other of these captions displays depending upon whether this is a sale or a credit memo.
Enter the quantity of this sale. When you enter this quantity, the new qty avail and New whs avail are automatically calculated and displayed.
If this item is serialized, the quantity must be a whole number.
|
Format |
99999999.99999 |
|
Example |
Type: 10 |
The number of units available in the top LIFO/FIFO layer displays above as part of the old information. If your sale quantity exceeds this amount, you will be using at least one new LIFO/FIFO layer to satisfy the sale quantity.
Price for (unit)
Unit represents the selling unit for this item.
Automatic calculation of sale price, contract price, or discounted price, such as occurs in the Invoices selection, is not available in the Inventory selection. This is because Inventory transactions are not specific to any particular customer.
Enter the unit price or press <F2> for Price-1.
|
Format |
99999999.99999 |
|
Example |
Press <F2> |
Ext price
The extended price appears automatically.
Actual cost per (unit)
For credit memos, actual cost must always be entered. For sales, this field is informational and contains the average cost, which cannot be changed.
Standard cost sales are costed at the standard cost in Items.
For LIFO/FIFO the exact actual cost per unit of the sale is determined by automatically running through enough LIFO/FIFO layers to satisfy the quantity of the sale. The total cost, represented by the layers to be relieved, is divided by the sale quantity to obtain the actual cost per unit. Unposted entries existing elsewhere for the same item do not affect the layers, so the cost of this item when it comes to be posted may vary from what you see now. To see the cost used for posting, print an edit list just before posting.
Comment
Enter any comment as follows, or press <Enter>.
|
Example |
Type: New Account for the comment |
Cost Center (or Sub-account)
|
Format |
Your account structure as defined in Company Information |
|
Example |
Press <Enter> to accept the default |
At this point the screen is complete. Make any needed changes, or use the standard options as described for Receivings.
|
Example |
Post this entry using Post as described later in this chapter |
To see the impact of your entries on the LIFO layers, post them and review the resulting Inventory Transaction Register. Post is described in Posting Inventory Transactions.
Follow the same procedure as for a Sale above and enter the information shown on the next screen. Specify C for Type.
Graphical Mode
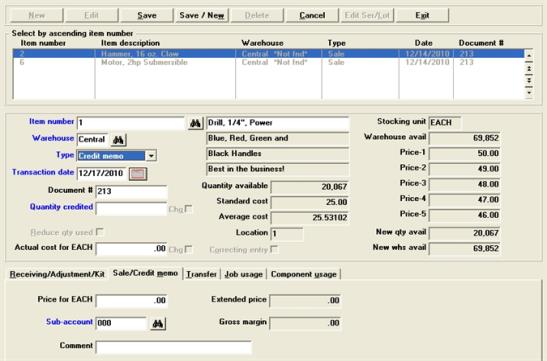
The Sales/Credit Memo tab displays.
Character Mode

|
Example |
Following the same procedure as for a receiving above, enter the information shown on the next screen. Specify C for Type |
|
Example |
Post this entry using Post as described in Posting Inventory Transactions |
If you are using single-warehousing, skip to the Adjustments section.
This section describes how transfers between warehouses are handled. This is available if you are using multi-warehousing.
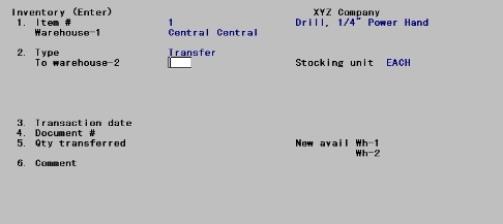
Specify T for Type and the following screen displays:
Graphical Mode
![]()
Character Mode
Item #
|
Format |
15 characters |
Enter the item number or description, or scan the bar code, as for a receiving.
Warehouse-1
|
Format |
Two characters |
Enter the warehouse code of the sending warehouse (the one the item is being sent from), or press <Enter> for the Central warehouse.
Type
Enter the transaction type for a transfer.
|
Format |
One character |
When a transfer is specified for Type, Warehouse changes to Warehouse-1, and you are asked to enter:
|
Format |
Up to two digits |
Warehouse-2 designates the receiving warehouse. Enter the warehouse code or press <Enter> for the Central warehouse.
At this point, existing information displays as follows:
This is the sum of available quantities for all warehouses.
This is the available quantity of the item at the sending warehouse.
This is the available quantity at the receiving warehouse.
Enter the remaining information as follows:
|
Format |
MMDDYY |
Enter the date of the transaction, just as for a receiving.
As with other transaction types, make any necessary change to Transaction date at this point. The transaction date cannot be changed in an existing transaction.
|
Format |
Up to ten characters |
Enter the document number, just as for a receiving.
Enter the quantity transferred (in stocking units). Negative or zero quantities are not accepted. Fractional quantities are not accepted for serialized items.
|
Format |
99999999.99999 |
When this field is entered, the new available quantities at the sending (Wh-1) and receiving (Wh-2) warehouses display.
New avail wh-1 and New avail wh-2
These are the new available quantities of the item at the sending and receiving locations, respectively. This information appears when the quantity is entered.
|
Format |
25 characters |
Enter any comments you wish about this transfer.
If you do not use kits, proceed to the Job Usage Entries section called Entering Job Usage Transactions
The transaction types K (kit assembly) and U (component usage) are used only if you specified in Control information that you are using kits and you use work orders to assemble kits.
Kit assembly transactions are created automatically when work orders are closed and when immediate work orders are issued. Kit assembly transactions cannot be entered (or deleted) through Inventory. Also, you do not enter any kit assembly transactions.
When a kit assembly transaction is posted, the quantity assembled (as shown on the entry screen) is used to increase the quantity on hand of the kit-item. Therefore, a kit assembly transaction is the manufacturing counterpart of a receiving transaction used to enter a quantity received of goods purchased for resale.
This screen is intended for viewing or changing kit assembly transactions. You can not enter or delete them from this screen. You can change them only to the extent of changing the comment.
The screen that appears in Inventory is similar to the screen for receivings, except that:
| • | Qty assembled is shown for kit assembly instead of Qty received |
| • | a WIP account # (Work in Process) is displayed |
Fields already described in the Receivings and Adjustments sections are not repeated here except where a difference exists.
Begin by selecting Kit assembly for the Type field.
|
Example |
Type: K for type |
Document #
Issue work orders creates document numbers for each kit assembly entry by prefixing W/O to the 6-digit work order number. Enter the following:
|
Format |
Up to ten characters |
|
Example |
Type:W/O-000001 |
There are 2 fields that can be edited for a kit assembly:
New location
Enter the new location for the kit.
Comment
|
Format |
25 characters |
Enter any comments you wish about this kit assembly.
You may select a Component usage transaction type only if you chose in Control information to use kits. Refer to the chapters on Kits and Work Orders, for details on these subjects
Component usage transactions are created automatically when work orders are issued. Component usage transactions cannot be entered (or deleted) through Inventory.
When a component usage transaction is posted, the # used (as shown on the entry screen) is subtracted from the quantity on hand of the component item and the Qty used PTD and Qty used YTD of the component item are increased. Thus, a component usage transaction is similar to a downward adjustment, except it represents a usage of the inventory to construct a kit as opposed to a downward adjustment for some other reason.
You can use Inventory to view kit assembly transactions. Changes can be made to the Comment field.
The screen that appears in Inventory is similar to the screen for downward adjustments, except that:
| • | # used is shown for kit assembly instead of # adjusted |
| • | WIP account # is shown instead of Adj. acct |
Fields already described in the Receivings and Adjustments sections are not repeated here except where a difference exists.
|
Example |
Type:U for Type |
Document #
Issue work orders creates document numbers for kit assembly entries by prefixing W/O to the 6-digit work order number. Enter the document number:
|
Format |
Up to ten characters |
|
Example |
Type:W/O-000001 |
Quantity used
The new quantity available and new warehouse available are automatically calculated and displayed.
Comment
|
Format |
25 characters |
This is the only field that can be changed. Enter any comments you wish about this kit assembly.
This section applies only if Job Cost is interfaced to I/C. If it isn't, skip to the section, Printing Inventory Edit Lists.
Job Usage entries cause items to be allocated to a specific job or to be returned to inventory from that job. These processes resemble Adjustments in as much as the same screen can both increase or decrease quantity on hand.
Job usage transactions are created automatically in the Job Cost module but may also be entered by this Inventory transaction.
The transaction type J (job usage) is available only if you are using Job Cost with I/C.
Fields already described in previous sections above are not repeated here except where some difference exists.
Enter a positive value for usage of items on jobs, and a negative value to return items from jobs to inventory. Zero is not accepted.
|
Format |
99999999.99999 |
6. Actual cost per (unit)
You may not change the actual cost of items sent to a job, but you may do so for items being returned to inventory.
|
Format |
99999999.99999 |
7. Job #
Enter the job number in which the item is being used, or from which the item is being returned to inventory. The job description and status appear.
If this job has sub-jobs and/or change orders, you are also asked to enter these numbers.
|
Format |
Up to seven characters |
8. Cost item
Enter the cost item to which this transaction applies.
|
Format |
999999999.99999 |
9. Job account #
Enter the G/L account number for this job, or press <F2> to use the G/L account number assigned to the cost item entered above.
Data import provides flexible field mapping, numeric conversion, date conversion and other options for converting field peculiarities. It has many more conversion options than the Fixed format import.
Data import will allow the importing of receivings, transfers, adjustments and layer adjustments.
A data import control record must be entered before this selection will operate properly. The control record contains field by field instructions for the importing of the file. See the Data import (DI_PBS.PDF) documentation for details on the set up of importing inventory transactions.
There must be no existing transactions on file to run this function.
Select
Data import from the Inventory menu.
Follow the instructions on the screen.
Use Inventory (Edit list ) to print a report of the transactions after they are imported.
Use Inventory (Enter) to view or change transaction information after the import.
Receiving and Transfer transactions can be imported into Inventory Transactions from an outside source.
The field conversion specifications are somewhat limited using the Fixed format import menu selection. If you want much more flexibility when defining field mapping, numeric conversion, date conversion and other options to converting field peculiarities use Data import. Data import will allow the importing of receivings, transfers, adjustments and layer adjustments. See the Data import documentation for details.
First, you must tell the system whether this is a receivings or a transfer transaction. Then, you define the layout of the file that you wish to import.
Select
Fixed format import from the Inventory menu.
The following screen displays:
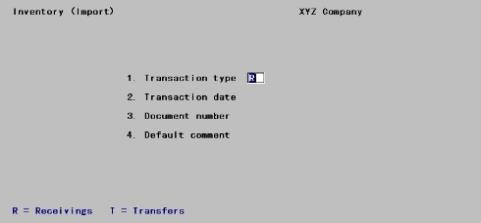
1. Transaction type
Enter the transaction type, R or T.
|
Format |
One character |
|
Example |
Type: R |
The following screen displays:
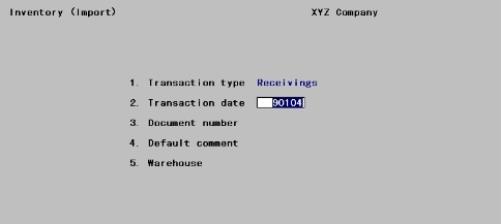
2. Transaction date
Enter the date.
|
Format |
MMDDYY |
|
Example |
Press <Enter> to default to the current date |
3. Document number
Enter the document number for the import transaction.
|
Format |
Up to 10 characters |
|
Example |
Type:Import |
4. Default comment
Enter a comment.
|
Format |
Up to 25 characters |
|
Example |
Press <Enter> |
5. Warehouse
Enter a warehouse if applicable. Press <Enter> to default to Central warehouse.
|
Format |
Two characters |
|
Example |
Press <Enter> |
If you entered a Type T transaction type in Field 1, the following screen displays:

5. From warehouse, and
6. To warehouse
These fields allow you to enter the appropriate warehouse codes for the transfer.
Make any changes or press <Enter> at Field number to change ? to continue.
For a Receivings Import, the following screen displays:
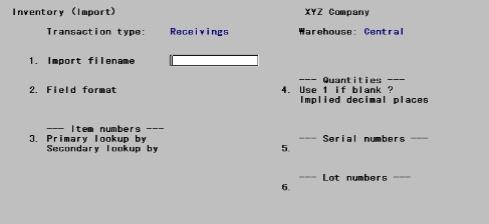
Enter an import format in a similar manner for receivings and transfers, as follows:
1. Import filename
Enter the name of the file to be imported. If the import file is not in the top-level PBS folder (directory), include the drive letter or path name where it is located.
|
Format |
Up to 14 characters |
|
Example |
Type: C:\IMPORT1.TXT |
2. Field format
|
Format |
One character |
Enter the letter that corresponds to the format of each field in a record of the import file.
Options
Enter the one of the following options:
|
D |
If the data fields in a record are in variable starting columns, and are separated by a specific, delimiting character at the end of each field |
|
F |
if each data field in each record always begins in a specific, fixed column. |
If you specify a delimited field format, two additional fields display for you to further define the delimiting character.
Delimiting char
|
Format |
Two characters |
Specify the ASCII character used at the end of each field to separate the fields in a record. The character should be entered in its two-character hexadecimal form.
The corresponding ASCII character is then displayed in quotation marks next to the hexadecimal entry.
Text in quotes?
Answer Y if the text fields in a record are enclosed in quotation marks. Otherwise, answer N.
Use the remaining fields on this screen to describe the item number, quantity, serial number, and lot number information in the import records. The fields that display depend on the field format that you entered in field #3.
|
Format |
One letter, either Y or N |
|
Example |
Type: N and then press <enter> |
3. Item numbers
Describe the method of determining item numbers, as follows:
Primary lookup by
Enter the letter corresponding to the first method to be used to locate each item number.
Enter I if the actual item number appears in the import record, or enter B if the item's bar code exists in the import record.
|
Format |
One letter, either I or B |
|
Example |
Type: I and then press <enter> |
Secondary lookup by
Enter the letter corresponding to the alternate method of locating the item number in each import record, or press <Enter> for no secondary lookup method.
During the import, the item number (or bar code) is initially looked up using the method specified for Primary lookup by. If a matching entry is not located using that method, the Secondary lookup by method is used.
|
Format |
One letter, either I or B |
|
Example |
Type: I and then press <enter> |
Field number
For delimited field formats, enter the relative field number of the item number (or bar code) in an import record.
For example, if you enter 4 for this field, the item number (or bar code) for each item would be found in the fourth field, and is preceded by three occurrences of the delimiting character specified above in field #3.
|
Format |
Enter up to two digits |
|
Example |
Type: 10 and then press <Enter> |
Start Position and Length
Length
For fixed position field formats, specify the starting column number and length of the item number (or bar code) field in an import record.
For example, if you enter a Start position of 15, and a Length of 10, the item number (or bar code) for each item would be found beginning at column 15 and extending for 10 characters.
4. Quantities
Describe the handling and location of the quantity in each import record, as follows:
Use 1 if blank?
Answer Y to import a default transaction quantity of 1 for any record whose quantity is spaces. Otherwise, answer N.
If you answer Y, any numeric quantity, including 0, is imported as the value in the record. If the quantity is spaces (blank), a quantity of 1 is imported. Non-numeric values that are not spaces are reported as errors.
If you answer N, numeric values are imported as usual. All non-numeric values, including spaces, are reported as errors.
|
Format |
One letter, either Y or N. There is no default |
|
Example |
Type: Y and then press <Enter> |
Implied decimal places
Enter the number of decimal places contained within the quantity to be imported, either 1, 2, or 3, or press <Enter> to default to 0 if the quantities are always expressed as whole numbers.
If the quantity to be imported contains a decimal point to separate whole digits from the decimal positions, the decimal point is used to determine the number of decimal places, and your entry in this field is ignored.
Field number
For delimited field formats, enter the relative field number of the quantity in an import record.
Start Position and Length
For fixed position field formats, specify the starting column number and length of the quantity field in an import record.
5. Serial numbers
Describe the location of the serial number in each import record for serialized items, as follows:
Field number
For delimited field formats, enter the relative field number of the serial number in an import record, or press <Enter> to default to None if you are not using serial numbers.
|
Format |
Up to two digits or use the option |
|
Example |
Press <Enter> for None |
Start Position and Length
For fixed position field formats, specify the starting column number and length of the serial number field in an import record, or press <Enter> to default to a Start position of 0 if you are not using serial numbers.
|
Format |
Up to two digits or use the option |
|
Example |
Press <Enter> for Start Position |
6. Lot numbers
Describe the location of the lot number in each import record for lot-controlled items, as follows:
Field number
For delimited field formats, enter the relative field number of the lot number in an import record, or press <Enter> to default to None if you are not using lot numbers.
Start Position and Length
For fixed position field formats, specify the starting column number and length of the lot number field in an import record, or press <Enter> to default to a Start position of 0 if you are not using lot numbers.
|
Format |
Up to two digits or use the option |
|
Example |
Press <Enter> for Start Position |
Make changes as usual.
If you defined a new import format, or changed the saved import format, you are asked if you wish to save (replace) the format.
Answer Y to save this import format for use in subsequent import sessions. Only one import format may be retained. The import format is saved in I/C Control information.
Answer N to use this import format for the current import session only. Any existing saved import format remains unchanged.
After you answer this question, a screen appears for you to select where to print the Inventory Import Log. The import process then begins.
Using the details supplied in the import format, the information from the import file is used to create inventory receiving or transfer transactions for the corresponding items and warehouse.
As the data file is being imported, a count of the records being imported and the item number being processed is displayed.
Any error conditions encountered during the import session are recorded on the Inventory Import Log, and a message notifying that errors have been recorded in this file is displayed on the screen at the end of the import session. The import error log resides in the Passport top-level folder (directory), and is named IMPORTxx.LOG, where xx is the Company-ID.
Use Inventory (Enter) to view or change any of the information on the transactions after they are imported.
This selection will print an Inventory Edit List for your review before you post all of your inventory entries.
Select
Edit list from the Inventory menu.
Graphical Mode
Character Mode
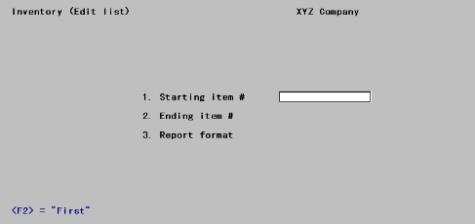
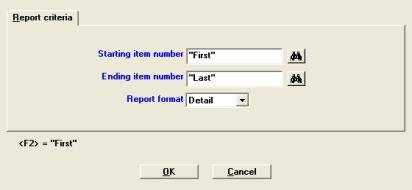
Ending item number
Enter the item numbers of the starting and ending transactions to print. Follow the screen instructions.
Select either the Detail, Summary, or Condensed version for the Inventory Transaction Edit List.
A summary list does not include serial number/lot number information for any transaction.
A condensed list consolidates like transactions for an item into a single entry. In addition, the condensed list does not show G/L account numbers for any transaction or job numbers and cost items for job usage transactions.
Select OK to print the edit list of Cancel to return to the menu.
Check the Inventory Transaction Edit List for warning messages regarding transactions that will not be posted. If such a message appears for any transaction, use Inventory (Enter) to correct or complete entry of the transaction prior to posting.
Select
Post from the Inventory menu.
You are then asked to specify where to print the Inventory Transaction Register.
The Inventory Transaction Register is printed followed by a period of processing which updates Items, the Status, and I/C Distributions to G/Lwith the new transaction information.
If you entered transactions for serialized and lot-controlled items, the serial number and lot number information prints on the Inventory Transaction Register, and is updated to the Serial file/table.
If you attempt to post transactions that are incomplete or incorrect, a message describing the error appears on your Inventory Transaction Register. These erroneous transactions are not posted and remain. Posting of accurate and complete transactions continues normally.
Inventory transactions are posted in the order shown below. The G/L distributions generated by transaction posting are also described here.
| • | Debit item's Inventory Account (defined in the item header screen of Items) |
| • | Credit Balance Sheet Liability Account (defined in Control information) |
If a receiving occurs when there is a negative quantity on hand:
| • | Debit (or credit) Cost Correction Account (defined in Control information) if the cost for the receiving is greater than average cost, or credit if it is greater. If identical, do neither. |
| • | Debit kit item's Inventory Account (defined in the item header screen of Items) |
| • | Credit Work in Process Account. This account is stored in the kit assembly transaction by Issue work orders or Close work orders. It is always the Work in Process Account that was entered on the original work order entered in Work Orders. |
| • | In addition, if a kit assembly occurs when there is a negative quantity on hand: |
Debit the Cost Correction Account (defined in Control information) if the cost for the kit assembly is greater than average cost, or credit it if the reverse is true. Accumulated round-off errors of odd pennies are also directed to the Cost Correction Account.
| • | Debit item's Inventory Account (defined in Control information) |
| • | Credit the Memo Account. The Credit Memo Account is obtained by combining the Credit memo account # field of this item with the Cost Center (or sub-account) entered for the specific transaction. |
| • | Debit item's Inventory Account (Items) |
| • | Credit Job Account (entered for the transaction) |
If a job usage occurs when there is a negative quantity on hand:
| • | Debit item's Inventory Account (Items) |
| • | Debit (or credit) Cost Correction Account (I/C Control information) |
| • | Credit Job Account (I/C Control information) |
* See the note below titled Special Note on Cost Correction.
| • | Debit the item's Inventory Account |
| • | Credit the Adjustment Account. The Adjustment Account is obtained from the specific transaction. |
| • | No distributions are created for transfers. |
| • | Debit the Adjustment Account. The Adjustment Account is obtained from the specific transaction. |
| • | Credit the item's Inventory Account |
| • | Debit the Expense Account. The Expense Account is obtained by combining the Expense account # field from the item with the Cost Center (or sub-account) entered for the specific transaction. |
| • | Credit the Inventory Account. |
| • | Debit the Work in Process Account. Issue work orders take the Work in Process Account entered on the original work order (via Work Orders) and moves it to the component usage transaction. |
| • | Credit the component item's Inventory Account (defined in Control information). |
| • | Debit Job Account (entered for the transaction) |
| • | Credit item's Inventory Account (Items) |
Transactions are posted in the same order and with the same amounts as appear on the Inventory Transaction Register.
When there is a negative quantity on hand and a receiving, kit assembly, credit memo, upward job usage, or upward adjustment is posted, if the cost is greater than average cost, then the cost correction account is debited for the difference between the two costs. If the cost is less than average cost, then the cost correction account is credited.
Cost correction can also occur in a kit assembly when the sum of the exact costs for each component are different from the sum of the rounded costs for each component (i.e., when each component's cost is rounded to two decimal places). In this case, inventory value has either been lost or gained as a result of manufacturing the item.
For example, if a kit-item is assembled out of two inventory items whose costs are 3.487 and 4.235 each, the inventory accounts for the components are credited for 3.49 and 4.24, summing up to 7.73. However, the actual cost of the kit-item is 3.487 + 4.235 = 7.722, which results in a debit of 7.72 to the kit-item's inventory account. The penny that is lost in the manufacturing process is debited to the cost correction account.
For LIFO/FIFO
If a receiving occurs when there is a negative LIFO/FIFO layer, debit the Cost Correction Account if the cost for the receiving is greater than replacement cost; or credit it if the reverse is true. If identical, do neither.
For Standard Cost
Debit the Purchase Variance Account if the actual cost is greater than standard cost of the kit item, or credit it if the reverse is true. Do nothing if both are equal.
Order of Posting
Entries are posted in the same order and with the same amounts as they appear on the Inventory Transaction Register.
Possible Cost Flow Calculation Problem
Inventory Control normally posts all of an item's receivings on a given date before posting that item's sales.
In the rare event of a computer failure during posting (as the result of a power outage or other hardware problem), it is wise to restore your data from your backup copies and rerun the posting procedure. Refer to the Backing Up PBS Data appendix in the PBS Administration documentation.
If you have not backed up prior to posting, the posting procedures include features that prevent previously posted transactions from being posted again.
When the computer becomes functional again, print the Inventory Transaction Edit List to determine which transactions have been posted. The edit list will identify the transactions that have already been posted with the message:
***Entry will not be posted due to duplication***
The first transaction on the edit list not accompanied by this message is probably partially posted.
If you rerun posting without having the data restored from your backup copies, you should watch for this partially posted transaction. If any error is found in posting this transaction, you will have to correct it using manual entries.