This chapter contains the following topic:
Introduction to Valuation Reports
Selecting the Valuation Report
Selecting the Valuation by Date Report
Use the Valuation and Valuation by date reports to print details for the current value of a range of inventory items for one or all warehouses.
The Valuation report shows current inventory values only. If using LIFO or FIFO, it provides values from the layer file/table. If not, the values are from the item or status file/tables.
The purpose of the inventory Valuation by date report is to appraise the value of inventory items for one or all warehouses as of a certain date (cut-off date). Appraisal is done by looking at the Inventory Transaction history. For each selected item, the quantity-on-hand, cost and price is printed.
The Valuation report provides more details than the Valuation by date report. The Valuation report looks at current quantities only so it cannot provide a cut-off date. It varies based on the valuation method used.
Both reports have an option to print by item record inventory account number.
|
Note |
If the status quantities or layer quantities become out of sync with the Inventory History, then the inventory values may not be equal when comparing both reports. Under normal usage this should not happen. |
If you are using the LIFO or FIFO inventory valuation method, you have the option of showing LIFO/FIFO layers. Depending on the valuation method chosen, some fields may be different.
The actual cost appearing on the report is calculated differently depending on the valuation method:
| • | For the Average Cost and Standard Cost valuation methods, this is the running average cost. |
| • | For the LIFO and FIFO valuation methods, the average cost is calculated based in data in the Layers at the time the report is generated. |
Select
Valuation report from the Reports menu.
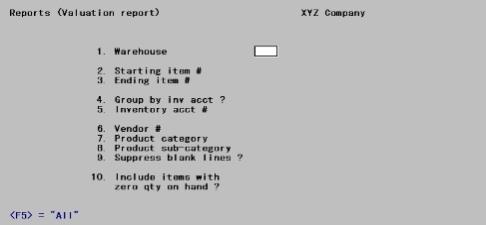
The following screen displays:
Field variations
Your screen may vary from the above display for the following reasons, and the fields are renumbered to accommodate variations:
The above screen is for multi-warehousing. If you are using single-warehousing, you will not see the Warehouse field.
The Use standard or actual cost ? field only displays if you use the Standard cost valuation method.
The last two fields depend on which selection you have chosen.
Enter the information as follows:
1. Warehouse
Options
If you are using multi-warehousing, enter the warehouse code for which you want the report printed, or use one of the options:
|
<Enter> |
For the Central warehouse |
|
<F5> |
For All warehouses |
|
Format |
Up to two characters |
|
Example |
Press <F5> for All warehouses. |
|
Note |
If you are not using multi-warehousing, you will not see the Warehouse field and all field numbers will be one less than the numbers shown. |
2. Starting item # and
3. Ending item #
Enter the range of item numbers to include on the report. Follow the screen instructions.
|
Example |
Press <F2> for the First and Last item number. |
4. Group by inv acct?
Answer Y to restrict the report to a single inventory account, or to group items by inventory account. Your entry in the next field determines the grouping.
Answer N to print the items in item number order. If you answer N, the next field displays (Not applicable).
|
Format |
One letter, either Y or N. The default is N. |
|
Example |
Press <Enter> for the default. |
5. Inventory account #
If you chose not to group by Inventory account, this field displays as (Not applicable). Enter the inventory account for which to print the report.
Options
You may also use the options:
|
<F1> |
For next inventory account |
|
<SF1> |
For the previous inventory account |
|
<F2> |
For the default inventory account as defined in Control information |
|
<F5> |
For All inventory accounts. Items will print grouped by inventory account. |
|
Example |
Press <F5> for All Inventory accounts. |
6. Vendor #
Enter the vendor number to print the report for only one vendor.
Options
You may also use the following options:
|
<F5> |
To include All items regardless of whether they have a vendor number |
|
<Enter> |
To include only those items which do not have a vendor number. |
|
Format |
Up to six digits |
|
Example |
Press <F5> for All vendors. |
7. Product category
Options
Enter the category to print the report for only one product category.
You may also use the following options:
|
<F5> |
To include All items regardless of whether they have a category |
|
<Enter> |
To include only those items which do not have a category. |
|
Format |
Up to five digits |
|
Example |
Press <F5> for All categories. |
8. Product sub-category
If you entered Blank in the previous field, this field also displays as Blank and may not be changed.
Enter the product sub-category for the items to be printed.
Options
You may also use one of the following options:
|
<F5> |
To include All items regardless of whether they have a sub-category |
|
<Enter> |
To include only those items which do not have a sub-category |
|
Format |
Up to five characters |
|
Example |
Press <F5> for All sub-categories. |
9. Suppress blank lines?
Answer Y to eliminate blank lines between items on the report. Answer N if you wish one line to be skipped prior to printing each item.
|
Format |
One letter, either Y or N. The default is Y. |
|
Example |
Type Y and then press <Enter>. |
10. Include items with zero qty on hand?
Answer Y to include items with zero quantity on-hand. Answer N to exclude items with zero quantity on-hand from the report.
|
Format |
One letter, either Y or N. The default is N. |
|
Example |
Press <Enter> to accept the default. |
|
Note |
If you answer N, an item with zero quantity on-hand in the Item |
If you are using the LIFO or FIFO costing methods, a second screen displays where an additional field appears as follows:
Print LIFO (FIFO) layers ?
Answer Y if you want to have the layers of the item printed.
|
Format |
One letter, either Y or N. The default is N. |
|
Example |
Type:Y and then press <Enter>. |
If you are using the standard cost method, an additional field appears as follows:
11. Use standard or actual cost ?
Answer S for standard cost and A for actual cost.
|
Format |
One letter, either S or A . |
|
Example |
In our example we are not using standard costing, so this field will not display. |
Field number to Change ?
Make changes to any field as needed. When finished select enter to print the report.
Use this selection to print a report detailing the current value of inventory items for one or all warehouses as of a certain date. You may select all or part of the inventory.
Select
Valuation by Date report from the Reports menu.
The following screen displays:
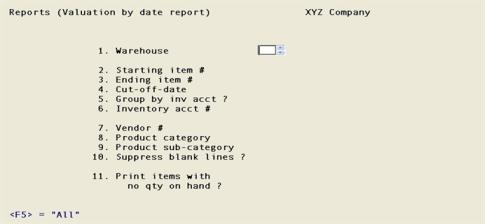
Field variations
Your screen may vary from the above display for the following reasons, and the fields are renumbered to accommodate variations:
The above screen is for multi-warehousing. If you are using single-warehousing, you will not see the Warehouse field.
The Use standard or actual cost ? field only displays if you are using the Standard cost valuation method.
The last two fields depend on which selection you have previously chosen.
Enter the information as follows:
1. Warehouse
Options
If you are using multi-warehousing, enter the warehouse code for which you want the report printed, or use one of the options:
|
<ENTER> |
For the Central warehouse |
|
<F5> |
For All warehouses |
|
Format |
Up to two characters |
|
Example |
Press <F5> for All warehouses. |
|
Note |
If you are not using multi-warehousing, you will not see the Warehouse field and all field numbers will be one less than the numbers shown. |
2. Starting item # and
3. Ending item #
Enter the range of item numbers to include on the report. Follow the screen instructions.
|
Format |
15 characters |
|
Example |
Press <F2> for the First and Last item number. |
4. Cut-off date
Enter the cut-off date for the report.
Any inventory transaction history records on or before this date, that fall with in the other report criteria, will be included on the report.
|
Format |
6 digits |
|
Example |
MMDDYY |
5. Group by inv acct?
Answer Y to restrict the report to a single inventory account, or to group items by inventory account. Your entry in the next field determines the grouping.
Answer N to print the items in item number order. If you answer N, the next field displays (Not applicable).
|
Format |
One letter, either Y or N. The default is N. |
|
Example |
Press <Enter> for the default. |
6. Inventory account #
If you chose not to group by Inventory account, this field displays as (Not applicable). Enter the inventory account for which to print the report.
Options
You may also use the options:
|
<F1> |
For next inventory account |
|
<SF1> |
For the previous inventory account |
|
<F2> |
For the default inventory account as defined in Control information |
|
<F5> |
For All inventory accounts. Items will print grouped by inventory account. |
Example | Press <F5> for All Inventory accounts on file. |
7. Vendor #
Enter the vendor number to print the report for only one vendor.
Options
You may also use the following options:
<F5> | To include “All” items regardless of whether or not there is an associated vendor number |
<Enter> | To include only those items which do not have a vendor number. |
Format | Up to six digits |
Example | Press <F5> for All vendors. |
8. Product category
Options
Enter the category to print the report for only one product category.
You may also use the following options:
<F5> | To include All items regardless of whether they have a category |
<Enter> | To include only those items which do not have a category. |
Format | Up to five digits |
Example | Press <F5> for All categories. |
9. Product sub-category
If you entered Blank in the previous field, this field also displays as Blank and may not be changed.
Enter the product sub-category for the items to be printed.
Options
You may also use one of the following options:
<F5> | To include All items regardless of whether they have a sub-category |
<Enter> | To include only those items which do not have a sub-category |
Format | Up to five characters |
Example | Press <F5> for All sub-categories. |
10. Suppress blank lines?
Answer Y to eliminate blank lines between items on the report. Answer N if you wish one line to be skipped prior to printing each item.
Format | One letter, either Y or N. The default is Y. |
Example | Type Y and then press <Enter>. |
11. Print items with no qty on hand?
Answer Y to include items with zero quantity on-hand. Answer N to exclude items with zero quantity on-hand from the report.
If there is no history for the item it will not print on the report, regardless of what you select here.
Format | One letter, either Y or N. The default is N. |
Example | Press <Enter> to accept the default. |
If you are using the standard cost method, an additional field appears as follows:
12. Use standard or actual cost ?
This question only displays if you are using standard costing methods.
Answer S for standard cost and A for actual cost.
Format | One letter, either S or A . |
Example | In our example we are not using standard costing, so this field will not display. |
Field Number to Change ?
Make any changes needed. Select Enter when you are ready to print the report.
