This chapter contains the following topic:
Selecting Purge Inventory History
Use this selection to purge inventory history.
Maintaining inventory history has no significant detrimental effect on the system. However, you may choose to purge your inventory.
The purge creates balance forward records for all items and warehouses. For this reason you may want to select a purge cut-off date on the last day of the fiscal year.
You may purge to eliminate no longer needed history. You may also purge to improve system performance or conserve disk space.
If you purge to conserve disk space on a Vision system (not SQL), you should know that disk space is not regained unless the records are physically removed by running the Data recovery utilities selection to Export and then restore from export Inventory History. Refer to the PBS Administration documentation for more information.
Depending on the size of the history data and performance of your system, purging may take a significant amount of time.
There is no report generated when purging history. You may use the Inventory History report to save the history to disk before purging. To run a report on inventory history, see the Inventory History Report chapter.
Prior to purging, have all users exit PBS and make a backup of the entire Inventory Control Vision data by copying the ICxx directory with the xx representing the company number. On an SQL system, make a backup of the database. If you happen to select the wrong item or a cutoff date that is too recent, this is the only easy way to get back your data.
Purging Inventory History data does not affect A/R Invoice history or P/S Invoice history. The history of the lines with that item may be retained in either history unless you purge it as well.
Select
Purge inventory history from the Utility menu.
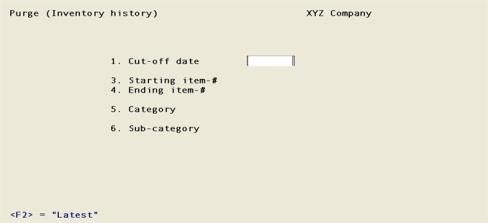
The following screen displays:
Enter the information as follows:
1. Cut-off date
Enter the last date of the inventory history to purge, or press <F2> for the Latest cut-off date.
Only history records with a date on or before the date entered here are included.
|
Format |
MMDDYY |
|
Example |
Type 123109 |
2. Starting item-# and
3. Ending item-#
Enter the range of item numbers to be included in the purge or press <F2> in each field for First and Last. Follow the screen instructions.
|
Format |
Up to 15 digits or use the option |
|
Example |
Press <F2> for First and Last. |
4. Category
Enter the category to purge items for only one product category, or press <F5> to include items for All product categories.
|
Format |
Up to five digits or use the option |
|
Example |
Press <F5> for All categories |
5. Sub-category
Enter the sub-category to purge items for only one product sub-category, or press <F5> to include items for All sub-categories.
|
Format |
Up to five digits or use the option |
|
Example |
Press <F5> for All sub categories |
Field number to change ?
Make any changes or select <Enter> to continue.
Are you sure you wish to do this ?
When you are ready to continue, answer Y to the question Are you sure you wish to do this?. If you are not sure, then select N.
If you select to purge inventory history, the program purges from the Inventory history all inactive items with dates on or before the cut-off date specified.