This chapter contains the following topics:
Introduction to Control Information
Second Tab - Account Information
Fourth Tab - Default/User Forms
Fifth Tab - Orders (Enter) Defaults
The Control information selection enables you to input key information about your business operation. The information sets software parameters and defaults that apply throughout the Order Entry (O/E) software module.
Select
Control information from the Master information menu.
From here, you enter a new controls, if this is the first time using O/E, or make changes to the existing information.
The following screen displays:
The O/E Control information is a single record, so the only buttons available are Edit, Save, Cancel and Exit.
Character Mode
The first screens displays:
If you already have O/E Control information, when Field number to change ? appears, you can press <Enter> or <PgDn> to move to the next screen. At subsequent screens, you can press <PgUp> to move to a previous screen.
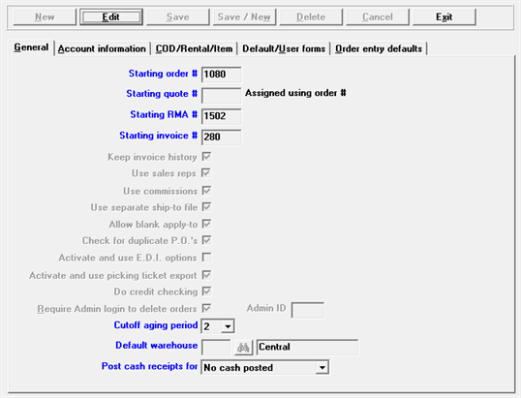
On the General tab enter the information as follows:
This number is assigned to the next order entered. Each time a new order is entered, this order number is incremented (increased by 1) automatically.
|
Format |
Up to six digits: 999999 |
|
Example |
Type: 1 |
Enter the number to be assigned to the next quote entered, or press <F2> to assign the next order number to each quote.
If you select to use separate quote numbers, the number entered here should be selected so that quote numbers will not overlap order numbers.
When a quote is converted to an order, the next order number is assigned and the quote number is retained for informational purposes.
|
Format |
Up to six digits: 999999 |
|
Example |
Type: 1 |
Enter the number to be assigned to the next RMA (Return Merchandise Authorization) entered, or press <F2> to assign the next order number to each RMA.
If you select to use separate RMA numbers, the number entered here should be selected so that RMA numbers will not overlap order numbers or quote numbers.
When an RMA is converted to a credit memo, the next order number is assigned to the credit memo and the RMA number is retained for informational purposes.
|
Format |
Up to six digits: 999999 |
|
Example |
Type: 4 |
Enter the number to be assigned to the next invoice printed, or press <F2> to use the original order number for each invoice.
If you select to use invoice numbers that are different than order numbers, this field is automatically updated for each new invoice printed.
When invoices are printed, if the starting invoice number has already been used in invoice history or as an I type order in orders, the program looks for the next available invoice number and uses that
|
Format |
Up to six digits: 999999 |
|
Example |
Type: 4 |
When invoices are posted to Inventory Control and Accounts Receivable during Billing, the invoice number becomes the document number referred to in the I/C and A/R modules..
Check this box if you wish to retain a history of posted invoices.
If you uncheck this box, Invoice history by customer, by customer/invoice, by invoice, and by item appear on the View and Reports menus of the O/E menu but may not be selected.
|
Format |
Check box, checked is yes and unchecked is no. The default is checked. |
|
Example |
Press <Enter> to accept the default. |
There are many advantages to retaining invoice history. One of the few disadvantages is the extra disk space taken up by Invoice History. As most modern systems have more than enough disk space to handle a large volume of history, we recommend that you decide to keep invoice history.
Check this box if you wish to enter a sales rep number or commission information for your orders. If you check this box, you must also have checked the box to this question in the A/R Control information, and you must have set up sales reps in Accounts Receivable.
If uncheck this box, you are not required to enter a sales rep number or commission information in later selections.
|
Format |
Check box , checked is yes and unchecked is no. The default is checked. |
|
Example |
Press <Enter> to accept the default |
If you checked the box to the Use sales reps field, you may check this box if you wish to track commissions for your sales reps. If you check this box, you must also have checked the box to this question in the A/R Control information.
If you unchecked this box , you are not required to enter commission information in later selections. If you unchecked the Use sales reps field, this field automatically is unchecked and an entry is not allowed.
|
Format |
Check box , checked is yes and unchecked is no. The default is checked. |
|
Example |
Press <Enter> to accept the default. |
Check this box if you want to use separate ship-to addresses, to retain addresses to which customer merchandise is shipped when the address is different from the customer’s billing address.
If you uncheck this box you may still enter a ship-to address for an order that differs from the customer’s billing address, but you will not be able to retain ship-to addresses.
|
Format |
Check box , checked is yes and unchecked is no. The default is checked. |
|
Example |
Press <Enter> to accept the default |
When entering a credit memo or RMA, you are allowed to enter the apply-to number of the invoice from which merchandise is being returned. Checking this box makes this a required field. Un-checking this box allows the field to be left blank until the credit memo or RMA is entered.
|
Format |
Graphical: Check box , checked is yes and unchecked is no. The default is checked. Character: Enter Y or N |
|
Example |
Press <Enter> for the default. |
Check this box (enter Y) if you want to check the open orders and invoice history headers for a duplicate purchase order number when entering field Customer P.O. # from the Orders, (Enter) screen. If a duplicate is found, then a window will display data about the invoice or order that has the duplicate number. Leave it unchecked (enter N) if you do not want to check for a duplicate P.O. number.
The Orders chapter Purchase Order Number Checking section has more information on the data that will be displayed when a duplicate P.O. is found.
If you have very large history or many open order header records, it may take some time for the Orders, (Enter) program to respond when looking for a duplicate.
|
Format |
Graphical: Check box , checked is yes and unchecked is no Character: Enter Y or N |
|
Example |
Select the Space bar to check the box or enter Y |
Activate and use E.D.I. options
Check this box if you are using EDI (Electronic Data Interchange). This will enable the various interfaces to process EDI data. For example, in Orders there is an option to import EDI data files.
For information on the purpose of E.D.I. and how it is used in PBS O/E, see the E.D.I. Overview section of the Orders chapter.
|
Format |
Graphical: Check box , checked is yes and unchecked is no. The default is unchecked (no) Character: Enter Y or N |
|
Example |
Select Enter for the default |
Activate and use picking ticket export
Check this box to allow the option of exporting picking ticket information to a fixed length text or CSV file format or leave it unchecked if you do not want this option.
|
Format |
Graphical: Check box , checked is yes and unchecked is no Character: Enter Y or N |
|
Example |
Select the Space bar to check the box |
This option will be available when selecting Picking tickets from the main menu.
This determines if you will check the customer’s credit limit, as defined in customers, when processing their order.
|
Format |
Graphical: Check box , checked is yes and unchecked is no Character: Enter Y or N |
|
Example |
Use the space bar to check the box |
Require Admin login to delete orders
When checked an Administrative User ID may delete an order and a General user will be prompted to enter an Administrative User ID and password in order to delete an order. This field may be used with the next field: Admin ID which creates an additional restriction.
When checked these O/E menu selections are affected for general users:
| Main menu | Sub menu | General user restrictions |
|---|---|---|
|
Orders |
Enter |
A General user is restricted from deleting any order type. If the customer is over the credit limit and the amount being billed is increased, you will prompted to enter a User ID and password to continue the deletion |
|
Billing |
Select for billing |
If the customer is over the credit limit and the amount being billed is increased, you will prompted to enter a User ID and password to continue the deletion |
A user may cancel the entry of a new order when not fully completed.
Any user may delete a recurring order.
A General user may not edit this field, even if they have access to O/E Control information.
An Administrative user may not edit this field if the Admin ID field has a value and it is different than the User ID you log in with.
Users are not restricted from deleting or adding order lines. They are not restricted from editing any fields.
|
Format |
Graphical: Check box , checked is yes and unchecked is no Character: Enter Y or N |
|
Example |
Leave it unchecked |
If you checked the Require Admin login to delete orders field you have the option to enter a User ID in this field. You may only enter an Administrative User ID.
When the Administrative user ID field is blank:
| • | Any Administrative User ID can delete an order in either Orders (Enter) and in Billing (Select for billing). You may cancel (delete) and order in Billing (Select for billing) when the customer is over the credit limit. |
| • | General users will be prompted for a User ID and password in order to delete the order. Normally you would not want to provide an Administrator’s user ID and password to a General user. The general user may call on an Administrative user to enter the User ID and password to complete the deletion. Or, the Administrative user may delete the order from his or her computer. |
| • | Any administrative user may edit this field and enter a value. |
After you enter an Administrator User ID and save the entry for this field:
| • | When selecting to delete an order in Orders (Enter) and Billing (Select for billing), both Administrative users and General users will be prompted to enter the matching User ID and password to complete the deletion. As you would not want to provide an Administrative User ID and password to a general user, the general user may call on an Administrative user to enter the User ID and password to complete the deletion. |
| • | If this field has an Administrative User ID entered, only the person logged in with that User ID may edit this field. As an example, if the entry in this field is PSI, the only user that can edit this field is the one that logs in with the PSI user ID. |
|
Format |
Up to three characters |
|
Example |
You may not enter this field because the previous field was not checked |
Define the aging period here and the program will check for outstanding invoices within that aging period for this customer.
If you unchecked the box at the Do credit checking field, the Cutoff aging period cannot be entered.
|
Format |
One digit |
|
Example |
Type: 3 |
An entry in this field is allowed only if you specified in I/C Control information that you are using multiple warehouses.
If you are using multi-warehousing, enter the code for your usual warehouse. A warehouse is requested for each order or credit memo.
To choose the Central warehouse as the default, press <Enter> (if you defined a Central warehouse in Warehouses in I/C).
|
Format |
Up to two characters |
|
Example |
Press <Enter> for Central Warehouse. |
Your answer to this question depends upon how you want to handle cash receipts when posting invoices , orders and orders that have been selected for billing.
If you are using multi-payments, per the A/R Control information, then this field defaults to the Multi-payments setting and cannot be changed. For more information on using Multi-payments, see the Multi-payments Setup appendix in the Accounts Receivable user documentation.
You may apply cash to orders or invoices. It may be a cash receipt entered at the time the order or invoice was entered, or it may be prepaid cash entered using A/R Cash receipts that you are applying to the transaction. These are the options:
No | Option | Description |
0 | No cash posted | This means you are not posting cash. You may enter cash on an order or invoice, but only for memo purposes. |
0 | Multi-payments | If you are using multi-payments, per the A/R Control information, then this field cannot be changed. |
1 | Invoice only | You may enter a cash amount and post it as a cash receipt with invoices. Cash entered on an order is a memo only. |
2 | Invoice & prepaid | You may enter a cash amount, apply prepaid cash and post as cash receipts with invoices. Cash entered on an order is a memo only. |
3 | Invoice, order & prepaid | You may enter a cash amount, apply prepaid cash and post as cash receipts with invoices and orders selected for billing. |
4 | Invoice & order | You may apply and post a cash receipt with invoices and orders. Prepaid cash cannot be applied. |
5 | Order only | You may apply and post cash receipts with orders. Prepaid cash cannot be applied to orders. Cash entered on an invoice is a memo only. |
This table represents the posting of entered or applied prepaid cash for invoice and order types:
Character Number | Option | Invoice | Prepaid Cash * On Invoice | Order | Prepaid Cash * On Order | Select for billing | Prepaid Cash * with Select for billing |
0 | No cash posted |
|
|
|
|
|
|
1 | Invoice only | Post |
|
|
|
|
|
2 | Invoice & prepaid | Post | Post |
|
|
|
|
3 | Invoice, order & prepaid | Post | Post | Post | Post | Post | Post |
4 | Invoice & order | Post |
| Post |
| Post |
|
5 | Order only |
|
| Post |
| Post |
|
* In order to enter prepaid cash you must have selected to use prepaid cash in A/R Control information. Up to three prepaid cash amounts may be entered for an order or invoice.
You would only want to apply cash to an order if the order remains unselected, printed and posted for a short time. Cash is not posted until the order is invoiced and posted. In a case where the cash receipt needs to be posted sooner than later, then use the Prepaid cash features.
If cash receipts are handled by your A/R department and memo information is passed to your order processing department for entry on invoices, you would answer 0 here to avoid double posting of cash receipts.
Format | Drop down list |
Example | Select No cash posted |
Make any needed changes. Upon pressing <Enter> from the last field the next tab appears.
Graphical Mode
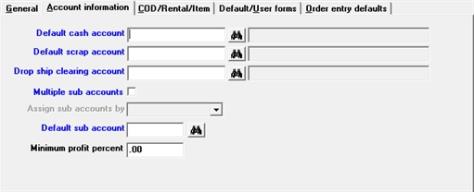
The Account information tab is shown below:
Character Mode
This is the second screen in Control information
Enter the cash account to use in Orders as a default when you enter cash received with an order. The account number specified must be in the Cash Accounts file.
Format | As defined by your account number structure |
Example | Type: 1000-000 |
Enter the number of the G/L account to use in Orders as the default scrap account.
While entering a credit, you enter a scrap account if the quantity being returned to inventory is smaller than the quantity being credited (for example, when faulty merchandise is credited but not returned). The dollar value of the quantity scrapped (not returned to inventory) is distributed to the scrap account.
Format | As defined by your account number structure |
Example | Type: 7030-000 |
When you sell goods from inventory (non-drop shipped), the item’s expense account is debited and the item’s inventory account is credited.
However, drop shipped items do not come out of your inventory. For drop shipped items, the item’s expense account is still debited, but the credit goes to the drop ship clearing account entered here.
If you are using Accounts Payable, you will enter a voucher for your cost for the drop shipped items at the time you receive the invoice from the vendor who drop shipped the items.
When distributing the Payables expense in A/P, be sure to use the same drop ship clearing account that you enter here. This will create a debit to the drop ship clearing account, properly clearing the account balance to zero.
When you are using A/P, the balance in the drop ship clearing account should be zero at the end of each accounting period. If it is not zero, vouchers have not been entered for one or more drop shipped items. In this case, consult with your accountant regarding G/L adjustments needed to reflect merchandise that you have drop shipped for which you have not yet received an invoice from the vendors concerned.
Enter the number of the G/L account to be used as the drop ship clearing account.
Format | As defined by your account number structure |
Example | Type: 1000-000 |
If the account number you enter is not present in the Valid G/L Accounts file, the prompt Drop ship clearing account is not on file - would you like to add it ? appears. You may answer Yes to add it to the Valid G/L Accounts file.
If you answer Yes, you are then asked to enter an account description. If you answer No, you are returned to the Drop ship clearing account field to enter a different number.
Note | If A/R or I/C is interfaced with G/L, you must also enter this same account through Chart of accounts in the G/L module. (When interfaced to G/L, any time a new account is added in a module, you must also add it to the Chart of Accounts in G/L.) |
Multiple cost centers (or sub accounts)
If you are not using cost centers (or sub accounts), as specified in the Company file, this field is skipped.
If you leave this box unchecked, all orders entered in O/E are assigned to the cost center (or sub account) entered in the Default cost center (or sub account) field. If you check this box, cost center (or sub accounts) for orders are assigned according to your answer to the Assign cost centers (or sub accounts) by field below.
If you plan to use a single cost center (or sub account) for all orders, leave this box unchecked. Otherwise, check it.
Format | Graphical: Check box , checked is yes and unchecked is no. The default is unchecked. Character: Enter Y or N |
Example | Select the space bar to check the box. |
Assign cost centers (or sub accounts) by
If you left the previous field unchecked, you will not be able to enter this field.
Options
When multiple cost centers (or sub accounts) are used, they can be assigned in three different ways in O/E:
| O = order | Assign by order A cost center (or sub account) is entered on the first screen for the order. This cost center (or sub account) is used for posting all line items on the order. |
| L = line item | Assign by line item A cost center (or sub account) is entered on each line item on the order. The cost center (or sub account) assigned to each line item is used when the order is posted. A default cost center (or sub account) is entered on the first screen of the order. This default may be used when assigning cost center (or sub accounts) to individual lines to simplify data entry when most of the lines on the order are assigned to a single one. |
| I = inventory Item | Assign by inventory item This option is only available if cost center (or sub accounts) are assigned to inventory items, as specified in the I/C Control information. In this case, cost center (or sub account) are never entered for orders (either on the first screen or on the line item screen). The cost center (or sub account) used for each line item is taken from the item itself, as entered using Items in Inventory Control. |
Format | Graphical: Drop down list. Use one of the options from the table above Character: Use either O, L or I |
Example | Select Order |
When a line item is posted, the cost center (or sub account) is obtained using the method entered for this field. This cost center (or sub account) is then combined with the sales account in the Item record to obtain the G/L account to be credited for the sale. The Cost of Goods account to be debited for the sale is obtained by combining the same cost center (or sub account) with the expense account in the Item record.
Default cost center (or sub account)
If you specified that cost center (or sub accounts) are assigned by inventory item in the previous field. The system will use the Inventory items Cost Center (sub account), but you must make an entry here to be used with Services items.
If you specified that cost center (or sub accounts) are assigned by order, the cost center (or sub account) entered here is used as a default when you enter the actual cost center (or sub account) for the order.
If you specified that cost center (or sub accounts) are assigned by line item, the cost center (or sub account) entered here appears as a default when entering the default cost center (or sub account) on the first screen of the order. The cost center (or sub account) may be changed for individual line items.
Format | As defined by your account number structure |
Example | Type: 100 |
After the price and cost have been entered for each line on an order the percentage profit is calculated for that line. The calculated percentage is then compared to the value entered here. If the profit percentage of the line is less than the value entered in Control information, a warning message is displayed. The user is allowed to override the message.
Format | Up to six digits |
Example | Type: 5.000 |
Graphical Mode
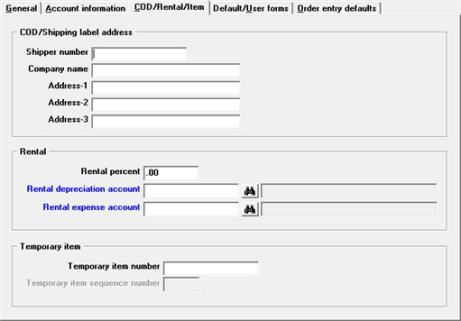
The COD/Rental/Item tab looks similar to the following:
Character Mode
A third screen then appears similar to this:
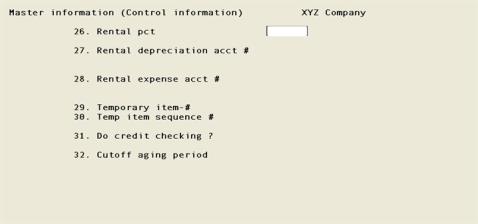
COD/Shipping label address
If you plan to use shipping or COD labels, enter your company name and address here. The name and address entered here may be printed on COD and shipping labels as described in the chapter titled COD/Shipping Labels.
Enter your account number with the company that handles your COD shipments. This account number may be printed on COD labels as described in the chapter titled COD/Shipping Labels.
Format | Up to 15 characters as define in Labels |
Example | Type: 271-35905-7 |
Company name
Address-1
Address-2
Address-3
Format | Up to 25 characters for each field (22-25) |
Example | Type: XYZ Company |
Rental
This is the default rental depreciation percent. This is multiplied by the unit price. You can override this based on the rental interval and the rental itself when you process a rental transaction.
Format | Up to six digits |
Example | Type: 50.000 |
Enter the depreciation account number as defined in I/C Control information.
Format | As defined by your account number structure |
Example | Type: 8010-000 |
Enter the rental expense account number.
Format | As defined by your account number structure |
Example | Type: 8000-000 |
Temporary Item
If you will be adding inventory items on the fly, provide a template item number here.
See the Temporary Item section of the Orders chapter for how temporary items are used in O/E and how they are later converted to permanent items in I./C.
Format | Up to 15 characters |
Example | Type: *TEMP |
Note | This should also be defined as an item in the Inventory control module. You should use an item number that begins with an asterisk (a miscellaneous item) to ensure that you do not process receivings for this template item. |
Temporary item sequence number
This is an internal sequence/counter number for temporary items. This is incremented each time an item is added on the fly.
Format | Up to six digits |
Example | Type: 12000 |
Make any needed changes. Upon pressing <Enter> the next tab appears:
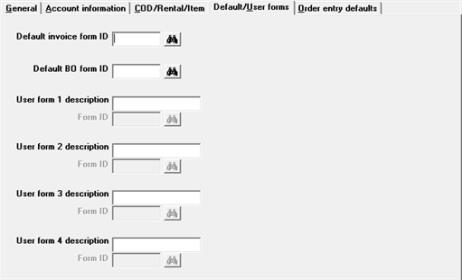
Use the fields on this tab to assign forms for immediate printing.
Before you can enter the data needed for these fields, you must first have your form designed and you must set up the printers in company information.
Immediate printing is optional. The fields on this tab may be skipped or filled in later.
PBS comes with several predefined forms for Order Entry that you may restore using the O/E data utilities. The file is called OEFRMF00.EXP. It is found in several zip files: formats.zip, PBSFormats.zip , PBSFormats-new.zip and rwcforms.zip. For PBS on a Linux/UNIX system they are .tar files. You may restore each one and choose the format that fits your business.
If you are restoring the forms for a company other than 00, you must rename the file to match the company. For example, if the company ID is IW, then rename the file to OEFRMFIW.EXP.
You may design your own form or modify an existing form using the forms designer. See the Forms chapter.
Graphical Mode
The Default/User Forms tab is shown below:
Character Mode
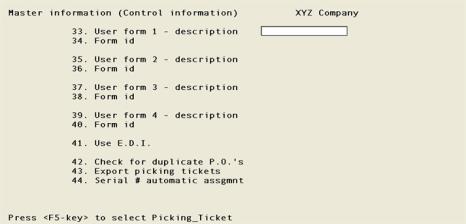
The fourth control screen is shown below:
Options
Enter the ID of the form to be used for printing an Invoice type, or use the Option:
<F1> | For next Form on file |
<SF1> | For previous Form on file |
<F6> | Assign printer |
You may specify a form ID that has not yet been specified in the Form file (Not on file will display), but the form must be defined in the Form file prior to actually printing it.
On a new entry, after selecting the form, a window displaying the defined printers will appear. To select one of the printers to be automatically used when printing invoices, highlight the printer and press <Enter>. Press <Esc> if you wish to select the printer each time you print an invoice. If you are changing the printer, select the <F6> key to re-assign it.
On the last screen of the Orders (Enter) you will be presented with all the option of immediately printing your invoice and on the last page of Billing (Select for billing) you may immediately print your selected order. See the Immediate Invoice Printing section of the Orders chapter. Also see the Immediate Invoice Printing of Orders in the Billing and Invoice chapter.
Format | Up to five digits |
Example | Type: 1 |
Specify the form ID number of the backorder report to which the program will default. The backorder form can be customized.
Format | Up to five digits |
Example | Press <F1> for the next form on file |
User form (1 through 4) - description
Form ID
(Printer selector)
The User form description, Form ID and printer selector fields define the default formats that you will use when processing immediate transactions. You can enter up to 4 forms for immediate printing.
On the last page of the Orders (Enter) you will be presented with all the immediate printing options you have set up here. You can immediately print invoices, orders, picking tickets and any one of the different form types you have available. You will only be provided the option of printing an invoice if you are entering an Invoice type order.
Before you can enter the data needed for these fields, you must first have your form designed and you must set up the printers in company information.
There are three steps for entering each form.
Step 1. Description
Enter the form description or use the option.
Format | Up to 14 characters for each field |
Options
When entering the description field you have the following option:
<F5> | If you are going to print an immediate picking ticket and you want to update the picking ticket printing status for the order, then select the <F5> auto-input option, Picking Ticket, for any one of the fields 33, 35, 37 or 39. For best results select a form id type that is a picking ticket. |
Step 2. Form ID
Select the Form ID from a list of available forms set up in Forms under the O/E menu selection Control information.
Format | Up to 5 characters for each field |
The form ID must match the form type that you intend to print. For example if you are going to print an invoice, then the form ID must have an invoice type associated with it.
Step 3. (Printer selector)
You will then be prompted to select a printer. The list of available printers from Company information will display. If you are running PBS via Windows or Thin client, you can also select Windows printer.
You can choose the printer by selecting the <Enter> key, or press <Esc> for no default printer.
Selecting Windows printer will bring up the Print selector window. In the window drop down box select the printer. then select the OK button. The form will print to the selected printer. When you print the form the Windows print adjustment window will display.
The Immediate Invoice Printing section of the Orders chapter has more information on the use of this feature.
Make any needed changes Select <Enter> at the last field and the next tab displays.
Graphical Mode
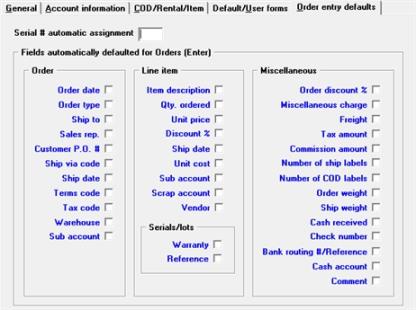
The Order entry defaults tab looks similar to the following:
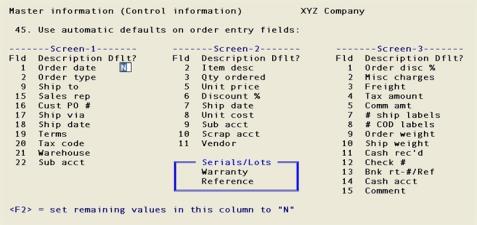
Character Mode
Last screen now appears similar to this:
Enter a number, other than zero, to allow an automatic assignment of serial numbers for a serialized item entered on the orders line item entry screen. If you enter a value of zero, then this feature will not be used.
Serial numbers are often produced sequentially (i.e. A101, A102, A105, A110, etc.). When selling a large quantity of the same serialized item on an order and they are all sequential, use this setup to assist in automatically entering the serial numbers.
Serial numbers may not follow numerically one right after the other. To compensate for this, enter in this field a numerical search value that indicates to the program how many numbers will be skipped when searching for the next number.
For example, inventory may have an item with a serial number of A105 followed by a serial number of A110. If the search value entered is 1 the program will not find the next serial number of A110. If the search value is 5 or more the program will find it.
If the next serial number is more than 99 away from the first entry, the program cannot find it.
Format | A number 0 to 99. |
Example | Type: 1 |
Fields automatically defaulted for Orders (Enter)
To permit rapid order entry, you may specify to automatically use default values for specific fields when entering orders. Check the box for each field that should automatically use the default.
Automatic field defaulting was developed long ago. Since then other technologies other defaulting technologies may also be utilitzed. Before you set these fields read the Graphical Mode and Character Mode notes:
Graphical Mode
Using graphical mode many of the fields are defaulted regardless of your setting. The order header auto default and default field values are set like this:
| Field | Auto default value | Graphical mode default value | ||
|---|---|---|---|---|
| Order date | Today's date | Today's date | ||
| Order type | Order | Order | ||
| Ship to | Same as bill-to address | None | ||
| Sales rep | Same as customer's sales rep | Same as customer's sales rep | ||
| Customer P.O. # | None | None | ||
| Ship date | Today's date | Today's date | ||
| Ship via code | Same as customer's ship via | Same as customer's ship via | ||
| Terms code | Same as customer's terms | Same as customer's terms | ||
| Tax code | Same as customer's tax code | Same as customer's tax code | ||
| Warehouse | Central | Central | ||
| Sub account | From O/E Control information | From O/E Control information |
In graphical mode the order lines auto default and graphical default field values are set like this:
| Field | Auto default value | Graphical default value | ||
|---|---|---|---|---|
| Item description | Description from Items (Enter) | Description from Items (Enter) | ||
| Qty. ordered | 1.00 | Blank | ||
| Unit price | Price 1 from Items (Enter) | Price 1 from Items (Enter) | ||
| Discount % | .00 | Blank | ||
| Ship date | Date from header | Blank | ||
| Unit cost | From items | From items | ||
| Sub account | Sub account from header | Blank | ||
| Scrap vendor | Not enterable | Not enterable | ||
| Vendor | Blank | Blank | ||
| Serial/lot Warranty | Blank | Blank | ||
| Sereial/lot Reference | Blank | Blank |
Using graphical mode the miscellaneous auto default and graphical default field values are set like this:
| Field | Auto default value | Graphical default value | ||
|---|---|---|---|---|
| Order discount % | Discount from Customers (Enter) | .00 | ||
| Miscellaneous charge | 0.00 | 0.00 | ||
| Freight | 0.00 | 0.00 | ||
| Tax amount | Calculated | Calculated | ||
| Commission amount | Depends on if commission is calculated during posted | Depends on if commission is calculated during posted | ||
| Number of ship labels | 0 | 0 | ||
| Number of COD labels | 0 | 0 | ||
| Order weight | Auto calculated | Auto calculated | ||
| Ship weight | Auto calculated | Auto calculated | ||
| Cash received | .00 | .00 | ||
| Check number | Blank | Blank | ||
| Bank routing #/Reference | Blank | Blank | ||
| Cash account | Blank | Blank | ||
| Comment | Blank | Blank |
Character Mode
Press <F2> during initial entry, to set all remaining fields for that screen to N. The cursor skips that field.
Automatic field defaulting is a global function for this company. Therefore it effects all users entering order entry fields. If you want different settings per user, you may prefer to use BreakOut to skip fields and customize field defaults. You can read more about BreakOut in the PBS System documentation.
Format | Graphical: Check box , checked is yes and unchecked is no. The default is unchecked for all fields. Character: Enter Y or N |
Example | Check each box you want defaulted. |
During the entry of orders, if you uncheck a box for a field, the cursor stops at that field to allow you to enter a value.
When you selected enter on the last field, then the cursor goes to the Save button and the first tab displays.