This chapter contains the following topics:
Introduction to Deliver-to-Locations
Use this selection to set up one or more deliver-to locations (places for receipt of shipments) on your purchase orders. Defining your locations beforehand is more efficient and more secure than keying them into each purchase order. If necessary you can still enter one-time delivery locations on a purchase order, for instance if you want office supplies delivered to a hotel suite for a weekend conference.
If you are interfaced to Inventory Control
Warehouses defined for I/C automatically become available as deliver-to locations, and vice versa. There are not two sets of data, but only one, which one module interprets as locations and the other as warehouses.
Locations which you add here will be established as warehouses in the Inventory Control module.
If you have specified (in I/C Control information) that you do not use multi-warehousing, only one deliver-to location is available to you; the default Central location.
If you are interfaced to Job Cost
You may wish to designate the site of each major project as a deliver-to location for the duration of the contract.
If you use I/C as well as J/C, job sites so defined will be regarded as warehouses, whether or not you actually stock inventory there. Items delivered to such a location are treated differently depending on your answer to the question This P.O. line is for ? on the purchase order:
| • | If you specified for inventory, the item is stocked at the warehouse upon receipt, and cannot be used by the job until it is removed from inventory by a Job usage transaction in I/C Inventory. |
| • | If you specified for job, the item is assigned to the job directly, without going through Inventory Control and without affecting your inventory valuation. |
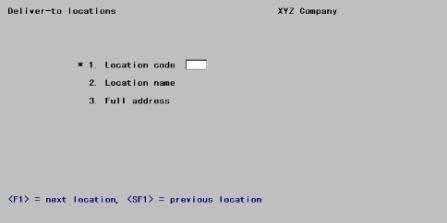
Select
Deliver-to locations from the Master information menu.
The following screen displays:
From this screen you can work with both new and existing deliver-to locations.
Enter the following information:
*1. Location code
The default deliver-to location
You can define a default location. Its location code is entered as Blank. This displays as Central on the screen.
| • | If you define a default location code, in subsequent selections you will be able to choose the default location by simply leaving the location field blank. |
| • | If you do not define a default, in subsequent selections a blank entry will not be accepted. |
| • | If all your business takes place at a single site, Central is the only deliver-to location that you need. |
For a new deliver-to location
If you are interfaced to I/C, entering a new location in this selection automatically creates a new entry in the I/C Warehouses selection.
For an existing deliver-to location
Enter the code of an existing deliver-to location (which may be Blank if Central already exists)
Options
or use the option:
|
<F1> |
For the next deliver-to location. |
|
<SF1> |
For the previous deliver-to location |
The Central deliver-to location cannot be reached by the option keys even if it has already been defined; you must enter Blank explicitly.
Upon selection of a valid existing location, the data for that location will display and you will be positioned at Field number to change ?.
|
Format |
Two characters |
|
Example |
Type: 1 |
2. Location name
Enter the name of the deliver-to location. This is for your reference only and does not appear on the printed purchase order.
|
Format |
10 characters |
|
Example |
Type: Main |
3. Full address
Enter the full address of the deliver-to location including the company name. You can skip a line by pressing <Enter>, but you must go through all 5 lines to complete adding the new deliver-to location.
|
Format |
Five lines of 25 characters each |
|
Example |
Type: XYZ Company |
|
|
Type: 101 Buckley |
|
|
Type: Market Center Depot |
|
|
Type: Anytown, Texas 12345 |
|
|
Type: Attn: Shipping Clerk |
Field number to change ?
Make any needed changes. If this is an existing entry, you may also use one of the following options:
<F3> To delete this deliver-to location (see the restrictions below)
You should not delete a deliver-to location if there are any open purchase orders or uninvoiced receivings still on file for that location. You can check this on the Open Purchase Order Report and Uninvoiced Receivings Report. Refer to the Reports chapter.
If you are interfaced to I/C, you will not be able to delete a location so long as any item is still stocked at that warehouse.
Within these restrictions, it is valid to delete any location including Central.
Upon pressing <Enter> with this field blank, your entry is accepted and the data fields are cleared for entry of the next location.
Select
Deliver-to locations from the Reports menu.
No selection menu appears as the entire range of locations is printed unconditionally.
See a Deliver-to Locations report example in the Sample Reports appendix.