This chapter contains the following topics:
Introduction to Pre-purchase Processing
Issuing Purchase Order Numbers
Printing Purchasing Advice Reports
Printing Purchasing Worksheets
Processing Pre-purchase Records
Converting Pre-purchase Records
The Pre-purchase orders processing selection groups together four functions which are preliminary to processing purchase orders.
When numeric purchase order numbers are used, they must be issued before use. This is often done in blocks, each block being assigned to an individual who then becomes responsible for those purchase orders until all numbers have been accounted for.
When alphanumeric purchase order numbers are used, purchase order numbers are not issued and this selection does not apply. See the Control Information chapter for a full explanation.
The Purchasing Advice Report and the Purchasing Worksheet reports are available only when you interface to Inventory Control. They help you decide what and when to re-order.
The Purchasing Advice Report is an expanded version of, and replacement for, the Purchasing Advice Report in I/C. When the Purchasing Advice Report is run, pre-purchase records are created for each item that falls within the re-order parameters entered for the report.
Both reports include information about I/C inventory items, whether or not those items are present in Vendor Items.
In addition to generating a report, Purchasing advice creates pre-purchase records based on the parameters entered for the report. These pre-purchase records may be edited until they reflect your actual order and then converted to purchase orders automatically.
If interfaced with O/E, costs may be pulled from an O/E line when running the Purchasing Advice Report.
When numeric issuing applies, and only in that case, this function is used to issue a group of consecutive purchase order numbers.
A particular purchase order number cannot be assigned to a purchase order in the Purchase orders (Enter) function unless it has been issued here first.
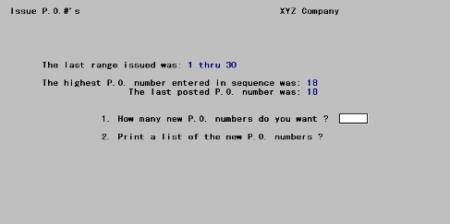
Select
Issue P.O.#’s from the P/O menu.
The following screen appears:
The first three lines on this screen are for information only. The numbers shown are automatically updated by the software in the course of day-to-day processing. If you just want to look at this information and don't want to issue any new numbers, press <Esc>
Otherwise, enter the following information:
1. How many new P.O. numbers do you want ?
Enter the quantity of new purchase order numbers you want to issue.
|
Format |
999 |
|
Example |
Type: 10 to issue 10 numbers |
2. Print a list of the new P.O. numbers ?
Answer Y if you want to print an Available P.O. Numbers List. You can use this list as a control document. It provides blank spaces for you to enter the date and vendor number for each purchase order number used.
|
Format |
One character, either Y or N |
|
Example |
Type: Y |
Field number to change ?
Make any needed changes. Upon pressing <Enter> with this field blank, the requested numbers will be issued and the Available P.O. Numbers List, if requested, will be printed. See a sample Available P.O. Numbers report in the Sample Reports appendix.
You can print this report only if I/C is interfaced with P/O.
The Purchasing Advice Report is a valuable aid in planning your purchasing. When this report is run, pre-purchase records are created for each item that falls within the re-order parameters entered for the report.
When pre-purchase order records are generated the cost for an item can come from several sources. These include:
| • | Vendor item record. If there is more than one vendor with the same item, it takes the cost from the vendor with the lowest amount |
| • | Order Entry Line Estimated or Negotiated Cost |
Using Order Entry Estimated and Negotiated Costs
If Order Entry is not installed on your system this section does not pertain to you.
From Order Entry Orders (Enter), the Vendor, Neg. cost (negotiated cost) and Est. cost (estimated cost) fields may be used when running this report to establish the cost.
For each O/E line item, the item-number is used to read pre-purchase orders. The O/E entered costs will be used for the pre-purchase order record when:
| • | A pre-purchase order record is being generated with an item number that matches the O/E entered item |
| • | On the O/E line, the vendor number field is not blank and either the Neg. cost or Est. cost fields are not zero |
| • | The cost entered on the O/E order line is less than the cost on the pre-purchase order record |
Then the order to which that line item belongs is a valid order and a pre-purchase order record is updated in the following manner:
| • | If the negotiated cost is not zero and not greater than the pre-purchase order cost the O/E line Vendor, Neg. cost and Item number are used to write the pre-purchase order record. For this case an "N" is placed in the pre-purchase order cost flag |
| • | If the estimated cost is not zeros and not greater than pre-purchase order cost the O/E line Vendor, Neg. cost and Item number are used to write the pre-purchase order record. For this case an "E" is placed in the pre-purchase order cost flag |
| • | If both the negotiated and estimated costs are not zero and at least one of them is not greater than the pre-purchase order price, then the lessor cost will be used to write the pre-purchase order record |
See a sample Purchasing Advice Report in the Sample Reports appendix.
Select
Purchasing advice from the Pre-purchase orders menu.
A screen similar to the following appears:
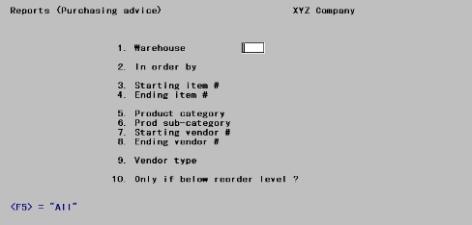
If you do not use the multi-warehouse feature, Field #1. Warehouse does not appear and the remaining fields are renumbered accordingly.
Enter the following information:
1. Warehouse
If you want to show only items stocked at one warehouse, enter the code for that warehouse.
Options
Otherwise, use the option:
|
<F5> |
To show items stocked at All warehouses |
If you select a single warehouse, then on-hand, reorder level, and other quantities are shown for only that warehouse.
If you select All warehouses, then the information shown will be the combined quantities for all warehouses.
|
Format |
Two characters |
|
Example |
Press <F5> |
2. In order by
Enter either:
|
I |
To print in item number order. |
|
V |
To print in vendor number order. |
|
C |
To print in product category order. |
|
S |
To print in product subcategory order. |
|
T |
To print in order by vendor type (defined in A/P Vendors) |
|
Format |
One character from the list above |
|
Example |
Type: V |
3. Starting item # and
4. Ending item #
Enter the range of inventory items to show on the report. Follow the screen instructions.
|
Format |
15 characters for each field |
|
Example |
Press <F2> at both fields. |
5. Product category
You can show items for only one product category or for all product categories. Entering Blank means that you only want those items which have no product category. Enter the product category, or press <F5> for All items regardless of product category.
|
Format |
Five characters |
|
Example |
Press <F5> |
6. Product sub-category
This field displays as Not applicable and may not be entered if you have not specified a product category.
Otherwise, you can show items for only one product subcategory or for all product subcategories within this category. Entering Blank means that you only want those items within this category which have no product subcategory.
Enter the product subcategory or press <F5> for All items in this product category, regardless of subcategory.
|
Format |
Five characters |
|
Example |
Press <F5> |
7. Starting vendor # and
8. Ending vendor #
This vendor number refers to only the prime vendor for the item.
Enter the range of vendors whose items are to show on the report. Follow the screen instructions.
|
Format |
Six characters at each field |
|
Example |
Press <F2> at both fields. |
9. Vendor type
Unless you chose to print in Vendor Type order (Field #2 above), this field displays as All and may not be changed.
Otherwise, enter the vendor type you wish to print, or press <F5> to show items for All vendor types.
|
Format |
Three characters |
|
Example |
This field defaults to All and is skipped. |
10. Only if below reorder level ?
Answer Y to show only those items whose quantities are below their reorder levels as specified in I/C Items.
There are two different item quantities that can be compared to the reorder level. Your answer to the following question will determine which is compared.
Answer N to show items regardless of reorder level.
|
Format |
One character, either Y or N. The default is N. |
|
Example |
Type: N |
If you answer Y, the following field appears:
Compare reorder level to
This question appears only if you answer Y for Only if below reorder level ?.
Your answer to this question determines which item quantity to compare to the reorder level. Enter 1 or 2.
|
1 |
Quantity on hand |
|
2 |
Quantity available minus qty on backorder
|
The reorder level is compared to:
(Quantity on-hand plus quantity on order), minus (Quantity committed plus quantity on backorder)
|
Format |
9 |
|
Example |
Does not appear in this example because you typed N in the previous field. |
Field number to change ?
Make any needed changes. Upon pressing <Enter> with this field blank, the report will be printed and pre-purchase records will be generated for all items that align with the parameters entered for the report.
The Purchasing Worksheet is an expanded version of the Purchasing Advice Report in I/C. It provides much more information about each item, including information about the vendors who sell it. The worksheet contains a section of blank lines in which you can enter information about your final purchasing decision for each item.
There is a separate worksheet for every item. Each worksheet starts on a new page with its own number.
At the end of each printed set of worksheets is an index in order by vendor number. This allows you to quickly find all items that are sold by any particular vendor.
Like the Purchasing Advice Report, this worksheet requires that I/C be interfaced with Purchase Order.
See a sample Purchasing Worksheet 0001 in the Sample Reports appendix.
Select
Purchasing worksheet from the Reports menu.
A screen resembling the following appears:
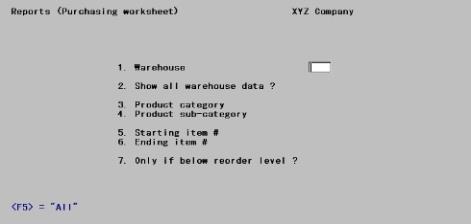
If you do not use the multi-warehouse feature, Field #1 does not appear and the remaining fields are renumbered accordingly.
Enter the following information:
1. Warehouse
If you want to show items stocked at one warehouse only, enter the code for that warehouse, Otherwise, press <F5> to show items stocked at All warehouses.
If you select a single warehouse, then on-hand, reorder, and other quantities will be shown for that warehouse only. If you select All warehouses, then the information shown will be the combined quantities for all warehouses.
|
Format |
Two characters |
|
Example |
Press <F5> |
2. Show all warehouse data ?
Answer Y to show the inventory status for this item at each warehouse individually, in addition to the status for the selected warehouse (or in addition to the combined statuses for all warehouses, if you selected All warehouses above).
Answer N to skip the warehouse detail section on the worksheets.
|
Format |
One character, either Y or N. The default is N. |
|
Example |
Type: Y |
3. Product category
You can show items for only one product category or for all product categories. Entering Blank means that you only want those items which have no product category.
Enter the product category, or press <F5> for All items regardless of product category.
|
Format |
Five characters |
|
Example |
Press <F5> |
4. Product sub-category
This field displays as Not applicable and may not be entered if you have not specified a product category.
Otherwise, you can show items for only one product subcategory or for all product subcategories. Entering Blank means that you only want those items within this category which have no product subcategory.
Enter the product subcategory, or press <F5> for All items in this product category, regardless of subcategory.
|
Format |
Five characters |
|
Example |
Press <F5> |
5. Starting item # and
6. Ending item #
Enter the range of inventory items to show on the worksheet. Follow the screen instructions.
|
Format |
15 characters for each field |
|
Example |
Press <F2> at both fields. |
7. Only if below reorder level ?
Answer Y to show only those items whose quantities are below the reorder level specified in I/C Items. There are two different item quantities that can be compared to the reorder level. Your answer to the following question will determine which is compared.
Answer N to show items regardless of reorder level.
|
Format |
One character, either Y or N. The default is N. |
|
Example |
Type: N |
Compare reorder level to
This question appears only if you enter Y for Only if below reorder level ?.
Your answer to this question determines which item quantity to compare to the reorder level. Enter 1 or 2.
|
1 |
Quantity on hand |
|
2 |
Quantity available minus qty on backorder |
The reorder level is compared to:
(Quantity on-hand plus quantity on order), minus (Quantity committed plus quantity on backorder)
Field number to change ?
Make any needed changes. Upon pressing <Enter> with this field blank, the worksheet will be printed.
After the worksheet prints, you are asked whether the worksheets just printed are OK.
If you answer Y, the Next P.O. worksheet # field in Control information is updated; if N, it is not.
Purchase orders prepared from a worksheet can be cross-referenced to that worksheet by entering the worksheet number in the header of the purchase order.
Print the Pre-purchase Edit List before converting your pre-purchase records to purchase orders. You may use the information provided to be sure that only those pre-purchase records that you have reviewed will be converted to actual purchase orders.
Select
Edit list from the Pre-purchase orders menu.
The following screen will be displayed.
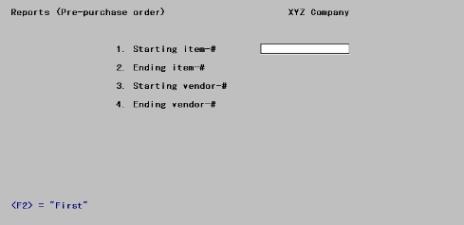
You may limit the information that appears on the report. The following fields are available.
1. Starting item-# and
2. Ending item-#
Enter a range of items to print on the Edit List or press <F2> for First and Last for each field.
3. Starting vendor-# and
4. Ending vendor-#
Enter the range of vendors, whose items will be eligible for the Edit List or press <F2> for First and Last for each field.
|
Format |
Six characters |
Field number to change ?
Make any changes you wish to make. Upon pressing <Enter>, you will be prompted to chose a printer for the report.
Choose this selection to edit or delete records created when the Purchasing Advice Report was run. From within this selection you will also be able to select and unselect items for conversion to purchase orders. The actual conversion is done from this selection and monthly purchasing statistics are made available.
Costs that originated from an O/E line are identified by * ESTIMATED COST * or * NEGOTIATED COST * under the cost field.
An edit list is also available for final reference before you convert your pre-purchase records to actual purchase orders. See Pre-purchase Edit List
Select
Enter from the Pre-purchase orders menu.
The following screen displays:
You may use the following options to locate pre-purchase records or type in an item number to access a record for a particular item.
|
<F1> |
For the next pre-purchase record. |
|
<SF1> |
For the previous pre-purchase record. |
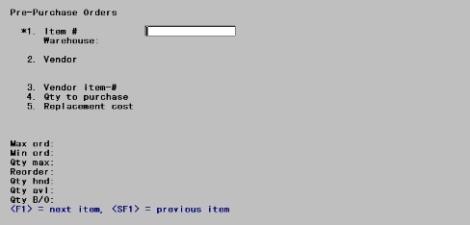
*1. Item #
You may enter an item number to retrieve a pre-purchase record.
Options
You may also use one of the options:
|
<F1> |
For the next pre-purchase record. |
|
<SF1> |
For the previous pre-purchase record. |
|
Format |
15 characters |
If a pre-purchase record for the entered item number exists, it displays for editing or deletion if you wish. A screen similar to the following displays:
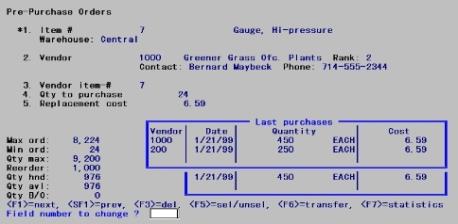
On the right of the screen are the last purchases information in two display boxes. They contain the following information:
| • | The upper box shows the last 3 times, by date, that the item was purchased |
| • | The lower box show the last 2 times the item was purchased from the vendor in field 2 |
The other fields and functions are explained below:
Options
The following options are available for displayed pre-purchase records:
|
<F1> |
For the next pre-purchase record. |
|
<SF1> |
For the previous pre-purchase record. |
|
<F3> |
To delete this record. |
|
<F5> |
To select and unselect this record for conversion to a purchase order. |
|
<F6> |
To convert selected records to purchase orders. |
|
<F7> |
To view purchasing statistics. A vertical box displays to show the purchases of the selected item during the last twelve months. Select Enter to exit the box. |
2. Vendor
Initial entry of a vendor number is not allowed. This field may only be accessed from Field number to change ?.
|
Format |
Six characters |
3. Vendor item #
Initial entry of a vendor item number is not allowed. This field may only be accessed from Field number to change ?.
|
Format |
15 characters |
4. Qty to purchase
Initial entry of a Qty to purchase is not allowed. This field may only be accessed from Field number to change ?.
|
Format |
999999.99999 |
|
Example |
Press <F5> |
5. Replacement cost
Initial entry of a Replacement cost is not allowed. This field may only be accessed from Field number to change ?.
|
Format |
9999999.99999 |
|
Example |
Press <F5> |
If the words * ESTIMATED COST * or * NEGOTIATED COST * display under the Replacement cost field, it means that the cost was established from a line in Order Entry. See the Using Order Entry Estimated and Negotiated Costs section for a full explanation.
Edit the pre-purchase record as required.
Print the Pre-purchase Edit List to verify your edits.
At any time while working in the pre-purchase record entry screen, you may convert pre-purchase records to purchase orders. You may convert one record at a time or you may convert many selected records at a time. It is advisable to develop a consistent process for doing this.
After you have printed the Pre-purchase edit list and you have verified that all records are correct for conversion, you may initiate the conversion.
Select
Enter from the Pre-purchase orders menu.
The following screen displays:
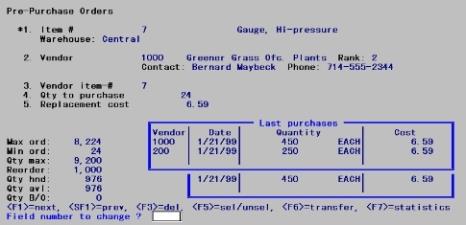
Options
You have the following options:
|
<F1> |
For the next pre-purchase order record |
|
<SF1> |
For the previous pre-purchase order record |
|
<F3> |
To delete the pre-purchase order record |
|
<F5> |
To select/unselect the record for transfer to P/O |
|
<F6> |
To transfer your pre-purchase records that have been selected (using <F5>) to actual purchase orders. Pressing <F6> displays the message, Create Purchase order for this vendor ONLY?. |
|
<F7> |
To display Qty by Month statistics |