This chapter contains the following topics:
Receipts in Excess of Quantity Ordered
Use this selection to produce various P/O reports. These reports are structured to quickly give you the valuable and pertinent information available in Purchase Order and other modules interfaced to it.
Twenty two different reports are available from this selection. Each report has numerous options to choose from.
All the reports in this selection use only the permanent Purchase Order files. No purchase order is included in these reports until it has been posted.
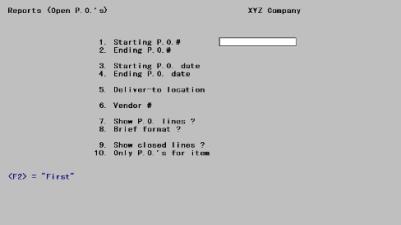
This report is a list which shows each purchase order on file that is currently open (not all goods ordered on it have been received yet). It is useful for:
| • | Predicting future deliveries |
| • | Verifying the status of deliveries for a particular purchase order |
| • | Verifying the status of purchase orders for a selected vendor |
| • | Looking at upcoming deliveries for a certain item only |
| • | Looking at upcoming deliveries for a selected location |
See a sample Open Purchase Order report in the Sample Reports appendix.
Select
Open P.O.’s from the Reports menu.
The following screen appears:
Field #10 appears only if you are using Inventory Control.
Enter the following information:
1. Starting P.O. # and
2. Ending P.O.#
Enter the range of purchase orders to show on the report. Follow the screen instructions.
|
Format |
15 characters at each field |
|
Example |
Press <F2> at both fields |
3. Starting P.O. date and
4. Ending P.O. date
Enter the range of purchase order dates to show on the report. Follow the screen instructions.
|
Format |
MMDDYY |
|
Example |
Press <F2> at both fields |
5. Deliver-to location
Enter the code for a valid deliver-to location if you wish to restrict the report to that location.
Blank for Central is valid if that location has been defined. If you are interfaced to I/C and have specified (in I/C Control information) that you do not use multi-warehousing. Blank is the only valid entry.
Options
You may also use the option:
|
<F5> |
For All locations |
Upon selection of a valid location, its name (or All, or Central) displays.
|
Format |
Two characters |
|
Example |
Press <F5> |
6. Vendor #
To show purchase orders for only a single vendor, enter the number of the vendor.
Options
You may also use the option:
|
<F5> |
For All vendors |
If you select a single vendor, the name and address automatically display.
|
Format |
Six characters |
|
Example |
Press <F5> |
7. Show P.O. lines ?
Answer Y to show the line item information, or N to show only the header information for each purchase order.
|
Format |
One letter, either Y or N. The default is Y. |
|
Example |
Type: N |
8. Brief format ?
The brief report has only one line of header information for each purchase order. If you are showing line items, only one line of information is printed for each line item. Answer Y for the brief format or N for the detailed format.
You can get the briefest possible report by answering N to Show purchase order lines ? above, then answering Y here.
|
Format |
One letter, either Y or N. The default is N. |
|
Example |
Type: N |
9. Show closed lines ?
If field #7 (Show purchase order lines ?) was answered N, this field displays as (Not applicable) and may not be entered.
A line item is closed if no shipments are due for that line. Answer N to show only open lines, or Y to show closed lines also.
|
Format |
One letter, either Y or N. The default is N. |
|
Example |
This field is skipped because the previous field is N. |
10. Only P.O.’s for item
If you are not using Inventory Control this field does not appear on the screen.
If field #7 (Show purchase order lines ?) was answered N, this field displays as (Not applicable) and may not be entered.
Enter the item number of a single item, or press <F5> for All items ordered.
If you enter a single item, the description is displayed. The item must be in the I/C Item file.
Only purchase orders having a line for that item will be shown, and only the lines for that item are shown.
|
Format |
15 characters |
|
Example |
This field is skipped because the Field #7 is N. |
Field number to change ?
Make any needed changes. Upon pressing <Enter> with this field blank, the Open Purchase Order Report will print.
This report lists all items that you indicated should be expedited in the Purchase orders selection. These are usually items due to be received in the near future. It is useful for showing which vendors to contact to ensure that their deliveries arrive on the scheduled date.
Select
Expedite shipment from the Reports menu.
The following screen appears:
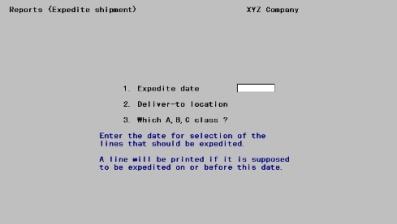
Enter the following information:
1. Expedite date
Enter the date to define what the near future is for expediting purposes. A line item shows on the report if it should be expedited on or before this date. The deliveries that need to be expedited have Expedited beside them. All deliveries for the line are shown.
For example, if today’s date were May 15, you might want to see what deliveries need to be expedited during the coming week. You would enter May 22 as the expedite date.
|
Format |
MMDDYY |
|
Example |
Type:33119 |
Delivery A was requested for May 24, and you entered 5 for the number of expedite days for this delivery (meaning that it should be expedited 5 days before the expected delivery, or on May 19). Delivery A would appear on the report.
If, on the other hand, delivery B is also expected on May 24, but the number of expedite days for this delivery is 1, then it should be expedited on May 23. Delivery B would not appear on the report.
2. Deliver-to location
Enter the code for a valid deliver-to location.
Blank for Central is valid if that location has been defined. If you are interfaced to I/C and have specified (in I/C Control information) that you do not use multi-warehousing. Blank is the only valid entry.
Options
You may also use the option:
|
<F5> |
For All locations |
Upon selection of a valid location, its name (or All, or Central) displays.
|
Format |
Two characters |
|
Example |
Press <F5> |
3. Which A, B, C class ?
This field appears only if you are interfaced with I/C.
ABC class is defined in the ABC Analysis chapter of the I/C User documentation. To recap briefly, the ABC class indicates an item’s importance to your business, with A items being at the top. This is useful if, for example, your time is limited so you decide to first expedite A items before spending time on B items.
Enter A, B, or C, indicating the class of items you want to expedite.
Options
You may also use the option:
|
<F5> |
For All ABC classes |
|
Format |
One letter, either A, B, or C |
|
Example |
Press <F5> |
Field number to change ?
Make any needed changes. Upon pressing <Enter> with this field blank, the Expedite Shipment Report will print.
If you chose to print the report, rather than display it on the screen, you are asked whether the report just printed is OK. If there was no problem during printing, answer Y.
If you answer Y, the number of expedite days for the deliveries printed on the report are set to zero. This insures that these deliveries will not show up on the next Expedite Shipment Report that is printed.
If you want one of these deliveries to show up on a future Expedite Shipment Report, you must re-enter the expedite days for this delivery through Changes to P.O.’s.
This report lists shipments that are past their delivery date and still due. It lists past due shipments continually until they are finally received.
This may be regarded as doing the opposite of what the Expedite Shipment Report does.
See a sample Follow-up Past Due Shipments report in the Sample Reports appendix.
Select
Follow-up past due shipments from the Reports menu.
The following screen appears:
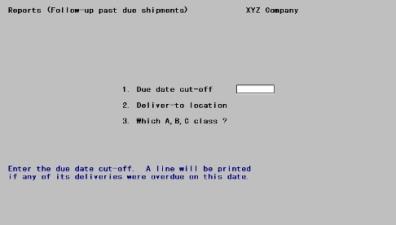
Enter the following information:
1. Due date cut-off
Enter the due date cut-off for the purchase order deliveries to show in the report. All deliveries for a line item will be shown if one of them is overdue (due on or before this date). The past due deliveries show Past due.
|
Format |
MMDDYY. The default is the system date. |
|
Example |
Type:63015 |
2. Deliver-to location
Enter the code for a valid deliver-to location.
Blank for Central is valid if that location has been defined. If you are interfaced to I/C and have specified (in I/C Control information) that you do not use multi-warehousing. Blank is the only valid entry.
Options
You may also use the option:
|
<F5> |
For All locations |
Upon selection of a valid location, its name (or All, or Central) displays.
|
Format |
Two characters |
|
Example |
Press <F5> |
3. Which A, B, C class ?
This field appears only if you are interfaced with I/C.
Enter A, B, or C, indicating the class of items you wish to show or use the option:
|
<F5> |
For All ABC classes |
Refer to the description of the Expedite Shipment Report for more information on the ABC classification, as well as the ABC Analysis chapter in the Inventory Control User documentation.
|
Format |
One letter, either A, B, or C |
|
Example |
Press <F5> |
Field number to change ?
Make any needed changes. Upon pressing <Enter> with this field blank, the Follow Up Past Due Shipments Report will print.
This report gives you an estimate of how much cash you will need to pay out in the near to medium-range future. The projected cash disbursements shown in this report are based on three things:
| • | Invoices already received and entered into the Accounts Payable module, but not yet paid. |
| • | Shipments already received but not yet invoiced (also known as uninvoiced receivings). |
| • | Open purchase orders for which goods have not yet been received. |
In a sense this report may be regarded as the opposite of the Accounts Receivable Projected Cash Receipts report.
See a sample Cash Disbursements Projection report in the Sample Reports appendix.
Select
Cash disbursements projection from the Reports menu.
The following screen appears:

Enter the following information:
1. through 6. Reporting period 1-6 - due for
You can look at projected disbursements for up to six future periods. Each period is defined by its ending date, and commences the day after the ending date of the previous period. Each period contains only the disbursements due within that period, except that past-due disbursements are included in the first reporting period.
|
Format |
A single letter indicating the reporting period. (W for weekly, M for monthly, or Q for quarterly) |
Leave this field blank if fewer than six reporting periods are desired.
For the ending date, MMDDYY. This is entered only for the first period, since it is calculated automatically for all the remaining ones. The default is the system date.
|
Example |
Type:W, then press <Enter> |
|
|
Type:W “Date” appears automatically. |
|
|
Type:M “Date” appears automatically. |
|
|
Type:M “Date” appears automatically. |
|
|
Type:M “Date” appears automatically. |
|
|
Type:Q “Date” appears automatically. |
7. # Of due days for temp vendors
In order to calculate the due date for individual cash disbursements, the number of due days on the Vendor record (in Accounts Payable) for each vendor is used.
However, temporary vendors do not have this information available. Therefore, an approximate number of due days must be entered here, so that any purchase orders, receivings, or invoices for temporary vendors can also be included on this report.
Enter the approximate average number of due days for all temporary vendors.
If you do not use temporary vendors, simply enter the default.
|
Format |
999 The default is 30 days. |
|
Example |
Press <Enter> to accept the default. |
8. Show details ?
Answer Y to show every applicable invoice, uninvoiced receiving, and open purchase order. Answer N to show only the summary figures for each reporting period.
|
Format |
One letter, either Y or N. The default is Y. |
|
Example |
Type: Y |
9. Starting vendor # and
10. Ending vendor #
Enter the range of vendors to show on the report. Follow the screen instructions.
|
Format |
Six characters at each field |
|
Example |
Press <F2> at both fields for First through Last. |
Field number to change ?
Make any needed changes. Upon pressing <Enter> with this field blank, the Cash Disbursements Projection will print.
This report shows shipments that were received in quantities in excess of what was ordered. It is useful in determining what disposition to make of the excess quantity received.
All receivings transactions on file must be posted before this report can be run.
Select
Receipts in excess of qty ordered from the Reports menu.
The following screen appears:
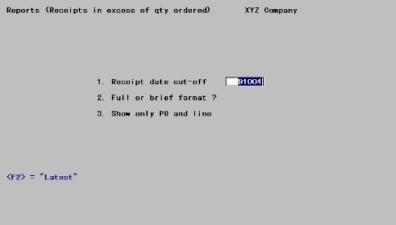
Enter the following information:
1. Receipt date cut-off
Enter the date of the last receipt to include in this report.
Options
You may also use one of the options:
|
<F2> |
For the Latest receipt date |
|
Format |
MMDDYY The default is the current date. |
|
Example |
Press <F2> |
2. Full or brief format ?
Answer F to print the full format of the report, showing each excess receiving on a separate page, or B to print the brief version of the report.
If you select the brief format, the next field (3) is not applicable.
|
Format |
One letter, either B or F. |
|
Example |
Type: F |
3. Show only P.O. and line
To print only a particular line on one purchase order, enter the purchase order number and the number of the specific line. A single-page report for this purchase order and line is printed.
Options
You may use the option:
|
<F5> |
For All excess receivings |
|
Format |
15 characters (for purchase order number) |
|
|
999 (for line) |
|
Example |
Press <F5> |
Field number to change ?
Make any needed changes. Upon pressing <Enter> with this field blank, the Receipts in Excess of Quantity Ordered Report will print.
If you print this report, you are asked whether the report just printed is OK.
If the report is satisfactory, answer Y. The excess receiving status is cleared for all receivings printed and a message appears telling you to press <Esc> This clearing is done to ensure that excess receivings shown on the current report will not be shown again on any future reports.
Print this report to examine the closed purchase orders still on file. A closed purchase order no longer has any open lines. Therefore, there are no more deliveries due for it.
Closed purchase orders remain on file until you purge them through Purge purchase orders. However, you cannot purge a closed purchase order until all invoices connected with it have been entered into the Accounts Payable module.
See a sample Closed Purchase Orders report in the Sample Reports appendix.
Select
Closed P.O.’s from the Reports menu.
The following screen appears:
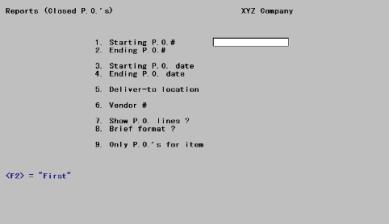
Enter the following information:
1. Starting P.O. # and
2. Ending P.O. #
Enter the range of purchase orders to show on the report. Follow the screen instructions.
|
Format |
15 characters for each field |
|
Example |
Press <F2> at both fields for First through Last |
3. Starting P.O. date and
4. Ending P.O. date
Enter the range of dates of the purchase orders to show. Follow the screen instructions.
|
Format |
MMDDYY |
|
Example |
Press <F2> at both fields for Earliest through Latest |
5. Deliver-to location
Enter the code for a valid deliver-to location to restrict the report to that location.
Blank for Central is valid if that location has been defined. If you are interfaced to I/C and have specified (in I/C Control information) that you do not use multi-warehousing, Blank is the only valid entry.
You may also use the option:
|
<F5> |
For All locations |
Upon selection of a valid location, its name (or All, or Central) displays.
6. Vendor #
If you want to show purchase orders for only a single vendor, enter the number of that vendor here.
Options
Otherwise, use the option:
|
<F5> |
For All vendors |
|
Format |
Six characters |
|
Example |
Press <F5> |
7. Show P.O. lines ?
Answer N to show only the header information for each purchase order without showing any of the line item information. Answer Y to show the purchase order line item information for each P.O.
|
Format |
One letter, either Y or N. The default is Y. |
|
Example |
Type: N |
8. Brief format ?
Answer Y to show only one line of header information. If you are showing line items, only one line information is printed for each line. Answer N to show full header and line details.
|
Format |
One letter, either Y or N. The default is N. |
|
Example |
Type: N |
9. Only P.O.’s for item
If you answered N to fields # 7 and 8, this field displays as (Not applicable) and may not be entered.
If you are not interfaced with I/C, this field does not appear on your screen.
To show purchase orders for one item only, enter that item number, or press <F5> for All items.
If you select a single item, the description displays. The item must be on the Item file in I/C. Only purchase orders having a line for that item will be printed, and only the lines for that item are shown.
|
Format |
15 characters |
|
Example |
Does not appear in this example because you answered N to the two previous fields |
Field number to change ?
Make any needed changes. Upon pressing <Enter> with this field blank, the Closed Purchase Orders Report will print.
This report shows receivings that are in your permanent Receivings History file. All receivings for a purchase order stay on file until that purchase order is closed and purged.
You can print the receivings in three different orders: by purchase order number, receiver number, or vendor number.
See a sample Receivings History report in the Sample Reports appendix.
Select
Receivings history from the Reports menu.
A screen appears for you to specify what order to print the receivings in. Answer P for purchase number order, R for receiver number order, I for Invoice or V for vendor number order.
The appearance of the next screen depends on the order chosen.
|
Format |
One letter from the list above |
|
Example |
Type: P |
A screen similar to this appears:
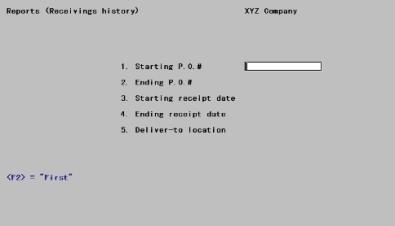
This screen shows P.O. # in fields 1 and 2. If you selected receiver number order or vendor number order, you will see Receiver # or Vendor # instead.
Enter the following information:
1. Starting (P.O., vendor, invoice or receiver) # and
2. Ending (P.O., vendor, invoice or receiver) #
Enter the range of purchase orders, vendors, or receivers to show. Follow the screen instructions.
|
Format |
Five characters (purchase order number) |
|
|
Six characters (vendor number) |
|
|
Fifteen characters (invoice number) |
|
|
999999 (receiver number) |
|
Example |
Press <F2> at both fields for “First” through “Last”. |
3. Starting receipt date and
4. Ending receipt date
Enter the range of dates of receivings to show. Follow the screen instructions.
|
Format |
MMDDYY |
|
Example |
Press <F2> at both fields for Earliest through Latest. |
5. Deliver-to location
Enter the code for a valid deliver-to location to restrict the report to receivings at that location.
Blank for Central is valid if that location has been defined. If you are interfaced to I/C and have specified (in I/C Control information) that you do not use multi-warehousing. Blank is the only valid entry.
Options
You may also use the option:
|
<F5> |
For All locations |
Upon selection of a valid location, its name (or All, or Central) displays.
|
Format |
Two characters |
|
Example |
Press <F5> |
Field number to change ?
Make any needed changes. Upon pressing <Enter> with this field blank, the Receivings History will print.
This report shows what you have purchased (or ordered) based on the purpose for which the items were purchased. Purchases can be made for various purposes:
| • | For inventory |
| • | For expense items, such as office supplies, insurance, advertising services, etc. |
| • | For capital items, such as cars, trucks, and computers |
| • | For jobs in progress (such as construction materials for a job) |
This report lists what has been ordered, grouped by G/L account number (or by job if you are using Job Cost). It also shows the outstanding dollar amount for each G/L account or job. (Outstanding means that the items are unreceived or uninvoiced.)
See a sample Purchase Order Distribution Report in the Sample Reports appendix.
Select
P.O. distribution from the Reports menu.
If you are using PBS Job Cost
You can use the Purchase Order Distribution Report as a basis for updating the outstanding purchase order amounts for your jobs. To do this, select the jobs and cost items you want to update, and also select to show Earliest and Latest for the starting and ending purchase order dates, and for both open and closed purchase order lines.
The dollar amount of a distribution for a line on a purchase order is considered to be outstanding up to the time that the invoice is entered into Accounts Payable. When the invoice is posted in Accounts Payable through the Payables selection, only then is the amount no longer outstanding.
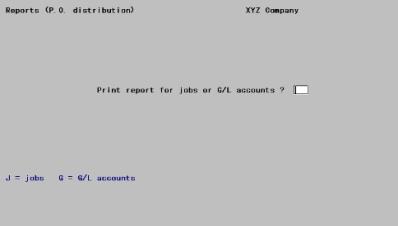
Answer J if you want to show purchase orders for Jobs only, or G if you want to show purchase orders for non-job purchases only.
If you select J, the following screen appears:
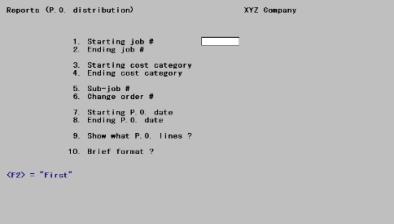
Enter the following information:
1. Starting job # and
2. Ending job #
Enter the range of job numbers to show. Follow the screen instructions.
|
Format |
7 characters |
|
Example |
This screen does not occur in this example because you are not interfaced to J/C. |
3. Starting cost category and
4. Ending cost category
Enter the range of cost categories to show. Follow the screen instructions.
|
Format |
999999 |
|
Example |
This screen does not occur in this example because you are not interfaced to J/C. |
5. Sub-job #
If you are printing this report for a single job, you can enter a sub-job number here to show only one sub-job of this job. Enter the sub-job number.
Options
You may use the option:
|
<F5> |
For All sub-jobs of the job |
If more than one job is selected, this field is automatically set to All.
|
Format |
999 |
|
Example |
This screen does not occur in this example because you are not interfaced to J/C. |
6. Change order #
If you are not using change orders in Job Cost, this field displays as (Not applicable) and may not be entered.
If you are printing this report for a single job, you can enter a change order number here to show only a single change order of that job, or press <F1> to show the original job and all change orders .
The original, unchanged job has a change order number of 000.
If you selected more than one job above, this field is automatically set to All.
|
Format |
999 |
|
Example |
This screen does not occur in this example because you are not interfaced to J/C. |
7. Starting P.O. date and
8. Ending P.O. date
Enter the range of dates of purchase orders to show. Follow the screen instructions.
|
Format |
MMDDYY |
|
Example |
This screen does not occur in this example because you are not interfaced to J/C. |
9. Show what P.O. lines ?
Type: O to show Open lines only, C to show Closed lines only, or B to show Both closed and open lines.
|
Format |
One letter from the list above |
|
Example |
This screen does not occur in this example because you are not interfaced to J/C. |
10. Brief format ?
Answer Y for brief format or N for full format.
|
Format |
One letter, either Y or N. |
|
Example |
This screen does not occur in this example because you are not interfaced to J/C. |
If you not are using PBS Job Cost
If you are not interfaced to Job Cost at all, or are interfaced to Job Cost but have chosen to see those distributions not associated with any job, the following screen appears:

Enter the following information:
1. Starting account # and
2. Ending account #
Enter the range of G/L account numbers for which to show distributions. Follow the screen instructions.
|
Format |
Your standard account number format, as defined in Company information |
|
Example |
Press <F2> at both fields for First through Last. |
3. Starting P.O. date and
4. Ending P.O. date
Enter the range of purchase order dates for which to show distributions. Follow the screen instructions.
|
Format |
MMDDYY |
|
Example |
Press <F2> at both fields for Earliest through Latest |
5. Show what P.O. lines ?
Enter O to show only open lines (line items for which there is still an unreceived amount), C to show only closed (fully received) lines, or B to show both closed and open lines.
|
Format |
One letter from the list above. The default is B. |
|
Example |
Type: B |
|
Note |
There can be an outstanding distribution amount for a closed purchase order line. If a line has been fully received, but the invoice for the received goods has not been entered into A/P Payables, an outstanding distribution amount will show for the line. |
6.Brief format ?
Answer Y to print the report in the brief format (one printed line per purchase order line item), or N to show all detail for each line item.
|
Format |
One letter, either Y or N. The default is N. |
|
Example |
Press <Enter> |
Field number to change ?
Make any needed changes. Upon pressing <Enter> with this field blank, the Purchase Order Distribution Report will print.
Make any needed changes. Upon pressing <Enter> with this field blank, proceed with the main screen as described above.
Original Distribution Amount
If the amount of this distribution was entered manually, this is what is used. If a percentage was used in the original distribution, it is applied to the total extended price of the line item to get the distribution amount.
Outstanding Distribution Amount
There are two separate parts to this:
A. The amount ordered but not yet received.
B. The amount received but not yet invoiced.
If none of the goods on a purchase order line have been received, the outstanding distribution amount is the entire original distribution amount.
If all of the goods have been received, and all of the goods have also been invoiced, the outstanding distribution amount is zero.
The next least complex case is when there is only one distribution for the line item, and some (but not all) of the goods have been received and invoiced.
| • | First, the distribution amount for the unreceived portion of the goods is calculated by comparing the unreceived quantity to the quantity ordered. This is a percentage applied to the original distribution amount. |
| • | The distribution amount for the received but uninvoiced portion of the goods is then calculated by comparing the received but uninvoiced quantity to the quantity ordered. This figure is also a percentage applied to the original distribution amount. |
| • | Finally, the amounts just calculated are added together to give the total outstanding distribution amount for that line item. |
| • | Note that this can be greater than the original distribution amount, but only if one or more scheduled deliveries have already been over-received, and these other deliveries are still open (unreceived). |
After you have entered this information, the sequence of prompts and responses is the same as for the G/L accounts version of this report.
The most complicated case is for a line item that has two or more distributions, and some (but not all) of the goods have been received and invoiced.
| • | The Purchase Order module does not know how the already received goods were split up between the various distributions for the line items, so it assumes that they were split proportionately among the distributions based on the ratio of each distribution to the total of all distributions. |
| • | These ratios are then applied to the outstanding distribution amount in the previous case to get the outstanding amount for each separate distribution of the line. |
Outstanding Released Dollar Amount
This applies only to blanket orders.
The outstanding released dollar amount is the dollar value of the total released quantity on a line for a blanket order that has not yet been invoiced. This figure is calculated in the same way as the outstanding distribution amount described above, but instead of using the total line item quantity ordered, the total line item quantity released is used.
This report shows all receivings not yet invoiced through the Payables selection of the Accounts Payable module. If you are interfaced to I/C, it is not necessary for a receiving to have posted in I/C Inventory in order for it to appear on this report.
You can print this report at the end of each month to give you a close approximation of the dollar amount of your liability for goods received but not yet invoiced.
See a sample Uninvoiced Receivings report in the Sample Reports appendix.
Select
Uninvoiced receivings from the Reports menu.
The following screen appears:
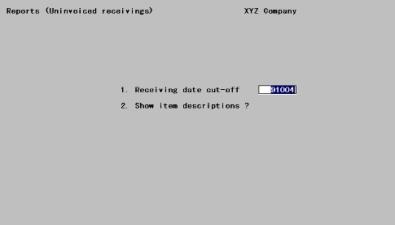
Enter the following information:
1. Receiving date cut-off
Enter the latest date for receivings to show.
|
Format |
MMDDYY. The default is the system date. |
|
Example |
Type: 041519 |
Field number to change ?
Make any needed changes. Upon pressing <Enter> with this field blank, the Uninvoiced Receivings Report will print.
The uninvoiced receivings total may not equal the total of the distributions shown on the report. This is because the distributions are based on the original purchase order, but the actual receivings may be different in quantity or price from the original purchase order.
Print this report to show all receivings marked as having an unknown price. There are two ways this can happen:
There was no purchase order for the receiving and you flagged the price as unknown.
You entered a temporary price through Price adjustments.
See a sample Unknown Prices report in the Sample Reports appendix.
Select
Unknown prices from the Reports menu.
There is one question on the selection screen.
Show item descriptions ?
Select Y if you want to show item descriptions if N if not.