This chapter contains the following topics:
Customizing Payroll with Control Information
Control Information First Tab / Screen
Control Information Second Tab / Screen
Direct Deposit Third Tab / Screen
Control Information Fourth Screen
Affordable Care Act Tab / Screen
Affordable Care Act (ALE) Tab / Screen
Affordable Care Act (DGE) Tab / Screen
Running the Encryption Utility
You use the Control information selection to set up the Payroll module for your business requirements. The information you enter here will control various operations throughout this module.
The control fields for Affordable Care Act determine how the ACA information is tracked and reported.
Several tabs are needed to contain all the information required. None of the information is saved until the last tab is entered.
Like other selections, Control information can be used to enter a new record (add mode), or alter an existing one (change mode).
Data entered here updates two files/tables. The general Payroll control data is entered on the General, Options and Direct deposit tabs and is stored in PRCTLF. The data entered on the three Affordable Care Act tabs are stored in ACACTL.
| • | Be aware that you will normally use add mode only upon initial setup of your company and you will not be asked to enter another record. |
| • | In change mode, some fields are protected against change. This feature is described in the System User documentation. Only a PBS administrative user can access and overwrite protected fields. |
Select
Control information from the Master information menu.
Three tabs are required for entering control information. In character mode 4 screens are needed. All the fields on the fourth character mode screen are on the second graphical mode tab.
If you cancel your entry by pressing <Esc>, before you have entered all the fields for all the screens, none of your entries are accepted.
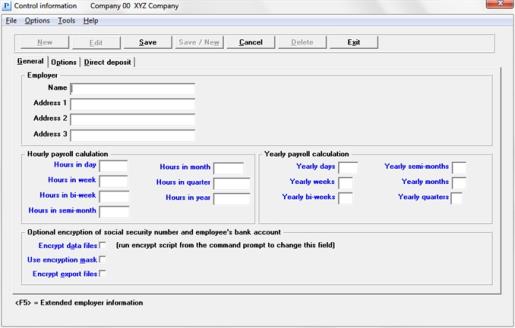
Using graphical mode, the window along with the first tab displays as follows:
In character mode, the first screen displays as follows:
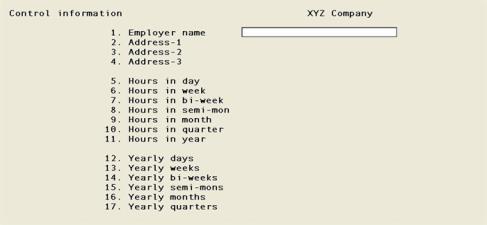
Employer
Enter the employer name and address information:
Enter the employer name. This name (and the address entered below) will be printed on the year-end W-2 forms, the Quarterly Payroll Report and the 941 report and PDF output.
|
Format |
25 characters |
|
Example |
Type XYZ Company |
Enter the first line of the employer’s address. This address is used for the 941 report and PDF output.
|
Format |
25 characters |
|
Example |
Type Southern California Div. |
Enter the second line of the employer’s address. This address is used for the 941 report and PDF output and you must enter the City, State and Zip on this line.
|
Format |
25 characters |
|
Example |
Type F |
Enter the third line of the employer’s address. This address is NOT used for the 941 PDF output.
|
Format |
25 characters |
|
Example |
Type Los Angeles, CA 90010 |
This amount is used in payroll calculations.
Options
Enter the number of hours in your standard work day, or use the option:
|
<F2> |
For 8.00 hours |
|
Format |
99.99 |
|
Example |
Press <F2> |
Options
Enter the number of hours in your standard work week, or use the option:
|
<F2> |
For 5 times the number of Hours in day field |
|
Format |
99.99 |
|
Example |
Press <F2> |
Options
Enter the number of hours in your standard bi-weekly pay period, or use the option:
|
<F2> |
For two times the Hours in week field |
|
Format |
999.99 |
|
Example |
Press <F2> |
Options
Enter the number of hours in your standard semi-monthly pay period, or use the option:
|
<F2> |
For Hours in week, multiplied by 52 and divided by 24 |
|
Format |
999.99 |
|
Example |
Press <F2> |
Options
Enter the number of hours in your standard work month, or use the option:
|
<F2> |
For hours in week, multiplied by 52 and divided by 12 |
|
Format |
999.99 |
|
Example |
Press <F2> |
Options
Enter the number of hours in a work quarter, or use the option:
|
<F2> |
For 13 times the Hours in week |
|
Format |
9999.99 |
|
Example |
Press <F2> |
Options
Enter the number of hours in a work year, or use the option:
|
<F2> |
For 52 times the Hours in week |
|
Format |
9999.99 |
|
Example |
Press <F2> |
Yearly Payroll Calculation
This information is used to calculate payroll taxes based on IRS and state annual withholding tax tables.
Options
Enter the number of work days in a year, or use the option:
|
<F2> |
For 260 |
|
Format |
9999 |
|
Example |
Press <F2> |
Options
Enter the number of work weeks per year or use the option:
|
<F2> |
For 52 |
|
Format |
99 |
|
Example |
Press <F2> |
Enter the number of bi-weekly periods per year used to figure withholding tax, or use the option:
|
<F2> |
For 26 |
|
Format |
99 |
|
Example |
Press <F2> |
Options
Enter the number of semi-monthly periods per year used to figure withholding tax, or use the option:
|
<F2> |
For 24 |
|
Format |
99 |
|
Example |
Press <F2> |
Options
Enter the number of months per year used to figure withholding tax, or use the option:
|
<F2> |
For 12 |
|
Format |
99 |
|
Example |
Press <F2> |
Options
Enter the number of quarters per year used to figure withholding tax, or use the option:
|
<F2> |
For 4 |
|
Format |
9 |
|
Example |
Press <F2> |
Optional encryption of social security number and employee's bank account
This field cannot be changed on this Control information screen. If you are a PBS administrative user, you can run a utility that will either encrypt or decrypt the social security numbers and bank account numbers fields in the appropriate Payroll files/tables. In Windows use the batch ENCRYPT.BAT. In Linux run the script encrypt. For more information see Running the Encryption Utility.
If this is a new install, immediately after running EZ Convert or entering any new data, the fields start as encrypted.
Normally you will want to leave the fields encrypted. However if you are using XDBC (ODBC tool) to view the data you may need to have the unencrypted Social Security number or Bank Account numbers fields. See Encryption Files and Fields for a list of data effected.
Specify whether or not to mask social security numbers and bank account numbers when printing reports, checks and direct deposit mailers. This field also determines if the social security number is viewable from the entry screen in Employees (Enter). If you do not want the social security number to print on checks and mailers, also see the Incl. Soc sec # on check field.
Check the box to mask the numbers for printing and viewing. Leave the box unchecked to print and view full social security numbers and bank account numbers.
Some reports, forms and file outputs never have masked numbers. These include quarterly reports, quarterly and yearly mag media file generation, year-end W-2 forms including mag media and year-end 1099 forms including mag media.
|
Format |
Check box, checked is yes and unchecked is no |
|
Example |
Select <Enter> for the default of unchecked |
Specify whether or not to encrypt social security numbers and bank account numbers when generating an export using the standard or extended data utilities.
Check the box to encrypt the fields. Leave the box unchecked to not encrypt.
The restore program will interpret the fields being restored to determine the encrypted state. Whether or not they are encrypted and no matter how this field is set, it will restore the data properly.
See Encryption Files and Fields for a list of data effected.
|
Format |
Check box, checked is yes and unchecked is no |
|
Example |
Select <Enter> for the default of checked |
The files and fields that are effected by encryption include:
| File/Table | Description | Fields |
|---|---|---|
|
EMPFIL |
Employees |
Social Security number and bank account number |
|
EMPDDA |
Employee direct deposit accounts |
Up to 15 Bank account numbers |
|
KHISFL |
PR history |
Social Security number |
|
KHISFL |
PR history |
Up to 15 Bank account numbers |
|
TIMTRX |
Time transactions |
Social Security number |
|
TIMTRX |
Time transactions |
Up to 15 Bank account numbers |
|
MANTRX |
Adjustment transactions |
Social Security number |
|
VDMTRX |
Void PR checks main |
Social Security number |
|
CNGEMP |
Employee change logs |
Social Security number |
|
TIMHIS |
Time transaction history |
Social Security number |
|
TIMHIS |
Time transaction history |
Up to 15 Bank account numbers |
|
MANHIS |
Adjustment transaction history |
Social Security number |
The bank accounts number fields that can be entered and posted depends on the direct deposit Method selected. If it is Report only only one of two bank account numbers may be entered in the employee record. If it is Electronic payment up to 15 bank account numbers may be entered in a Employee direct deposit accounts record. Where and how these accounts are posted to history also depends on the method selected. See the PBS Field Definition Guide for more file and field details.
Make any needed changes. In change mode, you can also press <F5> for extended employer information.
Press <Enter> for the second screen or tab.
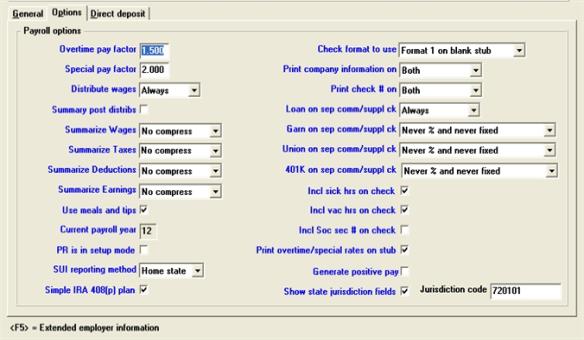
Using graphical mode, the second tab displays as follows:
In character mode the second screen displays as follows:
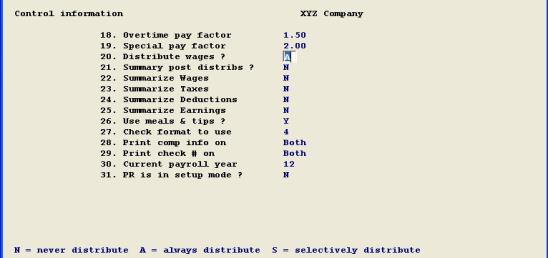
Payroll 0ptions
Enter the following information:
Enter the overtime pay factor. This factor is the number by which the employee’s regular pay rate is multiplied to compute his overtime pay rate.
When the employee overtime pay rate is requested in the Employees function, you can default to the employee’s regular pay rate times the overtime pay factor entered here.
|
Format |
9.999 |
|
Example |
Type 1.5 |
Enter the special pay factor. This factor is the number by which the employee’s regular pay rate is multiplied to compute his or her first special pay rate.
When the employee’s first special pay rate is requested in the Employees function, you can default to the employee’s regular pay rate times the special pay factor entered here.
|
Format |
9.999 |
|
Example |
Type 2 |
Options
Enter the selection as follows:
| Character | Graphical | Description |
|
N |
Never |
Never distribute |
|
A |
Always |
Always distribute |
|
S |
Selectively |
Selectively distribute |
The capability of distributing payroll amounts to G/L accounts remains part of the Payroll module, no matter what your answer is to this question.
Your answer here controls whether or not manual (versus automatic) distributions to G/L accounts are made for an employee’s regular pay.
If you answer Never (never distribute), all employee wages for regular hours or salary, overtime hours, and special hours will be distributed automatically (in the Standard Payroll function) to the G/L account specified for each employee in Employees.
If you answer Always (always distribute), you will be asked, when making entries in the Time worked Distribution of Wages function and the Adjustments Manual Distributions to General Ledger function, for the G/L accounts where employee regular pay, overtime pay, and special pay get distributed.
If you answer Selectively (selectively distribute), you will be asked to enter manual G/L distributions only for employees specifically designated for manual distribution in Employees.
|
Format |
Drop down list |
|
Example |
Select Selectively |
Select the <Space bar> to check the box or press <Enter> for unchecked.
If you leave it unchecked, one distribution is made to each appropriate G/L account for each check that is printed during the Checks function.
If you check the box, only one summary distribution is made as above to each appropriate G/L account, no matter how many checks are printed using that account.
If unchecked is selected, selections Summarize wages, Summarize taxes and Summarize deductions must be set to unchecked.
|
Format |
Check box, checked is yes and unchecked is no |
|
Example |
Press <Enter> for the default of unchecked |
Answering Date compress or Period compress for selections Summarize wages, Summarize taxes, Summarize deductions and Summarize earnings enable the payroll user to keep detailed distribution information for reports and voiding checks, but will not allow unsummarized, personal, payroll information to be transferred to the General Ledger.
Answer Date compress, Period compress, or No compress. In character mode enter D, P or N.
|
Note |
If you answer Date compress for Summarize wages, Summarize taxes, Summarize deductions and Summarize earnings, wages are summarized by date when transferred to General Ledger. If you answer Period compress, wages are summarized by period. If you answer No compress, wages are not summarized. |
|
Format |
Drop down list with the three options listed above. |
|
Example |
Select Date compress |
Answer Date compress, Period compress or No compress. In character mode enter D, P or N
|
Format |
Drop down list with the three options list above. |
|
Example |
Type Date compress |
Answer Date compress, Period compress or No compress. In character mode enter D, P or N
|
Format |
Drop down list with the three options list above. |
|
Example |
Type Date compress |
Answer Date compress, Period compress or No compress. In character mode enter D, P or N
|
Format |
Drop down list with the three options list above. |
|
Example |
Type Date compress |
Check the box for Yes or uncheck it for No. The default is unchecked.
Restaurants and businesses with a cafeteria may want to check the box if employees get free meals as part of their compensation. Taxes must be paid on employer-supplied meals, just as if the value of the meals were paid as wages. These taxes include both the employee and employer share of FICA.
Tips must be reported by the employee to the employer, so that taxes on tips can be deducted from the wages the employee receives, and the employer can report the employee’s total compensation on the W-2 form at the end of the year.
When an employee receives tips and is being paid less than minimum wage, the difference between the wage and the minimum wage is called the tip credit according to the Fair Labor Standards Act. Employer FICA, FUI and SUI contributions are calculated using reported tips, as opposed to the former practice of using tip credit.
|
Format |
Check box, checked is yes and unchecked is no |
|
Example |
Press the <Space bar> to check the box |
Enter the current year for which payroll checks are being printed. This field will be updated automatically to the new year when you run Close a year from the Payroll Year-end menu.
After you have started calculating payroll, printing and posting payroll payments you should never change this date.
|
Format |
99 |
|
Example |
Type 15 |
When first installing Payroll, answer Yes with a check mark. After you have completed setting up Payroll, set this field to No by leaving it unchecked.
This field is provided so that you can enter information into Payroll regarding the amounts you have paid to each employee this calendar year prior to installing the software. For moving out of setup mode refer to the Go from Setup to Regular Mode in the Getting Started chapter.
|
Format |
Check box, checked is yes and unchecked is no |
|
Example |
Select <Enter> for the default of unchecked |
Options
Specify the check format. The choices are:
|
Character Mode |
Graphical Mode |
Format Description |
|
1 |
Format 1 |
Format 1 |
|
4 |
Format 1 on blank stub |
Format 1 on blank stub, same as A/P blank sub |
|
9 |
Graphical form |
Use for a Windows only printer type. Do not select this unless you are running PBS on Windows or Thin client. This option must not be used with Linux telnet mode |
For a graphical check example see Graphical Check Form in the Form and Report Examples appendix.
When you are using electronic direct deposit you must enter the direct deposit form mailer type on the Direct mailer form field. When you are using Report only a check using one of the 3 above types is printed for each payment and following that a Direct Deposit Register prints that lists all the direct deposit amounts.
There are three main types of printers that PBS will work with. These are Windows printer, Company information laser printer and Company information dot matrix printer. The next two sections describe how each printer type does or does not work with each format.
Format 1 and Format 1 on blank stub and Printers
When using a Company information laser printer the check prints between 2 stubs. When using a dot matrix printer one stub prints with the check.
Windows printer is not a workable method of printing checks with Format 1 and Format 1 on blank stub form types. It is recommended that you using a Company information laser printer or dot matrix printer. When using a Company information laser printer setup, your printer must respond to PCL codes when doing an alignment.
If you use Accounts Payable as well as Payroll, the same blank stub check forms can be used for A/P and PR — the stubs are not preprinted and appropriate captions are printed by each. Refer to the A/P user documentation for details on setting up checks.
Graphical form and Printers
The Graphical form has one stub and the check prints at the bottom of the page. Because there is only one stub that is 2/3s of the page, it prints more information and the layout is clearer than the other types. The alignment is less critical because most of the information is printed on a nearly blank form. The MICR encoding is required by banks and must be pre-printed.
You must use Windows printer if you select the graphical form. You may not use a Company information printer and you may not use a dot matrix pin feed printer. You may not use this selection on a Linux system unless you have Thin client.
Please order your checks through your favorite forms supplier. The graphical form and other form types are available through Trainer Printing and Promotions at 847-296-2900.
|
Format |
Drop down list |
|
Example |
Select Format 1 on blank stub |
The check number can be printed on the check, on the stub, or on both. Enter Check, Stub, or Both check and stub.
|
Format |
Drop down list, with choices of Stub, Check or Both |
|
Example |
Select Both |
The company name as entered in Company information can be printed on the check. The name, address and phone entered in Company information can be printed on the stub. Your choices are:
| Character Mode | Graphical Mode | Description |
|---|---|---|
|
S |
Stub |
Prints the company name, address and phone number on the seventh line of the stub in compressed format. Depending on your check stub design, there may not be enough space on the stub if you are using Format 1. For best results select Format 1 on blank stub and use a company information laser printer. See Check format to use. If you have a dot matrix printer, the Company information Epson type printer will print the line in compressed mode if your printer accepts the PCL codes |
|
C |
Check |
Prints the company name on the check |
|
B |
Both |
Prints both the company name, address and phone on the stub and the company name on the check. See stub description for check format and printer type to use |
|
N |
None |
No company information is printed |
|
Format |
Graphical: Drop down list using one the choices from the table above Character: Select a letter from the table above. |
|
Example |
Select None |
Print overtime/special rates on stub
Specify whether or not to print pay rates on the employee's payroll check and direct deposit mailer stubs.
Check the box to print regular, overtime and special rates on the stub. When this field is checked, the rates and the remainder of the data on the line will print in compressed mode. See Check format to use and Direct mailer form.
When this field is not checked only the regular rate will print for hourly employees and no rates will print for salaried employees.
Also, when this field is checked:
| • | The regular rate and overtime rate will always print even if no hours are entered for those rates. |
| • | The special pay rate is zero when no special rate transaction has been entered for the employee. |
| • | If there is more than one special rate transaction entered per employee it will print the average of the special rates used for the employee's special rate transactions. |
| • | When an employee is being paid a salary then the regular rate is calculated based on the employee's pay frequency. The matching pay frequency number of hours, entered in one of the Control information Hourly payroll calculation fields is used. The number of hours is saved in Time worked during entry of a transaction. During printing it is divided into the salary to get the rate per hour. The overtime and special rates are based on the rates in the employee record. |
| • | If it is a salaried employee and the Pay salary ? field in Time worked is not checked (set to N in character mode) the regular, overtime and special pay rates are all based on the employee record. |
|
Format |
Graphical: Check box, checked is yes and unchecked is no Character: Enter Y or N |
|
Example |
Select <Enter> for the default of unchecked |
Specify whether or not to generate a positive pay file during a check run.
For more information on positive pay, see the appendix Implement Positive Pay and Direct Deposit.
Check the box to generate a positive pay file during a check run.
Leave the box unchecked to not use the positive pay feature.
|
Format |
Check box, checked is yes and unchecked is no |
|
Example |
Select <Enter> for the default of unchecked |
An employee setup for generating the full net amount to a direct deposit ACH file will not have a record generated in the positive pay file. If the employee is being paid partially through ACH and partially by check the check net amount will be generated in the positive pay file.
Show state jurisdiction fields
Specify whether or not to display and enter state jurisdictions fields and to be able to run state monthly and quarterly reports.
Check the box to use the state jurisdiction reporting. Leave the box unchecked to not use it. If you check this field the next field, Jurisdiction code, can be entered.
|
Format |
Check box, checked is yes and unchecked is no |
|
Example |
Select <Enter> for the default of unchecked |
The employer code is entered here. It becomes the default when entering jurisdiction information in Employees. If you do not want a default, leave this field blank.
|
Format |
11 characters |
|
Example |
Type 72101 |
Make any needed changes. In change mode, you can also press <F5> for extended employer information, provided that these fields have been defined.
Press <Enter> for the next tab.
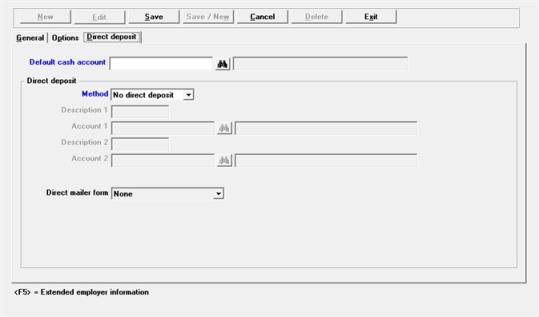
The third tab displays as follows:
In character mode, the third screen displays as follows:
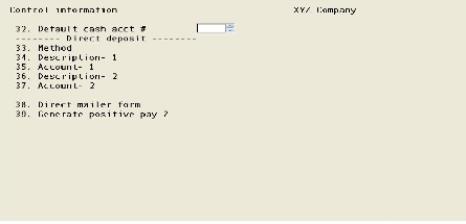
Enter the following information:
Enter the usual cash account from which payroll checks are issued. It must be in Ctl Cash accounts.
|
Format |
Your standard account number format, as defined in Company information |
|
Example |
Enter account # 1000-000 |
There are different sets of options depending on what you select for the Direct Deposit method.
Enter No direct deposit if direct deposits are not to be used and skip to the next tab.
Enter Report only if only a report is to be printed for employees who are directly deposited pay.
Enter Electronic payment for payments via direct deposit ACH file generation.
See ACH or Automated Clearing House
If you enter Report only the remainder of the fields on this screen are enterable. Direct deposits are allowed for one or two financial institutions by writing checks to the institutions and providing the information about each employee’s deposit, using the Direct Deposit Register form printed during check posting. You must set up the Direct Deposit field in Employees for each person who will have their funds deposited directly.
If you can enter Electronic payment you must set up at least one entry in CTL Banks for your company’s bank and one for each bank where the employees funds are deposited. In Employees you must set up field Direct Deposit. When checks are run, an ACH file is created which you send to your bank. For more information on Electronic direct deposit, see the Payroll documentation appendix Implement Positive Pay and Direct Deposit.
|
Format |
Drop down list |
|
Example |
Select Report only |
If you selected the direct deposit ACH payroll method of Electronic payment enter fields Description 1, Account 1 and Direct mailer form.
If you selected Report only enter Description 1, Account 1, Description 2, Account 2 and None for Direct mailer form.
If you select No direct deposit the other fields on this tab cannot be entered.
Enter the description code for the bank which will process the direct deposit records.
This description will display when entering direct deposit employee information.
|
Format |
Ten characters |
|
Example |
Type DD Bank |
When posting payroll checks for employees using direct deposit, this General Ledger account will be credited for the amount directly deposited.
A full discussion on using this account appears in the Checks chapter.
|
Format |
Your standard account number format, as defined in Company information |
|
Example |
Type 1010-000 |
This account is not on file - would you like to add it ?
If you entered an account number that is not one of the Valid G/L accounts you will get this message. Select Yes if you want to add the account to the Valid G/L accounts or select No to re-enter the account number.
|
Format |
Yes/No window |
|
Example |
Select No |
If you elect to add the account you must enter an account description.
Direct Deposit Account must be set up in Check Rec
This account is not in Check Rec - would you like to add it?
If you have Check Reconciliation for your company, you will be asked to add the checking account and the bank name.
If you select Yes you will be asked to enter the bank name.
This field can only be entered if you are using the Report only method of direct deposit.
Enter the description which is to appear on the check stub to identify the amount which has been directly deposited for the employee in institution two.
|
Format |
Ten characters |
|
Example |
Press <Enter> |
This field can only be entered if you are using the Report only method of direct deposit.
When posting payroll checks for employees using direct deposit, this General Ledger account will be credited for the amount directly deposited.
A full discussion on using this account appears in the Checks chapter.
|
Format |
Your standard account number format, as defined in Company information |
|
Example |
Type 1010-000 |
This account is not on file - would you like to add it ?
If you entered an account number that is not one of the Valid G/L accounts you will get the above message. Select Yes if you want to add the account to the Valid G/L accounts or select No to re-enter the account number.
|
Format |
Yes/No window |
|
Example |
Select No |
This field does is not for selecting a check format, but for selecting a format to print direct deposit payment information. The direct deposit formats are similar to checks with a few differences, depending on the type of printer used. For selecting a check format, see Check format to use.
This field must be entered with a value other than None if you are using the Electronic payment direct deposit Method. If you are using Report only enter None as Report only prints one fixed form related to the check format. If you are not using direct deposit select None.
The format options are:
| Character Mode | Graphical Mode | Description | Number of Dot matrix lines | Bottom stub |
|---|---|---|---|---|
|
2 |
DDP Fmt 1 |
Direct deposit check format 1. The alignment will work with a Company information laser printer. The top stub and check are similar to check format Format 1. The bottom stub prints. See Check format to use. |
N/A | Prints bank account information |
|
5 |
DDP fmt 1 on blank form |
Direct deposit check format 1 on blank stub. The alignment will work with a Company information laser printer. The top stub and check are similar to check format Format 1 on blank form. |
N/A | Prints bank account information |
|
6 |
Direct mailer on blank form |
Similar to DDP fmt 1 on blank form, but with no bank account information. Both stubs are similar to check format Format 1 on blank form, but the middle "check" section is shorter. |
N/A | Like top stub |
|
7 |
Matrix mailer carbon |
Intended for a dot matrix printer using a preprinted stub. It will print 1 employee per form and with multiple carbon copies. It is 5.5" tall. |
33 | N/A |
|
8 |
Matrix mailer double |
Intended for a dot matrix printer using a preprinted stub. This type will print the same employee twice and then print the next employee. It is 5.5" tall. |
33 |
N/A |
|
9 |
Matrix mailer 7" |
Intended for a dot matrix printer only, this layout is similar to check Format 1. |
42 |
N/A |
|
G |
Graphical mailer |
This option requires using Windows printeronly. You may not use a Company information printer. This option must not be used with Linux telnet mode. |
N/A | N/A |
|
(Blank) |
None |
No form will print during a direct deposit payment run. If you are using the Electronic payment method, you should NOT select this option. Use this option for the Report only method. |
N/A |
N/A |
What Printer Type to Use
There are three main types of printers that PBS will work with. These include Windows printer, Company information laser printer and Company information dot matrix printer. A Company information laser printer is the type that responds to PCL codes (for a flexible alignment). The information below describes which printer types work best with which forms.
The Graphical form is intended for Windows printer only. The Graphical form has one stub and the payment information prints on the bottom 1/3 of the page. Because there is only one stub that is 2/3s of the page, it has more room for additional payment and deduction information, The layout is easier to understand than the other types. The alignment is not critical because all of the information is printed on a blank form. You may use a pre-printed form if you like, but it is not required. The graphical form mailer and other form types are available through Trainer Printing and Promotions at 847-296-2900.
For the formats other than Graphical form, depending on the printer model, selecting Windows printer will not work for these reasons:
| • | Windows printer limits the printing area on a page vs. a Company information laser printer. Windows printer usually provides a smaller print area. |
| • | Many printers have differences in the potential printable area on a page. You may find that a form prints fine on one printer but the next printer it does not. When you need to change printers this will become evident. When printing to a Company information laser printer this problem will not show up as often. |
| • | The alignment for Windows printer is very limited and for Windows only printers, will not work at all. |
When printing to a laser printer, some of the forms print both an upper stub, check and lower stub. DDP Fmt 1, DDP fmt 1 on blank form and Direct mailer on blank form are intended for a Company information laser printer. DDP fmt 1 on blank and Direct mailer on blank form forms may be printed on plain paper using a Company information printer. For DDP Fmt 1 and DDP fmt 1 on blank form the upper stub prints the check payment information, deductions, earnings and totals similar to the checks stubs. The bottom stub prints a list of the bank accounts and an amount to be deposited to each account.
Most of the mailer formats can be used on a dot matrix printer (pin feed), however the Matrix mailer carbon, Matrix mailer double and Matrix mailer 7" are intended only for matrix printers. When printing to a matrix printer through a Company information printer and the Type 6 Epson printer is selected, it prints the upper stub and check only. The bank account information will not print as per DDP Fmt 1 and DDP fmt 1 blank form. You may experiment with other printer types as needed. NEVER print the graphical mailer on a dot matrix printer.
|
Format |
Drop down list with the options listed above |
|
Example |
Select <Enter> |
Press <F5> for extended employer information, or press <Enter> to move to screen four.
This screen only displays in character mode.
The fourth screen displays as follows:
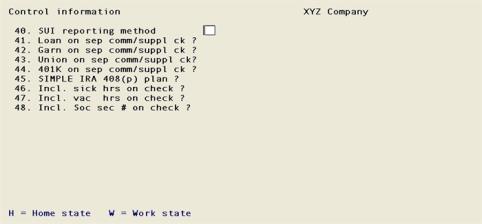
Enter the following information:
Enter the State Unemployment Insurance (SUI) reporting method used.
Select Home state if the SUI is to be computed based on the home state. The first state you enter in Employees for the State tax code field is considered the home state. No matter what state you enter in Time worked, the SUI is calculated on the home state.
Select Work state if SUI is to be computed based on the state in which the employee worked. The work state is determined by the state that is entered in Time worked. The work state and home state can be one and the same.
|
Format |
Drop down list |
|
Example |
Select Home state |
You may or may not want separate checks to receive the same deductions that regular checks do.
Options
The next four fields let you decide how to handle four different types of deductions (loans, garnishment, union, and 401K).
|
Always % and always fixed |
Take this deduction on separate checks (commission or supplemental earning), regardless of the frequency of this deduction as set up in the Employee entry. |
|
Never % and never fixed |
Do not take this deduction on separate checks. |
|
Always % and fixed with same frequency |
If this deduction is set up in the Employee entry as a percentage, separate checks always take this deduction.
If this deduction is set up in the Employee entry as a fixed amount, separate checks take this deduction only when the frequency of this deduction matches either: The frequency of the pay run (in the case of a supplemental earning check) The commission pay frequency of the pay run (in the case of a commission check). |
Enter a one-letter code whether or not to take loan deductions on separate checks (commission or supplemental earning).
Options
Because this deduction is always a fixed amount and never a percentage, your selection displays as:
|
Always |
Take fixed loan deductions on separate commission checks regardless of the frequency of loan deductions set up in the employee record. |
|
Never |
No loan deductions on separate commission checks. |
|
With same frequency |
With same frequency Take fixed loan deductions on separate commission checks for employees whose loan deduction frequency matches the commission pay frequency for the pay run. |
|
Format |
Drop down list |
|
Example |
Select Never |
Enter a one-letter code whether or not to take percentage and fixed garnish deductions on separate checks (commission or supplemental earning).
|
Always % and always fixed |
Take percentage and fixed garnish deductions on separate commission checks regardless of the garnish deduction frequency set up in the employee record. |
|
Never % and never fixed |
No garnish deductions on separate commission. |
|
Always % and fixed with same frequency |
Take percentage garnish deductions on ALL separate commission checks. Take fixed garnish deductions only for employees whose frequency for garnish deductions match the frequency for commission pay. |
|
Format |
Drop down list |
|
Example |
Select Never % and never fixed |
Enter a one-letter code whether or not to take union deductions on separate checks (commission or supplemental earning), under the following circumstances:
|
Always % and always fixed |
Take union deductions, both percentage and fixed, on separate commission checks regardless of the frequency of union deductions set up in the employee record. |
|
Never % and never fixed |
No union deductions on separate commission checks. |
|
Always % and fixed with same frequency |
Take percentage union deductions on ALL separate commission checks. Take fixed union deductions only for employees whose frequency for union deductions match the frequency for commission pay. |
|
Format |
Drop down list |
|
Example |
Select Never % and never fixed |
Enter a code whether or not to take 401(k) deductions on separate checks (commission or supplemental earning).
|
Always % and always fixed |
Take 401(k) deductions, both percentage and fixed, on separate commission checks regardless of the frequency of 401(k) deductions set up in the employee record. |
|
Never % and never fixed |
No 401(k) deductions on separate commission checks. |
|
Always % and fixed with same frequency |
Take percentage 401(k) deductions on ALL separate commission checks. Take fixed 401(k) deductions only for employees whose frequency for 401(k) deductions match the frequency for commission pay. |
For more on the 401(k) setup, see the 401(k) Elective deferral Code section in the Deductions/Earnings chapter. Also see 401(k) Plans
|
Format |
Drop down list |
|
Example |
Select Never % and never fixes |
A SIMPLE IRA is an employer sponsored retirement savings incentive plan that requires matching contributions from the employer.
If this box is checked, the 401(k) fields will be used to store salary reductions and matching contributions under the SIMPLE retirement plan. Headers will still display as 401(k) — not 408(p).
A 408(p) or SIMPLE IRA plan is considered both a pension plan and deferred compensation. Salary reductions and matching contributions will not be included in any deferred compensation totals in sub-total W-2s, W-3 totals, or when reporting electronically.
This field has no affect on how the 401(k) or 408(p) amounts are calculated and accumulated throughout the year. However, at year-end reporting time, in W-2s Box 12, a code S (for SIMPLE plan) will display before the total instead of the D which displays for a 401(k).
You should consult your accountant before setting up a 408(p) plan using PBS Software. Your accountant should be familiar with your software and can advise you on the correct way of setting it up.
|
Format |
Check box, checked is yes and unchecked is no |
|
Example |
Select the <Space bar> to check the box |
Specify whether or not to print employee’s available sick hours on check.
When printing sick hours on a check, they are calculated by adding the sick hours due saved in Employees, the calculated sick hours are accumulated based on sick accumulation setup in Employees and any addition or subtraction of sick hours as entered in time worked.
Check the box to print sick hours on check.
Uncheck the box to exclude sick hours from printing on check.
|
Format |
Check box |
|
Example |
Select <Enter> for the default of unchecked |
Specify whether or not to print employee’s available vacation hours on check.
When printing vacation hours on a check, they are calculated by adding the vacation hours due as saved in Employees, the calculated vacation hours are accumulated based on vacation accumulation setup in Employees and any addition or subtraction of vacation hours as entered in time worked.
Check the box to print vacation hours on check.
Uncheck the box to exclude vacation hours from printing on check.
|
Format |
Check box |
|
Example |
Select <Enter> for the default of unchecked |
|
Note |
If the employee is at the maximum sick or vacation hours allowed as defined in the employee Vacation and Sick setup fields (69 and 70 in character mode) an accumulation of additional sick time is not allowed when printing a check. Therefore no additional accumulated time will print on the check stub, only the maximum amount. |
Specify whether or not to print the employee’s Social Security number on the check stub.
Check the box to print the Social Security number on the check stub. If check this box and you select to mask the social security number based on the Use encryption mask field only the last 4 digits will fully print. The other digits will print as asterisks.
Uncheck the box to exclude the Social Security number from printing on the check stub.
|
Format |
Check box |
|
Example |
Select <Enter> for the default of unchecked |
|
Note |
For security reasons the employees social security number can be masked on Payroll reports by printing only the last 4 digits of the number. The first five digits are printed as asterisks. The Employees (Enter) program can mask the display of the social security number. Only during entry will you see the full number. See the Use encryption mask field. |
Press <F5> for extended employer information (described next), or press <Enter> to return to the module menu after accepting your changes on this screen and the preceding screens of this selection.
You must be licensed by Passport in order to use the PBS Affordable Care Act (ACA software). Contact your PBS provider for instructions on getting a license. For more information on the licensing levels and ACA features, see Introduction to the Affordable Care Act in the Affordable Care Act chapter.
Before entering information on this tab, consult with your accountant.
Values for certain fields may change from year to year. A separate record must be entered for each payroll year.
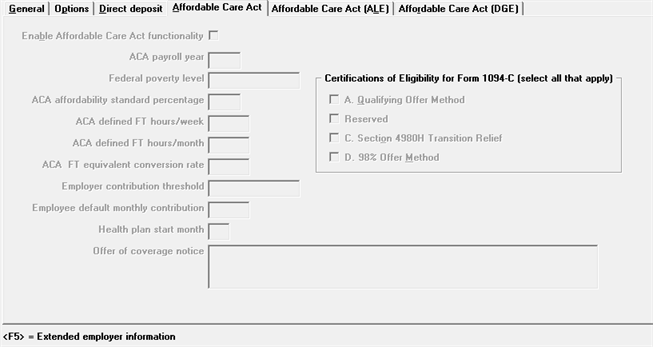
The tab looks similar to this:
Character Mode
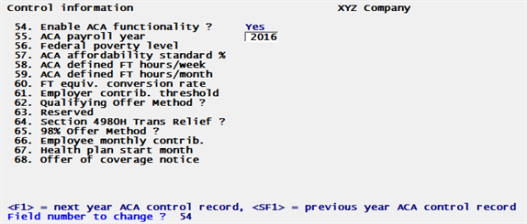
Enter the following fields:
Enable Affordable Care Act functionality
Select the check box to activate the program. Leave it unchecked to disable the Affordable Care Act (ACA) features and functionality. In order to use these features, you must have a license enabled for Affordable Care Act for this company.
|
Format |
Graphical mode: Check box where checked is yes and unchecked is no Character mode: Y= Yes and N = No |
|
Example |
This field cannot be accessed due to lack of an ACA license for this company |
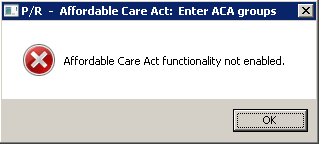
If you are licensed for the ACA features, but you have not checked this box, you will get the following message when accessing any menu selection under the Affordable Care Act menu:
Enter the ACA payroll year.
PBS Payroll can store Affordable Care Act data for multiple years. To allow for changes in control settings due to regulation changes from year to year, an ACA payroll control record must be entered for each year.
You must wait until the system date has reached January of the new year to enter an ACA Control information record for that payroll year.
You cannot add or modify an ACA Control information record for a previous payroll year. This is because past years are closed after the reporting has been submitted to the IRS. Modifying the Control information data for a previous year will lose the integrity of the ACA reporting audit trail.
Enter the Federal Poverty Level amount which is the base of a Safe Harbor calculation method to determine the affordability of self-only Minimum Essential Coverage health insurance.
This amount may change due to economic fluctuations or revisions to the ACA. The most recent update will default the amount intended for the current year. To verify the current Federal Poverty Level, refer to healthcare.gov and consult with your accountant.
ACA Affordability standard percentage
Enter the percentage of income which meets the government standard of affordability.
The percentage is 9.5% for 2015. This percentage may change due to economic fluctuations or revisions to the ACA rules. The most recent update will default the percentage intended for the current year. Consult with your accountant annually to determine this percentage.
Enter the number of hours per week, per ACA regulations, that determines full time status.
This amount is used for certain ACA reports including the Safe Harbor comparison report.
To determine an employees full time status this amount is defined by the ACA regulations as 30 hours per week. To monitor changes to the law and for updating this field, refer to this irs.gov section on the Identification of Full Time Employees.
Enter the number of hours per month per the ACA regulations that determines full time status.
This amount is used to for certain ACA reports including the Safe Harbor comparison report.
To determine an employees full time status this is defined by the ACA as 130 hours per month. To monitor changes to the law, refer to this irs.gov section on the Identification of Full Time Employees.
ACA FT equivalent conversion rate
This is the rate the IRS uses to calculate Full Time Equivalent (FTE) employees from the pool of Part Time hours. The calculation is: Total PT hours ÷ Entered rate = number of FTE
It is used to determine if a business is an Applicable Large Employer (ALE) and also to establish FTE counts for section 4980H Transition Relief indicators.
Employer contribution threshold
You may enter any dollar amount or select <F2> for Unlimited.
The amount entered here affects the last column in the Insurance Report, Coverage penalty?, which prints as Yes or No. This amount/setting helps you determine if paying a penalty for some employees is more cost effective than paying the full insurance premium. Yes printed on the report, for those employees, means you may consider paying a penalty instead of their premium.
Here are some examples:
| • | A setting of <F2> = Unlimited translates to any employer contribution being acceptable no matter how large. In this case, the last column in the Insurance report, Coverage penalty?, would always print as No. |
| • | Entering zero would flag every employee to Yes; requiring an employer contribution for each in order for coverage to remain affordable. |
| • | Entering $10,000 would flag those employees who require a employer contribution greater than that amount. |
Employee default monthly contribution
Enter the default amount. This amount will be used when entering an ACA group. If the ACA group does not have a default, this amount will be used when entering an employee ACA record. If you entered a Monthly contribution amount for the ACA Control information, you may select <F2> to accept that amount when entering a group or employee ACA record.
Enter the number of the month when your insurance health plan starts. You may choose from 01 = January, 02 = February, 03 = March, 04 = April, 05 = May, 06 = June, 07 = July, 08 = August, 09 = September, 10 = October, 11 = November and 12 = December.
A health plan start month can also be entered for each ACA group. The default for the group is used from here and each employee ACA info. The month entered here prints on Part II of the 1095-C form, however, if the ACA group has a start month it takes precedence over this entry. If there is an entry on the employee ACA info it takes precedence over the Control information and the ACA group defaults.
If you enter 01 for this field, the C. Section 4980H Transition Relief field cannot be entered.
If you are using the graphical check or graphical direct deposit mailer you may print a reminder on the stub that insurance has been offered to the employee. You may enter your own reminder, use the default or leave it blank. If blank, the reminder does not print on the check stub.
The reminder will only print if the employee has an ACA information record for the current year and the Insurance offered field is checked.
See the Check format to use and Direct mailer form fields. Due to lack of stub space on the other check and mailer form types, the offer reminder cannot be printed for those.
|
Format |
Four lines of 60 characters |
Certifications of Eligibility for Form 1094-C (select all that apply)
These codes are for direct population of Form 1094-C, Line 22. Check the boxes for all that apply.
If this box is not checked you cannot enter a Series 1 Code of 1A in the employee ACA record Monthly offer of coverage code field. If this box is checked you may enter a Series 1 Code of 1A in the employee ACA record. There are no restrictions on other Series 1 Codes.
If you have existing employee ACA records with a Series 1 code of 1A, you will not be allowed to uncheck this field. First, you must alter the employee ACA info entries by changing each Series 1 code to a value other than 1A. Run the Print employees ACA info report to determine the current values.
B. Reserved (formerly Qualifying Offer Method Transition Relief)
For the 2015 tax year the Qualifying Offer Method Transition Relief was an option. For 2016 and beyond, this field is no longer used and is reserved for future use.
C. Section 4980H Transition Relief
This field is not accessible if the Health plan start month is entered as 01. Otherwise, check this box only if your insurance plan started mid year 2015 and you want to claim it.
D. 98% Offer Method
For more information and assistance on choosing the 1094-C setting that applies to your company, refer to the irs.gov Instructions for Forms 1094-C and 1095-C.
|
Format |
Check the boxes for the 1094-C eligibility fields that apply |
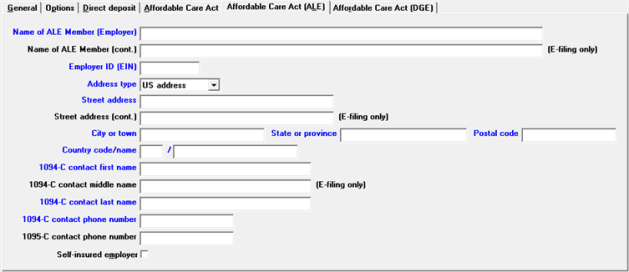
ALE
ALE is short for Applicable Large Employer. An ALE, as defined in U.S Code Section 4980H (Shared responsibility for employers regarding health coverage), is an employer with an average of 50 or more full-time employees plus full-time equivalents for the calendar year prior to the reporting year. Companies under common ownership or control are combined to determine whether they meet the threshold of 50 full-time equivalent employees. Employers will determine each year if they are considered an applicable large employer subject to the employer shared responsibility rules.
The fields on this tab are used for printing on the 1094-C (fields 1-8), 1095-C (fields 7-13) and they are used to generate the ACA magnetic media E-file.
This tab looks similar to this:
Character mode:
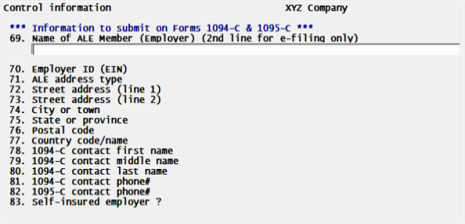
Enter the following fields:
Enter the name of the ALE. It is important that you use your full legal business name. THIS IS THE NAME AS IT WILL BE USED ON FORMS OR MAGNETIC MEDIA E-FILE SUBMITTED TO THE IRS. If this is not correct, the submission may be rejected.
You may enter up to 50 characters. Keep in mind that:
| • | The full 50 characters is only intended for the ACA magnetic electronic file. |
| • | Limit what you enter here when printing the 1094-C and 1095-C forms. Portrait forms, which limits you to 25 characters, have even less room per field than landscape. |
| • | To verify that the data looks okay, do a Validate 1095-C/1094-C info printing before you print the final forms. |
|
Format |
50 characters |
|
Example |
Type ABC Company |
Enter the additional name information of the ALE. This field is for magnetic media E-filing only. This field will not print on the 1094-C or 1095-C forms.
|
Format |
75 characters |
|
Example |
Select <Enter> |
Enter the ALE EIN number. Enter a legal nine-digit number.
|
Format |
999999999 |
Select either US address or Foreign address. In character mode select F = Foreign address or U = U.S. address.
When US address is selected the State or province field allows the entry of 2 characters. When a Foreign address the State or province field is 23 characters long.
Enter the street address of the ALE. This is the number and street or P.O. Box number.
|
Format |
35 characters |
|
Example |
Type 800 East North Ave |
Enter the additional street address of the ALE which will only be used when generating a magnetic media E-file.
|
Format |
35 characters |
|
Example |
Select <Enter> |
Enter the ALE's city or town.
|
Format |
22 characters |
|
Example |
Type Chicago |
If this is a US address enter the ALE's 2 character state code. If this is a foreign address this field allows an entry of up to 23 characters.
|
Format |
2 characters, converted to uppercase if US address 23 characters if this is a Foreign address |
|
Example |
Type IL |
Enter the ALE's zip code or postal code.
|
Format |
15 characters, converted to uppercase |
|
Example |
Type 60000 |
Enter the 2 digit country code and the country name. The country code for USA is “US”.
Enter the first name of the person to be contacted by the IRS concerning the submitted data on the ACA 1094-C and 1095-C forms or magnetic media electronic file. The first name is combined with the contact last name on the printed forms.
|
Format |
27 characters |
|
Example |
Type Susan |
Enter the middle name of the contact person. The middle name is only used when generating magnetic media E-filing. For the 1094-C and 1095-C forms the middle name is not printed.
|
Format |
27 characters |
|
Example |
Type M |
Enter the last name of the contact person.
|
Format |
27 characters |
|
Example |
Type Levine |
Enter the contact's telephone number, including area code, to be printed with the 1094-C and generated in the magnetic media E-file.
|
Format |
15 characters |
|
Example |
Type 847-555-1212 |
Enter the contact's telephone number, including area code, to be printed with the 1095-C and generated in the magnetic media E-file.
|
Format |
15 characters |
|
Example |
Type 847-555-2121 |
Check this box if you are a self-insured employer.
After checking this box you may access the Covered Individuals Entry screen under the Enter employee ACA info menu selection. Covered Individuals will print on Part III of the 1095-C form and will be generated in the magnetic media E-file.
DGE
A Designated Government Entity or DGE is a person or persons that are part of or related to the Governmental Unit that is the ALE Member and that is appropriately designated for purposes of these reporting requirements. In the case of a Governmental Unit that has delegated some or all of its reporting responsibilities to a DGE with respect to some or all of its employees, one Authoritative Transmittal must still be filed for that Governmental Unit reporting aggregate employer-level data for all employees of the Governmental Unit (including those for whom the Governmental Unit has delegated its reporting responsibilities).
The information entered here prints on fields 9 through 16 of the 1094-C Transmittal of Employer/Provided Health Insurance Offer and Coverage Information Returns. In order to print this form, you must be licensed for the PBS Affordable Care Act features. See the Introduction to the Affordable Care Act.
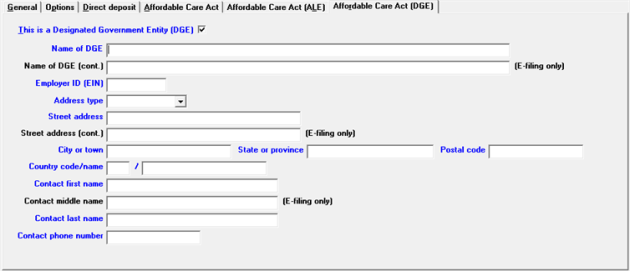
This tab looks similar to this:
Character Mode
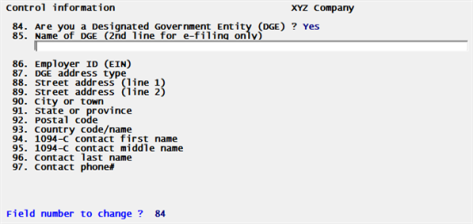
Enter the following fields:
This is a Designated Government Entity (DGE)
Check this box if this is a Designated Government Entity. Otherwise, leave it unchecked.
After checking the box the remaining fields on the screen can be entered.
Enter the name of the DGE. It prints in box 9 of the 1094-C form and is written to the magnetic media E-file.
|
Format |
67 characters |
|
Example |
Type DEF Company |
Enter the additional name of the DGE. This name will only be generated in the magnetic media E-file. It will not print on the 1094-C form.
|
Format |
67 characters |
|
Example |
Select <Enter> |
Enter the DGE EIN number. Enter a legal nine-digit number.
It prints in box 10 of the 1094-C form and is written to the magnetic media E-file.
|
Format |
999999999 |
Select either US address or Foreign address. Using character mode enter U = US address or F = Foreign address.
When US address is selected, the State or province field allows the entry of 2 characters. When a Foreign address type, the State or province field is 23 characters long.
Enter the street address of the DGE. This is the number and street or P.O. Box number.
|
Format |
25 characters |
|
Example |
Type 800 East North Ave |
Enter the additional address information of the DGE. This address will only be generated in the magnetic media E-file. It will not print on the 1094-C form.
|
Format |
25 characters |
|
Example |
Select <Enter> |
Enter the DGE's city or town. It is printed on the ACA 1094-C form box 12 and magnetic media electronic E-file.
|
Format |
22 characters |
|
Example |
Type Chicago |
If this is a US address enter the DGE's state code. If this is a foreign address the field allows an entry of up to 23 characters. Otherwise it is 2 characters for entry of a state code.
|
Format |
2 characters, converted to uppercase if US address type 23 characters if this is a Foreign address type |
|
Example |
Type IL |
Enter the DGE's zip code or postal code. It is printed on the ACA 1094-C form box 14 and magnetic media electronic E-file.
|
Format |
15 characters, converted to uppercase |
|
Example |
Type 60000 |
If this is a Foreign address type, enter the 2 digit country code and country name. The country code for USA is “US”.
Enter the first name of the person to be contacted by the IRS concerning the submitted data on the ACA 1094-C form box 15 and magnetic media electronic E-file. The first name is combined with the contact last name on the printed forms. The first name is combined with the contact last name in the printed 1094-C form box 15.
|
Format |
27 characters |
|
Example |
Type Susan |
Enter the middle name of the contact person. The middle name is only used when generating magnetic media E-filing. For the 1094-C form the middle name is not printed.
|
Format |
27 characters |
|
Example |
Type M |
Enter the last name of the contact person. It is printed on the ACA 1094-C form box 15 and magnetic media electronic E-file.
|
Format |
27 characters |
|
Example |
Type Levine |
Enter the contact's telephone number including area code. It is printed on the ACA 1094-C form box 16 and magnetic media electronic E-file.
|
Format |
15 characters |
|
Example |
Type 847-555-2222 |
Use extended fields to store additional employer data for use in making state quarterly and annual reports.
For example, in many states the department of revenue uses one employer identification number and the department of labor uses a different number. With this feature you can enter both.
Before you enter employer extended fields, they must be defined using Define extended fields. You are allowed to define up to 36 employer extended fields. (Similar fields can also be defined for each employee. These are described in the Extended Employee Information section of the Employees chapter.) Also see the Define Extended Fields chapter.
You can access extended employer data fields by pressing <F5> (at any of the tabs).
What and how much you can enter in an extended field depends upon how you have defined it. An extended field can be either a character field (such as a name), or a numeric field (such as number of employees or salary), or a date field.
Whatever the type of the field, you can enter information up to the size specified when the field was defined.
Options
Extended fields are displayed sequentially down the screen in a window. To enter or change a field, first use the <Up> and <Down> keys to get to it.
Graphical Mode
To edit a field, select the enter key or click on it. A box will display at the bottom of the window where you can make your entry.
You have the following button options:
| Button | Keyboard | Description |
|
Edit |
Alt +e |
To edit fields that were previously entered. |
|
Exit |
Alt +x |
If no field changes or new entries were made you will be returned to the last Control information tab.
If you made any changes, a Cancel Entry? message will display. If you select Yes any changes will be abandoned. If you select No you will return to the last field you edited. |
|
Cancel |
Alt +c |
Discard what was entered or changed. |
Character Mode
If there are more than 18 fields, press <PgDn> and <PgUp> to see all the fields. When done with entry or changes, press <Esc> and choose one of the file options as follows:
|
File |
Save what was entered/changed (like pressing <Enter> at Field number to change ? in other selections) |
|
Save & continue |
Save what was entered/changed, but leave the information on the screen for continued editing |
|
Abandon changes |
Discard what was entered/changed (like pressing <Esc> at Field number to change ? in other selections) |
|
Delete |
Delete the entire comment (like <F3> in other selections). You will be asked to confirm the deletion with an OK to delete? message. |
Use this utility to encrypt or unencrypt social security numbers and bank account numbers stored in payroll . It is also used to encrypt or unencrypt user passwords.
Running this utility will alter the fields in one of two ways. It will either decrypt the fields if already encrypted or encrypt the fields if not yet encrypted. Running this utility will also change the Control information Encrypt data files field, letting you know which was run last and how it is set now.
The utility does this:
| • | Exports the data to the ENCRYPT folder |
| • | Restores the data (either encrypted or unencrypted) |
| • | For security purposes it deletes the exported data files and ENCRYPT folder |
Before you run the utility verify that all users, including yourself, are not in PBS.
Logging into the utility requires that you are a PBS administrative user.
From the top-level PBS run ENCRYPT.BAT.
After entering your user name and password the following screen displays:

Company to process
If you are using multiple companies you must enter the company to process or select <F5> for all companies.
Encrypt PR data files
Enter Y to encrypt the data. The will set the PR Control information field of Encrypt data files to checked (Y in character).
Enter N to decrypt the data. The will set the PR Control information field of Encrypt data files to unchecked (N in character).
Please enter device for export file
Enter the drive letter where the top-level PBS is installed.
Any change ?
Enter Y to make changes to N to continue.
This screen displays:

Are you sure ?
Select Y to continue or N to return and re-enter your choices.
After you enter Y and select the Enter key it will take some time to finish the process. Please be patient.
The data is exported and restored. During the export the data is put in an ENCRYPT folder. If the folder is not there the program creates it. If the folder is there it warns you that the data in the folder will be deleted. At the end of the restore it removes this folder and contents.
When the program is finished it displays this message:
Please review log file: ENCRYP01.LOG
Restore completed <Esc> = return to file menu
You may select the Esc key twice to finish.
The log file is in the top-level PBS. It is a text file. Viewing the log will tell you which files/tables where changed, the number of records changed for each and the result. If any files/tables were empty, which means they did not require a change and the log will tell you that as well. It does not contain any employee data or passwords. It does not contain user passwords either.