This chapter contains the following topics:
Designing Your Own Payroll Wage Reports
Creating Your Own Quarterly Reports
Quarterly Report General Appearance
This selection allows you to design your own quarterly payroll wage reports. You can specify which employer and employee information fields to show on the report and the exact arrangement layout of that information on the report.
Many states require that employee wage information be listed on official pre-printed forms, that are available as continuous forms for use in your printer.
The general format for these pre-printed forms typically consists of a Header area in which employer information is printed, an Employee area in the middle area of the report, where a list of employees and their wages are printed, and a Totals area at the bottom of the page, where the wage totals are printed.
This selection can be used to design almost any quarterly payroll report that conforms to the general format described above.
First, here are definitions of some terms used in this chapter to describe the report formatting process.
The field location grid is a set of vertical and horizontal lines of numbers that you can print on your preprinted report form to aid in positioning information so that it matches up horizontally and vertically with the titles and lines already on the form.
The report layout worksheet is a set of numbered vertical and horizontal lines that you can print on a blank sheet of paper to create your report from scratch (layout is an alternate term used interchangeably for format).
In either case, the basic concept is:
Number of print lines down from the top margin.
Number of spaces to the right of the left print margin.
Row and column of the printed information on the page.
The report format consists of three areas:
| 1. | Header |
| 2. | Employee |
| 3. | Totals |
The Header area is the first part of the report and usually includes information pertaining to the overall report: employer’s name and address, your tax rpt ID #, the quarter ending date, etc.
Middle part of the report where the employee wage information (employee name and social security number, employee gross pay, employee state withholding pay, etc.) is printed. Within the Employee area are employee items, which consist of wage information for one employee.
Bottom part of the report, which includes the totals for the report
The following gives you an overview of the steps involved in creating a report. Each of these steps is explained in detail in the following sections of this chapter.
First, if your report is printed on a preprinted report form, use the Location grid function to print a grid on top of the form so that you can see where the information is located on the form.
If the report is printed on plain paper, use the Layout worksheet function to print a layout worksheet on plain paper, and sketch the layout of your report on the worksheet.
Now that you have an idea of what your report looks like, use the Quarterly report formats General appearance function to describe the report’s general appearance. Use this function to define the number of rows and columns on the form or paper, where the Employee area starts and ends, where the Totals area begins, etc.
Then use the Header area function to choose the fields that you want in the top portion of the report and position them where you want them to print.
Next, use the Employee area function to choose and position the fields for the employee wage information. Then use the Totals area function to choose and place the page and report totals for the report.
After you have selected and placed all of the fields for your report, use the Verify function to obtain a list of any problems such as overlapping fields that would prevent you from printing the report. If any problems are indicated in the Verify report, use the appropriate Enter function to correct them.
Then use the Sample report function to print a report sample. If you are using a preprinted form for the report, the sample shows you how your fields fit on the form so that you can make any adjustments needed.
Finally, use the Format specifications function to print a list of your report specifications that can be filed for later reference.
When you want to create another report, if it is similar to an existing one that you have already designed, you can use the Copy function to copy the existing one to the new report format. Then use the functions described above to tailor the new copied format rather than having to create it from scratch.
This chapter describes how to create a report in the same sequence as described above.
Select
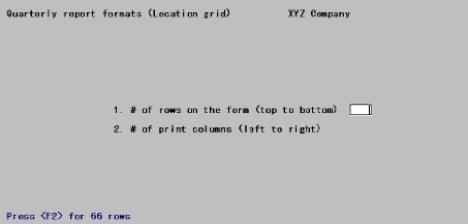
Location grid from the Quarterly report formats menu.
The field location grid is a tool to help you lay out your report properly when you are using a preprinted report form. When you print this grid on top of your report form, you see the exact rows and columns of every piece of report information. You can then specify the exact row and column for each piece of information when you use the Enter function described later in this chapter.
|
Note |
Use the Quarterly Report Fields Appendix to aid you in laying out your fields on the location grid. This lists all of the fields available for printing, with the definition, length, and appearance of each. |
Enter the information as follows:
1. # of rows on the form (top to bottom)
Enter the number of rows to appear on the grid. The number you enter here corresponds to the number of rows on your report form.
Options
You can also use the option:
|
<F2> |
For 66 rows, corresponding to regular 8¾” x 11” paper, 6 rows/inch, with no top or bottom margins |
|
Format |
99 |
|
Example |
Press <F2> for 66 |
2. # of print columns (left to right)
Options
Enter the number of print columns to appear across the page on the grid, up to 132, or use the option:
|
<F2> |
For 80 columns, corresponding to regular 8¾ x 11” paper, ten characters/inch, with º” left and right margins |
|
Format |
999 |
|
Example |
Press <F2> for 80 |
The following screen displays:
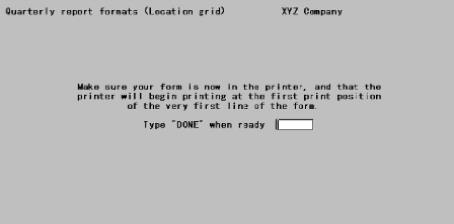
The printer should always be ready to print in location 1, 1 that is, row 1, column 1.
If you are using a laser printer, load the form in the printer’s paper tray according to the instructions in the printer’s user manual.
The grid prints.
After the grid prints, you are asked whether you want to print it again. If you answer Y, another grid prints; if N, you are asked to mount regular paper.
|
Note |
Laser printers are unable to print on the first 1/6th inch at the top of a page and on the last 1/6th inch at the bottom of a page. Because of this physical limitation, the first row of a location grid is not printed on a laser printer. The last row is not printed when it falls within the last 1/6th inch of the page. For example, if you enter 66 for # of rows on the form and print on letter-size (8-1/2” x 11”) paper, row 1 and row 66 do not print. |
The layout worksheet is a tool to help you lay out your report on blank paper. The location grid is used to design a report for preprinted report forms. Whereas the location grid has rows and columns of numbers, the layout worksheet has rows of dotted lines on which you can fill in report information in the way you want it printed on blank paper.
|
Note |
Use the Quarterly Report Fields Appendix to aid you in laying out your fields on the layout worksheet. This lists all of the fields available for printing, with the definition, length, and appearance of each. |
You can print the layout worksheet on a preprinted form as well, if you prefer it over the location grid.
Select
Layout worksheet from the Quarterly report formats menu.
The following screen displays:
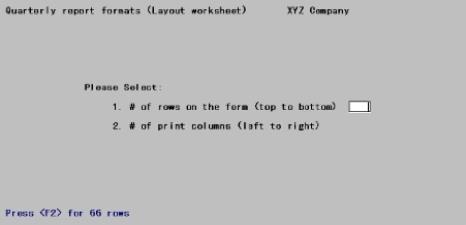
Enter the information as follows:
1. # of rows on the form (top to bottom)
Options
Enter the number of rows to appear on the worksheet, or use the option:
|
<F2> |
For 66 rows, corresponding to regular 8¾” x 11” paper, 6 rows/inch, with no top and bottom margins |
|
Format |
99 |
|
Example |
Press <F2> |
2. # of print columns (left to right)
Options
Enter the number of columns to appear across the page on the worksheet, up to 132, or use the option:
|
<F2> |
For 80 columns, corresponding to regular 8¾” x 11” paper, ten characters/inch, with º” left and right margins |
|
Format |
999 |
|
Example |
Press <F2> for 80 |
The following screen displays:
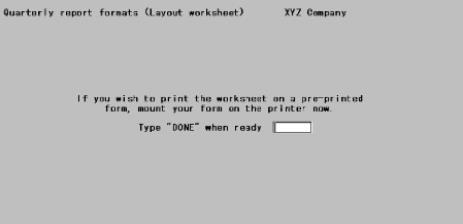
The printer should always be ready to print in location 1, 1 row 1, column 1.
The worksheet then prints.
After the worksheet prints, you are asked whether you want to print it again. If you answer Y, another worksheet prints; if N, you are asked to mount regular paper.
|
Note |
Laser printers are unable to print on the first 1/6th inch at the top of a page and on the last 1/6th inch at the bottom of a page.
Because of this physical limitation, the first row of a layout worksheet is not printed on a laser printer. The last row does not print when it falls within the last 1/6th inch of the page.
For example, if you enter 66 for # of rows on the form and print on letter-size (8¾” x 11”) paper, row 1 and row 66 do not print. |
To enter a report format, the sequence of steps to follow is:
| • | Use General appearance to specify the general overall appearance of the Format length, width, etc. |
| • | Use Header area to select which fields or text to print in the header area of the report, where they should print, and how they should look. Then use Employee area and Totals area similarly. |
| • | Use Verify to check the format for errors. Make any corrections necessary. |
| • | Use Sample report to confirm that the format is what you want. |
Select
General appearance directly from the Quarterly report formats menu.
The following screen displays for you to either assign a number and description to the new format you are about to add or to retrieve an existing format to change.

1. Format #
If you are adding a new format, enter a new number to identify it. If the format is not on file, you are asked to enter the description of the new format.
Options
If you want to change an existing format, enter its number or use the option:
|
<F1> |
For next format |
|
<SF1> |
For previous format |
|
Format |
99 |
|
Example |
Type 11 |
2. Description
For a new format, enter a description of it. For an existing format, the description displays automatically.
|
Format |
25 characters |
|
Example |
Type Example format |
Field number to change ?
Options
Make any needed changes. You can also use one of the following options:
|
<F1> |
For next format |
|
<SF1> |
For previous format |
Press <Enter> to continue.
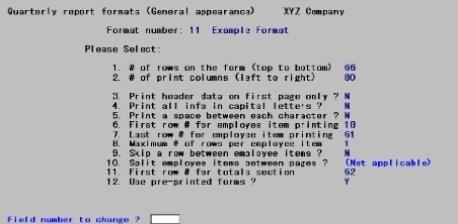
The following screen displays:

Enter the information as follows:
1. # of rows on the form (top to bottom)
Options
Enter the number of rows on the report form, or use the option:
|
<F2> |
For 66 rows, corresponding to regular 8¾” x 11” paper at 6 rows per inch |
|
Format |
99 |
|
Example |
Press <F2> for 66 rows |
|
Note |
If you wish to use a form with more than 66 rows on a laser printer, you must use Company information to set up an “Other” laser printer with the proper Job control codes. To print on legal size paper, you must use the appropriate Job control codes to set the text length to 84 rows. Refer to the the PBS Administration documentation for an explanation of the codes used for job control. |
2. # of print columns (left to right)
Options
Enter the number of columns on the report form, up to 132, or use the option:
|
<F2> |
For 80 columns, corresponding to regular 8¾” x 11” paper, ten characters/inch, with º” left and right margins |
|
Format |
999 |
|
Example |
Press <F2> |
3. Print header data on first page only ?
Press <Enter> to print the header information on only the first page of the report. Answer N to print it at the top of every page of the report.
|
Format |
One letter, either Y or N |
|
Example |
Type N |
4. Print all info in capital letters ?
Some states require that all information be printed in capital letters on their quarterly report forms.
Answer Y if you want all information on the report to print as capital letters. Answer N if you want all information to print as you originally entered it. For instance, for an employee name entered as Jim Smith, this name would print as JIM SMITH if you answer Y, or Jim Smith if you answer N.
|
Format |
One letter, either Y or N. The default is N. |
|
Example |
Press <Enter> |
Answer Y if you want a blank space to print between each character of information on the report. Answer N to print information without any extra spaces inserted between characters.
|
Format |
One letter, either Y or N. The default is N. |
|
Example |
Press <Enter> |
5. Print a space between each letter?
Some states require a space between each letter so the agency can scan the form. Answer Y for spaces or N for no spaces.
|
Format |
One letter, either Y or N |
|
Example |
Type N |
6. First row # for employee item printing
Enter the row number that you want the first employee item to start printing from 3 to maximum rows on form minus 4. As an illustration, if you had specified in field 1 above that the number of rows on the form was 66, you could enter a number from 3 to 62, 66 minus 4.
Be sure to leave room for the header area and for any blank rows to separate the header area from the line items.
|
Format |
99 |
|
Example |
Type 18 |
7. Last row # for employee item printing
Enter the row number of the last row in the employee item area. Employee item information is not printed after this row number. This number must be larger than the row on which you want the first employee item to start printing entered above, but smaller than the maximum rows on the form minus 3. Continuing with the example, if you entered 18 for the first row number for employee item printing, you could enter a number from 19 to 63, 66 minus 3.
Be sure to leave room for the totals area and for any blank rows to separate the totals area from the employee items.
|
Format |
99 |
|
Example |
Type 61 |
8. Maximum # of rows per employee item
Enter the maximum number of rows to print per employee item, from 1 to 12. This number cannot be larger than the difference between the numbers entered for First row # for employee item printing and the Last row # for line item printing, plus 1.
For instance, if you were designing a very short form and had specified the first row for employee item printing to be 9 and the last row to be 17, the rows per employee item could not be larger than 9, 17 - 9 + 1 = 9.
|
Format |
99 |
|
Example |
Type 1 |
9. Skip a row between employee items ?
If the number of rows per employee item is 1, either answer Y to skip a row between line items, double-space them, or N to print them single-spaced.
If the number of rows per employee item is 2 or more, this is automatically set to Y and cannot be changed.
|
Format |
One letter, either Y or N |
|
Example |
Enter N |
10. Split employee items between pages ?
If the number of rows per line item is 2 or more, answer Y if you want to allow employee items to be split between pages. Or answer N to keep all information for an employee item on the same page. If the number of rows per employee item is 1, (Not applicable) displays.
|
Format |
One letter, either Y or N |
|
Example |
Automatically set to (Not applicable) |
11. First row # for totals area
Enter the row number of the first row of the totals section. If it takes more than one page to print an employee, the totals area is usually left blank on all but the last page; however, the system is capable of printing page totals as well as report totals.
Options
You can also use the option:
|
<F1> |
To float the totals after the last employee item printed (leaving two blank rows), instead of printing them on a specified line. |
Floating totals are useful if your report is printed on plain paper. They are not useful for preprinted forms because the totals are required to print at a specific location on the form.
|
Format |
99 |
|
Example |
Enter 62 |
Floating totals and laser printers
Certain precaution are needed when floating totals are used in conjunction with a laser printer.
| • | The location of the multi-part label is part of the print process, not part of the report — it does not float. If you put the Laser multi-part label field at row 10 of the floating totals area, the label prints on the 10th row after the format’s Last row # for employee item printing (Field #7 above). If you enter 55 in Field #7 put the Laser multi-part label field at row 10 of the floating totals area, the label prints on row 65 of each page (55 + 10= 65). |
| • | When printing a report with floating totals, it is possible that a totals field may overlap the fixed location of the Laser multi-part label field. To avoid this, put the Laser multi-part label field on or near the last row of the floating totals area and locate it so that it does not print in the same columns as any other totals area fields. |
| • | It is also possible to position the Laser multi-part label field so that its printed location, calculated as described above falls beyond the # of rows on the form. To avoid this, make sure that the row # of the Laser multi-part label field plus the last row # for item printing does not exceed the # of rows on the form. |
12. Use preprinted forms ?
If this report format is used with preprinted forms, answer Y; otherwise, answer N. If you answer Y, you are prompted to mount preprinted forms on the printer when you use this format to print your report.
|
Format |
One letter, either Y or N |
|
Example |
Type Y |
Field number to change ?
The screen should now appear as:
Make any desired changes. Press <Enter> to return to the Quarterly report formats Enter menu.
Here you choose which payroll information fields you want to print in the header area of your report.
You can also enter text to print in the header area of the report. When you select a field to print, you are not selecting the title of the field to print, only the actual information to print. For example, if the field is Employer name and the information in the field is XYZ Company, you are selecting to print XYZ Company, not the Employer name title. If you want to print a title on the report, you must specify a piece of text to print. This is explained in detail below.
Select
Header area from the Quarterly report formats menu.
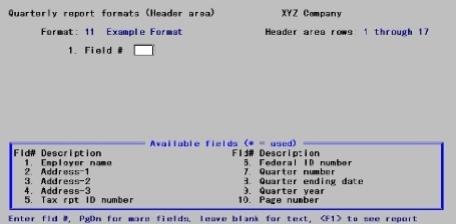
At the bottom of this screen, a list displays showing the first ten fields available to you for printing in the header area of your report.
Refer to the Quarterly Report Fields Appendix for an explanation of each of these fields.
1. Field #
Options
Enter the number of the field that you want to select for the report, or use one of the options:
|
<Enter> |
To enter a piece of text |
|
<F1> |
To see a picture of your report |
|
<PgDn> |
To scan through ten more fields |
|
<PgUp> |
To return to the previous ten fields |
There are approximately eighty fields in all, listed in the Appendix. Not every field is eligible for printing in the header area (some can appear only in the Employee area or in the Totals area). You are shown only the ones that you can select. These are numbered consecutively. This means that the numbers you see associated with the fields on the screen are not generally the same numbers you see in the Appendix.
You can select any of the fields shown by entering the corresponding number, but only when it displays in the window. Any field which you have already selected displays with an asterisk next to it. This provides a convenient way of ensuring that you have included all the fields that you wish to.
|
Example |
Review all fields by using <PgDn>, the use <PgUp> until you return to the first screen. Then enter 1 at Field # to select Employer name. |
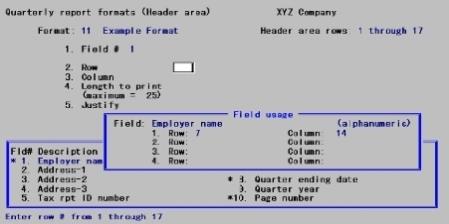
The following screen displays:
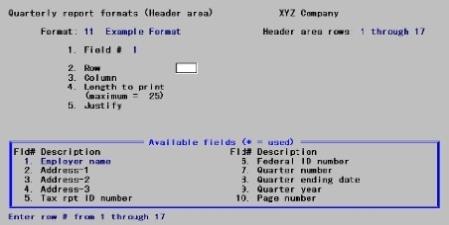
This screen allows you to specify where to print the selected field, Employer name, and how you want it to look when it is printed.
The appearance of this screen below Row and Column depends on what type of field you have selected. A field is one of three types, depending on the type of information that it contains:
| • | Alphanumeric fields can contain any combination of letters, digits, and special symbols. |
| • | Date fields contain only dates. |
| • | Numeric fields contain only digits, along with any decimal points, minus signs or parentheses for negative numbers, and commas. |
Alphanumeric fields
Because our example, Employer name, is an alphanumeric field, we shall discuss this type of field first.
All alphanumeric fields allow the same set of choices, as shown in the screen above. The maximum size of the field depends on the particular field chosen, and is shown in the Quarterly Report Fields Appendix. Enter the information for an alphanumeric field as follows:
2. Row
Specify the row where this field should print.
|
Format |
99 |
|
Example |
Type 7 |
3. Column
Specify the starting column in which to print this field.
|
Format |
999 |
|
Example |
Type 14 |
4. Length to print (maximum = )
Enter the number of characters you want to print in this field, up to the maximum number shown. The maximum number shown is the size of that field as it is stored in the software. You can choose to print all or part of the information in this field.
|
Format |
99 |
|
Example |
Press <Enter> to accept the default of 25 |
5. Justify
Here, justify means to adjust characters within the space allowed.
Example: This paragraph is left-justified since the group of characters is aligned with the left-hand margin. There are no blank spaces between the left-hand margin
and the first character.
Example: This paragraph is right-justified since the group of characters is aligned with the right-hand margin of the space; that is, there are no spaces between the right-hand margin and the last character.
Options
Your choices are:
|
L |
To left justify |
|
R |
To right justify |
|
N |
For no justification; to print the information exactly as it is entered. |
|
Format |
One letter from the list above. The default is L |
|
Example |
Press <Enter> |
Field number to change ?
|
Example |
Now press <Enter> so that you are back at Field #, ready to select another field. Select Page number by entering 10. |
The following screen displays:
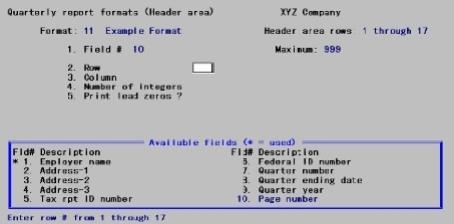
Numeric Fields
If you select a numeric field that lacks decimals, such as Page number, the screen has the above appearance.
The choices for a numeric field depend on the characteristics of that particular field. For instance, its maximum length, whether negative numbers are allowed, does it have any decimal places, etc.
The Page number field has no decimal and it cannot contain commas, so the screen displays as above.
For our example, enter a Row of 7 and a Column of 74. After specifying the Row and Column, you specify the remainder of the information as follows:
4. Number of integers
Options
Enter the number of integers, digits to the left of the decimal point, you want to print in this field, up to the maximum shown above, or use the option:
|
<Enter> |
To print the maximum |
|
Example |
Press <Enter> to accept the default of 3 |
|
Note |
When printing Michigan Form MESC 1017, each employee wage amount must be printed so that the dollars figure is separated from the cents figure by a few blank spaces. To do this, you must use the SUI total wages field twice in the Employee area. First to specify the dollar (integer) figure, and second, to specify the cents (decimal) figure. To specify the dollar figure, select this field and enter a Column and Row that properly positions the dollar amount on the form, specify the Number of integers you want, and enter 0 for Decimals. To specify the cents amount, select this field again, enter Column and Row to properly position the cents amount on the form, and enter 0 for Number of integers. |
5. Print lead zeros ?
This field does not appear when you select a numeric field that contains a decimal.
Answer Y if you want to print lead zeros when they occur in this number; otherwise, answer N. For instance, if the Page number is 34 and you answer Y here, it prints as 034; if you answer N, it prints as 34.
|
Example |
Type N |
Type N. If the numeric field contains decimals, the screen offers several more choices. For example, if you select field #14, Total Hours, the screen displays as:
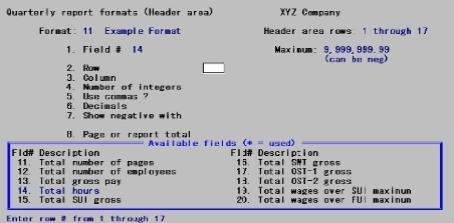
Since this is a numeric field having decimals, several more items appear on the screen. These fields are described below.
5. Use commas ?
This field displays as field # 5 when you select a numeric field that contains a decimal.
Answer Y to use commas when printing this field on a report.
6. Decimals
If this field has no places to the right of the decimal point, this choice does not appear.
Enter the number of decimal places you want to print, up to the maximum shown.
7. Show negative with
If this field cannot contain a negative value, this choice is not applicable.
Options
Enter either M, P or N:
|
M |
show negative with a minus sign |
|
P |
show negative by enclosing number in parentheses. |
|
N |
not shown (prints same as positive number) |
If P is chosen the question Print where? displays. Answer F for fixed or N for next to number.
|
Note |
When printing Michigan Form MESC 1017, the not shown option is useful when printing each employee’s SUI total wages amount in the Employee area. This field must be printed in two parts, the dollar amount and the cents amount. In order to do this, the field must be used twice to print the dollar amount separately from the decimal amount. In this case, the sign should be shown only for either the dollar amount or the cents amount so that the sign is printed only once. |
on left or right ?
This question displays only if the answer to # 7 is M.
Options
Enter either L or R:
|
L |
print negative sign to left of number, for example, -1234 |
|
R |
print negative sign to right of number, for example, 1234- |
|
Format |
One letter from the list above |
|
Example |
L |
8. Page or report total
This field displays only if you have selected a field that contains a total.
Although totals normally print at the end of a report, some states require totals to print in the Header area of a form. Enter P to print a page total, R to print a report total.
|
Format |
One letter from the list above |
|
Example |
R |
If you enter R, the following field displays:
Print on
Options
Enter either F, L, A:
|
F |
Print this total on first page of report only |
|
L |
Print this total on last page of report only |
|
A |
Print this total on all pages of the report |
|
Format |
One letter from the list above |
|
Example |
Type A |
Field number to change ?
|
Example |
Press <Enter> so that you are back at Field #, ready to select another field. Select Quarter ending date by entering 8. |
The following screen displays:
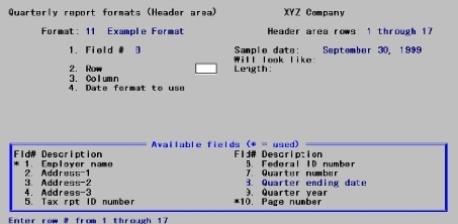
Date Fields
If you select a date field, such as Quarter ending date, the screen displays as above.
For our example, Quarter ending date field, enter a Row of 7 and a Column of 56.
4. Date format to use
Options
Enter one of these choices for the date Format
|
1 |
MM/DD/YY |
|
2 |
MM/DD |
|
3 |
DD-MMM-YY |
|
4 |
DD-MMM |
|
5 |
Month fully spelled |
When you make the choice, the right side of the screen shows how the date looks. The length of the field displays so you know how much room this field occupies on the report.
|
Example |
Type 1 |
Field number to change ?
Press <Enter> to return to Field #
Viewing the Report
While entering the report specifications, you can press <F1> to see a picture of the report. This gives you an idea of the appearance of your report.
|
Example |
Press <F1> |
The following screen displays:
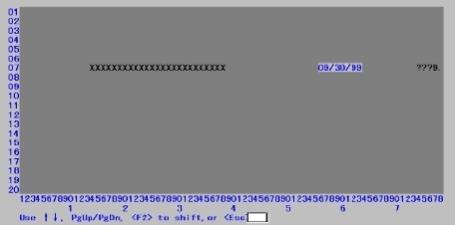
The width of the report is what you entered previously for # of print columns in General appearance. The number of lines is what you entered for # rows on the form.
X’s appear to represent the alphanumeric fields that you have selected for the report, and occupy the length and locations you have selected. 9’s appear for your numeric fields.
Dates are represented differently depending on the format you chose for the date. Question marks (?) appear where any of the fields overlap, in which case you need to change the position of a field.
Options
Text displays exactly as entered (entering text will be described below). Any location where you have not yet entered anything is left blank. Options for viewing the report are:
|
<Up> / <Down> |
To scroll your report up and down by one row at a time. This is useful to bring a row to the bottom of the screen to be near the column numbers, where you can more easily judge a field’s column position |
|
<PgUp> / <PgDn> |
To shift your view of the report up and down by a screen-full at a time. This is useful when your report size is larger than can be displayed on the screen. |
|
<F2> |
To shift your view to the right edge of the report. This is useful when your report size is wider than can be displayed on the screen. Press <F2> again to shift back to the left. |
|
<Esc> |
To leave this view report screen and return to the layout screen |
|
Format |
99 to enter a line number where you wish to begin viewing |
|
Example |
Press <Esc> to leave this screen and you are back at Field #, ready to select another field. |
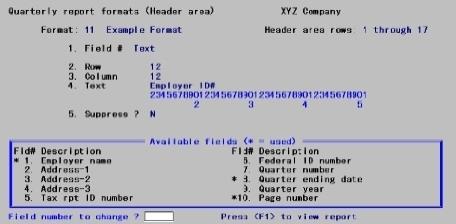
Inserting Text on the Report
This allows you to enter text and position it where you want it to print on each report. You can also use this option to print dashed lines or symbols on your reports.
The following explains how to define textual information to print on your report.
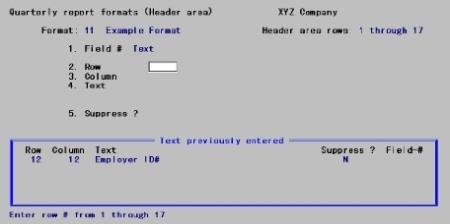
1. Field #
Press <Enter> with this field blank. Text displays to indicate that you are working with text rather than fields.
2. Row
Enter the row that you want the text to print.
|
Format |
99 |
|
Example |
Type 12 |
3. Column
Enter the column that you want the text to begin printing.
|
Format |
999 |
|
Example |
Type 12 |
A ruler appears with numbers starting at the column you just specified and extends up to 40 columns. The ruler stops at the right-hand edge of your report. If your report has at least 40 more columns to the right of the starting column for this text, the ruler is 40 columns long. Otherwise, it is shorter.
In the example above, the ruler starts at column 12, as specified, and extends for 40 columns to column 51.
4. Text
Enter the exact text you want to appear in that location.
|
Example |
Type Employer ID # |
5. Suppress ?
Answer Y if you want the text suppressed (not print) when some field, to be specified next, is zero or blank. This is useful when you wish to print a caption for a field only when that field is in fact present.
|
Format |
One letter, either Y or N. The default is N. |
|
Example |
Press <Enter> |
Field #
If you answered Y to Suppress ?, the available item fields display. Enter the number of the field that, when it is zero or blank, causes the text not to print.
If you have not selected this field to print on the report, you get a warning message. However, your choice is still accepted. Make a note to select the field later. The field you select here must also be selected to print on the report.
Press <F1> to see how your text displays on the report.
Now press <Enter> at Field number to change ? to return to Field #, ready to select another field.
Next, you learn how to delete text, and change its location or content.
Changing or Deleting Text
To delete a text, or change the location or wording of a text you have entered, get to the text screen by pressing <Enter> at the blank Field # field. The following screen displays:
A window shows information on the text already entered.
To delete a piece of text, enter its row and column number and press <F3> when prompted to do so.
To change the wording of the text, enter its row and column number, select Field #4, and enter the new wording. You can also change the Suppress ? information by selecting Field #5 and entering a new answer or new field number.
To change the row or column in which the text starts, enter its current row and column numbers. Then select Field #2 or 3 and enter the new row or column number.
|
Example |
Press <Esc> at Field number to change ? to leave the text unchanged. |
Next, you learn how to change the location and appearance of a field that you have previously selected to print on your report.
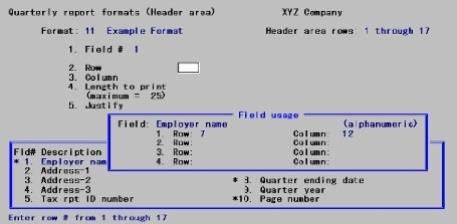
Modifying Fields
Sometimes you need to change the appearance or print location of a field that you have already selected to appear on your report. This section tells you how to change a field’s appearance, change its location, delete it, or print it in additional locations on the report.
The first step is to select the field that you want to modify by entering its number in Field #.
|
Example |
Type 1 to reselect the Employer name field |
The following screen displays:
The field usage window shows how many times that you have used this particular field in your report and where you have used it. You can use each field up to four times. In this example, Employer name has been used only one time, in row 7, column 14.
The next step is to select which usage of the field you wish to modify by entering its row in Row and its column number in Column.
|
Example |
Enter 7 for Row and enter 14 for Column. |
From the Field number to change ? field you can select and change any of the information about this field.
Options
Enter a field number to change or use one of the options:
|
<F1> |
To see a picture of the report (as described earlier in the chapter) |
|
<F3> |
To delete this particular usage of the field. (Any other usages will not be affected.) |
|
Example |
Enter 3 at Field number to change ? to enter a new Column. Enter 12 for Column so that the Employer name field now prints in column 12 of the report. Press <F1> if you want to see the change in location for Employer name. |
After making changes press <Enter> at the Field number to change ? field and you return to Field #, ready to select another field.
Printing a Field in More Than One Location
You can print any field in up to four different locations in the Header area.
To use a field again, enter its number in Field #.
|
Example |
Enter 1 at Field # to use Employer name again. |
The following screen displays:
The field usage window displays the row and column for any existing usages of this field. At this point, you can enter the row and column of an existing usage to modify it, or enter the row and column of a new usage. When you print your report, this field prints in all of the locations that you have specified.
|
Example |
Press <Esc> to exit without entering another usage for Employer name. |
Adding, changing, or deleting Employee area fields and text is handled in exactly the same way as header area fields and text, except that the row refers to the relative row, not the absolute row. That is, employee area row 2 means the second row from the top of the employee area, not the second row from the top of the report form.
Select
Employee area from the Quarterly report formats menu.
The following screen displays:
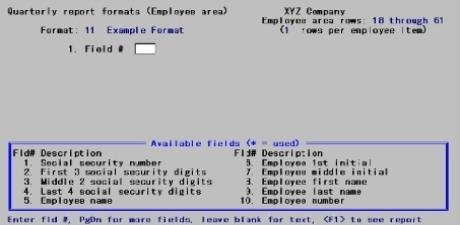
Refer to the Quarterly Report Fields Appendix for an explanation of each of these fields.
There are six more windows of employee fields, which you can see by pressing <PgDn>.
Three fields which would normally print in the Header or Totals area are also included in the Employee area. This is because a few state forms require these fields in the body of the report. These are:
| • | Page number |
| • | Total number of pages |
| • | Quarter of year |
These can be positioned in any column of the Employee area, but are printed only once per page, in the first row of the Employee area.
Adding, changing or deleting Totals area fields and text is handled in exactly the same way as Header area fields and texts, except as described below.
Entering a Row for Totals
If floating totals are selected in General appearance for First row # for totals section, when entering a Row for a totals field enter the relative number of the row within the totals area where you want the field to print. For instance, to print the field on the first total row, enter 1.
In the example you did not select floating totals so the message on floating totals does not appear and you enter the exact row number on the form (61, 62, 63, etc.) on which to print the totals field.
Non-total Fields in the Totals Area
There are numerous non-total type fields included for your selection in the Totals area. For instance, Employer name and address are included here and in the Header area. This allows your quarterly reports to meet the reporting requirements of a government agency whose forms have these fields in the Totals area.
Select
Totals area directly from the Quarterly report formats menu.
The following screen displays:
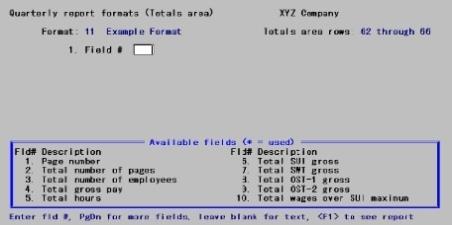
Refer to the Quarterly Report Fields Appendix for an explanation of each of these fields.
There are seven more windows of totals fields, which you can see by pressing <PgDn>.
Totals information is entered exactly as is Header or Employees, except for one additional question:
8. Page or report total ?
Enter P if this total is to print at the foot of each page, or R if it is to print as a report total on the final page for each employee.
|
Format |
One letter, either P or R |
|
Example |
Type P |
Select
Verify from the Quarterly report formats menu.
The printer selection menu displays. After you select a printer the program immediately begins checking the report format for errors.
At the end of the verification, an error report prints. Some messages shown on the report are only warnings; these are identified by *WARNING ONLY *.
You must correct errors before you can use a report format.
You can either correct warnings or leave them as they are.
Select
Sample report from the Quarterly report formats menu.
|
Note |
You must verify a format and correct any errors before you can print a sample report. |
You will be instructed to mount report forms on the printer, and the following screen displays:

Compressed print ?
Answer Y if you want to print a compressed font (approximately 17 characters per inch, allowing 132 print columns to appear on 8¾” paper).
|
Format |
One letter, either Y or N. The default is N. |
|
Example |
(No example is given) |
Any change ?
Answer Y to re-enter the screen, or N to continue.
If you are using preprinted forms, a screen displays telling you to mount report forms on the printer. Mount these forms on the printer and type DONE. If you are printing the sample report on a laser printer, you are asked to enter Up/down adjustment and Left/right adjustment amounts to adjust the alignment of the laser printer. The values last entered for these amounts are shown. After entering new values or accepting the values shown, the sample report prints.
Use the up/down and left/right adjustments for laser alignment to position the sample report information so that it exactly aligns with the pre-printed form.
Pre-printed forms are produced according to very exact specifications, but the print position of laser printers may vary slightly from model to model or between manufacturers. These adjustment amounts allow you to compensate for the differences between laser printers so that your report information can be positioned correctly on the report form. (The early models of Hewlett-Packard laser printers, such as the LaserJet+, do not support this adjustment feature. The adjustment amounts are ignored by the original LaserJet printer, the LaserJet+ model, the LaserJet II model, and laser printers manufactured by others that are compatible only with these older Hewlett-Packard models.
You can press <F1> at any time to stop printing. After one sample report prints, you can print another or press <Esc> to exit. If you are using preprinted forms, replace these with plain paper and type DONE, finally press <Esc>.
If you have already created a report format that you want to keep, and you are going to add another similar format, use this option to copy the existing format. Then make changes to the copy.
Select
Copy directly from the Quarterly report formats menu.
The following screen displays:
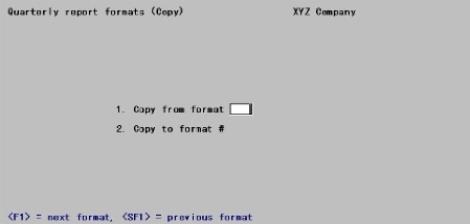
Enter the information as follows:
1. Copy from format #
Options
Enter the number of the format you want to copy or use the option.
|
<F1> |
For next format |
|
<SF1> |
For previous format |
|
Format |
99 |
|
Example |
Type 11 |
2. Copy to format #
Enter the number you wish to assign to the new format. If you enter the number of a format already on file, you see an error message informing you of this and that you must delete the existing format first before you can use this format number.
Enter another format number that is not already used and enter a description of the new format.
|
Format |
99 (format number) 25 characters (format description) |
|
Example |
Type 99 Type Copy of format 11 |
When the format is copied, press <Esc>.
Use this option to delete report formats which you no longer want to keep.
Select
Delete from the Quarterly report formats menu.
Options
A screen displays for you to enter the format number of the format to delete. Enter the number or use the option:
|
<F1> |
For next format |
|
<SF1> |
For previous format |
To delete a format, answer Y when you are asked to confirm the deletion. Otherwise, press <Enter> to keep it.
If you answer Y, a message displays stating that the format has been deleted. Enter the number of another format to be deleted, or press <Esc>.
|
Format |
99 |
|
Example |
Type 99 |
|
|
Answer Y to OK to delete this format ? |
Use this option to print a full list of the exact specifications that define one or more report formats. This is different from a sample report. A sample report shows what the report will look like. The format specification shows all the information you entered to obtain the report you want.
Select
Format specifications from the Quarterly report formats menu.
A screen displays for you to enter the starting and ending numbers of the formats that you wish to print specifications.
1. Starting format # and
2. Ending format #
Enter the range of the formats you want to print, or use the option:
|
<F2> |
For the First (at Field #1) or Last (at Field #2) format on file |
|
Format |
99 |
|
Example |
Press <F2> at both fields |