This chapter contains the following topics:
Introduction to Transaction Processing
Retail Point of Sale Processing
Making Payments and Releasing Layaways
Cancelling and Forfeiting Layaway Payments
Miscellaneous Functions Window
The Passport Business Solutions Point of Sale is a very flexible module that facilitates the processing of retail point of sale transactions, layaway transactions, order processing, entry of sales quotes, payments on account and issuance of credit memos and returns.
The transaction processing screen, combined with BreakOut for the Passport Business Solutions, create a highly efficient transaction entry environment that can be tailored to the needs and preferences of each individual user of the system.
Retail Processing
In retail point of sale environments, users can create a fast, no frills, sales entry screen to rapidly process items brought to checkout by customers.
Order Processing
In an order processing environment, sales people have a complete two-step order processing facility complete with the ability to produce quotes that may later be converted to orders or invoices.
With the Passport Business Solutions Point of Sale module these two different sales processing environments may be implemented at the same time using one system. The Passport Business Solutions Point of Sale and BreakOut™ combine to make a flexible and powerful sales and order processing module for many different types of businesses. For more information on the setup and use of BreakOut, see the PBS System documentation.
Regardless of the transaction type you intend to process, you must first log into the Passport Business Solutions Point of Sale transaction screen. Logging in is covered in Transaction Processing Login.
After a successful login into the Point of Sale transaction screen you will be positioned to enter a transaction. From this screen, you can enter new transactions or work with existing transactions. If a transaction already exists with the transaction number you specify, that transaction will appear and be available for changes or deletion.
The process of entering transactions is similar for invoices, orders, quotes, layaways, payments, credit memos, and returns (types I, O, Q, L, P, C, and R respectively).
The Miscellaneous Functions menu is available from all fields in the Point of Sale transaction screen. This menu can be displayed by pressing <F5> from any field. The following functions are made available from the Miscellaneous Functions menu.
•Lock register
•Open drawer
•Payout
•Change user
•Hold transaction
•Retrieve last hold
•List store holds
•Turn prompts on/off
For further information about the Miscellaneous Functions menu, refer to Miscellaneous Functions Window section in this chapter.
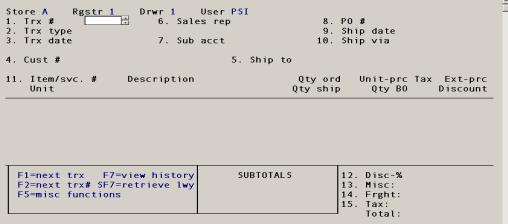
The heart of the Passport Business Solutions Point of Sale is contained in the transaction processing screen where seven different types of transactions may be entered.
| • | Invoices - When an invoice is processed in the Passport Business Solutions Point of Sale, the recording of goods and/or services purchased, the delivery of goods and/or services and payment for goods and/or services is handled in one step. |
| • | Orders - When an order is entered, a two-step billing process is initiated. The transaction is entered along with the items to be purchased. A picking ticket may be printed and the items are gathered for delivery. In the second step, the items on the order are selected for billing and an invoice is prepared. |
| • | Quotes - A quotation is a proposal for the sale of goods and/or services to a customer. This transaction type is subject to modification and may be turned into an invoice or an order when the terms of the sale are agreed upon. |
| • | Credit Memos - These transactions allow for return of inventory and other customer credits. A provision for scrapping inventory is provided. |
| • | Layaways - A layaway allows a customer to pick a specific item for purchase and make payments on the item. You mark the item for layaway and when the customer finishes the final payment you select the item for release so the customer may take it. |
| • | A/R payments - A payment may be entered and applied against an A/R open item or to open cash. An invoice or receipt indicating the payment may be printed. Posting the payment creates a new record in A/R open items. |
| • | Returns - This provides a return of inventory with a payment return. You may enter the invoice number being returned against or you can return to open. When returning to an invoice number the system validates the inventory items and quantities against Point of Sale invoice history. |
After entering the transaction login screen (see the Transaction Processing Login chapter)and then selecting enter from field number to change the transaction screen will display.
The upper third of the screen is referred to as the header area. The information entered here defines type of transaction being entered and provides for information necessary to process the transaction.
1. Trx #
Options
Enter a transaction number or use one of the options:
|
<F1> |
To scan through existing transactions for this store |
|
<F2> or <Enter> |
To use the next transaction number as specified in Stores |
|
<F5> |
To display the Miscellaneous Functions menu |
|
<F6> |
To view the previous transaction to make changes or reprint a form. |
|
<F7> |
To display the View Invoice History menu |
|
<SF7> |
To retrieve a layaway from layaway history. Layaway history contains both cancelled and forfeited layaways. With this option you may retrieve a layaway and allow the customer to continue making payments on the item(s). |
|
<F8> |
to view a list of existing transactions and select one to display |
|
Format |
999999 |
|
Example |
Press <Enter> |
2. Trx type
This field defaults to the transaction type entered in Registers. Enter a transaction type or press <Enter> to default to the type defined in Registers.
|
Letter |
Type |
Description |
|
I |
Invoice |
a one-step sales transaction |
|
O |
Order |
a two-step sales transaction |
|
Q |
Quote |
a proposal for goods/services that may be converted to an order or invoice |
|
C |
Credit memo |
a one-step transaction to accept returns from a customer and record other customer credits |
|
L |
Layaway |
an item is set aside while a customer makes payments toward the item. Payments may be printed. |
|
P |
Payment |
to be applied to one invoice or to “open” in A/R open items |
|
R |
Return |
a transaction that allows a customer to return inventory for a refund. Entering the invoice number will validate the items being returned. |
|
Format |
1 letter, either I, O, Q, C, L, P or R |
|
Example |
Type I |
3. Trx date
Options
Enter a date for this transaction or use the option. Typically, this will be set to the current date.
|
<Enter> |
To default to the current date |
|
Format |
MMDDYY |
|
Example |
Press <Enter> |
4. Cust #
Options
Enter the customer number for this transaction. The customer’s address will be displayed in a window below the customer name. You may also use one of the options.
|
<Enter> |
To enter or find a customer by name |
|
<F1> |
To scan through existing customers in order by customer number |
|
<F6> |
To use the customer number from the previous transaction |
|
Format |
Up to 12 characters |
|
Example |
Type 1 |
If you entered a default customer number in the store, then that customer number will be the default when you access this field. However you may change it to a different customer number.
Customer name
Options
If you pressed <Enter> in the Cust # field, you will be prompted to enter a customer name. Enter the customer name or use one of the options.
|
<Enter> |
To enter a customer number |
|
<F1> |
To scan through existing customers in order by customer name |
If you selected a customer that is over their credit limit, a warning will be displayed showing the customer’s credit information. This message is a warning. The transaction can be completed. If the customer intends to apply this transaction to their A/R account, an authorized user will need to override the subsequent credit warning in the payment window.
Type Y to continue with the transaction or N to cancel the transaction.
If a customer memo was set up for the selected customer, the memo will display.
Press <ESC> to close the Customer Memo window.
Customer memos are entered in A/R Customers notes. Read the Accounts Receivable User guide Customers chapter for more information.
5. Ship to
Options
This is an optional field. Leave the field blank to indicate that the customer will pick up the items for this transaction. To ship the items, enter a ship-to code or use an option.
|
<Enter> |
To indicate customer pickup |
|
<F1> |
To scan through existing ship-to addresses for this customer |
|
<F2> |
To use the billing address in the customer record |
|
<F6> |
To enter a temporary ship-to address |
|
Format |
Up to six characters |
|
Example |
Press <Enter> |
|
Note |
If the ship-to code you enter is not on file for this customer, you will be given the option of adding the ship-to address as a permanent address “on-the-fly.” If you enter a temporary ship-to address, you will be prompted for a tax code to be associated with this transaction. |
6. Sales rep
Enter the sales rep for this transaction or press <F1> to default to the sales rep in the customer’s record.
|
Format |
Up to 3 characters |
|
Example |
Press <F1> |
7. Sub acct
Enter a sub account to assign to this transaction or press <F1> to default to sub account 000.
|
Format |
As defined in Company information |
|
Example |
Press <F1> |
8. PO #
Optionally enter the customer’s purchase order number. This number is for information only.
|
Format |
Up to 15 characters |
|
Example |
Press <Enter> to skip this field |
If the field PO Required in A/R Customers (Enter) is selected as Y, then you will be required to enter a purchase order number for the customer.
9. Ship date
Enter the requested date of shipment for this transaction or press <Enter> for ASAP. Use ASAP for pickups and other transactions that don’t require shipment.
|
Format |
MMDDYY |
|
Example |
Press <Enter> |
10. Ship via
Options
Optionally enter the ship-via code for the shipping method to be used for this transaction. Ship-via codes are defined in the The Passport Business Solutions Accounts Receivable module.
|
<F1> |
To use the ship-via code from the customer’s record |
|
Format |
MMDDYY |
|
Example |
Press <Enter> |
This completes entry for the header area.
Once you have completed entry for the transaction header area, you can begin entering the items and services that are being purchased or returned.
Line numbers are automatically assigned to each line in the transaction. The line numbers do not need to be consecutive. Therefore, the lines are not renumbered when a line item is deleted from the transaction.
11. Item/svc #
Options
Enter an item or service number or use an option.
|
UpArrow |
To move to the line item above the current line item |
|
DownArrow |
To move to the line item below the current line item |
|
PageUp |
To move up one screen at time |
|
PageDn |
To move down one screen at a time |
|
<F6> |
To jump to another line item (Jumping to line 1 will position the cursor on the first line item. Jumping to line 999 will position the cursor on a blank line after the last line item.) |
|
<Esc> |
To stop entering line items and complete processing of the transaction |
Any time the cursor is positioned on a blank line at the end of the line items for this transaction, you may enter a new line item.
If you try to exit the line item area without entering any line items, you will be asked if you wish to cancel this transaction. Answer Y to cancel the entire transaction or N to add line items to this transaction.
Options
Use the following options when an existing line item is highlighted.
|
<F1> |
To insert a line item above the current line |
|
<F2> |
To add or change comments for the current line item |
|
<F3> |
To delete the current line item from the transaction |
|
Format |
Up to 15 characters, If you are using the I/C bar codes, you can enter up to 20 characters to locate the item. |
|
Example |
Type 1 |
If your register is set up to display the warehouse window, it will be displayed after entering an item or service number. The warehouse displayed in the window is the default warehouse as defined in Stores. If you have multiple warehouses, the warehouse can be changed from the item quantity field. See the Qty ord field below for more information.
Unit
The unit of measure for this item of service is a display only field for all but miscellaneous items. If you enter a miscellaneous item number, you will be required to enter a unit of measure.
Options
For a miscellaneous item, enter a unit of measure or use the option.
|
<Enter> |
For “Each” |
|
Format |
Up to 4 characters |
|
Example |
Press <Enter> |
Description
The two-line description for the item or service will be displayed. You can, optionally change this description.
|
Format |
2 lines of up to 25 characters each |
|
Example |
Press <Enter> to accept the default description |
Enter the quantity of the item/service being purchased. If an item or service is being returned or credited as part of a transaction, enter a negative quantity.
Enter the quantity of the item being purchased for this transaction or press <Enter> to specify a quantity of “1.”
|
Format |
999999.99- |
|
Example |
Type 20 |
Options
The following options may also be available from the Qty ord field.
|
<F1> |
To select another warehouse only if
|
|||||||||
|
<F2> |
To indicate that this item will be drop shipped only if
|
|||||||||
|
<F6> |
To view alternate items only if
|
A negative quantity can be used to specify returned goods or services on an invoice or an order. If you enter an negative quantity for an item, you will be asked to enter the quantity that will be returned to inventory. Remaining items will be scrapped. Items that are scrapped do not effect inventory quantities and are distributed to a scrap account during posting.
Press <F1> to modify the scrap account. A window will be displayed which will allow entry of an account number.
Enter the desired scrap account or press <F1> to use the default scrap account.
The warehouse window contains options that are available when you are positioned in the Qty ord field.
For services, there is no status to display so the window will display “Service warehouse.”
The Passport Business Solutions Point of Sale allows you to assign a service to a specific warehouse however. This is so that a request for service will print on a picking ticket for that warehouse. This way, the service can be performed within that warehouse as soon as the picking ticket is received.
For items the following information is displayed from the default warehouse.
| • | Quantity on hand |
| • | Quantity committed |
| • | Quantity on back order |
| • | Quantity available |
| • | Quantity on order (if interfaced to the PBS Purchase Order) |
If the full quantity is not available for shipping, a menu is displayed which offers the following selections.
| • | Backorder balance - To ship all items that are currently available and back order the remaining items. This choice will only appear if back orders are allowed for the Register being used. |
| • | Backorder all - To back order all items so that the customer will receive all of these items at one time. This choice will only appear if back orders are allowed for the Register being used. |
| • | Ship in stock - To ship the quantity that is currently available without back ordering the remaining balance. |
| • | Override - To override the quantity that is available. An override is typically used when the customer is physically holding the item they wish to purchase. It is assumed, at this point that the quantity shown by the computer is not correct. When this option is selected, the quantity ordered will still be subtracted from the quantity available. |
| • | Alternate items - To view the alternate items for the requested item if alternates have been defined in Inventory Control. |
| • | Cancel line - To cancel this line item (new line item) or to cancel the changes made to the line item (existing line item). |
|
Note |
If you elect to ship a partial quantity and the customer does not accept partial shipments, as defined in the customer record, a warning will display that will allow you to proceed or return to the Qty order field. |
Qty ship
This field displays the quantity that will be shipped or carried away. It is automatically set by the actions that are taken when entering the quantity for this purchase.
You may change this field by pressing the <Up Arrow> key from the following Unit-prc field.
If you change this field to specify an amount that is less than the calculated quantity to ship, you will be prompted to handle the difference in some way.
| • | Backorder balance - To ship all items that are currently available and back order the remaining items. This choice will only appear if back orders are allowed by the Register. |
| • | Ship in stock - To ship the quantity that is currently available without back ordering the remaining balance. |
|
Note |
If you elect to ship a partial quantity and the customer does not accept partial shipments, as defined in the customer record, a warning will be displayed that will allow you to proceed or return to the Qty ord field. |
If you are not allowed to back order, the screen will display *OS* to indicate that the remaining quantity is out of stock.
Qty BO
The quantity back ordered for this line item is calculated and displayed in this field. This field will be blank if the full quantity is available and a back order is not initiated. Other information that might display is shown below.
|
Display |
Explanation |
|
*OS* |
The item is out of stock |
|
*DS* |
Items to be drop shipped |
Unit-prc
This is the price per unit that the customer will be charged for this item or service. The default calculated price is displayed for the item. The price is noted as a special price with a lowercase “s” or a “c” next to the price.
|
Code |
Explanation |
|
c |
A “c” next to the price indicates that this is a contract price that is currently in effect for this customer for this item. |
|
s |
A “s” next to the price indicates that this is a sale price that is currently in effect for this item. |
If no letter is displayed next to the price, the price is the standard item price.
Select the price by using one of the options.
|
<F1> |
To use the calculated displayed price |
|
<F2> |
To use a sale price that is lower than a customer’s contract price (Only applies if a sale price is available for the item or service that is lower than the contract price) |
|
<F6> |
To display the price lookup window as set up in POS Users. A user may not have access to any price lookup window. |
|
Format |
999999.999- |
|
Example |
Press <F1> |
Entering a price that is different from a calculated price will generate a “price override.” Unless you are authorized for price overrides, you must select a calculated price.
A Price Overrides Report is available from the Management menu.
Tax
Answer Y if this item is subject to sales tax or press <Enter> to accept the default value of Y. Select N to not charge sales tax for this line.
Discount
This is a discount that is to be given on the current item. The discount is applied to each item or service unit not to the extended price. The extended price includes the unit discount.
The discount can be entered as a percentage or a dollar amount. The initial discount type is a percentage indicated by a percent symbol (%) that is displayed to the right of the input field. If the percent symbol is not displayed, the value entered will be interpreted as a dollar amount.
Options
Enter the discount to be taken on each item using the option to determine how the discount is to be applied.
|
<F2> |
To toggle between an amount or a percentage |
Ext prc
This field is a “display only” field that displays the extended price for this line item.
If your register is set up to automatically prompt for line item comments, a window will be displayed after entry of a line item. This window will allow the entry of comments specific to this line item. You can enter up to 999 comment lines for each line item.
Press <Enter> after each line in entered.
When you have finished entering comments, press <ESC> to continue entering line items for the transaction.
This line comment window is also available by pressing <F2> from the Item/svc # field.
When you have completed entering line items for a transaction, press <ESC> to leave the line item area of the screen and complete entry of the transaction.
Once you have completed entering line items, you complete the transaction by entering miscellaneous information about the transaction and processing payment for the transaction.
12. Disc-%
This is a percentage discount that will be applied to the entire transaction total. Enter the discount percent or press <F1> to default to the discount from the customer record.
|
Format |
99.999 |
|
Example |
Press <F1> |
13. Misc:
Enter the miscellaneous charges for this transaction.
|
Format |
9999999.99- |
|
Example |
Type 27.25 |
The amount you enter here will be distributed to the miscellaneous account number defined in Accounts Receivable Control information.
Options
You may use the option to change the distribution account.
|
<F1> |
To change the miscellaneous account number |
Pressing <F1> will display the Miscellaneous Account Window and allow the account to be changed. Pressing <F1> while the Miscellaneous Account Window is displayed will recall the default miscellaneous account number entered in A/R Control information.
Press <ESC> to close the Miscellaneous Account Window.
14. Frght:
Enter the freight charge for this transaction.
|
Format |
9999999.99- |
|
Example |
Type 159.98 |
The amount you enter here will be distributed to the freight account number defined in Accounts Receivable Control information.
Options
You may use the option to change the distribution account.
|
<F1> |
To change the freight account number |
Pressing <F1> will display the Freight Account Window and allow the account to be changed. Pressing <F1> while the Freight Account Window is displayed will recall the default freight account number entered in A/R Control information.
Press <ESC> to close the Freight Account Window.
15. Tax:
Enter the tax code for this transaction. The tax code defaults based on what is entered or not entered in the Ship-to field.
If the Ship-to field contains a ship-to address, the tax code associated with the ship-to address is used.
However, if the Ship-to field is blank, it is assumed that the purchase is a local purchase then the tax code entered in the Store is used. But, if the A/R Tax code record Non-taxable ? field is set to Y for the tax code entered on the Customer record, then the customer’s tax code will be used. This will result in a zero tax amount for this particular customer. This table illustrates the how the Non-taxable field is used:
|
Ship-to Field |
Tax Code Non-taxable Field |
Default Tax Code |
|
Blank |
N |
The tax code from the Store record is the default |
|
Blank |
Y |
The tax code from the customer is used |
|
Non-blank |
Not applicable |
The tax code associated with the Ship-to address is the default |
The tax amount will be effected when calculating the tax by line as setup in the tax code. For an example of this type of taxation see the Sample tax calculation section of the Tax codes chapter in the Accounts Receivable documentation.
|
Format |
Up to 3 characters |
|
Example |
Press <Enter> to accept the default tax code |
Total:
This is a display-only field showing the total due for this transaction.
Field number to change ?
Changes are only allowed for fields 3 and 5 through 15.
Enter the number of the field you want to change or use one of the options.
|
<ESC> |
To discard changes or, if this is a new entry to void the entire transaction |
|
<Enter> |
To process payments for this transaction |
|
<F2> |
To enter transaction comments (Only available if allowed by the Register) |
|
Note |
If you are working with an invoice transaction, for which an invoice or receipt has been printed, no changes will be allowed to the transaction. You may select field 11 to view the transaction’s line items, but no changes may be made. The only exception to this rule is a quote. Quotes can be reused again as often as needed. |
The following options are only available when working with existing transactions.
|
<F1> |
To scan through existing transactions for this store |
|
<F3> |
To void this transaction |
|
<F6> |
To reprint the picking ticket, invoice or receipt for this transaction |
|
<F7> |
To select line items on an order for billing or to convert a quote to an order or an invoice |
|
<F8> |
Remove printed status (See appendix A for more information) |
|
Note |
Void transaction cancels a transaction and the transaction number can not be re-used. This allows an audit trail of the transaction numbers. You cannot void a transaction if an invoice or a receipt has been printed for the transaction. If the Store is configured to Print void transactions, void transactions must be printed to be posted to history. |
If your Register is configured to automatically prompt for transaction comments, a Transaction Comment window will display after you press <Enter> from Field number to change ?. If the display is not automatic you may select <F2> to display the window.
You may enter up to 999 comment lines for a transaction.
You must press <Enter> after each line you type. When you have finished entering transaction comments, press <ESC> to exit the Transaction Comment window and continue to the Payment Window.
Be sure to press <Enter> after each line that you want to appear in the transaction comment before pressing <ESC>.
For invoices (type “I”), full payment is required before you can complete the transaction (or the amount can be applied to A/R by entering an A/R terms code). An overpayment may be allowed if the user has permission.
For orders (type “O”), you can use payment codes and A/R terms codes to indicate how the order will be paid for or applied to Accounts Receivable. If the intended method of payment is a credit card, you can enter the credit card number and expiration date. This information can be used to pre-approve the credit card purchase. You will not be able to enter actual amounts for an order until it has been selected for billing.
For layaways (type “L”) a payment is expected. The amount may be less than the total, but there may be a minimum amount as determined by settings in the store record. An A/R terms code should not be used for a layaway. All layaway payments are posted and become an “L” type payment in A/R open items.
For returns (type “R”) the return amount cannot be more than the original payment. The return payment type should match what the original invoice indicated. However there may be an exception for checks where a cash return is allowed for a check payment if the minimum amount of time for the check to clear has been reached as set in the store.
For credit memos (type “C”) any type of return payment or A/R terms is allowed. The return amount cannot be greater than the total credit memo.
For a quote (type “Q”) payments cannot be entered.
For an A/R payment (type “A”) any amount is accepted. An A/R terms code is not accepted.
|
Note |
You can enter up to 99 Point of Sale payment codes, but only one A/R terms code per invoice, returns and credit memo transaction types. |
Type
Enter the type of payment (a point of sale payment code or an A/R terms code) you wish to use to process this transaction or use one of the options.
|
<F2> |
To return to Field number to change ? |
|
<F6> |
To cancel this transaction (only available if the transaction has not been invoiced) |
The following option is only available while the cursor is positioned to enter a new payment code.
|
<F1> |
To use the default A/R terms code assigned to this customer |
The following option is only available while the cursor is positioned on an existing payment line.
|
<F3> |
To delete the current payment |
|
Format |
Up to 3 characters |
|
Example |
Type MC to a point of sale payment method |
Description
This is a display-only field that shows the description of the payment code that is entered.
Amount
Options
Enter the amount paid or applied to terms for the payment method. If you are using integrated credit card processing, then the XCharge window displays where you finish the payment. For integrated credit card processing see the Credit Card Configuration appendix. You may also use the option:
|
<F1> |
To set the amount to the remaining transaction balance |
|
Format |
9999999.99 |
|
Example |
Press <F1> |
Check/credit card #
This field is only available for Point of Sale check or credit card payment codes. Enter the check or credit card number.
|
Format |
Up to 20 characters |
|
Example |
Type 5123 5123 1234 3215 |
Expdat
This field is only available for Point of Sale credit card payment codes. Enter the credit card expiration date.
|
Format |
MMYY |
|
Example |
Type 0100 to specify an expiration date of January, 2000 |
Auth code
When Point of Sale check and credit card payment codes are defined, you specify whether authorization codes are required. Refer to the Payment Codes chapter in this documentation for further information.
Enter the authorization code for this payment (check or credit card payments only) or leave the field blank if no authorization is required.
|
Format |
Up to 10 characters |
|
Example |
Type 1234567890 |
Balance / Change due
This field displays a running balance of the amount due for this transaction or the amount to be returned to the customer after payment is received.
When “Balance” is displayed, the amount shown is the amount remaining to be paid for the transaction.
When “Change due” is displayed, the amount shown is the amount that is due to the customer after receipt of payment.
When you have finished entering payment information, press <ESC> to complete the transaction.
If your register has a cash drawer, it will open.
At this time, all forms, set to print automatically in Registers, are printed. These include receipts, invoices, picking tickets, etc.
If you have any device forms as “Optional” per the Register, the Optional Print Menu displays. Here is an example of the menu:
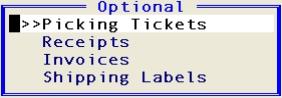
From this menu, you may select the forms that you wish to print. The available selections are based on what has been entered in the register.
Depending on the register devices being used, the selections are limited to Picking Tickets for an order and Receipts or Invoices if you enter a quote.
If you do not have any device forms set up as optional in the register, then this menu will not display.
Depending on your register setup, your invoice, quote or picking ticket print job may go to a printer, PDF file or both.
After printing the desired forms, press <ESC> to complete the transaction and reset the screen for entry of a new transaction.
As described in the Introduction, type “O” transactions involve a two-step process: entering the transaction and selecting the transaction for billing.
When an invoice is entered, each line item is automatically selected for billing. You must receive payment for the invoice (or apply the amount to Accounts Receivable) before the process of entering the invoice can be completed.
When an order is entered, the line items are not selected for billing. And until the line items are selected for billing, there is no payment due from the customer.
|
Note |
You specify in the Register whether a payment window is even displayed after entering an order. |
If you do display the Payment Window for orders, you are allowed to enter payment types without entering specific amounts. This allows you to document the payment method that a customer intends to use and can be used later when the items are selected for billing.
With a two-step billing process, generally a picking ticket is printed for an order so that the items on the order can be gathered and prepared for shipping. Once the order is ready for shipping, the line items are selected for billing and invoiced.
The chapter in the documentation, Select for Billing, details the billing process for two-step type “O” transactions.
In retail point of sale environments, users may not be concerned with much of the information that is necessary in order processing environments. For example, information such as purchase order numbers, shipping dates, shipping methods or customer numbers is typically not used in retail point of sale.
This section describes how the transaction processing screen could be used in a retail point of sale environment with some help from Passport’s BreakOutTM functionality. With BreakOut, many other possibilities are available.
Make sure your register is set up to operate in a point of sale environment. Select Registers from the Point of Sale Setup menu.
Possible settings for the register in a point of sale environment:
|
Field |
Setting |
|
Default trx type |
Invoice |
|
Use ship-to addresses ? |
No |
|
Display cust/ship-to windows ? |
No |
|
Line comments |
Manual |
|
Trx comments |
Manual |
|
Show prompts during entry ? |
No |
|
Allow inventory overrides ? |
Yes |
|
Always override on invoice ? |
Yes |
You might want to be sure that you have a cash drawer defined for the register. After you review these fields, press <Enter> to save any changes you made and enter the Form/Device setup screen.
Set up devices such as a cash drawer and a display pole if you use them. Set receipts or invoices to print automatically after entering a transaction. Depending on your register setup, your invoice, quote or picking ticket print job may go to a printer, PDF file or both.
Press <ESC> to exit the Form/Device setup screen.
Be sure to understand how to use BreakOut before you modify the behavior of the transaction screen. This feature is documented in the PBS System Documentation.
The following fields can be configured to ensure rapid transaction processing in a retail point of sale environment.
|
Field |
BreakOut Setting |
|
Trx type |
Set to accept default I type and skip over field |
|
Trx date |
Set to accept today’s date and skip over field |
|
Cust # |
Set to default to A/R “CASH” customer and skip over field |
|
Ship to |
Set to default and skip over this field |
|
Sales rep |
Set to default and skip over this field |
|
Profit ctr |
Set to default and skip over this field |
|
PO # |
Set the skip over this field |
|
Ship date |
Set to default and skip over field |
|
Ship via |
Set to default and skip over field |
With all of these fields configured to be processed properly by BreakOut, you eliminate the need to make any entries in the transaction Header Area with the exception of the transaction number.
As soon as <F1> or <Enter> is pressed in the Trx # field, the cursor will automatically be positioned next in Item/svc. # field for entry of a line item. At this time you can scan the item or enter an item or service number. Set the remaining line item fields as desired using BreakOut™.
|
Field |
BreakOut Setting |
|
Description |
Set to accept default description and skip over field |
|
Quantity |
Set to accept default of “1” and skip over field |
|
Unit-prc |
Set to default to item price (or sale price) and skip over field |
|
Tax |
Set to default and skip over this field |
|
Discount |
Set to “0” and skip over this field |
You will now be positioned to scan in the next item for this transaction.
After all items are registered for the sale, Press <ESC> to move to the Miscellaneous Area and on to processing payment for the point of sale transaction.
After you press <ESC> to exit the Line Item Area, you will be moved to the Miscellaneous Area of the transaction screen to enter Miscellaneous charges and to total the transaction.
You might configure BreakOut to handle these fields in this way.
|
Field |
BreakOut Setting |
|
Disc-% |
Set to accept default of “0” and skip over field |
|
Misc: |
Set to skip over this field |
|
Frght: |
Set to skip over this field |
|
Tax |
Set to default and skip over this field |
After all of these fields were processed automatically by BreakOut, the cursor would be positioned in Field number to change ?
Field number to change ?
Press <Enter> to process payment for this transaction.
Enter a payment code and process the payment for this point of sale transaction, printing a receipt or an invoice automatically as set up in the Register’s Form/Device screen.
You may use BreakOut™ to customize the screen in any way you choose.
Perhaps you want to collect customer information and record sales by customer. Set up BreakOut to pause on the customer number field and enter a valid customer number or name or add a new customer to your A/R Customers.
Credit memos are used to reverse all or part of the charges that appeared on a previous invoice. Credit memos can be used in situations where, for example, an item is returned by a customer, an item is lost in shipment or a customer cancels a service that they requested.
The flexible transaction screen can be used to enter credit memos by specifying a transaction type of “C”. Credit memos are most applicable when crediting an open item in A/R for a specific customer.
Most of the information you enter for a credit memo is the same as an invoice. There is no validation of inventory being returned from the original invoice. For that type of transaction processing you must use a return.
This section will document processing on the transaction screen that differs between credit memos and other transaction types.
1. Trx #
Enter a transaction number or use one of the options
|
Format |
999999 |
|
Example |
Press <Enter> to default to the next trx number |
2. Trx type
This field defaults to the transaction type entered in the Register. Enter a transaction type or press <Enter> to default to the type defined in the Registers.
|
Format |
1 character, either I, O, Q, C, P or L |
|
Example |
Type C |
Apply to store/inv
Enter the store number and invoice number that this credit memo applies to. If the invoice number is not known, leave the invoice number field blank to apply the credit memo as “Open.”
|
Format |
2 or 3 characters for the store and 5 or 6 numbers for the invoice number depending on the invoice format defined in Control information |
|
Example |
Press <Enter> in both fields to apply as “Open” |
All other header fields are handled as appropriate as with other transaction types.
Enter an item number and press <Enter> until the cursor is positioned in the Quantity field.
Qty cr
Enter the full quantity for which the customer is being credited. Press <Enter> for a quantity of 1.
Rtn to inv
Enter the quantity of this item that is being returned to inventory. If there is a difference between the quantity that is being credited and the quantity that is being returned to inventory, the system assumes that this difference is being scrapped.
This field is not available when crediting a service.
Unit cost
If you have indicated, in the Register, that the cost should be requested for inventory returns, this field will be made available. Enter a unit cost for the item being returned or press <F1> to use the item’s cost from the Item.
A credit memo is used when a payment is to made to a customer. Any combination of payment types or the customer’s A/R account may be used to credit the customer.
In the Payment Window, you may credit the full amount to the customer’s A/R account or use any valid payment code to indicate that a refund was made to the customer.
|
Note |
Enter positive amounts on a credit memo even though the amount is being returned to the customer. Passport Point of Sale will properly interpret these amounts as credits. |
A return transaction allows a customer to return inventory for a refund.
If you are crediting A/R, use the credit memo transaction type.
The flexible transaction screen can be used to enter returns by specifying a transaction type of “R”. You will be asked to enter an invoice number from history. When you do the items will be validated against the original POS history invoice.
Most of the information you enter for a return is the same as for an invoice. This section will document processing on the transaction screen that differs between returns and other transaction types.
1. Trx #
Enter a transaction number or use one of the options
|
Format |
999999 |
|
Example |
Press <Enter> to default to the next trx number |
2. Trx type
This field defaults to the transaction type entered in the Register. Enter a transaction type or press <Enter> to default to the type defined in the Register.
|
Format |
1 character, either I, O, Q, C, R, P, or L |
|
Example |
Type R |
Apply to store/inv
Enter the store number and invoice number that this return applies to. If the invoice number is not known, leave the invoice number field blank to apply the return as “Open.”
|
Format |
2 or 3 characters for the store and 5 or 6 numbers for the invoice number depending on the invoice format defined in Control information |
|
Example |
Press <Enter> in both fields to apply as “Open” |
If the apply to number is entered as “Open”, all other header fields are handled as appropriate as with other transaction types.
If a valid apply to invoice number is entered the transaction date is entered as with other transaction types and the rest of the header fields are defaulted from the apply to invoice. The entry of the lines will be validated against the original invoice as well.
Enter an item number and press <Enter> until the cursor is positioned in the Quantity field.
Qty cr
Enter the full quantity for which the customer is returning. Press <Enter> for a quantity of 1. If a valid apply to was entered the quantity credited is verified to the apply to invoice and any other returns that have been applied to the same invoice.
Rtn to inv
Enter the quantity of this item that is being returned to inventory. If there is a difference between the quantity that is being refunded and the quantity that is being returned to inventory, the system assumes that this difference is being scrapped.
This field is not available when refunding a service.
Unit cost
If you have indicated, in the Register, that the cost should be requested for inventory returns, this field will be made available. Enter a unit cost for the item being returned or press <F1> to use the item’s cost from the I/C Item.
If you are not using reason codes, as defined in the store, then you can ignore this section.
There may be standard reasons for returns. Rather than enter the reason in the comments, you may enter a reason code that fills in up to 2 lines of the comments
Following the entry of a return line, a window will display where you will be asked to enter the reason code.
Enter the code and the reason code description will fill into the line comments window. You may enter additional description or just accept the default.
A refund payment is provided to a customer. Refunds may to payment types of cash or credit card.
If the original payment was made via a check or it was a Customer’s AR terms, then a cash refund may not be made. In this case a check, produced manually or via PBS A/P, will be sent to the customer.
|
Note |
Enter positive amounts on a return even though the amount is being refunded to the customer. Passport Point of Sale will properly interpret these amounts as credits. |
A payment may be made to an open item invoice. There are no line items entered.
This section will document processing on the transaction screen that differs between payments and other transaction types.
1. Trx #
Enter a transaction number or use one of the options:
|
Format |
999999 |
|
Example |
Press <Enter> to default to the next trx number |
If you enter a number for a transaction that is on file, then that transaction will display.
To locate a transaction on file you may use the <F8> Lookup.
2. Trx type
This field defaults to the transaction type entered in the Register. Enter a transaction type or press <Enter> to default to the type defined in the Register.
|
Format |
1 character, either I, O, Q, C, P or L |
|
Example |
Type P for payment |
The transaction date and customer number must be entered next.
Payment amount:
Enter the amount paid to be applied to cash or an open item invoice.
|
Format |
9999999.99 |
|
Example |
Press <F1> |
Apply to #:
Enter the invoice number that this payment applies to. If the invoice number is not known, leave the invoice number field blank to apply the credit memo as “Open.”
|
Format |
5 or 6 numbers for the invoice number depending on the invoice format defined in Control information |
|
Example |
Press <Enter> in both fields to apply as “Open” |
Following the entry of the apply-to number you must enter the payment code and amount. No other header fields are entered for a payment transaction.
A layaway reserves an inventory item, allowing the customer to make payments over time. The system does not release the item until it is fully paid.
This section will document processing on the transaction screen that differs between layaways and other transaction types.
1. Trx #
Enter a transaction number or use one of the options
|
Format |
999999 |
|
Example |
Press <Enter> to default to the next trx number |
2. Trx type
This field defaults to the transaction type entered in the Register. Enter a transaction type or press <Enter> to default to the type defined in the Register.
|
Format |
1 character, either I, O, Q, C, P or L |
|
Example |
Type L |
The line item section is filled out in the same manner as an invoice or an order. The Qty ship field must always be the same as the quantity ordered.
A layaway can contain items or services.
If your Register is set up to display the Warehouse Window, you will see currently available quantities for an item.
The entry of the fields in this section for a layaway are the same as the entry of an invoice, order or quote. Enter as needed the transaction discount, miscellaneous charges, freight, and a tax code for this layaway.
An initial payment may be required depending on the store setup. If a payment is required then it must be either cash, check or credit card depending on your store policy. You may not enter an A/R terms type for a layaway.
If a minimum payment is required, then the following option will display on the amount field.
|
<F2> |
$999.999 (To automatically enter the minimum payment due.) |
When entering a payment the next payment date will display. This date will also print on the invoice or receipt.
Following the entry of the payment you may print the invoice or receipt.
This section describes the process of making payments and selecting a layaway for release. Payments may be paid throughout the process. You may select and release the layaway item when the customer is ready to make the final payment.
Enter the transaction number of the layaway. You may use <F8> to display a transaction lookup window or scan through your transactions using the <F1> key.
When the layaway is displayed, you can then enter a payment by selecting the <F2> key.
You will be at the payment window where you may enter the payment type and amount. If you are using a minimum payment amount, then that will display in the window and you will have this option.
|
<F2> |
$999.999 (This is option to automatically enter a minimum amount. |
The receipt or invoice, depending on which you use, will indicate that it is a layaway transaction. The payment amount and next payment date will also print. The next payment date is calculated though the set up in the store record.
Following the entry of the final payment. When your changes are complete, press <F7> from Field number to change ?. A window will display for which you have four choices:
Release paid layaway
Cancel - refund now
Cancel - refund later
Forfeit layaway
Use the enter key to select Release paid layaway. If the layaway is not fully paid, then the following message will display:
A balance exists for the layaway. Please enter final payment.
Select <F2> to enter the final payment.
After the layaway item is fully paid, you may release it. Following the release, in the upper right corner of the screen, the word RELEASED will display.
Before you print the layaway, if for any reason you want to reverse the selection, press <F7> and a window will display that has one choice:
Cancel selections
When you press enter on Cancel selections then the layaway selection is reversed. You may now make further changes to the layaway.
You must print a released layaway to complete the transaction. Following the printing the layaway is ready for posting. A layaway is posted as an invoice in A/R open items.
There are two types of cancellations and one forfeit type for layaways.
You select a layaway for a cancellation when either refunding the customer at the counter or refunding the customer later as with an accounts payable check. With a cancellation you may also have the option to charge a restocking fee. A forfeit layaway is used when you are not refunding the amount to the customer.
You are not required to print cancellation or forfeit layaways in order to post them. However you may print them as needed.
A cancellation with a refund now or refund later are virtually the same process in POS. The main difference is you are providing the customer with a refund now vs. providing the customer with a refund later. The receipt will indicate which has been used. Also, during posting the accounts used are different.
When a layaway cancellation is necessary select the layaway transaction and press <F7> from Field number to change ?. A window will display for which you have four choices:
Release paid layaway
Cancel - refund now
Cancel - refund later
Forfeit payment
To return the refund at the register select Cancel - refund now. The payment window will display. You must select a refund payment code. The amount you enter must be a negative amount.
Select <F2> for the refund amount or enter it. It must be a negative number.
|
<F2> |
$999.999- (This is option to automatically enter the refund amount. |
After the layaway item refund payment is entered in the upper right corner of the screen, the word CANCELED will display. The invoice or receipt will indicate that the refund was made at the register.
When a layaway cancellation is necessary select the layaway transaction and press <F7> from Field number to change ?. A window will display for which you have four choices:
Release paid layaway
Cancel - refund now
Cancel - refund later
Forfeit payment
To return the refund at the register select Cancel - refund later. The payment window will not display but a refund payment record will automatically be created for the amount that is to be refunded at a later time.
After the layaway is canceled in the upper right corner of the screen, the word CANCELLED will display. The invoice or receipt will indicate that the refund is to be made at a later time.
You may submit a copy of the receipt or invoice to accounts payable which has the information needed to allow them to produce a voucher.
When you are forfeiting the customers payment, locate the layaway and press <F7> from Field number to change ?. A window will display for which you have four choices:
Release paid layaway
Cancel - refund now
Cancel - refund later
Forfeit payment
To forfeit the payment select Forfeit layaway. The word FORFEITED will display in the upper right corner of the screen. If you print an invoice or receipt it will indicate that a forfeit of the payment was done.
There could be a situation where you need to retrieve a cancelled or forfeited layaway from layaway history. For example you may have forfeited a customer’s payments mistakenly. Point of Sale offers this option.
From the transaction number field select <SF7> to retrieve a layaway. Use the <F8> Lookup to find the layaway. Once you have located the layaway select the <Enter> key and the transaction screen will be populated with the layaway. It will show the last status of the layaway. It would have been cancelled or forfeited. Select the <F7> key to reverse the status and make it an open layaway again.
Enter additional payments as needed to complete the layaway.
A quote is a proposal about what goods or services will be sold and for what price. It is similar to an invoice or an order in appearance.
The quote is processed as a document that is adjustable until it is converted into an invoice or an order.
Because a quote is maintained in transactions after it is converted to an invoice or an order, the quote may be used as a “standard” quote to create “standard” orders or invoices. Quotes can remain until they are purged.
This section will document processing on the transaction screen that differs between quotes and other transaction types.
1. Trx #
Enter a transaction number or use one of the options
|
Format |
999999 |
|
Example |
Press <Enter> to default to the next trx number |
2. Trx type
This field defaults to the transaction type entered in the Register. Enter a transaction type or press <Enter> to default to the type defined in the Register.
|
Format |
1 character, either I, O, Q, C, P or L |
|
Example |
Type Q |
Exp date
After entering a transaction date for a quote, an expiration date is requested. The quote will be valid through the date that is entered here.
This date can be used as a review date for “standard” quotes or orders to ensure the quote’s continued viability particularly regarding the prices presented in the quote.
Options
Enter an expiration date or use the option.
|
<F1> |
To set the expiration date to “None” |
|
Format |
MMDDYY |
|
Example |
Press <F1> |
The line item section is filled out in the same manner as an invoice or an order except that inventory is not actually committed. The Qty ship field for a line item will always be blank.
A quote can contain items, services, items that will be returned (enter a negative quantity), items that will be drop shipped, discounted items, etc.
If your Register is set up to display the Warehouse Window, you will see currently available quantities for an item. Because inventory is not committed when a quote is entered, the quantities in this window should be considered informational only.
This section is the same for a quote as it is for an invoice or an order. Enter the transaction discount, miscellaneous charges, freight, and a tax code for this quote.
Payment cannot be accepted for a quote until the goods or services and the price of the purchase is agreed upon by the buyer and the seller and the quote is converted into an invoice or an order.
The payment window will not be displayed.
You may enter a transaction comment if desired.
This section describes the process of converting a quote to an invoice (transaction type “I”) or an order (transaction type “O”). This process is initiated from the transaction screen. The transaction type that the quote is converted to is specified in the Register.
Enter the transaction number of the quote. You may use <F8> to display a transaction lookup window or scan through your transactions using the <F1> key.
When the quote is displayed, you can make any desired changes to the transaction.
When your changes are complete, press <F7> from the Field number to change ? field. A window will be displayed that will request a customer number for the transaction.
Quote Expired
If the quote has expired, the window displays a message and indicates the date that the transaction was entered and the expiration date.
This message is an informational message only and does not prevent the quote from being converted. Press <Enter> to continue to convert the quote or <ESC> to return the Field number to change ?
Cust #
If you are using the quote as a “standard” quote or order, you may change the customer number at this time. Otherwise, press <Enter> to accept the customer number that was entered for the quote.
|
Format |
Up to 12 characters |
|
Example |
Press <Enter> to accept the default |
Update prcs ?
The customer may have contract prices and the quote may not reflect these prices.
Answer Y to update the contract prices for the customer. If you select Y and there are no contract prices, then the prices will not change. Answer N to use the prices on the quote.
OK to convert ?
Answer Y to convert this quote into the transaction type specified in the Register. Answer N to cancel this conversion.
As the transaction is converted, each line item will be displayed. If the full quantity contained in the quote is not available for shipping, the Full Qty Not Avail menu will display and you will be asked to select one of the options.
•Back order balance
•Ship in stock
•Override
•Cancel line
Use your <UpArrow> and <DownArrow> keys to highlight the option you want to select and press <Enter>.
|
Note |
If you choose “Cancel line,” the current line item is not converted and will not be part of the resulting invoice or order. You will be asked to confirm your request before a line item is cancelled. |
Conversion complete. Keep this quote on file ?
Answer Y to keep the quote for future use. Answer N to delete the quote from transactions.
After the quote has been converted, your cursor will be positioned in the Field number to change ? field of the invoice or order that was created from the quote.
From this point the transaction is processed as a standard invoice or order.
Use this selection to purge quotes from transactions. You may elect to purge quotes either by transaction date or by expiration date. This process will completely remove quotes that meet the criteria of the purge.
Select
Purge quotes from the Utility menu.
Purge using
Specify which date you will use to purge quotes from transactions. You may purge using the transaction date or the expiration day as a cut-off date.
|
T |
To use the quote’s transaction date |
|
E |
To use the quote’s expiration date |
|
Format |
1 character, either T or E |
|
Example |
Type T |
Ending cut-off date
Enter a cut-off date for the transactions to be purged.
When using the quote’s transaction date, all quotes entered before this dated will be purged from transactions.
When using the quote’s expiration date, all quotes that have an expiration date prior to this date will be purged from transaction.
Enter a date or use the option.
|
<F1> |
To purge all quotes regardless of the transaction or expiration date |
|
Format |
MMDDYY |
|
Example |
Press <F1> to purge all quotes from transactions |
Purge only expired quotes
The question is only asked if you are purging using the transaction date.
Answer Y if you wish to purge only those transactions entered before the cut-off date that have expired.
Answer N if you wish to purge all quotes entered before the cut-off date.
Any change ?
You will be prompted to answer Y or N to any change in the purge parameters that were entered. The default is N.
If you elected to purge all quotes for all dates, the following message will be displayed.
*** WARNING WARNING WARNING ***
*** ***
*** You are about to purge all quotes ***
*** from the transaction file. ***
Are you sure ?
You will be given another option to abort the purge process.
|
Y |
Type Y to purge the Quotes |
|
N |
Type N to abort the purge process and return to the main P/S menu |
If you answer Y, a period of processing will follow and you will be prompted to return to the main P/S menu.
Purge complete - press <ESC>
The Miscellaneous Functions menu is available from most fields in the Point of Sale transaction screen. This menu can be displayed by pressing <F5> from any field. After selecting <F5>, a screen similar to the one below will display:
Some of these functions may not be available for every POS user based on the permissions allowed.
Lock Register
If the user has to leave the register, this will allow the means of preventing functions such as data entry, opening a cash drawer, printing a receipt or anything else by others. Once Lock register is selected, then a window like this will display.
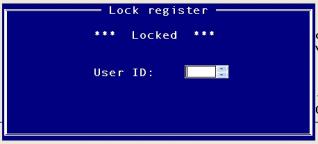
This window hides the User field that normally displays at the top of the transaction screen.
To unlock the register, the user must enter their User ID and password, if passwords are used in POS.
Open drawer
This will allow the user to open the cash drawer. If there is no cash drawer set up in the register, then this function is not available.
Payout
This function will not be available if you are not interfaced with A/P, as determined in POS Control information, and the user does not have permission to enter payouts.
A payout is used for the tracking of paying cash for deliveries.
Change user
This will allow the changing of the user if a shift changes.
Hold transaction
A hold transaction allows the user to save an invoice transaction to be completed later. Only invoices can be put on hold. They must have at least one line item entered to be put on hold. The user can retrieve the hold transaction from the miscellaneous functions window, where it can be converted back to an invoice.
Retrieve last hold
This will allow the user to quickly find the last transaction that was put on hold for this store, register and user. Once the held transaction is accessed, it removes the hold status. You may complete the transaction or put it back on hold again.
List store holds
Based on a setting in register users, the user may not have permission to access this function.
This will display a list of transactions on hold for any register, user and store. The user may select any of the held transactions for viewing or completing.
Turn prompts-on or
Turn prompts-off
This will allow the user to toggle the prompts on or off. The prompts display in the lower left corner of the screen.
The default prompts setting is in the register field 11. Show prompts during entry. See the Registers chapter for more information.