This chapter contains the following topics:
Before using this selection, you must set up at least one invoice format, using Invoice formats. You may also use one of the pre-defined invoice formats provided with T/B.
Using this selection, you may perform the following actions:
| 1. | Print trial invoices for one or more clients. |
A trial invoice is the same as an actual invoice, except that it is assigned invoice number 999999 and cannot be posted. It is used to see what an invoice will look like when it is actually printed.
| 2. | Print invoices for one or more clients. |
When printing invoices, you are given the opportunity to mount letterhead stationery or special forms, as needed. You may also selectively reprint invoices that have been printed but damaged during the printing process.
| 3. | Print envelopes for one or more clients. |
When printing invoices, you are given the option to print envelopes only. This is useful if your printer does not allow switching automatically between envelopes and letterhead for each invoice printed.
| 4. | Post invoices. |
All invoices which have been printed and designated as being "ok" are posted.
Select
Print from the Invoices menu of the T/B menu.
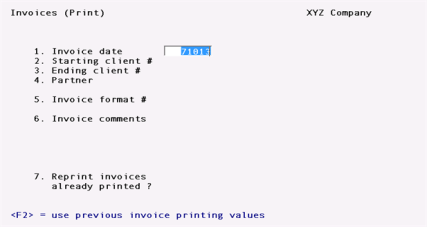
The following screen will be displayed:
In multi-user environments, Invoices currently being printed - try again later, appears if another user is already printing invoices. You must wait for the other user to finish, then try again. This restriction prevents the duplicate assignment of invoice numbers, which are assigned at the time of printing.
Enter the information as follows:
1. Invoice date
Enter the date for the invoices to be printed, or use one of the options:
|
<ENTER> |
If invoices have been printed previously (but not posted) or a billing edit list has been printed, then the last invoice date entered is used. Otherwise, the system date is used. |
|
<F2> |
If you saved entries made on this screen, pressing F2 allows you to re-use them. (They all display and you may change individual entries.) |
|
Format |
MMDDYY |
|
Example |
Press ENTER for the default, 33113 |
|
Note |
All WIP items which are to be billed on an invoice must be dated on or before the date used on the invoice. The date entered here must be on or after the date of any WIP item selected for billing for any client. |
Combined Invoices and Statements
If the T/B Control information specifies that combined invoices and statements are to be printed, then the "Invoice date" field does not appear. Instead "Statement period" appears, and you must enter a starting and ending date for the combined invoice and statement. The ending date for the period is used as the invoice date. The options available for the ending date are the same as described above for the invoice date.
2. Starting client #
3. Ending client #
Enter the range of client numbers to print. Follow the screen instructions.
|
Format |
12 characters for each field |
|
Example |
Type 5, then type 50 |
4. Partner
Enter the partner for the clients to be printed, or use the option:
|
<F5> |
For "All" partners |
|
Format |
3 characters |
|
Example |
Press F1 |
5. Invoice format #
Enter the number of the invoice fonnat to use for these invoices, or use one of the options:
|
<ENTER> |
To use the format specified in T/B Control information |
|
<F1> |
To scan through the invoice formats on file |
|
<SF1> |
To scan through previous invoice formats on file |
|
Format |
99 |
|
Example |
Type 4 |
Each Client record may contain its own invoice format. When an invoice is printed for a client, the invoice format contained in the Client record will be used, provided that it and any attachments have been verified. Otherwise, if there is no invoice format specified or the format or attachments are unverified, then the format entered above will be used to print the client's invoice.
|
Note |
If you get the message, "Format must be verified prior to printing" or "Attachment 99 must be verified prior to printing", leave this selection and go to the Invoice formats selection. Then select Enter from Invoice formats, select this format number or the format number of the unverified attachment, and then select Verify. See the chapter titled Invoice Formats for more details. |
6. Invoice comments
Enter any comments which are to appear on all invoices. The text entered here will appear on each invoice, provided that the comments have been included in the invoice format used to print the invoice.
|
Format |
5 lines, each up to the maximum "Comment text length" as specified in the T/B Control information |
|
Example |
Press F2 to skip entering comments |
7. Reprint invoices already printed ?
Press ENTER for N, or answer Y to reprint invoices already printed for clients.
|
Example |
Type N |
Make any changes.
After pressing ENTER at "Field number to change ?", you may select 1 to review your entries or select 2 to print the invoices. If you select to print, you then have the option of saving your entries to use the next time you print invoices.
If you are not using combined invoices and statements, skip ahead to the section titled Printer Control Screen.
If T/B Control information specifies that combined invoices and statements are to be printed, a second screen appears.
Enter the information as follows:
1. Define aging periods by
Type D to define aging periods by days, S to define them by specific dates, or use the option:
|
<F2> |
If you saved entries made on this screen, pressing F2 allows you to re-use them. (They all display and you may change individual entries.) |
|
|
If you did not save the previous entries, you may press F2 to use the A/R Control information default values. |
|
Format |
1 character |
If you select aging periods by days, you see:
*SCREEN*
Enter the following information:
2. # aging days in prd 1
Enter the number of days in period 1, or use the option:
|
<ENTER> |
To use the default number of days from A/R Control information |
|
Format |
999 |
3. Period 1 description
Enter a description for aging period 1, or use the option:
|
<F2> |
For "Current" |
|
Format |
2 lines of 13 characters each |
4. # aging days in prd 2
Enter the number of days in period 2, or use the option:
|
<ENTER> |
To use the default number of days from A/R Control information |
|
Format |
999 |
5. Period 2 description
Enter a description for aging period 2, or use the option:
|
<F2> |
For "Over (number of days in period 1) days" |
|
Format |
2 lines of 13 characters each |
6. # aging days in prd 3
Enter the number of days in period 3, or use the option:
|
<F2> |
To use the default number of days from the A/R Control information |
|
Format |
999 |
7. Period 3 description
Enter a description for aging period 3, or use the option:
|
<F2> |
For "Over (number of days in period 2) days" |
|
Format |
2 lines of 13 characters each |
8. # aging days in prd 4
Enter the number of days in period 4, or use one of the options:
|
<ENTER> |
To use the default number of days from the A/R Control information |
|
<F2> |
For 999 (unlimited age) |
|
Format |
999 |
9. Period 4 description
Enter a description for aging period 4, or use the option:
|
<F2> |
For "Over (number of days in period 3) days" |
|
Format |
2 lines of 13 characters each |
The first aging period ends with the statement ending date and starts with the cut-off date. For instance, if the statement ending date was 9/30/20, you could enter a period 1 cut-off date of 9/1/20; period 1 would then be from 9/1/20 to 9/30/20.
The starting dates of aging periods 2, 3, and 4 are defined by the cut-off dates you enter. The ending date of each period is the day prior to the cut-off date of the period entered earlier. For instance, if period 1 was from 9/1/20 to 9/30/20, and you entered a cut-off date of 8/1/90 for period 2, period 2 would be from 8/1/20 to 8/31/20. Note that the ending date of period 2 is one day less than the period 1 cut-off date.
Enter the following information:
2. Cut-off date for prd 1
Enter the starting date for period 1, or use the option:
|
<ENTER> |
For a date "thirty days" earlier than the statement ending date. The actual date will depend upon the number of days in the month in which the statement ending date falls. For example, if the statement ending date is 9/30/20, the F2 key will yield "9/1/20". If the statement ending date is 8/15/20, the F2 key will yield "7/16/20". |
|
Format |
MMDDYY |
3. Period 1 description
Enter a description for aging period 1, or use the option:
|
<F2> |
For "(period 1 cut-off date) to (statement ending date)" |
|
Format |
2 lines of 13 characters each |
4. Cut-off date for prd 2
Enter the number of days in period 2, or use the option:
|
<F2> |
For a date one month earlier than the period 1 cut-off date |
|
Format |
999 |
5. Period 2 description
Enter a description for aging period 2, or use the option:
|
<F2> |
For "(period 2 cut-off date) to (day prior to period 1 cut-off date)" |
|
Format |
2 lines of 13 characters each |
6. Cut-off date for prd 3
Enter the starting date for period 3, or use the option:
|
<F2> |
For a date one month earlier than the period 2 cut-off date |
|
Format |
MMDDYY |
7. Period 3 description
Enter a description for aging period 3, or use the option:
|
<F2> |
For "(period 3 cut-off date) to (day prior to period 2 cut-off date)" |
|
Format |
2 lines of 13 characters each |
8. Cut-off date for prd 4
Enter the starting date for period 4, or use one of the options:
|
<F1> |
For a date one month earlier than the period 3 cut-off date |
|
<F2> |
For "Unlimited". In this case, all documents older than the period 3 cut-off date will be included in aging period 4. |
|
Format |
MMDDYY |
9. Period 4 description
Enter a description for aging period 4, or use the option:
|
<F2> |
For "(period 4 cut-off date) to (day prior to period 3 cut-off date)"
If "Unlimited" was chosen for the previous field, the option is "Older than (period 3 cut-off date)". |
|
Format |
2 lines of 13 characters each |
After pressing ENTER at "Field number to change ?", you may select 1 to review your entries on the previous screen and this one, or select 2 to print the invoices. If you select to print, you then have the option of saving your entries to use the next time you print the invoices.
You will be asked to enter a printer control code to be used when printing invoices. Press ENTER to use no printer control, or use the F1 option to scan through the control codes defined for the printer type you are using.
If you enter a printer control code that specifies the use of envelopes, you are asked whether or not you want to print envelopes for the invoices. How this is done depends upon the form type (continuous or cut sheets) you are using for invoices.
When the printer control code specifies "continuous forms" and that envelopes are used, you are asked "Print invoices or print envelopes". This allows you to print your invoices in one print run, and your envelopes in another print run. In this case, you would mount your continuous form invoice paper and use Invoices (Print) to print invoices. (Be sure to answer Y to "Save values just entered ?" so that you can later print envelopes for the same range of invoices.) Next, you would dismount your invoice paper, mount your continuous form envelopes, and use Invoices (Print) to print envelopes for the same range of bills. (To do this, use the F2 option to use the previous invoice printing values and answer Y to "Reprint invoices already printed ?".)
When the printer control code specifies "cut sheets" and that envelopes are used, you are asked "Print envelopes ?". If you answer N, only invoices will be printed. You would answer N if you want to print envelopes in a separate print run, as described above for continuous forms. This is useful when you are using the same paper bin for envelopes and invoices. If you answer Y to "Print envelopes ?", you are asked "Print invoices ?"
If you answer N to "Print invoices ?", only envelopes will be printed. If you answer Y, invoices and envelopes will be printed together, one after the other, using the bins specified in the printer control code. (After each invoice is printed, its envelope will be printed, using the "Envelope bin" codes and the envelope information specified in the printer control code.)
Prepare the printer selected with letterhead, second sheets, and envelopes, as needed. Type DONE when the printer is ready.
NOTE: You can use preprinted invoice forms if you wish.
You are asked "Print alignment ?". Answer Y to print a test alignment form filled out with lines of X's and 9's. (A sample alignment form is shown at the end of this chapter.)
After the form prints, you are again asked "Print alignment ?". If necessary, adjust the invoice forms in the printer to the left, right, up, or down, then answer Y to print another alignment form.
Continue to print alignment forms and make necessary adjustments until the invoice forms are properly aligned.
When alignment is correct, answer N to "Print alignment ?". If you are printing envelopes only, they are printed at this point. Otherwise, you are asked if you wish to do a trial print of invoices:
Trial print ?
Answer Y to do a trial printing of invoices. Each invoice printed will be the same as the actual invoice except that it will be printed with invoice number 999999 and cannot be posted. If you answer N, then the following field is entered.
|
<ENTER> |
To use the next available invoice number |
If you enter a number lower than the next available number in the T/B Control information, you will get a warning message.
|
Format |
999999 |
|
Example |
Press ENTER, then answer N to "Any change ?". lines of 13 characters each |
The invoices are then printed. (Sample printed invoices are shown at the end of the chapter titled Invoice Formats.)
When the invoices have been printed, you are asked "Are the invoices just printed OK ?".
|
Note |
Each invoice number is checked against invoice history prior to being used. If it is already contained in invoice history, it is skipped and the next invoice number is used instead. |
When to Answer N to "Are the invoices just printed OK ?"
Answer N if the invoices just printed are bad due to an incorrect billing date, wrong selection of the clients to be billed, inappropriate invoice comments, wrong WIP items billed on invoices, or printer malfunction which has ruined the majority of the invoices. In this case, T/B considers the invoices for the last range of orders just entered on the invoice printing screen as being not OK. Any previously printed ranges of invoices are still "OK" if you answered Y to the question above after printing those ranges.
If you answer N to "Are the invoices just printed OK ?", you are asked a second question: "Restart invoice printing ?". If you answer Y to this second question, then you are returned to the invoice printing screen to enter another range of clients. You would answer Y if you wished to reprint all of the invoices that were bad at this time, without making any other changes for the clients concerned. If you answer N, then you are asked to "Please mount regular paper on printer. Type 'DONE' when ready." Enter DONE when you have mounted regular paper. You are then returned to the menu. (You would answer N to the second question if you had to make changes to the WIP items selected, retainer billing, contingent fee billing, fixed fee billing, or billing adjustments prior to reprinting invoices.)
When to Answer Y to "Are the invoices just printed OK ?"
Answer Y to "Are the invoices just printed OK ?" if all of the invoices just printed are OK, or the majority are OK but a few have been damaged during printing. (The invoices being referred to here are the invoices for the range of clients just entered on the invoice printing screen.)
If you answer Y to "Are the invoices just printed OK?", you will be asked a second question: "Reprint selected invoices ?". If all of the invoices just printed are OK, answer N to this question and you will be returned to the invoice printing screen to select another range of L clients to print. Answer Y if the majority of the invoices are OK, but a few require reprinting due to being damaged during printing.
If you answer Y, then a screen appears which allows you to enter the range of invoices to reprint. Enter the invoice numbers for the range to be reprinted. Use the invoice numbers as printed on the actual invoices. You are also asked for the starting invoice number for the reprint. This number will default to the starting invoice number of the range specified. This allows you to reprint the invoices using the same numbers. (Be sure to destroy or otherwise void the first versions of these invoices.) You may reprint as many different ranges of invoices as needed.
|
Note |
You may reprint a specific range of invoices as many times as needed. However, you must always refer to an invoice by the number which appeared on the invoice the first time it was printed, and not the number that appeared on the invoice due to a reprint. |
When you have completed reprinting invoices, press ESC and you will be returned to the invoice printing screen to select another range of clients to print.
|
Note |
When reprinting invoices, you may also use F1 (for the starting invoice number) to start invoice printing using an invoice number which is one greater than the last invoice printed. This is useful if you are using invoice forms which contain serial numbers (preprinted invoice numbers) and need to number the reprinted invoices so that they correspond to the preprinted numbers on the forms. (Each invoice number is checked against invoice history prior to being used. If it is already contained in invoice history, it is skipped and the next invoice number is used instead.) |
|
Example |
Type Y to indicate invoices are OK, and then type N to indicate that reprinting is not required. |
You then see:
"Please mount regular paper on printer. Type DONE when ready".
Change the paper, then type DONE.
After you have printed invoices and designated them as "OK", you can post them to the A/R package.
Select
Post from the Invoices menu.
In multi-user environments, when one user is posting invoices, other users may not use the Sales or Cash receipts selection in the A/R package. Conversely, while one user is using one of those selections, invoice posting is not allowed.
If there are any sales or cash receipt transactions in A/R to be posted, you see a reminder that they will be posted, as well as the invoices you have selected. Answer Y to proceed with posting; otherwise, answer N.
The Billing Register is printed first. Then a period of processing occurs while sales and cash receipt transactions are generated for the A/R package and files within T/B are updated. Then sales and cash receipts are posted in A/R, with the corresponding journals printed.
The handling of cash entered on billing transactions depends upon the setting of the field "Post cash to A/R ?" which is in Control information. If cash is to be posted to A/R, then cash receipt transactions are generated for cash entered on billing transactions in T/B, and these entries are posted along with any other cash receipt entries already on file in A/R. If cash is not to be posted to A/R, no posting of cash receipts occurs, and the cash entered on invoices is treated as memo information (i.e., no cash receipt transactions are generated or posted).
If you interrupt the printing of the Billing Register, then simply restart posting in T/B.
If you interrupt the printing of a register in A/R, then you must go into A/R and do all the rest of the posting steps manually from within A/R, first posting sales and then posting cash receipts.
When posting invoices, you might see "Duplicate sales or entry - see instructions. Press ENTER to continue". If you see this message, check to see if there has been a duplicate invoice.
During invoice posting, you might find that an invoice number had been assigned that was previously used by another invoice. This can occur in two ways:
First, the starting invoice number might have been reset in the T/B Control information to a lower number before printing invoices.
Second, a sales transaction with a conflicting invoice number was entered through Sales in Accounts Receivable.
If the software detects this condition, the T/B invoice will remain on file and its information will not be posted to A/R. You can print the Billing Edit List, if needed, to determine the number of the duplicate invoice.
To resolve this, you can either:
| • | Delete the sales transaction in A/R having the same invoice number, or |
| • | Reprint this T/B invoice with a different starting invoice number, so that the conflict will not occur, and then post it again. The original invoice should be destroyed. |
The following are the G/L distributions generated by invoice posting:
1. Work in Process
The following distributions are generated for selected WIP items which are billed on the invoice. In each case, the amount distributed is for the full amount of the WIP item excluding any adjustments.
Revenue recognized when time and expenses posted
If the Client record specifies that revenue is recognized when time and expenses are posted, then the following distributions are generated:
|
|
DR Accounts receivable account (Customer record) |
|
|
CR Work in process account (Client record) |
Revenue recognized when invoices posted
If the Client record specifies that revenue is recognized when invoices are posted, then the following distributions are generated:
|
|
DR Accounts receivable account (Customer record) |
|
|
CR Revenue account (Service or Expense record) |
|
|
DR Unbilled fees account (T/B Control information) |
|
|
CR Work in process account (Client record) |
2. Adjustments
For each selected WIP item which has been adjusted using Select WIP for billing, the following additional distributions are generated:
Write-up (upward adjustment)
|
|
DR Accounts receivable account (Customer record) |
|
|
CR Revenue account (Service or Expense record) |
Write-down (downward adjustment)
|
|
DR Markdown account (Service or Expense record) |
|
|
CR Accounts receivable account (Customer record) |
3. Fixed Fee Billing, Contingent Fee Billing, Flat Fee Billing, and Billing Adjustments
For each of these transaction types, the following distributions are generated:
|
|
DR Accounts receivable account (Customer record) |
|
|
CR Accounts receivable account (Customer record) |
For negative billing adjustments, DR and CR are reversed in the above distributions.
4. Periodic Advance Billing Retainers or One-time Retainers
|
|
DR Accounts receivable account (Customer record) |
|
|
CR Advance billing account (Client record) |
For negative one-time retainers, DR and CR are reversed in the above distributions.
5. Advance Billings Used
The following distributions are generated when existing billings on account are used to reduce the amount due for a matter being billed on the invoice. The amount distributed is the amount of advance billings used to reduce the amount actually due.
|
|
DR Advance billing account (Client record) |
|
|
CR Accounts receivable account (Customer record) |
6. Sales Tax
Any sales tax due is distributed to the G/L accounts specified in the Tax Code record associated with the client. See Tax codes in the Accounts Receivable User Manual.
7. Cash Receipts
If cash received is posted to A/R, then the following distributions are generated:
|
|
DR Cash account (Billing Transaction record) |
|
|
CR Accounts receivable (Customer record) |
If the invoice generated is a credit memo, DR and CR are reversed in the above distributions.