This chapter contains the following topic:
Introduction to Control Information
The A/P Control information selection contains information about the accounting set-up of your Accounts Payable module. It “controls” functions in the Accounts Payable module and supplies default values for other functions.
Select
Control information from the A/P Master information menu.
You must use two tabs to enter control information. If you cancel before completing the second screen, any changes made on the first screen are discarded.
There is only one entry for this selection. You can work with either new or existing information. A new entry occurs only when the module is installed (or the Control Information is initialized).
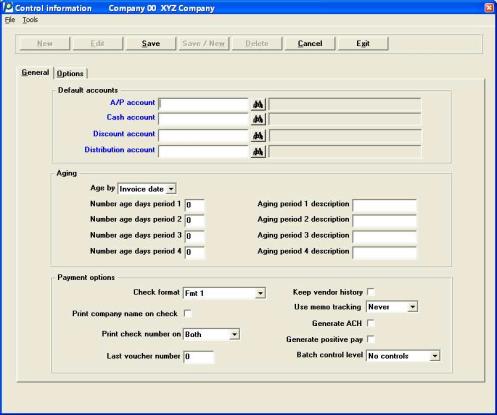
The first screen is displayed:
In character mode, the following screen displays:
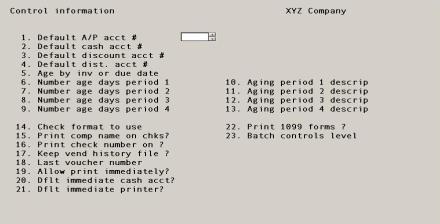
Enter the following:
Default Accounts
Each vendor is assigned a default A/P account number. This account is used for that vendor’s vouchers. Since the same account is often used for many vendors, you can provide a default for the default. The account number you enter here becomes the default in the Vendors A/P account no field.
|
Format |
Your standard account number format, as defined in Company information |
|
Example |
Enter account 2000-000 |
The account should be defined in the A/P Accounts selection (which in turn is defined in the CTL Valid G/L accounts selection).
The messages below appear if the account you have entered is not in Valid G/L Accounts, or in A/P Accounts. If you have entered the number incorrectly, Select <Enter> to correct it. Select the <Space bar> to add the new account number.
This account is not on file
and/or
This account is not in the A/P accounts file
Would you like to add it ?
|
Format |
Yes/No window |
|
Example |
(does not occur in this example) |
Type in account description
Enter a new account’s description for the Valid G/L Accounts.
|
Format |
30 characters |
|
Example |
(does not occur in this example) |
Checks and direct deposit payments must be paid from a cash account, which must be defined in the CTL Cash accounts selection. This in turn must be defined in the CTL Valid G/L accounts selection.
Use this field to specify a default value for this account number, to be used in the Payables Cash account field, Open items (Modify, manual payment), and in Checks Cash account # field (but not for the immediate check voucher, which has its own Control information default defined in the Default immediate cash account field).
The cash account used when generating a direct deposit ACH file and/or positive pay file must also be entered in CTL <Banks>. See Implement Positive Pay and Direct Deposit.
|
Format |
Your standard account number format as defined in Company information |
|
Example |
Enter account 1000-000 |
This account is not on file
and/or
This account is not in the Cash accounts file
Would you like to add it ?
These message[s] appear if the account you have entered is not in Valid G/L Accounts or in Cash Accounts. Answer <Enter> to correct an erroneous entry, or select the <Space bar> to add the account.
|
Format |
Yes/No window |
|
Example |
(does not occur in this example) |
Type in account description
If adding a new account, enter its description.
|
Format |
30 characters |
|
Example |
(does not occur in this example) |
Enter the number of the usual account you use to record purchase discounts. When you use Payables, you can either default to this account or enter a different account.
|
Format |
Your standard account number format, as defined in Company information |
|
Example |
Enter account 4070-000 |
Enter the number of the usual account you use to record purchase distributions. When you use Payables, you can either default to this account or enter a different account.
|
Format |
Your standard account number format, as defined in Company information |
|
Example |
Enter account 4080-000 |
This account is not on file. Would you like to add it ?
This message appears only if the account you have just entered is not in the Valid G/L Accounts. Answer N to correct an erroneous entry, or Y to add the item to the file.
|
Format |
Yes/No window |
|
Example |
(does not occur in this example) |
If adding a new account, enter its description.
|
Format |
30 characters |
|
Example |
(does not occur in this example) |
Aging
The Aging fields are used as defaults when you print the Aged open items report, accessible from the Reports menu selection.
This field controls what aging method is used in the Aged Open Items report. Select Invoice date to age by invoice date or Due date to age by due date.
|
Format |
Drop down list, with a choice of Invoice date or Due date |
|
Example |
Select Invoice date |
These fields allow you to describe up to four age brackets for use in the Aged Open Items Report. n represents a number from 1 to 4.
Days must be entered in ascending sequence. Only the upper limit of each bracket is entered, since the lower limit is implied (by the upper bound of the preceding bracket).
The lower limit of the first bracket is not entered explicitly. If aging by invoice date, the lower limit is assumed to be zero (that is, you cannot pay a bill before you receive it). If aging by due date, it is assumed to be minus infinity (that is, you can pay your bills as long before their due date as you want).
Negative values are allowed, but are meaningful only if you age by due date. This lets you distinguish payments that are made just on time from those that are imprudently early. For more informaton on using negative values see Using the Aged Open Items Report For Projections in the Aged Open Items chapter.
“999” is used, by convention, for the upper limit of the oldest bracket. This does not imply that there is a fifth bracket of “1000 days and over”. Anything older than 999 days is forced into the last bracket.
| • | If you want fewer than four brackets, enter 999 at Number age days periods 2 and 3. |
| • | Do not use a lesser value than 999 for the last bracket, unless you want items older than that not to appear on the report at all. |
Options
Enter the upper limit of each aging period, or use the option:
|
<F2> |
For an upper limit of 30, 60, 90, or 999 days, at the Number of days period fields 1, 2, 3, and 4 respectively |
These fields allow you to provide a brief description of each bracket entered in Number age days period fields. These will appear as captions on the Aged open items report. n represents a number from 1 to 4.
Options
Enter a brief description of each bracket, or use the option:
|
<F2> |
Current, Over 30 day, Over 60 days, Over 90 days |
|
Format |
12 characters at each field |
|
Example |
Press <F2> at each field |
A/P checks can be printed on three different stock forms. You can also print checks on a customized form when you use the Check form designer.
With the stock forms, there are minor differences in the format of the check itself, but the some differences in the check stub. The printing of the reference may occurs on the stub.
Your check stub format choices are:
|
Character Mode Options |
Graphical Mode Options |
Printing and Sample |
Reference printed? |
Vouchers per stub |
|
1 |
Fmt 1 |
Compressed, See a sample Check Format 1 |
Yes |
14 |
|
2 |
Fmt 2 |
Normal |
No |
14 |
|
3 |
Fmt 2 with ref |
Normal, See a sample Check Format 2 with Reference |
Yes |
7 (two lines for each) |
|
4 |
Fmt 1 on blank stub |
Compressed with field and captions printed on the stub. See a sample Check Format 1 on Blank Stub |
Yes |
14 |
|
5 |
Forms |
Custom form - both stub and check can be designed. See the Check and Remittance Forms chapter for more information. |
Depends on stub design |
Depends on stub design |
The advantages and disadvantages of the four options may be summarized thus:
|
Option |
Advantage |
Disadvantage |
|
Fmt 1 |
Prints maximum amount of information on each stub. PCL 5 or compatible laser printers will print this compressed format. |
Requires a 17 characters per inch printer. |
|
Fmt 2 |
Useful if the reference number is used for internal purposes only. |
This option does not print the reference number on the stub. |
|
Fmt 2 with ref |
Normal printing is more easily read (but it makes the form look “busy” to print two lines per item) |
Fewer vouchers can be printed on a stub because it also prints the reference. |
|
Fmt 1 on blank stub |
Similar to format 1 except the stub is blank. Prints maximum amount of information on each stub. Lets you use the same set of checks for both A/P and Payroll. |
Requires 17 characters per inch printer. |
|
Forms |
You may custom design your own check and stub form. |
You must understand how to design your own check and stub. * See the Check and Remittance Forms chapter for more information. |
* Ask for a sample check from your forms supplier. If you produce a custom form, we recommend that you send a printed form example (printed on the printer you are going to use) to your forms supplier with an explanation of each field. Some samples of check formats are provided with the install of PBS. See the Pre-defined Check and Remittance Formats section of the Check and Remittance Forms chapter.
No matter which format you choose, when you have more vouchers than will fit on a check stub you do have the option of printing a separate remittance page.
|
Format |
One option from a drop down list |
|
Example |
Select Fmt 1 on blank stub |
Choosing a Check Printer
An important part of check form printing is choosing the right printer. The right printer will help make the aligning of the check paper stock with the printed check data more easily done. Although we do not recommend a specific printer, understanding how the alignment works could help you decide on your purchase. For more information on the check alignment, see the Windows Printer Alignment and Company information - Laser printers-alignment sections in the Prepare Payments / Checks and Direct Deposit ACH chapter.
This choice is valuable if you have multiple companies. By having check forms printed without the company name, you can use the same check stock for more than one company.
Select the check mark to print the company name on the checks, or remove the check mark if the company name is preprinted on the check forms.
|
Format |
Check box |
|
Example |
Select <Enter> to print company name of check |
This determines where the check number is printed. Select either:
| Character | Graphical | Description |
|
S |
Stub |
To print the check number only on the check stub |
|
C |
Check |
To print the check number only on the check itself |
|
B |
Both |
To print the check number on both stub and check |
|
Format |
One of the above options using a drop down list |
|
Example |
Select Both |
The number entered here sets the starting number for vouchers. The first voucher number assigned in Payables is this number plus 1. When additional vouchers are entered in Payables, the voucher number is automatically increased by 1 for each new voucher.
|
Format |
999999 |
|
Example |
Type 152 |
Enter a check mark if you want to keep vendor history.
Passport highly recommends that you keep vendor history. A possible reason not to keep history is when your hard disk has very limited space. We highly recommend that you upgrade your disk space when this happens.
Some reports are available only when you keep vendor history. View vendor invoices is only available when you keep history. Refer to the Vendor History chapter for report examples.
Keeping vendor history lets you void checks more readily.
Your answer determines whether vouchers and payments are kept on file after being paid off. You can store these for as long as you wish, or you can selectively delete parts of this file. See the Purging Vendor History section of the Vendor History chapter.
Transfer Payment Information to Check Reconciliation
If you are using, or intend to use Check Reconciliation and you want to transfer checks, ACH payments and voided check information into Check Reconciliation, you must keep vendor history. If you are not keeping history, you may enter the checks information manually in Check Reconciliation (C/R). However you may end up with double postings to General Ledger if you get distributions from C/R.
When keeping vendor history there are two methods of transferring payment information when you are using the PBS Check Reconciliation module. For both methods you must set the C/R Control information field Using PBS Accounts Payable to checked. The transfer method you use is determined by the C/R Control information Post PBS Accounts Payable checks automatically field. The methods are:
| 1. | Posting automatically from A/P. When this is used, the C/R checkbook is updated during posting in A/P. |
| 2. | Pulling the payment information into C/R via the menu selection Transfer checks/deposits. This is also know as the batch method. |
Here are the details on both transfer methods:
Transfer Method 1 - Automatic
When C/R Control information is set to automatically transfer payment information to Check Reconciliation, these are the A/P menu selections where posting is direct to C/R:
| Main menu | Sub menu | Function | Comment | ||||||
|---|---|---|---|---|---|---|---|---|---|
|
Payables |
Post |
Immediate check (Void) |
When voiding an immediate check, the voided check is transferred to Check Reconciliation (C/R). A separate transfer register is printed. |
||||||
|
Payables |
Post |
Immediate check |
The check is transferred to C/R. A note is added to the register. |
||||||
|
Open items |
Post |
Manual payment |
Manual payments are transferred to C/R. A note is added to the register. |
||||||
|
Print checks and post |
|
Checks/ACH payment posting |
Checks and ACH payments are transferred to C/R. A note is added to the check and direct deposit register. |
||||||
|
Print checks and post |
|
Voids posting |
A note is added to the check register in both cases.
The same above applies to voided ACH payments. |
||||||
|
Void checks |
Post |
|
Voided checks are transferred to C/R. A note is added to the register. |
Transfer Method 2 - Batch
If you are using the second method, Vendor History is used to store information until it is transferred to the C/R Checkbook. The transfer is run using the C/R Transfer checks /deposits selection.
|
Format |
Check box |
|
Example |
Select the <Space bar> to keep vendor history |
Memo tracking cannot be used when Accounts Payable is interfaced to Job Cost.
Enter your selection for memo tracking.
A memo transaction provides a purchase-from vendor and a pay-to vendor. This is useful for credit card payments and employee expense reporting. For example you may have already paid the purchase-from vendor with a credit card, but you have not yet paid the credit card pay-to vendor. When you enter the payable to the credit card company the memos are assignable to the payable when entering the payable distributions. The default distribution account assigned to each pay-to vendor may be used.
The Memos selection, found on the Payables menu, allows you to enter memos in advance of entering the payable and assigning the memos to the payable when you enter distributions. If you prefer, you may enter all or some of the memo distributions when you enter the payable. The payables edit list includes memo information.
After posting a payable with memos vendor history that includes memo distributions identifies the actual purchase-from vendor for specific purchases that are being paid to a different vendor such as a credit card company or employee expense reimbursement account. Posting also updates the vendor record with period to date, next period and year to date memo purchase amounts.
Memo purchase information as well as regular purchases can be printed using the Vendor History Report and the Purchase Journal. Period to date, year to date, next period and current period totals for memos, stored in Vendors, are included with the Vendor by vendor # and Vendor by vendor name reports. The Memos report will print posted or unposted memos. The Purchase Journal has an option to show memo purchases on the report.
Memos also provide a means of tracking sales tax per state. This may be useful for auditing purposes. The Tax by state report provides state totals.
These are the options:
| Character | Graphical | Description |
|
N |
Never |
Never use memo tracking. |
|
A |
Always |
Always use memo tracking when entering payables distributions. |
|
S |
Selective |
Selective use When entering a payable you will have the choice of the regular distributions screen or the memo tracking assignment distributions screen. |
|
Format |
One drop down list option from the list above |
|
Example |
Select Selective |
If memo transactions have been entered in the memo transaction file, you can not turn off memo tracking.
Memos cannot be used if you are interfaced with Job Cost.
Check this box to generate a direct deposit ACH file when paying vouchers or do not check the box to not use this feature.
ACH direct deposit can be selective per vendor. For more information on the features and setup of direct deposit ACH processing, see the appendix Implement Positive Pay and Direct Deposit.
|
Format |
Check box, checked is generate ACH and unchecked is no ACH generation |
|
Example |
Select <Enter> to not generate ACH |
Check this box to generate a positive pay file when printing checks or uncheck it to not use this feature.
For more information the features and setup of positive pay see the appendix Implement Positive Pay and Direct Deposit.
|
Format |
Check box, checked is to generate positive pay and unchecked is no positive pay |
|
Example |
Select <Enter> to not generate positive pay |
This field displays as N/A and may not be entered whenever CTL Company information specifies that batch controls are not used.
Otherwise, enter the level of batch control desired: No controls, Partial, or Full controls. Refer to the Batch Processing Control chapter in the System User documentation for more information on batch processing.
|
Format |
Graphical mode: One option from the drop down list Character mode: Either N, P or F |
|
Example |
Select No controls |
After entering these fields the second tab displays. Enter the fields on this tab.
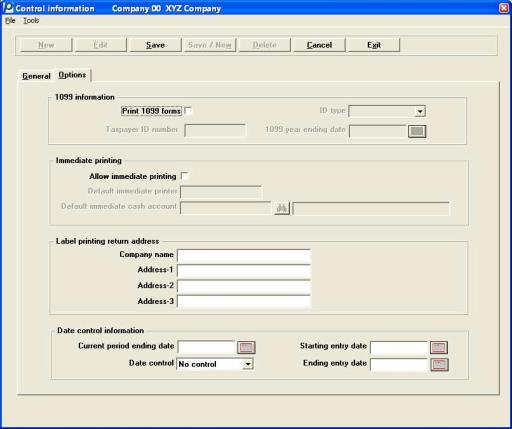
1099 information
If you wish to produce 1099-MISC IRS reports and a 1096 annual summary report for selected vendors, check the box; if not, leave it unchecked.
This field is protected from change. Refer to the System User documentation for overriding protected changes.
|
Format |
Graphical mode: Check box, checked is yes and unchecked is no Character mode: Y or N |
|
Example |
Select the <Space bar> to Print 1099 forms |
If you responded to not Print 1099 forms this field cannot be entered.
Otherwise, enter your taxpayer ID number.
|
Format |
999999999 (no hyphens) |
|
Example |
Type 923456781 |
If you responded to not Print 1099 forms this field cannot be entered.
Otherwise, enter the type of taxpayer ID number:
1 = Business (employer ID number)
2 = Individual (Social Security number)
|
Format |
Character mode: Enter either 1 or 2 Graphical mode: Drop down list, select either Business or Individual |
|
Example |
Select Business |
The Taxpayer id number field changes to the appropriate format: 99-9999999 for a business or 999-99-9999 for an individual.
If you responded to not Print 1099 forms this field cannot be entered.
Otherwise, enter the date on which the current calendar year ends.
This automatically updates when you perform the Close year for 1099's procedure.
Options
You have the following option:
|
<F4> |
To select a date from the calendar lookup |
|
Note |
This field has no effect on the accumulation of 1099 amounts that you will report at year end. The reported amounts are accumulated in the A/P Federal Auxiliary file/table. See the 1099 Year End Processingsection of the Year-end chapter for more information. However, this date is used during postings when updating 1099 amounts in vendors. If the entered date has an unsuitable year, incorrect 1099-MISC amounts may be accumulated in the vendor 1099 fields. The 1099 amounts in vendors are for informational purposes only and are not used for year end reporting. This date is checked when entering a 1099 immediate check payable, printing a Pre-check writing report and when running Print checks and post. Warnings display (or print on the edit list) when a 1099 payable is entered with a date that is more than one year after the 1099 year ending date. |
|
Format |
MMDDYY |
|
Example |
Type 123118 |
Immediate printing
Check the box to use the Print Check Immediately option in Payables. This option enables you to issue a printed (not manual) check immediately using a Immediate check voucher. Leave it unchecked to disable immediate check printing.
Immediate check printing can only pay one voucher at a time. For printing multiple vouchers on one check use Print checks and post.
|
Format |
Check box, checked is yes and unchecked is no |
|
Example |
Select <Enter> to not allow printing immediately. |
Default immediate cash account
If you select to not allow immediate printing, this field cannot be entered.
Otherwise, specify the cash account to which immediate check vouchers are posted. The account you enter here appears as the default when entering the Cash account field in Payables, but only for the immediate check voucher. For non-immediate checks, refer to the Cash account Control information field. If you do not want to distinguish by account number between the two types, enter the same account number in the Cash account and Default immediate cash account fields.
|
Format |
Your standard account number format, as defined in Company information |
|
Example |
Enter account 1000-000 |
This account is not on file
and/or
This account is not in the A/P accounts file
Would you like to add it ?
These message[s] appear only if the account you have just entered is not in Valid G/L Accounts or in A/P Accounts (respectively). If you have merely keyed in the number incorrectly, leave it unchecked to correct it. Check this box to accept the new account number and add it.
|
Format |
Yes/No window |
|
Example |
(does not occur in this example) |
Type in account description
If adding a new account, enter its description.
|
Format |
30 characters |
|
Example |
(does not occur in this example) |
If you elect to not allow immediate printing, this field may not be entered.
Otherwise, enter the name of the printer on which you most often print your A/P checks. This is the default printer when you use immediate check payable vouchers. The default can be changed during processing.
If you do not want a default you may leave the field blank. This is the optimal approach.
If you do specify a specific printer, the name should be the same as one defined on the printers tab of CTL Company information; this however is not validated by the program so any value can be entered. If the name of the printer is changed in Company information it will not be changed here unless you re-enter it.
You can also assign Windows printer to display a window where you can select the printer. Due to the aligning the data to the form during printing, Windows printer may not work with your printer and the results may not be usable. However, if you design your own check format you may be able to get the data to fit on your check stock.
You have these options.
|
<blank> |
You will be asked to select a printer at the time. |
|
<F5> |
To assign Windows printer in the field. This will display the Windows printer window. |
|
<Company Information Printer> |
Enter the Company information printer name. |
|
Format |
15 characters |
|
Example |
Select <F5> |
This field is case sensitive. Enter the exact lower and uppercase characters as they appear on the screen in the Printer-name field in Company information. If you change the name in Company information you will have to update this field with the name change.
In character mode the following screen displays:
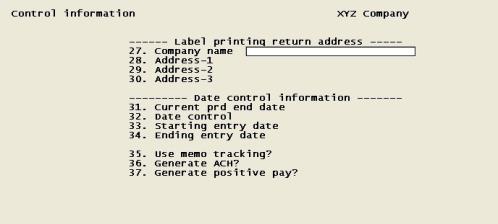
Fields are numbered consecutively from the preceding screen, and thus may appear differently in your company than they do in the screen display above.
All four lines of the address lines are optional and if present are not required to conform to any particular format.
Enter your company name and address.
|
Format |
25 characters at each field |
|
Example |
Enter: XYZ Company
|
The next four fields provide date controls for the A/P module.
If you use the Passport Business Solutions General Ledger, you may enter the same date as the Current period ending date in G/L Accounting Periods. However, you are not required to close a period at the same time you move to another entry period in G/L.
After the initial entry of this field, the close a period function will change the date automatically. Normally, you will never have to manually enter this date. Refer to the Close a Period chapter.
If you do not use G/L, enter the last date of the accounting period you are in.
This date is provided as a reminder of the current period in which you are working and will display when you are adding, changing or viewing vendor information.
When a payable or a check is posted, amounts are added to either the Period to date (if the posting date is in the current period) or Next period (if posting date is a month ahead of the current period) vendor fields.
Enter the current period ending date.
Options
You have the following option:
|
<F4> |
To select a date from the calendar lookup |
|
Format |
MMDDYY |
|
Example |
Type 33118 |
A/P checks, voucher distribution and void check dates are prone to misinterpretation and incorrect entry. The next three fields provide the set up for a feature that restrict users to entering dates, which ultimately result in G/L transactions, to a specified date range. The use of date entry control would increase the security against accidental incorrect entry of distribution dates.
Fields that are affected by date entry control include:
|
Function |
Field on Screen |
|
Payables (Enter)* |
Distribution date |
|
Payables (Enter) |
Check date (for a Non-A/P check only) |
|
Print checks and post |
Check date |
|
Void checks |
Distribution date |
* When you use either the Import or Data Import Payables menu selections, no date controls are placed on these functions.
Enter the date control type. Use one of the values from the table below:
| Character | Graphical | Description |
|
N |
No control |
There are no controls for the entry of dates. |
|
W |
Warning only |
When a date is entered outside the designated range the user will be warned Date not in current entry period, but allowed to proceed. |
|
F |
Full control |
When a date is entered outside the range, the user will receive the warning, but will not be able to proceed until a date is entered that is within the range. |
|
Format |
One drop down list option from the list above |
|
Example |
Select Warning only |
This field may not be entered if you selected No control to the Date control field.
Enter the starting date for which you are going to control the date entry. This can be any date, but normally it is the first day of the current month.
When you run the Close a period function, you will be asked to re-enter this date. A default of the next period starting date is provided.
Options
You have the following option:
|
<F4> |
To select a date using the calendar lookup |
|
Format |
MMDDYY |
|
Example |
Type 30118 |
This field may not be entered if you selected No control to the Date control field.
Enter the ending date for which you are going to control the date entry. This can be any date, but normally it is the last day of the current month.
When you run the Close a period function, you will be asked to re-enter this date. A default of the next period ending date is provided.
Options
You have the following option:
|
<F4> |
To select a date from the calendar lookup |
|
Format |
MMDDYY |
|
Example |
Type 33118 |
Make any changes required. Press <Enter> to accept your changes.