This chapter contains the following topics:
Printing Vendors by Vendor Number
Printing Vendors by Vendor Name
Printing the Vendor Change Log
A/P Pre-note ACH File and Report
Use this selection to enter information about your vendors. The vendor name and address as well as the vendor purchasing status are defined for each of your vendors. A separate pay-to address may be assigned to a vendor. Vendor contact information and specific payment terms are also defined in this selection.
Information regarding purchasing history, discounts, payments, memo purchases is recorded in the vendor record.
Bank information may be entered for direct deposit ACH processing.
Unlimited date and time stamped notes, particular to each vendor, are supported.
Each vendor is identified by a six-character vendor number. This number can be numerals, letters, or a combination of both, depending on your preference.
You may print vendor reports from two places:
| • | One is from the Graphical mode vendors screen by selecting By Vendor number or By vendor name from the Print menu. |
| • | From the A/P Reports, vendor menu selections, you will be able to print the same selections, ordered by name or by number. You will also be able to print vendor labels as well as a log of changes made to vendor records. |
There are up to four tabs for entering vendors. To access vendors entry do the following:
Select
Vendors from the A/P menu.
Graphical Mode
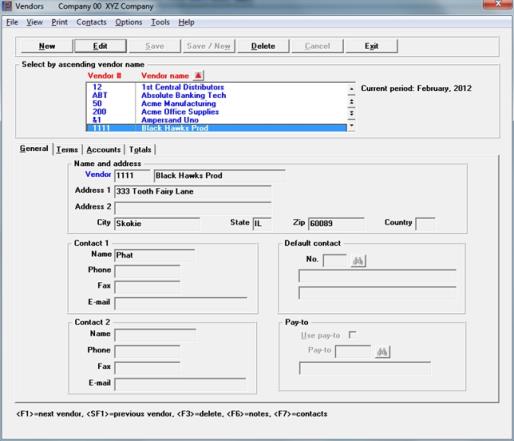
The following screen and tab appears:
In the screen above, there have been no vendors entered. When vendors have been entered you select vendor using the list box.
The list box displays up to 6 vendors at a time. You may sort the vendors by vendor number or vendor name, both in ascending or descending order. Only column names in red may be sorted. Click on the column name or the arrow to the right of the column name to change the sort or use the View options.
To locate a vendor, start typing a number or name, depending on which sort field is selected. You may also use the up/down arrows, Page up, Page down, Home and End keys to locate an item. The <F1> and <SF1> keys are the same as the up/down arrow keys.
Vendors that display in the list box are available for changes or deletion. The fields for the selected vendor display in the lower part of the screen.
When a vendor is found, you may select the <Enter> key or Edit button to start editing.
You may select a button or keyboard equivalent for editing, deleting or adding a new vendor:
| Button | Keyboard | Description |
|
New |
Alt+n |
To enter a new vendor |
|
Delete |
Alt+d |
To delete the vendor selected in the list box. You may also select <F3> to delete a vendor. For restrictions, see Vendor Deletions |
|
Edit |
Alt+e |
To edit the vendor selected in the list box |
|
Save |
Alt+s |
To save a new vendor or changes to an edited vendor |
|
Save/New |
Alt+w |
Same as Save button plus the New button |
|
Cancel |
Alt+c |
To cancel adding or editing a vendor |
|
Exit |
Alt+x |
To exit the screen. You may also use the <Esc> key |
Menu Selections
At the top left of the screen menu selections are available. Most of these are the similar from screen to screen. If a menu selection is grayed out you will not be able to access it. The selections that are unique to this screen are explained here:
From this screen you can access additional information by selecting the Options menu and then selecting View Open Items, Viewing Vendor Invoices, Vendor notes or Pay-to Addresses .
You may select the Print menu to print reports such as Vendor by vendor number and Vendors by vendor name. Other Print reports include: Aged open items, Cash disbursements projection, Cash requirements, Distributions to G/L, Open payables by date, Purchase journal, Purchases/Discounts, Vendor history, Purchasing addresses, Tax by state, Memos, AP pre-note ACH and report. The Year-end sub menu selections include 1099-MISC reporting list, Brief 1099 report and Full 1099 report.
When you select the Contacts menu you access a window where you may add or edit contacts for the selected vendor.
Character Mode
In character mode the following screen appears:
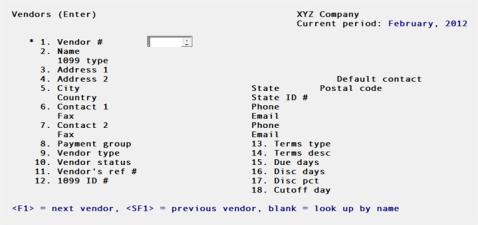
Options
Enter the vendor number, or use one of the options:
|
<F1> |
For the next vendor on record, in vendor number sequence |
|
<SF1> |
For the previous vendor |
|
blank |
To look up the vendor by name |
|
<F8> |
For selecting a vendor from a list a vendors. From the vendor list window you may select the Vendors button to view, edit and add vendors. When on the vendors screen you may edit or add Pay-to addresses and Contacts as well. Various reports are accessible from the Vendors Options menu and several view screens can be accessed from the View menu. |
Entering Vendors
The descriptions below fit the full graphical version of PBS, but most of the field functions are similar in the character mode.
From these tabs, you can work with both new and existing vendors.
If there are existing entries, a few vendors display in the list box at the top of the screen and the first vendor will display. Otherwise no data will display.
Vendor Search
To search for a vendor, start typing the name in the list box at the top of the page. You may also use the arrow keys, page up and page down keys and the home and end keys to select the vendor.
The default sort in the list box is by name. When you select the View menu, you may change the sort from Vendor name to number.
The current period from Control Information appears in the heading.
Enter the following information:
Alphanumeric vendor numbers are allowed.
| • | If your numbers are alphanumeric, be aware that lower-case is accepted but converted to upper. Embedded spaces are not removed. Thus, “ABC” is the same vendor as “abc”, but distinct from “ ABC”. In addition, vendor 12A will appear before 2A on sorted reports, not after. Passport does not recommend that you use vendor numbers with leading spaces (because they are stored alphabetically before temporary vendors - temporary vendors are explained on the next page). |
| • | If your numbers are completely numeric with no alphabet characters, leading zeroes are stripped off, and sort order is based on the numeric value. Thus, a vendor entered as 0012 is the same as 12. In addition, vendor 12 will appear after vendor 2, not before. |
An ampersand (&) next to the vendor number indicates that there is a note for this vendor.
Character Mode
Options
If you choose to look up by name, the cursor moves to the name field and you may enter the vendor’s name, or just its leading characters. Upper or lower case is significant. You may also use the options:
|
<F1> |
For the next vendor, in vendor name sequence |
|
<SF1> |
For the previous vendor |
To designate a vendor as temporary, enter an asterisk as the first character of the vendor number. Do this for one-time or casual purchases from vendors you do not deal with on a regular basis. The differences between permanent and temporary vendors are:
| • | Temporary vendors can be entered on the fly as you create vouchers for them in Payables. You do not have to enter them in advance here. |
| • | Temporary vendors can be purged as a group from Vendors. |
| • | You may not print labels for temporary vendors. |
| • | Some types of vouchers may not be issued for temporary vendors. |
| • | Purchase and discount totals are not kept for temporary vendors. |
| • | A partial payment cannot be made for a temporary vendor. If a voucher is paid, it must be paid in full. |
| • | You cannot create recurring payables for temporary vendors. |
There is no way to promote a temporary vendor to a permanent one, so do not routinely use this feature for all new vendors — only for those you do not expect to deal with regularly.
If you are familiar with the A/R or I/C modules, you may have noticed that miscellaneous customers and items also begin with an asterisk. These miscellaneous entries are a means of consolidating numerous casual entries into a single dummy entry for the sake of efficiency. This is not the purpose of the asterisk in A/P. Temporary vendors are real vendors, however casual. For instance, the address that you enter for them is used to print the check. In A/R, a miscellaneous customer’s address must be re-entered each time the customer is referenced (on the assumption that it is not really the same customer each time). In A/P, it is not intended that you use the same dummy number for two different vendors.
|
Format |
6 characters |
|
Example |
Type 100 |
This is the vendor’s name that appears on the vendor reports and on computer-prepared checks.
If the vendor’s name starts with “The” (e.g., The Ace Company) then you might want to enter the vendor name here as Ace Company, The. This allows the Vendors by Vendor Name Report to print this vendor in order with other companies whose names start with the letter A (e.g., after Abbot Enterprises but before Advanced Associates).
When changing a vendor name, if the vendor is also in recurring payables, the name will be updated there as well.
Options
Enter the vendor’s name, or use the option:
|
<F2> |
To toggle between entering a person’s name and a corporate name. Initially corporate name entry is assumed. |
|
Format |
25 characters |
|
Example |
Enter Vermont Metal Products |
|
Note |
If you are interfaced to PBS Purchase Order you may be printing purchase order forms. Purchase orders may be stored as PDF files that can be emailed to vendors. The PDF files are stored with the vendor name as part of the PDF file name. If you have vendor names with special characters, these special characters are converted to a Z when generating a PDF file. Special characters include "~!@#$%^&*()+`{}|[]\:;'<>?/". If you are going to send purchase order forms to PDF files, to avoid any confusion, we recommend that you do not use special characters within vendor names. |
If your vendor is a person and not a corporation, using <F2> lets you split the name into two subfields: one for the first name (and optional middle initial), and another for the family name or surname. The advantages are:
| • | When printing the name on a check or displaying it on the screen, the name has a normal appearance (John Smith not Smith, John). This also neatly handles the case of surnames containing two words, such as Martin van Buren, or Leonardo di Caprio. |
| • | When printing vendors by name sequence, the sequence is based on surname. |
| • | When looking up a vendor by name in Payables, the <F1> and <SF1> lookups are by surname (but only by surname) you can ask for the first Jones, but not for the first Jones, Ebenezer). |
You can ignore <F2> and enter the name as John Smith or Smith, John, if you prefer. Best results are obtained when you decide on one method and enforce it consistently.
|
Format |
10 characters (for personal name) 14 characters (for surname) |
|
Example |
(Does not appear in this example because you entered a corporate name) |
Enter the vendor’s address as you wish it to appear on the check. This will print below the vendor name and be used in window envelopes.
|
Format |
30 characters for the 1st address line 30 characters for the 2nd address line |
|
Example |
Type 300 Holcraft Avenue Press <Enter> |
City State Postal Code Country
Enter the vendor’s city, state and postal code as you wish it to appear on the check. This will print below address 1 & 2 and be used in window envelopes.
All fields are optional, and when present are not validated (foreign state and postal codes are accepted).
The comma between city and state is inserted automatically when printing. Do not key it in.
|
Format |
15 characters for the city 2 characters for the state 10 characters for the postal code 3 characters for the country code |
|
Example |
Type Newton Type VT Type 12345 Press <Enter> |
Enter the name of your primary and alternate contact for this vendor. The contact and phone number are printed on various reports. Both are optional.
|
Format |
15 characters at each field |
|
Example |
Type John Smith for the primary contact Press <Enter> to leave Contact 2 blank |
|
Note |
If you need to keep track of more than two contacts for a vendor or if you want to email PDF documents to vendors, refer to the Additional Vendor Contacts section at the end of this chapter. |
Either contact may have a phone. You can enter a phone without a contact, or vice versa (format is not checked). You may wish to adopt a consistent convention, for instance that the second phone is only used for FAX.
|
Format |
12 characters |
|
Example |
Type 555-777-1234 for the primary phone Type 555-777-1235 for the alternate phone |
Either contact may have an email address. You can enter an email address without a contact, or vice versa (format is not checked).
|
Format |
25 characters |
|
Example |
Select <Enter> to leave these fields blank |
Default contact
You must enter a vendor contact first before you enter this field. Vendor contacts are accessed via Contacts menu selection or using the <F7> key.
Enter the default contact. This field is optional. If you are emailing PDF purchase orders to vendors, the email address from the default vendor contact is used.
|
Format |
4 digits |
|
Example |
Press <Enter> |
There is a setup procedure for emailing PDF forms. Please see the Administration documentation appendix Email Configuration for more information. Also, refer to the Email and Email documents fields in the section titled Additional Vendor Contacts later in this document.
Once emailing is configured in PBS, you have generated PDF files and you want to start emailing these files, see the PDF Form File Processing chapter in PBS System documentation.
Pay-to
Check this box if you intend use a pay-to address that is different from the vendor address when printing checks and direct deposit remittances. In order to enter a pay-to number, you must have entered the pay-to address. For entering pay-to addresses see Pay-to Addresses.
|
Format |
Check box where checked is yes and unchecked is no. The default is unchecked |
|
Example |
Press <Enter> |
Enter the pay-to number. In order to enter a pay-to number, you must have entered the pay-to address. See Pay-to Addresses.
|
Format |
6 characters |
|
Example |
Cannot be entered because the Use pay-tofield is unchecked. |
The second tab displays like the following:
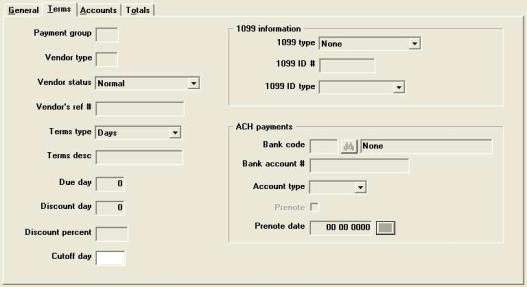
This field allows you to group vendors together for payment.
In Prepare payments / print checks, you can restrict the selection of vouchers for payment to only those in a specific payment group. The most obvious use is to separate the people you pay weekly from those you pay monthly, but you may also use the payment group as a criterion to:
| • | Print labels |
| • | Print vendor reports |
| • | Print the Aged Open Items Report and Cash Requirements Report |
Payment group is optional and may be left blank.
|
Format |
3 characters |
|
Example |
Type MFG (for manufacturing) |
Enter the vendor type.
This is a code of your own choosing, used mainly for your reference. The Purchases/Discounts report can be printed by vendor type, allowing better analysis of vendor activity. It is also used by the Purchasing Advice Report in the Purchase Order module. Entering a vendor type is optional; you may leave it blank.
|
Format |
3 characters |
|
Example |
Type MFG |
Vendor status refers to how this vendor is treated in respect to payments and discounts. Enter one of the following status codes:
| Character | Graphical | Description |
|
blank |
Normal |
Normal activity is allowed, and discounts are taken according to the vendor’s terms. |
|
A |
Always take discount |
Normal activity is allowed, but you always take any discount. The discount is always taken regardless of payment or discount dates. |
|
H |
Hold payment |
Selecting vouchers for payment to this vendor are not allowed. If there is one or more vouchers selected for payment before you change the status to Hold payment, the payment may still be done. You may also want to run the Pre-check writing report to verify that no vouchers have been selected for the vendor. If yes, you may unselect them. |
|
N |
No purchases |
No purchases are made from this vendor. If a voucher is entered for such a vendor, a warning message is displayed. |
|
Format |
One option from the list box |
|
Example |
Type Always take discount |
This optional field is the number that this vendor uses to refer to your company. It is printed on the checks you send to him, as an aid to identification.
|
Format |
15 characters |
|
Example |
Type 12769 |
In the next 5 fields, enter the vendor’s payment terms.
Payment terms specify how many days after a sale the payment is due, if there is a discount for early payment, how much the discount is, and how early payment must be made to get the discount.
There are two methods used in A/P to express vendor’s payment terms. The terms may specify that an invoice is due a certain number of days after the invoice date. Alternatively, the terms may specify that an invoice is due on a particular day in the calendar month following the invoice date. This second method is called proximo terms.
An example of proximo terms is 2/10th net 31st, meaning 2% discount if paid by the 10th of next month, net due on 31st of next month.
Select Days or Proximo (Day of next month). For character mode enter D for Days or P for Proximo.
|
Format |
Drop down list, either Days or Proximo |
|
Example |
Select Days |
Enter a description of this vendor’s payment terms. The next fields give the exact specifications for these terms.
|
Format |
15 characters |
|
Example |
Type 2/10 Net 31 |
For this vendor, if you select the Terms type field as Days, go to Terms by days. If you select Days of the month then read Proximo Terms (Day of next month).
This discussion of the fields Due days, Discount days, Discount percent, and Cutoff day applies only to Days terms.
Enter the number of days from the date of the vendor’s invoice when payment is due.
|
Format |
999 |
|
Example |
Type 30 to specify that payment is due 30 days from the invoice date |
Enter the number of days from the invoice date during which a discount is given for early payment. The discount days cannot be greater than the due days.
|
Format |
999 |
|
Example |
Type 10 to specify that payments made within 10 days from the invoice date qualify for a discount. |
Enter the discount percentage given if payment is made within the discount days.
|
Format |
99.99 |
|
Example |
Type 2 to specify a 2% discount. |
Cutoff day
This field cannot be entered when terms are by Days.
Proximo Terms (Day of next month)
This discussion of fields Due day, Discount day, Discount percent and Cutoff day applies only to day of next month proximo terms. If you have entered Days in the Terms type field, refer to Terms by days above.
Enter the day in the month on which payment is due. This day is the day in the month following the month in which the vendor’s invoice is dated.
|
Format |
99 |
|
Example |
(Does not occur in this example because you have entered Days in the Terms type field) |
Enter the last day in the month for which early payment discount is allowed. This day is the day in the month following the month in which the vendor’s invoice is dated.
The discount day must be less than or equal to the due day. It is always in the same month as the due day.
|
Format |
99 |
|
Example |
Does not occur in this example because you have entered Days in the Terms type field) |
Enter the discount percent given if payment is made on or before the discount day.
|
Format |
99.99 |
|
Example |
Does not occur in this example because you have entered Days in the Terms type field) |
The cutoff day is the last day of a month on which the proximo terms on an invoice apply to the next month. After the cutoff day, the terms apply to the month after the next one.
For instance, suppose that the terms are specified as 2% discount if paid by the 10th of next month, net due on the 31st of next month. Suppose that the cut-off day is specified as the end of the month. Then an invoice dated on the 30th of June or before would receive a discount if paid by the 10th of July, and would be due on the 31st of July.
The cutoff day is normally the end of the month. You may press <Enter> to set the cut-off day to Month end.
However, you may instead enter a positive or a negative number.
Enter a positive number, up to 27, to specify the last day of the month on which the terms of an invoice apply to the following month. After the cutoff day, the terms apply to the month after the next one.
Suppose the terms were 2% discount if paid by the 10th of next month, net due on the 31st of next month, and that the cut-off day was entered as 25. Then an invoice dated on or before the 25th of July would receive a discount if paid by the 10th of August and be due on the 31st of August. An invoice dated on the 26th of July would receive a discount if paid by the 10th of September and be due on the 30th of September.
Enter a negative number, up to 27, to specify how many days before the end of the month an invoice can be dated and still apply to the following month.
With the same terms as above, and the cut-off day entered as-2, an invoice dated on or before the 29th of July (31 July minus 2 days) would receive a discount if paid by the 10th of August and be due on the 31st of August. An invoice dated the 30th of July would receive a discount if paid by the 10th of September and be due on the 30th of September.
|
Format |
99- |
|
Example |
Does not occur in this example because you have entered Days in the Terms type field) |
1099 information
If you enter a 1099 type other than None, you must also enter the 1099 ID # and 1099 ID type fields.
If you specified in Control information that you do not print 1099-MISC forms, these fields cannot be entered.
Specify the default type of miscellaneous 1099 (1099 - MISC) for this vendor. These are the options:
| Character | Graphical |
|
N |
None * |
|
1 |
Rents |
|
2 |
Royalties |
|
3 |
Other income |
|
5 |
Fishing boat proceeds |
|
6 |
Medical and health care payments |
|
7 |
Non employee compensation |
|
8 |
Substitute payments in lieu of dividends or interest |
* Vendor does not require 1099 processing
|
Format |
Drop down list with the options listed above |
|
Example |
Select Non employee compensation |
This is the vendor’s Taxpayer Identification Number (TIN), as distinct from your own (which was entered in Control information). If you specified in Control Information that you do not print 1099’s at all, or if you specified that this particular vendor does not get them, this field cannot be changed.
Otherwise, a printed 1099-MISC form is required at year end so you must enter a number. You may leave the field blank if you do not know the number now, but it must be supplied before the next 1099 printing.
|
Format |
999999999 (no hyphens) |
|
Example |
Type 127659821 |
This field displays if you supplied a 1099 ID number in the preceding step.
Enter either Business or Individual. Upon entry the displayed tax identification number will be reformatted as either an Employer Identification Number (EIN), with format 99-9999999; or as a Social Security Number (SSN), with format 999-99-9999.
There is no connection between what you enter in this field and the vendor name field whether you have entered a corporate name or a personal name.
|
Format |
Graphical mode: Drop down list, either Business or Individual Character mode: Either 1 for Business or 2 for Individual |
|
Example |
Select Business |
Vendor Setup for Direct Deposit Payments
The general instructions for setting up direct deposit can be found in the Implement Positive Pay and Direct Deposit appendix.
When setting up direct deposit for a vendor you must enter the Bank code, Bank account #, Account type, Pre-note and Pre-note date fields.
Enter the bank code number to assign a direct deposit bank to this vendor. This number comes from the CTL selection of Banks. For more information on entering a bank, see the System user documentation Banks chapter.
Options
You may use one of the options:
|
<F1> |
For the next bank code. |
|
<SF1> |
For the previous bank code. |
|
<F3> |
Remove direct deposit processing. Select <F3> to delete the entry of bank information for this vendor. When you delete the entry of bank information this vendor must be paid via a check. |
|
Format |
4 characters |
|
Example |
Leave blank to not pay via ACH payments |
Bank name
This is a display-only field that identifies the name of the bank entered in the Bank code field.
This field cannot be entered if no number was entered in Bank code.
Enter the vendor’s bank account number. This will appear on the A/P direct deposit ACH Register. It will also be written to the ACH file.
|
Format |
17 characters |
|
Example |
Not used in this example |
The account type field designates the type of banking account. Enter Checking or Savings.
|
Format |
Drop down list, either Checking or Savings |
|
Example |
Not used in this example |
This field is used to determine if the vendor bank account has a pre-notification or normal status. Check this box for pre-notification status or uncheck it for normal ACH payment status.
A pre-notification status means that when an ACH file is created using the A/P pre-note ACH file & report utility, it will include the vendor bank account information but with a zero dollar amount. This ACH file may be sent to your bank to verify the vendor’s bank routing number and bank account information. Once this verification is done, a bank representative should notify you. When appropriate you can change the status from pre-notification to normal. This removal process can be done manually in Vendors on this field or using the A/P pre-note ACH file and report utility.
|
Format |
Check box, checked is yes and unchecked is no |
|
Example |
Not used in this example |
|
Note |
After the initial input of the ACH fields or any subsequent changes to the vendor Bank code, Bank account # or Account type fields, it must initiate a pre-notification status setting for the vendor bank account because a pre-notification verification will need to be done again. |
Enter the date when the ACH process is started for this vendor’s bank account.
This field is used when you run the A/P pre-note ACH file and report found under the A/P Utility menu. This utility can automatically update the pre-notification status from pre-note to normal based on the date entered in the Thru start date cut-off field. If this date is before the cut-off the status is changed. See the A/P Pre-note ACH File and Report section.
Options
You may also use this option:
|
<F4> |
To select a date using the calendar lookup |
|
Format |
MMDDYY |
|
Example |
Not used in this example |
Enter the State ID#. This will print on 1099 forms.
This field is optional, and when present is not validated.
|
Format |
10 characters |
|
Example |
Press <Enter> |
Options
Make any desired changes. For an existing entry, you may also use one of the options:
|
<F1> |
For the next vendor |
|
<SF1> |
For the previous vendor |
|
<F3> |
To delete this vendor. |
|
<F6> |
To add or change notes for this vendor |
|
<F7> |
To add or change contacts for this vendor |
Press <Enter> to proceed to the next tab. You may also select <Alt+A> to get to the Accounts tab.
The following tab appears:

Character mode has both the default accounts and totals on the same screen. For character mode the following screen appears:

This is the A/P account for this vendor’s payables. This account must already exist in A/P Accounts. Invoices and payments entered for the vendor are posted to this account.
Options
Enter the account number, or use one of the options:
|
<F2> |
For the next entry in A/P accounts If there is only one entry, the <F1> and <SF1> options do not appear. |
|
<SF2> |
For the previous entry in A/P accounts |
|
<F2> |
For the default A/P account from Control information |
This field is protected from change. For protected fields and how to override such protection, refer to the System User documentation.
If change becomes necessary, be aware that A/P is no longer in agreement with General Ledger. The Open payables by Date report does not show that the outstanding payables for a given A/P account add up to the A/P account balance in G/L.
To keep A/P and G/L in agreement:
| • | Run the Open Payables by Date report and get the A/P balance for the vendor at the end of the period. |
| • | Enter a G/L journal transaction that debits the vendor’s old A/P account and credits the vendor’s new A/P account. (This assumes the vendor has a credit balance on the payables report. If the vendor has a debit balance the old A/P account would be credited and the new A/P account would be debited.) |
| • | Only then should you change this field. |
|
Format |
Your standard account number format, as defined in Company information |
|
Example |
Press <F2> |
Options
Whatever account you enter here will be used as the default in Payables for recording purchase discounts for this vendor. The account must be in Valid G/L accounts. You can override this default during entry of the payable. You may also use the option:
|
<F2> |
For the default discount account from A/P Control information |
|
Format |
Your standard account number format, as defined in Company information |
|
Example |
Press <F2> |
Options
Whatever account you enter here will be used for this vendor as the default account in Payables for distributing the expense. The account must be in Valid G/L accounts. You can override this default during entry of the payable. You may also use the option:
|
<F2> |
For the default discount account from Control information |
|
Format |
Your standard account number format, as defined in Company information |
|
Example |
Press <F2> |
The following tab displays:
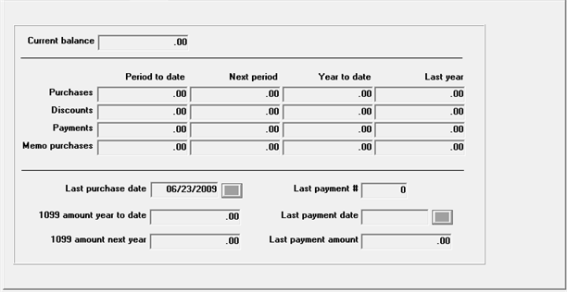
The fields on this tab are automatically updated as posting occurs. You do not change these fields, either for new or existing entries, except for setting up your data following installation of the A/P module. For a new entry you may not want to enter Period to date, Next period amounts as these are updated as you enter and post payables and print checks.
Character mode has both the default accounts and totals on the same screen.
All these fields are protected from changes.
Displays the current balance owed to this vendor.
|
Format |
9,999,999,999.99- |
|
Example |
Use default of .00 |
These four fields constitute the rows of a four-by-four table, whose columns include the period to date, next period, year to date, and prior year amounts for this vendor. The next period fields are only viewable using graphical mode. Using character mode it is a four-by-three table. Regardless of character or graphical mode, the data for all the fields are stored for the vendor.
For character mode, in each field, the cursor moves through all three subfields in turn. Within any field use <Up> and <Down> to move from one subfield to another.
The entire table is historical information, updated automatically, and is meant primarily for informational use. You would not normally change or enter any of these fields.
With a new vendor entry where you have already been doing business, you may decide to enter year to date and last year amounts. Keep in mind that when new payable entries and new checks are posted, the year to date amounts are updated as well. For a new entry do not enter period to date amounts as these are updated when you post new payable vouchers and post printed checks.
When Close a period is run, the next period field is rolled to the period to date field and the next period amount is added to the year to date amount. See Close a Period.
The year to date column is rolled to the last year column when Close a year is run at the end of your accounting year. See Close a Year.
For more information on Memo purchases see the Use memo tracking field in Control information.
|
Format |
9,999,999,999.99- at each subfield |
|
Example |
Use default of .00 |
This is the date of the last purchase from this vendor, and is maintained automatically. If you have made no purchase yet, leave the field blank. It will display as None.
Options
You have the following option:
|
<F4> |
To select a date from the calendar lookup |
|
Format |
MMDDYY |
|
Example |
Use default of None |
1099 amount year to date
1099 amount next year
These fields cannot be entered.
There will be no value in this field other than zero unless you answered something other than None to the 1099 type field on the Terms tab.
When present, they are used to accumulate 1099 payments to this vendor. It is an accumulation of the amounts for all the 1099 types if different types are entered on individual vendor vouchers. These fields are for informational purposes only. The data that is used for reporting of 1099amounts is stored with the A/P Federal Auxiliary data. See 1099 Miscellaneous Reporting Information in the Year-End chapter for how to view and edit the 1099 MISC amounts per vendor.
The first field of the pair accumulates payments for the current year, as defined in Control information (1099 year ending date).
The second field, for the year after that, allows normal A/P activity to proceed during the transition period when the old year has ended but the 1099 forms for the prior year have not yet been prepared. Rollover of the second field to the first is automatic upon preparation of these forms. After you start accumulating data in the next year field, sometime during the next year, you must select Close year for 1099s to keep the amounts on these fields accurate. See Close Year for 1099s in the Year-End chapter.
|
Format |
9,999,999,999.99- at each field |
|
Example |
These fields cannot be entered |
This is the number of the last check or direct deposit payment you have written to this vendor. If you have not written any yet, this field (with its date and amount) displays as UNAVAILABLE.
This field is maintained automatically and would not normally be changed.
If you press <Enter> for zero, this field (with its date and amount) displays as 0.
|
Format |
999999 |
|
Example |
Use default of 0 |
This displays the date of the last check or direct deposit payment written for this vendor. This field is maintained automatically and would not normally be changed. The cursor moves to this field only when you enter a non-zero check number in the preceding step.
Options
You have the following option:
|
<F4> |
To select a date from the calendar lookup |
|
Format |
MMDDYY or blank |
|
Example |
Use default of blank |
Displays the date of the last check or direct deposit payment written for this vendor. This field is maintained automatically and would not normally be changed. The cursor moves to this field only when you enter a non-zero check number.
|
Format |
99,999,999.99 |
|
Example |
Use default of .00 |
Options
Make any desired changes. For an existing entry, you may also use one of the options:
|
<F6> or select menu Options > Vendor notes |
To add or change Notes for this vendor |
|
<F7> or select menu Contacts |
To add or change Vendor Contacts for this vendor |
ACH Processing in Character mode
Press <Enter> after making all changes. If you are using ACH processing as defined in Control information, the third screen displays where you can enter the ACH related fields. If you are not using ACH processing then the record is saved and the first screen will display.
The third screen pertains to ACH processing. It is recommended that you read the appendix Implement Positive Pay and Direct Deposit before you attempt to enter these fields.
In character mode the following screen appears:

Notes
You may have any number of dated notes for a vendor.
Using character mode, for details on entering notes, refer to the Using Notes section of the Use of Function Keys, Tool Bar and Windows chapter in the System user documentation.
|
Format |
10 rows of 77 characters each |
Name changes
If you change an existing vendor’s name, all his recurring payables are changed accordingly. You may notice a slight delay while this occurs.
A vendor cannot be deleted if any of these conditions exist:
| • | The vendor has open items. |
| • | The vendor receives a 1099 form. |
| • | The vendor has reportable 1099 amounts. |
| • | The vendor has vendor history. You may purge vendor history for that vendor first and then delete the vendor. See Purging Vendor History |
A vendor can be deleted if a payable exits for that vendor. However, you will not be able to post payables until the payable is deleted as well.
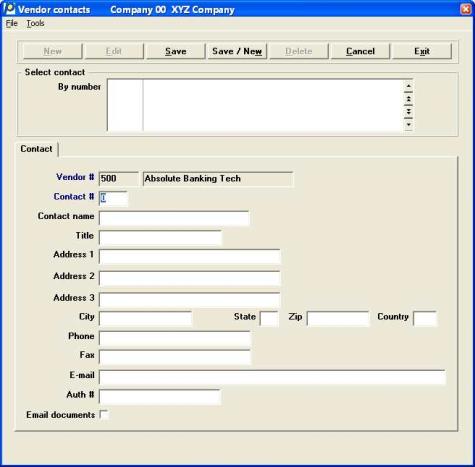
You are allowed to enter the names, telephone and fax numbers, and email addresses for two contacts for each vendor. If you require more than two contacts for a vendor, you may enter additional contacts or access existing additional contacts by pressing the <F7> function key when an existing vendor is displayed.
Graphical Mode
Press <F7> or from the menu select Contacts to display a screen similar to the following:
Character Mode
The following screen displays:
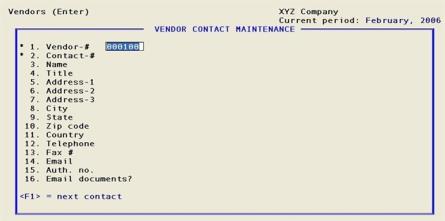
From this screen, you may work with new or existing contacts for this vendor. Each vendor may have up to 999 contacts in addition to the two defined in the vendor record.
There is no relation between the contacts you maintain here and the contacts entered in vendor record fields. For instance, if you blank out the contact in vendor record contact 2, the first contact in this window does not migrate to that field to fill the gap.
| • | If you need many contacts, you may wish to ignore the contacts in the vendor fields altogether and enter all your contacts in this window (so you will always know where to look for them). |
| • | Be aware however that the View selections, and most reports, show only the contacts in the vendor record. |
The Vendor # and Contact # fields are required, and cannot be changed on an existing contact; all the other fields on the screen are optional.
If you are interfaced to the Purchase Order module and you are emailing purchase orders to this vendor, you must enter at least one contact including an email address for the contact. There is a setup procedure for emailing forms. Please see the Administration documentation appendix Email Configuration for complete information.
Enter the following information:
Vendor #
This field contains the vendor number of the vendor you are currently working with and cannot be modified.
|
Format |
6 characters. |
|
Example |
Press <Enter> |
Enter a unique number to distinguish this contact from the vendor’s other contacts.
Options
If you have vendors, these options will be available to you.
|
<F1> |
For the next contact for this vendor |
|
<SF1> |
For the previous contact for this vendor |
|
<F3> |
To delete the displayed contact for this vendor |
|
Format |
9999 |
|
Example |
Type 3 |
Enter the name of this contact.
|
Format |
25 characters |
|
Example |
Type George Smith |
Enter a description of the position (title) of this contact.
|
Format |
20 characters |
|
Example |
Type Authorizer |
Options
Enter the address of your contact. At Address 1, you can use the option:
|
<F1> |
To set the Address 1 through Telephone fields to the corresponding values from the vendor record. |
|
Format |
25 characters for line 1 30 characters for lines 2 and 3 |
|
Example |
Type 37 Primrose Path for line 1 Press <Enter> for line 2 Press <Enter> for line 3 |
Enter the city for this contact.
|
Format |
15 characters |
|
Example |
Type Newton Corner |
Enter the state for this contact. The content of this field will be automatically forced to upper case.
|
Format |
2 characters |
|
Example |
Type VT |
Enter the zip code for this contact.
|
Format |
10 characters |
|
Example |
Type 12345-6789 |
Enter the country for this contact. The content of this field will be automatically forced to upper case.
|
Format |
3 characters |
|
Example |
Press <Enter> |
Enter the telephone number for this contact.
|
Format |
25 characters |
|
Example |
Type 555-777-1236 for voice phone |
Enter the Fax telephone number for this contact.
|
Format |
25 characters |
|
Example |
Type 555-777-1237 for Fax phone |
Enter the email address of this contact.
This email address is used when emailing purchase order documents, if you selected a contact as the default contact in the vendor record Default contact field. Also see the Email documents field below.
There is a setup procedure for emailing forms. Please see the Administration documentation appendix Email Configuration for more information.
Once emailing is configured in PBS, you have generated PDF files and you want to start emailing these files, see the PDF Form File Processing chapter in PBS System documentation.
|
Format |
60 characters |
|
Example |
Type georgesmith@vermontmetal.com |
If applicable, enter the code which the vendor has provided you in order to confirm that you have the authority to order goods from this vendor.
|
Format |
20 characters |
|
Example |
Press <Enter> |
If you want to use a vendor contact when emailing P/O purchase order PDF files, put a check mark in this check box. You may select more than one contact for emailing documents, however the contact marked as the default in the Default contact vendor field will be the default.
You must also have a valid email address in the contact's Email field.
There is a setup procedure for emailing forms. Please see the Administration documentation appendix Email Configuration for more information.
Once emailing is configured in PBS, you have generated PDF files and you want to start emailing these files, see the PDF Form File Processing chapter in PBS System documentation.
|
Format |
Check box |
|
Example |
Select <Enter> to not check the box |
To close the contact window and return to the vendor record, press <Esc>.
You are allowed to assign a separate pay-to addresses to each vendor. This is useful when the vendor you order from has a different address from the vendor where you send your payment.
Once a pay-to address has been entered you may assign it to a vendor . See Use pay-to.
When printing checks or direct deposit remittances the pay-to address is used.
Following the posting of a payment, the full pay-to address is stored in vendor history. The pay-to number and company name assigned to the vendor may be seen on the View vendor invoices screen when accessing a payment record; see Viewing Vendor Invoices. The number and name will also print on the vendor history report when selecting to show invoice history. To see the full address used for a payment, use either XDBC to SQL and write a custom query.
Select
Pay-to addresses from the Master information menu.
Using graphical mode, you may also select Pay-to addresses from the Options menu on the Vendors screen.
Graphical Mode
A screen similar to the following displays:
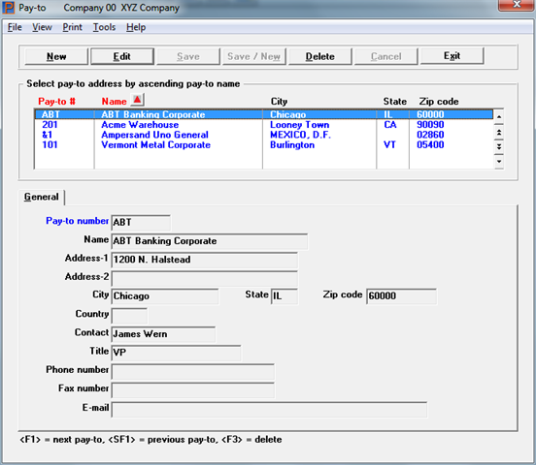
The list box displays up to 6 pay-to addresses at a time. You may sort the vendors by pay-to number or pay-to name, both in ascending or descending order. Only column names in red may be sorted. Click on the column name or the arrow to the right of the column name to change the sort or use the View options.
To locate a 6 pay-to address, start typing a number or name, depending on which sort field is selected. You may also use the up/down arrows, Page up, Page down, Home and End keys to locate an item. The <F1> and <SF1> keys are the same as the up/down arrow keys.
Pay-to addresses that display in the list box are available for changes or deletion. The fields for the selected 6 pay-to address display in the lower part of the screen.
When a 6 pay-to address is found, you may select the <Enter> key or Edit button to start editing.
You may select a button or keyboard equivalent for editing, deleting or adding a new vendor:
| Button | Keyboard | Description |
|
New |
Alt+n |
To enter a new 6 pay-to address |
|
Delete |
Alt+d |
To delete the pay-to address selected in the list box. You may also select <F3> to delete a pay-to address |
|
Edit |
Alt+e |
To edit the pay-to address selected in the list box |
|
Save |
Alt+s |
To save a new pay-to address or changes to an edited pay-to address |
|
Save/New |
Alt+w |
Same as Save button plus the New button |
|
Cancel |
Alt+c |
To cancel adding or editing a pay-to address |
|
Exit |
Alt+x |
To exit the screen. You may also use the <Esc> key |
Menu
Most of the menu selections are standard for every screen. However, on this screen, you may select "Print" to print a list of pay-to addresses.
Character Mode
The following screen displays:
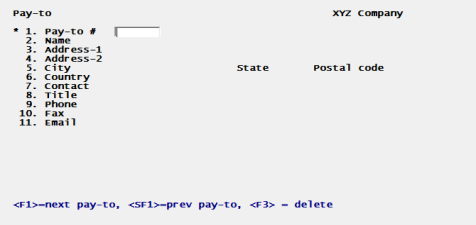
From this screen, you may work with new or existing pay-to addresses.
General Information
There is no relation between an address you enter here to an address entered in a vendor record until the pay-to record is assigned to a vendor. A vendor can only be assigned to one pay-to address. One pay-to address can be assigned to multiple vendors.
If a pay-to address is assigned to the vendor, the assigned pay-to address prints on checks and direct deposit remittances for that vendor. If no pay-to address has been assigned to a vendor the vendor address is used. When setting up user defined checks and remittances, where the vendor address is selected the pay-to address will print. be written to the positive pay file when the address fields are used in the format.
Pay-to addresses have no relationship to addresses used for purchase orders. See the Purchasing Addresses chapter for information on entering and using those.
The Pay-to number field is required, and cannot be changed on an existing pay-to; all the other fields on the screen are optional. It is recommended that at least the address, city, state and zip fields are entered.
Enter the following information:
Enter a number to distinguish this pay-to address. For easy tracking, it is recommended, but not required, that the Pay-to number be the same as the Vendor number for which it will be assigned.
Options
In character mode, these options are available to you.
|
<F1> |
For the next pay-to address |
|
<SF1> |
For the previous pay-to address |
|
<F3> |
To delete the displayed pay-to address |
|
Format |
6 characters |
|
Example |
Type 3 |
Enter the company name of this pay-to.
|
Format |
25 characters |
|
Example |
Type Vermont Metals Corporate |
Enter the address of your pay-to.
|
Format |
25 characters for line 1 30 characters for lines 2 and 3 |
|
Example |
Type 3900 Northeast Drive for line 1 Press <Enter> for line 2 Press <Enter> for line 3 |
Enter the city for this pay-to.
|
Format |
15 characters |
|
Example |
Type Burlington |
Enter the state for this pay-to. The content of this field will be automatically set to upper case (capital letters).
|
Format |
2 characters |
|
Example |
Type VT |
Enter the zip code for this pay-to.
|
Format |
10 characters |
|
Example |
Type 05400-9999 |
Enter the country for this pay-to. The content of this field will be automatically forced to upper case.
|
Format |
3 characters |
|
Example |
Press <Enter> |
Enter the company contact for this pay-to.
|
Format |
25 characters |
|
Example |
Type James Wern |
Enter a description of the position (title) of this pay-to.
|
Format |
20 characters |
|
Example |
Type CFO |
Enter the telephone number for this pay-to.
|
Format |
25 characters |
|
Example |
Type 802-728-1800 |
Enter the Fax telephone number for this pay-to.
|
Format |
25 characters |
|
Example |
Type 802-728-1899 |
Enter the email address of this pay-to.
|
Format |
60 characters |
|
Example |
Type jwern@vermontmetal.com |
Select Save to save your pay-to record.
To close the pay-to addresses window and return to the menu or vendor record, press <Esc>.
Select
Pay-to addresses from the Reports menu.
Using graphical mode you may also select Print from the Pay-to addresses entry screen.
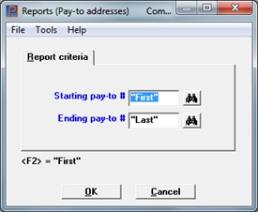
You will see a screen like this:
Graphical Mode
Character Mode

From the screen that appears, enter the following information:
Starting pay-to #
Ending pay-to #
Options
Enter the range of pay-to numbers you want to print, or use the option:
|
<F2> |
For the <First> starting pay-to number or the <Last> ending pay-to number. |
|
Format |
6 characters |
|
Example |
Press <F2> at each field |
Select OK to print or Cancel to not print.
In character mode, to print the report select the <Enter> key from Field number to change ?.
This report lists vendors in numeric order by vendor number. A similar report by vendor name is described in the next section.
Select
Vendors by vendor # from the Reports, vendor menu.
See an example of the Vendors by Vendor # report in the Sample Reports appendix.
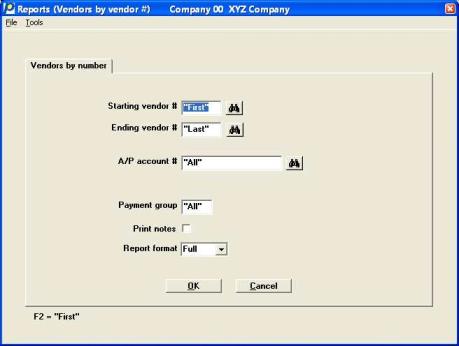
The following screen appears:
In character mode the following screen displays:
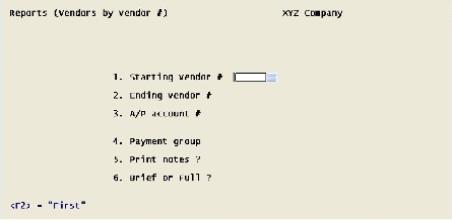
Starting Vendor #
Ending Vendor #
Options
Enter the range of vendors, by number, to include on the report. You may also use the option:
|
<F2> |
For the First starting vendor or Last ending vendor |
|
<F8> |
For selecting a vendor from a list a vendors. From the vendor list window you may select the More info button to view the full data about the vendor. You may also access vendor history from the Options menu |
|
Format |
6 characters each |
|
Example |
Press <F2> for each field |
Options
You may restrict the report to those vendors with a specified A/P account number. The account must already be in A/P accounts. Enter an account number, or use one of the options:
|
<F2> |
For the default A/P account from Control information |
|
<F1> |
For the next entry in A/P accounts. If there is only one record, the <F1> and <SF1> options do not appear. |
|
<SF1> |
For the previous entry in A/P accounts |
|
<F5> |
To list All vendors regardless of A/P account number |
|
Format |
Your standard account number format, as defined in Company information |
|
Example |
Press <F5> |
Entering a single group shows only vendors for that payment group.
Options
Enter the payment group, or use the option:
|
<F5> |
For All vendors regardless of payment group |
|
Format |
3 characters |
|
Example |
Press <F5> |
Note that leaving this field blank includes on the report only those vendors that do not have any payment group. This is not the same as requesting All vendors.
If you want the vendor notes to appear on the list, answer Y.
|
Format |
Check box |
|
Example |
Select <Enter> to leave the box empty |
When you select the Full option, it allows you to show the Period to Date and the Year to Date information for purchases and discounts. The Brief option does not.
This report lists vendors in order by vendor name. The previous section describes a similar report by vendor number.
Select
Vendors by vendor name from the Reports, vendor menu.
See an example of the Vendors by Vendor Name report in the Sample Reports appendix.
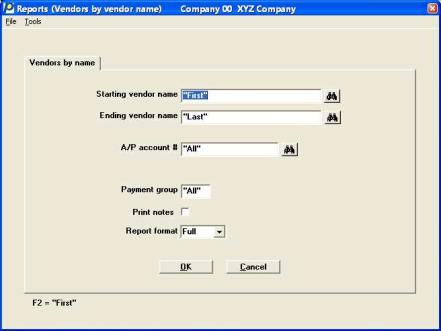
The following screen appears:
In character mode the following screen displays:
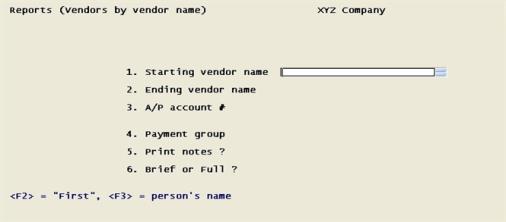
Starting vendor name
Ending vendor name
Options
Enter the range of vendors, by name, to include on the report. You may also use one of the options:
|
<F2> |
For the First starting vendor or Last ending vendor |
|
<F3> |
To toggle between entering a corporate name or a personal name |
|
<F8> |
For selecting a vendor from a list a vendors. From the vendor list window you may select the More info button to view the full data about the vendor. You may also access vendor history from the Options menu |
|
Format |
When entering a corporate name: When entering a person’s name: |
|
Example |
Press <F2> at each field |
Options
You may restrict the report to those vendors with a specified A/P account number. The account must already be in A/P accounts. Enter an account number, or use one of the options:
|
<F2> |
For the default A/P account from the A/P account field in Control information |
|
<F1> |
For the next entry in A/P accounts. If there is only one entry, the <F1> and <SF1> options do not appear |
|
<SF1> |
For the previous entry in A/P accounts. |
|
<F5> |
To list All vendors regardless of A/P account number |
|
Format |
Your standard account number format, as defined in Company information |
|
Example |
Press <F5> |
Options
Entering a single group shows only vendors for that payment group. Enter the payment group, or use the option:
|
<F5> |
For All vendors regardless of payment group |
Note that leaving this field blank includes on the report only those vendors that do not have any payment group. This is not the same as requesting All vendors.
|
Format |
3 characters |
|
Example |
Press <F5 |
If you want the vendor notes to appear on the list, answer Y.
|
Format |
Graphical: Check box where checked is yes and unchecked is no Character: One letter, either Y or N. The default is N |
|
Example |
Answer N |
Select the Full option to show the Period to Date and the Year to Date information for purchases and discounts. Otherwise select Brief to exclude this information.
Make any needed changes. Press <Enter> to print the report.
Select printer
You will be asked to select a printer. This is described in the Starting PBS, Menus and Printing section of the System user documentation.
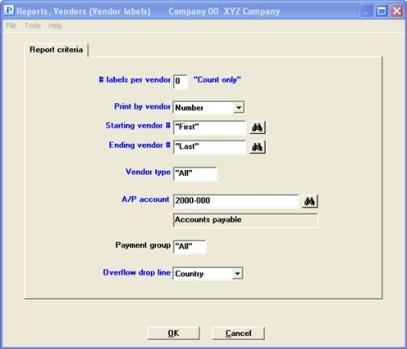
Use this selection to print mailing labels for vendor payments, or other vendor mailings. You can print labels for one or all vendor types, for one or all A/P accounts, and for one or all payment groups.
You must use continuous form labels that are 3-1/2 inches wide by 15/16 high, and 1 or 2 across, except when printing on a laser printer.
For a laser printer, you may use any one of the following label sizes:
| • | 4 inches wide by 1 inch high (20 per page) |
| • | 4 inches wide by 1-1/3 inches high (14 per page) |
| • | 4 inches wide by 1-1/2 inches high (14 per page) |
When printing vendor labels on a laser printer, you are asked to choose one of these label sizes.
Select
Vendor labels from the Reports, vendor menu.
The following screen appears:
Graphical Mode
Character Mode
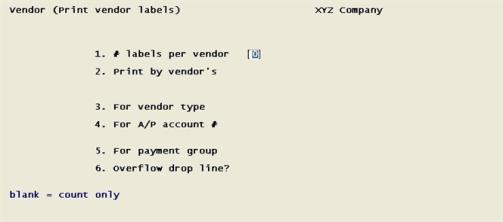
Enter the following fields:
Enter the number of labels per vendor. You can print up to nine.
You may enter zero here (by pressing <Enter>). This will not actually print the labels but will give you a count of the vendors who meet the conditions you are about to enter. This is sometimes useful for verifying that you have entered the right conditions or have enough labels on hand.
No labels are printed for temporary vendors, but any temporary vendors within the range requested are included in the count.
|
Format |
Numeric |
|
Example |
Type 2 |
Select one of the following:
| Character | Graphical | Description |
|---|---|---|
| 1 | Vendor name | To print by vendor name order |
| 2 | Number | To print by vendor number order |
|
Format |
Drop down list |
|
Example |
Select Vendor name |
Starting vendor name (or #)
Ending vendor name (or #)
Options
Enter the range of vendors to include on the report.
|
<F2> |
For the First starting vendor or Last ending vendor |
|
<F3> |
To toggle between entering a corporate name or a personal name (only if entering by name) |
|
<F8> |
For selecting a vendor from a list a vendors. From the vendor list window you may select the More info button to view the full data about the vendor. You may also access vendor history from the Options menu |
|
Format |
When entering a vendor number: 6 characters at each field
When entering a corporate name: 25 characters at each field
When entering a person’s name: 10 characters (first name) 14 characters (surname) |
|
Example |
Press <F2> for each field |
Options
Enter a vendor type to restrict the labels to vendors of that type, or use the option:.
|
<F5> |
For All vendors regardless of vendor type |
|
Format |
3 characters |
|
Example |
Press <F5> |
Note that leaving this field blank results in labels for only those vendors that do not have any vendor type. This is not the same as requesting All vendors.
Options
You may restrict the labels to those vendors with a specified A/P account number. The account must already be in A/P accounts. Enter an account number, or use one of the options:
|
<F2> |
For the default A/P account from Control information |
|
<F1> |
For the next entry in A/P accounts. If there is only one entry, the <F1> and <SF1> options do not appear. |
|
<SF1> |
For the previous entry in A/P accounts |
|
<F5> |
For All vendors regardless of A/P account number |
|
Format |
Your standard account number format, as defined in Company information |
|
Example |
Press <F5> |
Options
Entering a single group shows only vendors for that payment group. Enter the payment group, or use the option:
|
<F5> |
For All vendors regardless of payment group |
Note that leaving this field blank includes on the report only those vendors that do not have any payment group. This is not the same as requesting All vendors.
|
Format |
3 characters |
|
Example |
Press <F5> |
Options
Enter which line will be excluded on mailing labels if there is not enough room to print all six lines of text. Six lines of text will not print on continuous form labels or the smaller laser labels. The options are:
|
1 |
To drop address line 1 |
|
2 |
To drop address line 2 |
|
C |
To drop the country line |
For example, if a vendor used a street address and a post office box, you may decide to drop the street address portion of the mailing label since the post office box would be used for mailing purposes. You can drop the country code for vendors located in the United States.
|
Format |
1 character |
|
Example |
Type C |
Make any needed changes. Select OK to print the labels (or, if the # labels per vendor field is blank, to obtain a count of how many vendors meet these conditions).
If you asked for a count, there will be a pause as the vendors are read. You will then be informed of how many vendors meet the printing requirement, and will be asked if you wish to print them.
You are asked to mount labels on the printer and then type DONE when ready. For a non-laser printer, mount the labels on the printer so that the print head is at the first line of the first label. For a laser printer, load the labels in the printer’s paper tray according to the instructions in your printer’s user documentation.
After mounting labels, you are asked to select a printer. Since labels cannot be directed to disk or to the monitor, you will be asked this only if you have more than one actual printer defined. For more about printers, refer to the Starting PBS, Menus and Printing section of the System user documentation.
You are then asked Please select number of columns to print on mailing label sheets. Enter 1 or 2 to indicate how many labels should be printed across the label sheet.
Next, you are asked, Print label alignment ?.
If printing on a laser printer, you are first asked to enter the top margin and left margin of the label page and the size of the laser labels. After entering these, you are then asked if you want to print an alignment label.
Vendor labels are not designed to print to Windows printer. The first label will print as close as possible to the upper left corner of the printable area of the paper. This place on the page may vary per printer. If the printing does not align with your labels you must use a Company information laser printer that accepts PCL codes.
Alignment
If you want a sample label with X’s and 9’s printed so you can check the alignment on the printer, answer Yes. A sample label prints and you are again asked Print label alignment ?. You can print as many alignment labels as you wish.
If printing on a laser printer, you are given the chance to change the top and left margin before printing another alignment label.
After the labels have printed, your screen will display the same entries as before and the cursor will be positioned at the # labels per vendor field in Graphical mode and at Field number to change? in Character mode. If you wish to print labels for another range of vendors, repeat the process.
In Graphical mode select Cancel or press <Esc> and you will be asked to remove the labels paper and restore the stock paper to the printer. Check the box and select OK to return to the menu.
In Character mode you will be asked to dismount the label paper, to restore stock paper to the printer, and to type DONE. When you have done this, you will be returned to the menu.
|
Note |
When using a laser printer, you can save labels by printing the alignment on plain paper. After printing the alignment on plain paper, place the plain paper alignment on top of a page of labels and hold them up to a bright light to verify the alignment. Make any adjustments necessary and continue printing alignments on plain paper until you have the correct alignment. Then load the laser labels in the paper tray when you are ready to print labels. When the alignment is correct, answer N to the Print label alignment? question. The vendor labels then print. |
If the use of change logs was not specified in the PBS Company information, you will not be able to use this selection.
Otherwise, the change log is an audit trail of all changes that have been made in Vendors. This report indicates who made what change and when.
The vendor change log can be purged and printed or just printed with no purging.
Select
Vendor change log from the Reports, vendor menu.
The following screen appears:
Graphical Mode
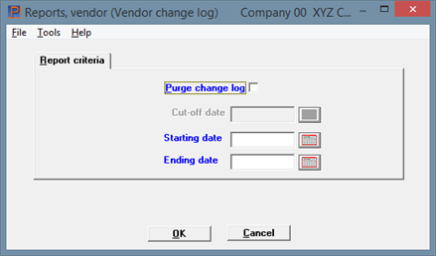
Character Mode
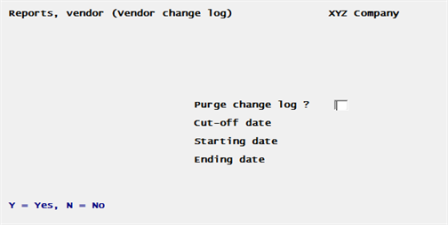
Enter the following fields:
Check this box to purge the change log, or leave it unchecked to retain the change vendor records.
|
Format |
Graphical mode: Check box where checked is yes and unchecked is no. The default is unchecked Character mode: Y or N. There is no default |
|
Example |
Press <Enter> for the default |
This field is only available if you checked the box for the Purge change log field.
Enter the cut-off date to the last change date you want to purge or use the option:
|
<F2> |
For the system date (today’s date) |
|
Format |
MMDDYY |
|
Example |
Press <F2> |
Ending date
These fields are only available if you did not check the box in the Purge change log field.
Enter the range of change dates to include on the report or use the option:
|
<F2> |
For the "Earliest" starting date or "Latest" ending date |
|
Format |
MMDDYY |
|
Example |
Press <F2> for both fields |
You will be asked to select a printer. You can choose to display the report on screen only if you are not purging. Purging has an Audit Trail restriction which requires printing to a printer or to disk.
Character Mode
Are the parameters ok ?
Enter Y if you are ready to continue. Enter N if you want to re-enter the fields.
If you are purging this question displays:
Are you sure you wish to purge ?
Enter Y if you are ready to purge the vendor change log. Use the default of N to return to the menu without purging.
This option is only available if you are generating direct deposit ACH file electronic payments as indicated in the Generate ACH Control information field. ACH is used to pay your vendors electronically via your bank.
Before you run this utility there is setup information that must be in place. See the appendix Implement Positive Pay and Direct Deposit for the steps needed to get direct deposit ACH implemented on your system.
The Pre-note field in Vendors determines one of two possible statuses for a direct deposit ACH: pre-notification and normal. These mean:
| • | A pre-notification status means that you are notifying the bank that there is at least one new vendor with direct deposit ACH bank information or changes to an existing vendor’s bank account information. This gives them time at your bank to verify the routing and bank account number before you do your next check run. |
| • | A normal status means that the account has gone through the pre-notification process with your bank and it is now okay to make a payment to the vendor via ACH electronic processing. |
This utility is used to create an ACH file of pre-notification vendor bank accounts and it can also be used to update a vendor bank account status from pre-notification to normal.
The ACH file created using this process will only contain pre-notification records. The name of the file will be the same as when an ACH file is created during a check run. See the appendix Implement Positive Pay and Direct Deposit for more information on the ACH file and where it is created on the system.
Select
A/P pre-note ACH file and report from the Utilities menu.
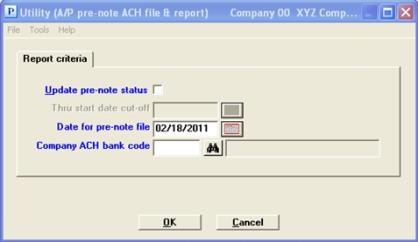
Graphical mode
You will see screen like the following:
Character Mode
You will see a screen like the following:
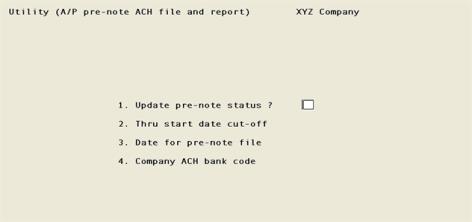
Enter the following fields:
Check this box if you want to update the status of the vendor Pre-note field from pre-notification to normal status. Leave it unchecked if you are generating a pre-note ACH file.
|
Format |
Check box where checked is update the status and unchecked is generate an ACH file. The default is unchecked |
|
Example |
Select <Enter> to accept the default |
If you leave it unchecked the next field cannot be entered.
Enter the cut-off date.
This field relates directly to the date entered in Pre-note date Vendors field . If the date you enter here is on or after the Prenote date then the status will be updated from pre-notification to normal. If it is before the Prenote date then the bank account start date will not be effected.
Options
|
<F2> |
For “Latest” |
|
Format |
MMDDYY |
|
Example |
This cannot be entered in this example |
This is the date written to the ACH file for the pre-notification bank accounts.
Enter the date to be used for the vendor pre-notification ACH records or use the option.
Options
|
<F2> |
For “Today” |
|
Format |
MMDDYY |
|
Example |
Select <F2> for "Today" |
Enter the bank account code for which you are reporting. The bank information is written to the ACH file.
|
Format |
4 characters |
|
Example |
Enter 1 |
Make any changes or select OK to generate the ACH file with an report or update the vendor Pre-note field and print a report.