
This chapter contains the following topics:
Payables are entries requiring payment. There are one-time-only payables and payables that recur periodically (like a monthly payment). For each payable to be paid, a voucher is created. There is a voucher number, which identifies each single payment.
Although the dictionary says that a Voucher is as much a physical document as a receipt or a check, Passport does not use the word in this sense. A voucher in this module is exclusively an internal record in the computer, and there is no physical document corresponding to it. Passport uses the terms voucher and payable interchangeably.
The Payables selection lets you enter or change various kinds of vouchers. If a voucher has already been entered (but not yet posted) for the information you specify, that voucher appears and is available for changes or deletion. Once the vouchers have been verified as correct (with the edit list), you can post them to the various A/P files or tables.
If you are using the Manufacturing Product Purchasing module you may want to use the built in invoicing function. You may enter Regular invoices where the distributions tie to the Product Purchasing purchase order lines. They are posted directly to A/P Open items. There are two other transaction types; Non-A/P check and Purchasing only-not A/P. See the P.O. Invoices chapter of the Product Purchasing documentation.
The types of vouchers that can be entered in this function are:
| Only available if authorized per Control information with the Allow immediate printing field | |
| Only available if Job Cost is installed and interfaced with Accounts Payable |
Following is a description of these different types:
Regular vouchers are entered for invoices, and vendor credit and debit memos. Entering a positive invoice amount credits (increases) accounts payable. When entering a voucher for a vendor’s invoice or entering a vendor’s debit memo, enter a positive invoice amount. The total of the distributions entered for the voucher must equal the invoice amount.
When entering a regular payable you may also assign memos to the distributions. Memos are useful for tracking purchase from vendor amounts separately from pay-to vendor amounts. The use of this feature is determined by the A/P Control information field Use memo tracking. For a more thorough explanation see Control information.
You must enter a negative invoice amount in order to record a vendor’s credit memo. Entering a negative invoice amount debits (decreases) accounts payable.
When entering the credit memo, set the due days and discount days to zero.
For the G/L distributions, distribute the amount to the same account that was used earlier when the original payable, for which this entry is a credit memo, was entered, or distribute the amount to a returned purchases account. Consult with your accountant as to the exact account to use, which may vary depending on the nature of the credit memo.
Enter the distribution amount as a negative number. If multiple G/L distributions were used for the original payable, you have to determine the amounts distributed to each account.
A cancellation voucher enables you to cancel a previous voucher that has already been posted to A/P Open Items, but has not been paid yet (no check printed).
Once a cancellation voucher is posted, both the original voucher (now canceled), and the cancellation (negative reversal) voucher is recorded for that vendor’s history.
To enter a cancellation voucher, you must know the vendor number and the number of the voucher to cancel. After entering the voucher number the original voucher fields are filled in on the screen from data in A/P Open Items, except the distribution date and reference. The distribution date is filled in with today's date. If needed, you may enter a reference and modify the distribution date. No other fields are modifiable on the first screen.
If a P.O. number was entered on the original voucher it is pulled in with the other cancellation data. The matching receivers are not included.
On the distributions screen you must manually enter the expense distributions (the G/L expense account where the expense was distributed) of the voucher you want to cancel. You may apply the full voucher amount to the vendor's default distribution account. However if you know that another account or multiple accounts were applied to the original payable, in order to determine where to apply distributions amounts, there are several ways:
Running in graphical mode you may access View vendor invoices from the Options menu on either the payables or distributions screen. Once the invoice is located, select the View distribution history button.
If you are using character mode (or graphical mode) you can find the distributions on the Payables Register that shows the voucher you want to cancel. and the Payables Distributions to G/L report (unless the distributions have already been purged from the A/P Distribution to G/L records).
If available you can also find the distributions on the Payables Register that has the original voucher.
During the posting of a cancellation the program generates a cancellation voucher in history. It deletes the voucher from A/P Open Items and also posts the distributions for the cancellation voucher to Vendor History and to A/P Distributions to G/L with the sign of the amounts reversed.
For the cancellation voucher’s distributions to cancel the original voucher’s distributions, the distribution dates of both vouchers should be identical. Here is an exception: if the original voucher was in a closed fiscal year and you are interfaced with General Ledger you must not use the original distribution date. You cannot write distributions to closed fiscal years. Enter a date for a current fiscal year.
If two or more cancellation vouchers exist that are identical to each other, posting of the cancellation vouchers is not allowed until you change or delete one of them. If you have duplicate vouchers stored in A/P Open Items and want to cancel each of them, do so in separate posting runs.
Vouchers that have been partially paid cannot be canceled using a cancellation voucher.
In order to cancel the balance of a partially paid voucher, do the following:
| 1. | Mark the voucher as manually paid using Modifying Open Items. This transaction requires entry of a cash account. Enter any valid cash account. Post this transaction. |
| 2. | Enter a negative non-A/P check (to the same vendor) for the same amount as was entered in (1). Use the same cash account that was entered in (1). Distribute the amount to the same accounts that were used in the original payable. Post this transaction. |
Marking the voucher as manually paid credits the cash account and debits the vendor’s accounts payable account. This reduces the accounts payable account correctly. A negative non-A/P check debits cash and credits the expense distribution accounts. Thus, the debit and credit to the cash account wash and the net result is to reduce the account’s payable account and to reduce the expense accounts.
There are other methods you can use to cancel a partially paid voucher. For example, you may enter a negative regular voucher for the balance to cancel and then select both the original voucher and the negative voucher for payment and then cut a check for $0.00. However, this technique requires the use of a computer check number. If the vendor is paid via direct deposit this may be the preferred method as check stock is not being used.
Adjustment to Distribution Voucher
This type of voucher enables you to redistribute expenses for a voucher that has been posted to A/P Open Items. After posting a voucher, if the expense distributions are wrong, you can enter an adjustment to voucher distributions to reverse the old distributions and enter new ones.
This feature allows you to make adjusting journal entries through A/P as soon as you discover an error, rather than waiting until you have interfaced the A/P distributions with the General Ledger module.
When entering such a voucher, enter only the vendor number and distribution date from the voucher you are adjusting. You cannot enter information for the rest of the fields.
After entering these fields, enter distributions opposite in sign and for the same amount as those you want to reverse and enter the correct distributions.
The total of all distributions must equal zero before you can exit, so that General Ledger is in balance.
A non-A/P check voucher enables you to record the purchase of goods or services where payment was made at the same time that the invoice was written. The invoice was prepaid, or paid in advance. The invoice is no longer payable at the time it is entered into the A/P module.
The A/P account is not changed by a non-A/P check voucher. For a voucher with a positive invoice amount, the cash account entered on the transaction entry screen is credited (decreased), the discount account is credited (increased), and the expense accounts are debited (increased).
A negative non-A/P check voucher can be entered to delete the distributions for a non-A/P check voucher that was incorrectly entered.
The expense distributions for non-A/P check vouchers are dated with the check date.
You can use a $0 non-A/P check voucher to record a voided manual check. See the Invoice amt field, later in this chapter.
If you are using positive pay for the cash account entered, posting payables creates a positive pay file. You should send the positive pay file to your bank before your bank receives the check.
Per the Check Reconciliation Control information you may be setup to automatically post to the C/R Checkbook (CKBOOK). When you are automatically posting to Check Reconciliation, a Check Transfer Register gets generated when posting a Non A/P check.
After using Payables (Post) that includes a Non AP check voucher, you may print the register. See Print register only in the Prepare Payments / Checks and Direct Deposits chapter.
An immediate check voucher is used to enter a non-A/P payable, but also have a check printed immediately. You may enter voucher and check information and cut the check immediately. This is useful for a COD delivery.
An immediate check voucher is similar to the non-check voucher in that payment is made at the same time that the invoice was written. Therefore, the invoice is no longer payable at the time it is entered into A/P. The A/P account is not changed by an immediate check voucher.
There are three fields in the Control Information menu that apply to the immediate check voucher. Ensure that the Allow immediate printing field in Control Information is selected. You are also required to enter a default cash account in the Default immediate cash acct field in Control Information. When an immediate check voucher is processed, this account is used. There is also a default printer setup in Control Information that is optional when printing immediate checks. If you leave this blank, you are asked to specify a printer before the check is printed.
If you are using positive pay for the cash account entered, posting payables creates a positive pay file. You should send the positive pay file to your bank before your bank receives the check.
As an immediate checks will produce only a check payment, a direct deposit ACH file cannot be generated.
Per the Check Reconciliation Control information you may be setup to automatically transfer immediate checks when posting payables. If yes they are sent to the C/R Check Book (CKBOOK). When you are automatically transferring the Payables Register indicates ** Check transferred to Check Reconciliation ** for each immediate check.
If Job Cost is interfaced and retainage payable is used, the retainage now due voucher enables you to record invoices for retainage now due. If Job Cost is not interfaced, this voucher type is not displayed. It allows you to indicate that the retainage portion of a previously entered invoice has now become due for payment.
The posting of the original invoice (with retainage), resulted in an A/P Open Item for that invoice amount, less the retainage amount. The retainage amount at that time was not an accounts payable; instead, it was a retainage payable.
When this retainage amount finally becomes due, a retainage now due voucher is used to transfer the amount from the retainage payable account to the accounts payable account. At this time, the retainage becomes an A/P Open Item.
In order to match the original invoice with its retainage portion which is now due, you should use the original invoice number on the retainage now due voucher.
No distributions are entered for retainage now due vouchers. The posting program automatically creates the distributions, using the account numbers in A/P and Job Cost Control information.
Select
Enter from the Payables menu.
If you are using Batch controls, a screen appears at this point for you to select the appropriate batch. Refer to the Using Batch Controls in the System User documentation.
Two screens are required for each voucher: one for the voucher itself, and one for distributing the expenses to the appropriate accounts.
Graphical Mode
The first screen appears as follows:
From this menu selection, you can work with both new and existing vouchers. In the screen above, no payables have been entered.
If there are vouchers ready to import, you will see the message Click here to import vouchers as seen below:

Clicking on this opens the import program. For what happens after you click on this link, see the Importing Vouchers section. You may also run the import using the Import menu from the Payables menu.
If you are licensed for Data Import Manager see Data Import for converting text data into Payables.
The list box displays up to 6 unposted payables at a time. You may sort the payables by voucher number or invoice number, both in ascending or descending order. Only column names in red may be sorted. Click on the column name or the arrow to the right of the column name to change the sort or use the View options.
To locate a voucher, start typing the voucher number or invoice number, depending on which sort field is selected. You may also use the up/down arrows, Page up, Page down, Home and End keys to locate a voucher. The <F1> and <SF1> function the same as the up/down arrow keys.
Vouchers that display in the list box are available for changes or deletion. The fields for the selected voucher display in the lower part of the screen.
When a voucher is found, you may select the <Enter> key or Edit button to start editing.
You may select a button for editing, deleting or adding a new payable:
| Button | Keyboard | Description |
|
New |
Alt+n |
To enter a new payable |
|
Delete |
Alt+d |
To delete the payable selected in the list box. Selecting <F3> will also delete the payable |
|
Edit |
Alt+e |
To edit the payable selected in the list box |
|
Save |
Alt+s |
To save a new payable or changes to an edited payable |
|
Save/New |
Alt+w |
Same as Save button plus the New button |
|
Cancel |
Alt+c |
To cancel adding or editing a payable |
|
Edit distrib |
Alt+b |
To access a window where you may edit distributions for the currently selected payable. See Expense Distributions |
|
Exit |
Alt+x |
To exit the screen. You may also use the <Esc> key |
Menu Selections
At the top left of the screen menu selections are available. Most of these are the same from screen to screen. The selections that are unique to this screen are explained here:
From the Options menu selection you may also enter Entering Memos and Memo Adjustments. You may select to Viewing Vendor Invoices, View vendor open items and Posting Vouchers. You may also edit or review Pay-to Addresses.
From the Print menu you may print the payables edit list, Aged open items, Cash disbursements projection, Cash requirements, Open payables by date, Purchase journal, Purchases/Discounts, Vendor history and Memos.
Date Controls
If you are using date controls, the entry period (from Date control fields in A/P Control information) displays at the upper right corner of the tab. The entry of the distribution date field is checked by date controls. When entering a Non-A/P check only, the check date is validated by date controls.
Character Mode
In character mode this is the first screen.
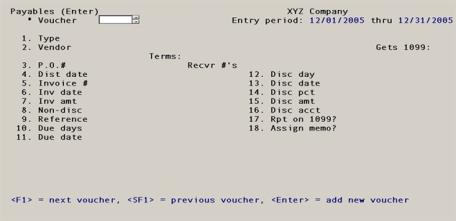
Character mode has field numbers and Field number to change. From here you may select <F1> or <SF1> to select existing vouchers or entry a new voucher.
For an existing voucher, you can change any field except the Type and Vendor. If you want to change those fields, delete the entire voucher and then re-enter it.
This is the unique voucher number for this payable.
To add a new voucher, select the New button. This assigns the next number in sequence, but not until you have finished entering the voucher. In the interim, * To be assigned * displays. You cannot assign an arbitrary number to a new voucher; you can only accept the next number available. The Last voucher number field in Control information shows the last voucher number used. The next voucher number will be one more than that.
|
Format |
999999 |
|
Example |
Press <Enter> for a new voucher |
Enter the type of voucher:
|
Regular |
|
|
Cancellation |
|
|
Adjustment |
|
|
Non-A/P check |
|
|
Immediate check |
Immediate Check (only if you have Selected to Allow immediate printing in A/P Control information) |
|
Retainage due |
Retainage Now Due (only if you are using Job Cost and selected to Use retainage payable? in J/C Control information) |
Use the links above for an explanation of the different types.
For the first voucher of a session, the type defaults to Regular. Thereafter, each entry’s type becomes the default for the next entry.
|
Format |
One letter from the list above |
|
Example |
Press <Enter> to use the default |
This field can only be entered if this is a Retainage due voucher type. Enter one of the following:
|
Regular |
Regular voucher |
|
Cancellation |
Cancellation voucher |
|
Adjustment |
Retainage adjustment |
These voucher sub-types work as described above for voucher types, except that now they refer to the retainage amount now due.
|
Format |
Drop down list, select one of the options above |
|
Example |
(Does not occur in this example) |
Options
Enter the vendor number for this voucher, or use one of the options:
|
<F1> |
For the next vendor on file, permanent or temporary, in vendor number sequence |
|
<SF1> |
For the previous vendor |
|
<F6> |
For the same vendor as the previous payable entered in this session. This option is not available for the first entry of a session. |
|
<F8> |
For a list of vendors. You may select a vendor from the list In graphical mode you may also click on the lookup button to access the list |
|
blank |
To look up the vendor by name |
|
Format |
6 characters |
|
Example |
Press <F1> |
Options
When blank is entered for vendor number, the cursor moves to the vendor name field. Enter the vendor name, or just the leading characters. Upper / lower case is significant. Entries made under a personal rather than corporate name are searched for by surname. You may also use one of the options:
|
<F1> |
For the next vendor on file, in vendor name sequence |
|
<SF1> |
For the previous vendor |
|
blank |
To return to vendor lookup by number |
|
Format |
25 characters |
|
Example |
(Does not occur in this example) |
If you have access to Vendors (Enter) you may add, edit or delete a vendor, including a temporary vendor, via the vendor lookup. Select the Vendors button on the vendor lookup. Otherwise, this is the only way you may add a temporary vendor.
Vendors who are not permanently entered in Vendors are referred to as temporary vendors. Temporary vendors can be paid using regular vouchers, non-A/P check vouchers and immediate check vouchers only.
Vendors that are already on file in Vendors can be selected for this field whether they are permanent or temporary.
Vendors that are not already on file can be added on-the-fly, but only as temporary vendors. To create a temporary vendor, enter a vendor number that starts with an asterisk (*). The following data entry window appears:
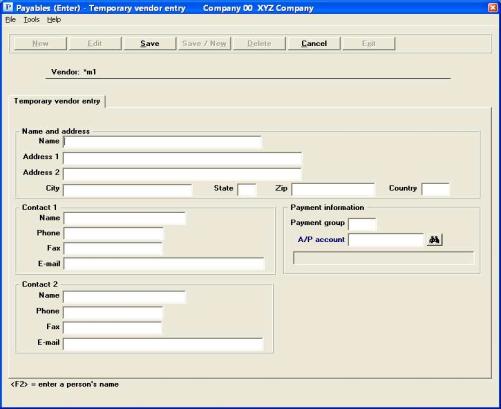
In character mode the following screen appears:
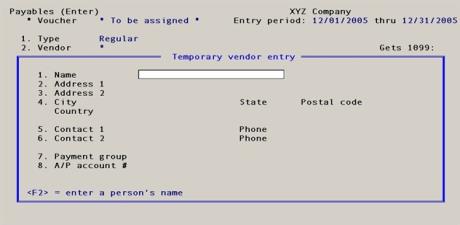
The fields in this window mean the same, and are entered in the same way, as the corresponding fields in the Vendors (Enter) selection. That description is not repeated here.
Be aware that in order to fit all the fields on one window, some of the Vendor fields have been omitted. These are mostly fields that would not be used for a temporary vendor anyway. They are left blank or zero in the record. Specifically:
| • | There are no FAX numbers or e-mail addresses. |
| • | There is no vendor type. |
| • | Discount and distribution account numbers are left blank. |
| • | The vendor does not get a 1099 form. |
| • | Sales terms are zero due days. |
If these defaults require correction in a particular instance, modify the entry as needed via Vendors (Enter).
A temporary vendor created by this window remains on file in Vendors even if the payable itself is canceled before completion.
For the most part a temporary vendor is processed like any other vendor. It appears on vendor history reports and the A/P Distribution to G/L report. However:
| • | Purchase and discount totals are not kept for temporary vendors (See the Vendor Purchases and Discounts chapter). |
| • | A partial payment cannot be made for a temporary vendor. If a voucher is paid, it must be paid in full. |
In the Vendors chapter you may read more about Temporary vendors.
For a cancellation voucher, enter the number of the voucher to cancel. This must be on file as a posted but unpaid voucher.
After you enter the number of the original voucher the remainder of the fields are filled in with original voucher amounts and the original discount (if any). The terms are filled in automatically. You may only change the reference and distribution date.
The distributions must be entered manually. You may find the original distributions using View vendor invoices, which is accessible from the graphical mode Payables Options menu. Locate the original voucher and select the View distribution history button. You can also find the distributions on the Payables Register that shows the voucher you want to cancel, and the Payables Distributions to G/L Report (unless the distributions have already been purged from the A/P Distribution to G/L records).
|
Format |
999999 |
|
Example |
(Does not occur in this example because this is not a cancellation voucher) |
Terms:
This field appears automatically upon selection of a vendor.
Gets 1099:
This field appears automatically upon selection of a vendor.
Select the Enter key to use the default or specify the type of miscellaneous 1099 for this vendor.
|
Note |
NOTES on the 1099 type field:
|
Options
The following is a list of the 1099-Miscellaneous types:
|
N |
None - Vendor does not require 1099 processing |
|
1 |
Rents |
|
2 |
Royalties |
|
3 |
Other income |
|
4 |
Fishing boat proceeds |
|
5 |
Medical and health care payments |
|
6 |
Non employee compensation |
|
7 |
Substitute payments in lieu of dividends or interest |
|
Format |
Drop down list with the options listed above |
|
Example |
Select <Enter> key |
The 1099 year ending date in Control information is used by various posting functions to update either the 1099 amount year to date or 1099 amount next year fields in Vendors. If the 1099 year ending date in A/P 1099 year ending date from Control information is more than one year after the invoice date you will see the following prompt:
Check date greater than 1 year after 1099 yr. OK to continue?
This means that the invoice date entered is at least one year greater than the 1099 year ending date in Control information. This usually indicates that you have not run Close year for 1099’s.
If you continue to post this transaction, during posting, the program will update the 1099 amount next year field for the vendor. So, if the 1099 year end date is at least 2 years ago, the 1099 amount is accumulated for a year that has already past. See the Close Year for 1099s section of the Year-End chapter for more information. If you post the amount, you may close the 1099 year and manually edit the vendor 1099 fields to make them accurate.
Posting also updates the the 1099-MISC information. This infomration is used for the year-end processing of printing 1099s and 1099 electronic file processing.
Enter the purchase order number that authorized the purchase from the vendor. This field is optional, but you should not omit it for purchase orders processed by the Purchase Order module.
It is recognized that even if you interface to P/O you may be paying on a hand-written purchase order that never went through the P/O module. A purchase order number is accepted (after a warning) even if that number is not on file in P/O. However, if it is on file it cannot be for a different vendor than you have entered in the Vendor field.
|
Format |
15 characters |
|
Example |
Type 1179 |
These fields only appear if you are interfaced to Purchase Orders. Receiver numbers are numbers corresponding to the receiving paperwork for goods authorized by the purchase order.
You cannot enter a receiver that is for a different purchase order than the one specified in the Vendor field.
Since a purchase order may have been received in installments, you may enter as many as four receiver numbers, with the first blank terminating data entry.
You may enter receiver numbers without a purchase order number, but only for goods received without a purchase order.
P/O considers that a receiving is uninvoiced until you have entered all of its receiver numbers here. It will not (normally) let a purchase order be purged until all its receivings have been invoiced. However, it is recognized that you sometimes have to pay a bill even though you cannot locate the proper paperwork, so an override capability (Clear uninvoiced receivings) is provided. This also handles the case where more than four receivings were required for a single purchase order.
These requirements mean that you cannot put two purchase orders into the same voucher. The reverse is not true however. It is legitimate to pay the same purchase order partly on one voucher and partly on another (if each voucher is for a different receiving).
You may not enter the original receivers for a cancellation voucher. It is assumed that you will not want to pay it again.
|
Format |
999999 at each field |
|
Example |
(Does not occur in this example because not interfaced to P/O) |
Enter the date that is assigned to all distributions for this voucher, including accounts payable, cash discount, and expenses distributions. For instance, if you are processing a vendor’s invoice for a previous fiscal year and you want the distributions dated within the current fiscal year, enter a distribution date that falls within the appropriate period, regardless of the document’s actual date.
For a non-A/P check voucher, the check date (entered later) is automatically used as the distribution date.
For an immediate check voucher, today's date displays and cannot be changed.
For a cancellation voucher today's date is used, however you may change it.
Otherwise, enter a date.
Options
You have the following option:
|
<F4> |
To select a date from the calendar lookup |
|
Format |
MMDDYY The default for the first entry of a session is the current date; thereafter each entry’s date becomes the default for the next entry. |
|
Example |
Type 31505 |
For an adjustment voucher, the remaining fields on this screen are not entered. The distribution screen appears to make the adjustment.
You may be warned or stopped from entering a date that is outside the allowed date range. For more information, see the Date control section of the Control information chapter.
Enter the vendor’s invoice number. This field is required. If this is a retainage due voucher, enter the original invoice number used on the voucher.
If this invoice number has already been used for this vendor, you see a warning message showing the dollar amount and whether it is already in Vendor History (means already posted) or Payables (means not yet posted). This protects you against paying the same invoice twice.
|
Format |
15 characters |
|
Example |
Type AG22401 |
If this is a cancellation voucher, enter the same invoice number as you did on the original voucher.
|
Note |
It is strongly recommended that you always make the invoice number unique for each voucher entry per vendor. |
The invoice date and the vendor’s terms (recorded in the Vendors) are used to automatically calculate the due date and the discount cut-off date for this voucher.
This field cannot be entered for an Adjustment to Distribution Voucher type transaction.
Options
You have the following option:
|
<F4> |
To select a date using the date lookup |
|
Format |
MMDDYY The default is the date entered in the Distrib. date field (except for an “immediate check” voucher, whose default is the current date) |
|
Example |
Press <Enter> |
Enter the invoice amount. For a vendor’s invoice or debit memo, enter the amount as a positive number. For a vendor’s credit memo, enter the amount as a negative number.
Options
If the voucher is for retainage now due, and Vendor History is being used, and an invoice with a non-zero retainage amount is found there for the invoice number and vendor number entered, you may use this option:
|
<F2> |
For the retainage amount from the invoice |
If you are interfaced with Purchase Order, you entered a purchase order number and at least one receiver number, you may use this option to enter an amount equal to the totals of the receivers entered:
|
<F5> |
Enter receiver totals, <F5> = 999,999.99 |
The nines in the above option is variable and represents the receiver totals. If you enter an amount that is not equal to the receiver totals, you will get the warning message “Invoice amount is not equal to the receiver totals.”.
A negative amount is only valid for a credit memo.
A zero amount is valid only for a non-A/P check voucher. This feature is intended for a manual check, which you have had to void. Entering such a check here with a zero amount will cause the check to appear on the monthly Check Register.
|
Format |
999,999,999.99- |
|
Example |
Type 1200 |
Enter the part of the invoice amount that is not eligible for a discount.
For regular and immediate check vouchers, $0.00 displays when you press <Enter>.
|
Format |
999,999,999.99- |
|
Example |
Type 50 |
This reference can be useful in these ways:
| • | It can optionally be printed on check stubs if certain check formats are used. See details on the Check format to use in the Control information chapter. |
| • | If you use G/L, you can choose to transfer either this reference or the vendor name to G/L (through Get Distributions in G/L). This is useful if you want G/L to show the reason why something was purchased, instead of the vendor from whom it was purchased. You should consult your accountant regarding which information should be transferred. |
| • | It appears on the A/P Distributions to G/L Report. |
Enter the desired reference.
|
Format |
25 characters |
|
Example |
Type Special order P.O.# 1179 |
This is either the number of days before payment is due, or the day of the month when payment is due (whichever method was defined in the vendor Terms). If you wish to change the default value for this vendor, for this payment only, you may enter that value here.
Options
Whatever you enter here, if anything, is used only to calculate a default value for the Due date field. If you leave this field blank you can still enter any desired value in the Due date field.
|
<F3> |
To switch from entering proximo terms to days terms. This option is only available if Vendors specified proximo terms for this vendor. It only works in one direction (you cannot toggle back to proximo terms). |
The vendor’s default value does not appear on the screen until <F2> is pressed, but can be changed afterward from Field number to change?.
|
Format |
999 |
|
Example |
(No entry is needed because the defaults displayed after the vendor was entered) |
Enter the due date.
Options
You have the following option:
|
<F4> |
To select a date from the calendar lookup |
|
Format |
MMDDYY The default is the date calculated by applying the vendor’s terms (possibly modified by the Due days field) to the invoice date in the Invoice date field. |
|
Example |
(No entry is needed because the defaults displayed after the vendor was entered) |
Enter the number of days within which, or the day of the month before which, payment must be made in order to take advantage of the vendor’s early payment discount (whichever method was defined in Terms).
Note that although the vendor has a default value for this field, that value is not available to you as an option. The software uses this default only when you press <F2> from the Due day field. This is because the vendor’s standard for discounting is no longer relevant to this payable once you have modified his standard due date.
Discount days cannot be greater than the due days already entered.
|
Format |
999 |
|
Example |
(No entry is needed because the defaults displayed after the vendor was entered) |
Enter the discount date, or use:
|
Format |
MMDDYY The default is the date calculated by applying the vendor’s terms. |
|
Example |
(No entry is needed because the defaults displayed after the vendor was entered) |
These fields are set automatically by the vendor defaults when you enter the vendor number.
Otherwise, enter the discount as either as a percentage in the first field of this pair, or as an amount in the second.
| • | If this is a new entry, the cursor moves first to the Discount pct field and the default discount percent (if any) from vendors Terms appears. You can change this or blank it out. |
| • | If you blank out the percent, or if it is already blank when you press <Enter>, the cursor moves to the Discount amt field to allow entry of an amount. If you leave the amount blank as well, there is no discount and the Discount acct field is skipped. If you enter a non-zero amount, the corresponding percent is calculated and displayed, and the cursor moves to the Discount acct field. |
| • | If you enter a non-zero percent in the Discount pct field, the software automatically calculates the amount and puts it into the Discount amt field. The cursor then proceeds to the Discount acct field. |
| • | If this is an existing entry, you can change either the percent or the amount after selecting the Edit button and changing the fields (which causes automatic re-calculation of the other field). |
The discount percent is always positive. The discount amount is negative if (and only if) the invoice amount is negative.
|
Format |
99.99 (for the percent) 99,999,999.99-(for the amount) |
|
Example |
(No entry is needed because the defaults displayed after the vendor was entered) |
If the Discount pct and Discount amt fields are blank, this field may not be entered.
Options
Otherwise, enter the number of the account for this discount. This must be a valid account from Valid G/L accounts.
|
<F2> |
For the vendor’s default discount account |
|
Format |
Your standard account number format, as defined in Company information |
|
Example |
(No entry is needed because the defaults displayed after the vendor was entered) |
This field appears on the screen only for a non-A/P check or immediate check voucher. For an immediate check, this displays as * To be assigned *.
Otherwise, enter the number of the check used to pay this invoice.
|
Format |
999999 |
|
Example |
(Does not occur in this example because this is a regular voucher) |
This field appears on the screen only for a non-A/P check or immediate check voucher.
Enter the date. The distribution date is automatically set to this check date.
You may be warned or stopped from entering a date that is outside the allowed date range when entering a non-A/P check date. For more information, see the Date control section of the Control information chapter.
Options
You have the following option:
|
<F4> |
To select a date from the calendar lookup |
|
Format |
MMDDYY |
|
Example |
(Does not occur in this example because this is a regular voucher) |
This field appears on the screen only for a non-A/P check or immediate check voucher in the Type field.
Options
Enter the number of the cash account for this check, or use one of the options:
|
<F1> |
For the next entry in Cash accounts. If there is only one entry on file, the <F1> and <SF1> options do not appear |
|
<SF1> |
For the previous cash account |
|
<F2> |
For the default cash account from Control information |
|
Format |
Your standard account number format, as defined in Company information |
|
Example |
(Does not occur in this example because this is a regular voucher) |
This field can only be entered if the A/P Control information Date control field is set to selective. By selective it means you may decide to not enter a check mark to enter distributions only or check the box to assign memo records. Memos are not available when using Job Cost.
|
Format |
Check box |
|
Example |
Type the <Space bar> to enter a check mark |
Using Positive Pay
If you are using positive pay and the cash account you select is set up for positive pay, a message displays letting you know that you must post your payables before the positive pay file is generated.
Character Mode
Make any needed changes. For an existing entry, you may use one of the options:
Select Save or when you are finished making changes to this screen.
Immediate checks are printed after entering the first screen but before entering the distributions.
If the default printer in Default immediate printer corresponds to a printer in Company information or Windows printer, that printer is used. Otherwise, a message appears saying the printer is invalid. In graphical mode a "Change immediate check Printer? window displays. You have the choice of Yes to Change immediate check printer or No to Return to Payables screen. If you return to the payables screen the immediate check must either be canceled or you select Save to start the immediate check printing again.
In character mode press <F7> to change the printer. You will also be prompted with the question “OK to print check?. Select Y to print the check and N to cancel.
If the printer has been set up properly or you selected another printer, an Immediate Check Printing screen appears, with the check amount, check date and printer filled in. (The check date equals the current date and cannot be changed.) Here is an example:
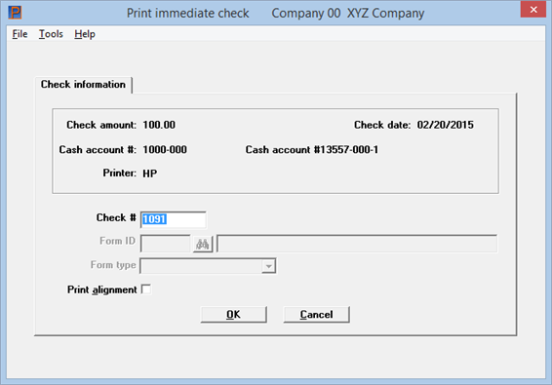
Check #
Accept the check number, or type in the correct number and press <Enter>.
Form ID and Form type
The Form ID field is grayed-out unless you selected to use the Form Check format to use in A/P Control information, you will be also asked to select a Form ID. Type the form ID or select <F1> for the next form ID and form type or <SF1> for the previous form ID and form type. See the Check and Remittance Forms chapter for more information on designing your own check format.
Print alignment
You will also be asked to print an alignment. Check the box to print an alignment as needed.
OK or Cancel
Select OK and the check is printed and a message appears to that effect.
Then the prompt “Is check just printed OK?” displays. If you select Yes then you must enter the distributions to complete the process.
Canceled or Void Immediate Check
You may cancel the immediate check process any time before you print the check.
After you print the check, if you answer No to the prompt “Is check just printed OK?”, the check is voided and during posting will print on the check register as a voided check. There are a series of other prompts that allow you to re-print the check.
Then you are the prompted “Print another check?”. If you select Yes then you may reprint the check.
If you select No the message “The immediate check was not printed” displays. You are returned to the payables screen. You may select the Cancel button to cancel the immediate check writing.
When character mode, from the payables screen after you select the <Enter> key you are prompted to print the immediate check. If you select the <Esc> key it cancels the immediate check.
Check Reconciliation Interface
When you are set up to automatically transfer checks (and voids) to Check Reconciliation a printer selection windows displays to print the Checkbook Transfer Register.
Immediate Check Distributions Window
No distributions are entered for retainage now due vouchers. The posting program automatically creates the distributions, using the account numbers from A/P and Job Cost Control information.
Otherwise, the distribution screen is presented either automatically or at your request.
Answer Y to view the distribution screen, or N to proceed to another payable entry. You are asked this question only if this is an existing entry and you have made no change to the payable Invoice amt field. If this is a new entry or if you have changed the amount, the second screen is presented automatically (except in the case of retainage now due vouchers).
Before proceeding to details of the distribution screen, considerations relating to two other modules will be described: P/O and I/C.
If there is a purchase order for this voucher, as soon as the distribution screen is displayed you are asked whether you wish to transfer distributions from the purchase order.
You can ignore the original intent of the purchase order and distribute the expenses yourself, or you can accept the distributions already present on the purchase order.
Distribution entries transferred in this manner may be changed or deleted, in the same way as the entries you make yourself.
Distributions are consolidated by account number before being transferred, so an entry on the screen does not necessarily represent a distinct line item of the purchase order. The amount will be equal the to the total of the receivers.
There is no guarantee that after the transfer the amount remaining to distribute will be zero, since you may have accepted delivery at a higher or lower price than you expected. Transferred distributions, like manually-entered ones, must be fully distributed before you can leave the screen.
If you enter a receiver number for goods received without a purchase order, the transfer feature is not available. P/O accommodates such emergency receivings but does not distribute their expenses.
If this payable is an invoice for a receiving previously posted in I/C, you must distribute the payable to the account, which is listed in the I/C Control information as the B/S liability account.
In order to understand why the B/S liability account is used as the expense account for the payable, we must first consider what occurs when receivings are posted in I/C.
Receivings transactions in I/C always debit the item’s inventory account and credit the B/S liability account which is contained in the I/C Control information.
Later, when the invoice for the receivings is sent to you by the vendor, and you enter it into A/P, the net effect is to debit inventory and credit accounts payable if the expense distribution is the same account which was originally credited at the time of the receiving in
I/C (i.e. the B/S liability account).
At the time of receiving:
|
DR |
Item’s B/S inventory account |
|
CR |
B/S liability account |
At the time of voucher entry:
|
DR |
B/S liability account (as the expense distribution) |
|
CR |
Accounts Payable |
The net effect is:
|
DR |
Item’s B/S inventory account |
|
CR |
Accounts Payable |
The B/S liability account may be a clearing account. It can also be a liability account called Unmatched receivings. You should consult with your accountant to determine the exact account to use.
The examples in this chapter assume that you are not using the I/C module.
The format of this screen varies depending upon whether or not you are interfaced to Job Cost. Distribution without Job Cost is described first.
After entering an invoice, the vendors distribution account and full invoice amount will default. In add or edit mode, existing distribution will display in the list box.
The list box may be sorted by ascending or descending account number order. Click on the column name or the arrow to the right of the column name to change the sort or use the View options. Only column names in red may be sorted.
Distributions Menu Selections
All graphical mode screens have a menu at the top of the screen. Some of the menu selections are common to all screens. The selections that are unique to this screen are on the Options menu and they are described here:
|
Distributions to G/L |
This selection allows you to print or view any previously entered and posted distributions as long as they have not been purged from A/P distributions |
|
View vendor invoices |
This allows you to view distributions for a specific invoice. This is especially useful when you are entering a cancellation voucher and you want to review the distributions for the original payable. For a cancellation voucher it will default to finding the matching voucher that is being canceled. After the invoice displays, select the View distribution history button and the program displays all the original accounts and amounts that were used. |
Organization of the Distribution Window
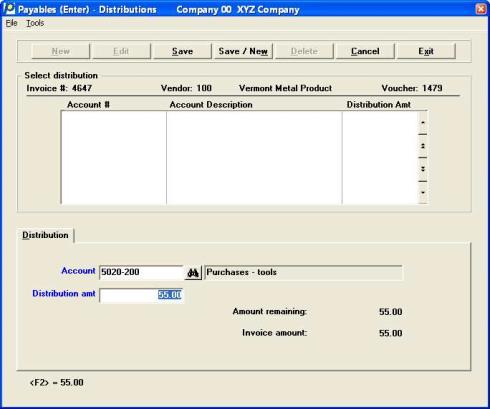
The list box is divided into three columns; account number, account description, and distribution amount. Each such sub-field is described separately below.
If this is a new voucher using graphical mode, when first accessed the list box has no entries. However, the program defaults the entire amount and uses the vendor distribution account which you may save as the first entry.
The amount remaining to distribute displays continuously at the bottom of the window. This may be zero or negative. Note that the distribution process does not terminate automatically as soon as the amount remaining is reduced to zero. The full invoice amount also displays.
Each row in the list box represents a single distribution. There is no limit to the number of distributions, but only ten are visible at any one time and they are listed in account number order. The list box includes rows that have scrolled off the top or bottom boundary as well as those currently visible.
Distribution entry is not required to be in account number sequence order. After saving a distribution it displays in account number order in the list box.
To change an existing entry, select it with the up and down arrow keys and select the Enter key or Edit button.
Character Mode
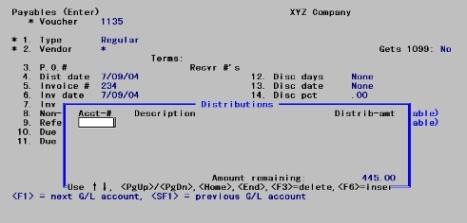
Enter the information for distributions as follows:
Options
The account number must already exist in Valid G/L accounts and may not duplicate the account number of any other distribution in this entry. Enter the account number, or use one of the options:
|
<F1> |
For the next account on file in Valid G/L accounts |
|
<SF1> |
For the previous account |
|
<F5> |
To transfer distributions from the purchase order. This feature is only available if you interface to P/O, and only when making the first distribution entry for this voucher. |
|
Format |
Your standard account number format, as defined in Company information |
|
Example |
No entry is needed to accept the default |
Enter the amount of the distribution. It may be positive or negative, but not zero.
|
Format |
999,999,999.99- |
|
Example |
No entry is needed to accept the default |
When Job Cost is used, you can distribute the invoice amount to specific job accounts and/or to expense (non-job) accounts.
Graphical Mode
The job cost distribution screen is:
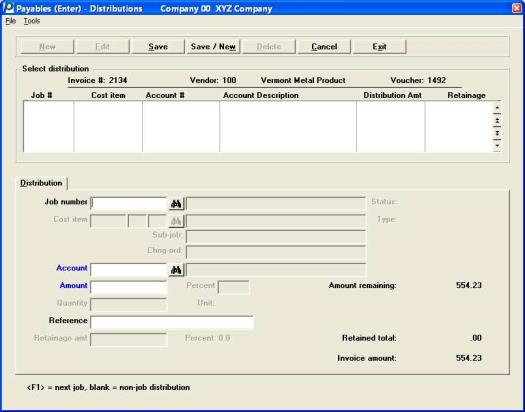
Existing distributions will display in the list box.
The amount remaining to distribute displays continuously at the bottom of the window. This may be zero or negative. Note that the distribution process does not terminate automatically as soon as the amount remaining is reduced to zero.
J/C Distributions Menu Selections
All graphical mode screens have a menu at the top of the screen. Some of the menu selections are common to all screens. The selections that are unique to this screen are on the Options menu and they are described here:
|
Distributions to G/L |
This selection allows you to print or view any previously entered and posted distributions as long as they have not been purged from A/P distributions |
|
View vendor invoices |
This allows you to view distributions for a specific invoice. This is especially useful when you are entering a cancellation voucher and you want to review the distributions for the original payable. For a cancellation voucher it will default to finding the original invoice |
Character Mode
In character based mode, the following screen appears:

Distributions are entered one at a time using the conventional numbered fields.
Fields #1 through 4 are displayed first. When the job number is entered, the remaining fields appear.
For a new entry, each distribution as it is entered is added to a table at the bottom of the window. Only the three most recent distributions are visible at one time.
For an existing entry, the distributions already on file are not displayed until requested individually.
The amount remaining to distribute displays continuously at the bottom of the window. This may be zero or negative. Note that the distribution process does not terminate automatically as soon as the amount remaining is reduced to zero.
Enter the information for distributions as follows:
Transfer distributions from the purchase order?
This question only appears if: (1) you interface to P/O, (2) this is a new voucher rather than an existing voucher, and (3) you have not yet made your first distribution entry for this voucher. Answer Y to transfer the distributions, or N to not do so.
Enter the job number to which all or part of the invoice amount is distributed. The job must be an active job in the J/C module. Once a job is selected, its description and job status displays.
Job number is optional; if this expense is not to be distributed to a job, leave the field blank. The cursor will move directly to the Account field.
Options
For a new entry, you may use one of the options:
|
<F1> |
For the next job on file |
|
<SF1> |
For the previous job distribution |
Options
For an existing entry, you may use one of the options:
|
<F1> |
For the next existing distribution on file |
|
<SF1> |
For the previous job |
Options
For either a new or an existing entry, you may use the option:
|
<Esc> |
To terminate entry of distributions and return to the main screen. |
|
Note |
You can do this only when the amount remaining to distribute is zero. If it is not zero, you cannot escape from this field even if you are willing to cancel the entire entry. If you really want to cancel the entry you can do so from Field number to change? but not from here. |
|
Format |
7 characters. For the first entry of each session there is no default; thereafter each entry’s job becomes the default for the next. |
|
Example |
This screen does not occur in this example because you are not interfaced to J/C. |
If this distribution is not for a job, this field is skipped.
The cost item must be on file for the job. It must be a direct cost, and it cannot be for a labor cost. Once the cost item number is entered, its description and that of the sub-job and change order (if any) displays.
Each J/C cost item contains a vendor number, but this is optional and in any case is only a default. You are not warned if you purchase the item from some other vendor.
Options
Enter the cost item number. This field must be entered in segments. You may also use one of the options:
|
<F1> |
For the next direct cost item for this job |
|
<SF1> |
For the previous cost item |
|
Format |
9999999: For cost category number.
999: For sub-job number. This segment is skipped if the job entered does not have sub-jobs.
999: For change order number. If you do not use change orders in J/C, this segment is skipped automatically. If this entry is not for a change order, press <Enter> at this segment. |
|
Example |
This screen does not occur in this example because you are not interfaced to J/C. |
Options
Enter the account number for this distribution, which must already be present in Valid G/L accounts. If this distribution is for a job, you may use the option:
|
<F2> |
For this cost item’s cost account |
|
Format |
Your standard account number format, as defined in Company information |
|
Example |
This screen does not occur in this example because you are not interfaced to J/C. |
Options
Enter the amount of the distribution, or use one of the following options:
|
<F1> |
For the amount remaining to distribute |
|
<F2> |
To toggle between entering the amount as a percent or as a dollar amount. |
If you have selected to use retainage in the Job Cost Control information, this amount includes the retainage amount.
A negative amount is accepted, but a zero amount is only accepted for the purpose of deleting an existing distribution when processing an existing voucher.
|
Format |
999,999,999.99-(for amount) 99.99 (for percent) |
|
Example |
This screen does not occur in this example because you are not interfaced to J/C. |
This field appears only for job distributions. If there is a unit connected with the cost item, such as BDFT (board feet) or SQYD (square yards), you can enter the quantity of these units for this distribution. If there is no unit connected with the cost item, this field is skipped.
|
Format |
99,999,999.99- |
|
Example |
This screen does not occur in this example because you are not interfaced to J/C. |
This field appears only for job distributions. Enter any reference or comment you want to make for this distribution. This reference is passed to the Job Cost module, and does not remain in the Accounts Payable module.
|
Format |
25 characters |
|
Example |
This screen does not occur in this example because you are not interfaced to J/C. |
This field cannot be entered if the Job number field is blank, or if you have answered N to use retainage payable in J/C Control information, or if this voucher is a non-A/P check voucher or an adjustment to distribution voucher.
Otherwise, enter the retainage amount for the distribution. This cannot be greater than the full amount of the distribution.
|
Format |
999,999,999.99- |
|
Example |
This screen does not occur in this example because you are not interfaced to J/C. |
Options
Make any needed changes, or use the option:
|
<Cancel> |
To terminate entry of distributions and return to the main screen without saving any information. |
Click on <Save> or <Save/new> when there are no further changes; the distribution you have just entered will be added to the list box appearing at the top of the window.
Memos cannot be used when interfaced to Job Cost.
Vendor memos can be entered or assigned to payable distributions. When posting the payable they are written to vendor history.
Memos may be entered here or before entering the payable. For more information see Entering Memos.
In order to use memo distributions you must enter Selective or Always in the Use memo tracking field in A/P Control information.
The memo distribution screen looks like the following:
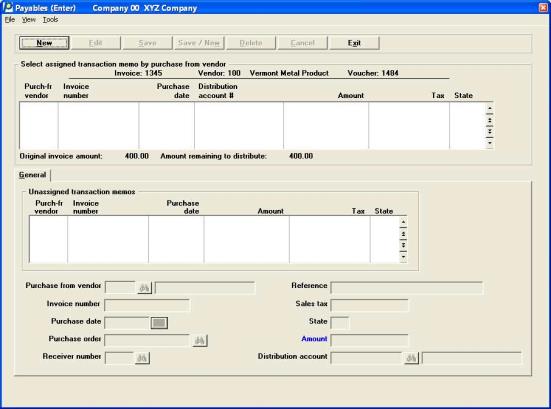
The upper list box contains any existing memo distributions. The lower list box shows the distributed memos.
Memo Distributions Menu Selections
All graphical mode screens have a menu at the top of the screen. Some of the menu selections are common to all screens. The selections that are unique to this screen are on the Options menu and they are described here:
|
Distributions to G/L |
This selection allows you to print or view any previously entered and posted distributions as long as they have not been purged from A/P distributions |
|
View vendor invoices |
This allows you to view distributions for a specific invoice. This is especially useful when you are entering a cancellation voucher and you want to review the distributions for the original payable. For a cancellation voucher it will default to finding the original invoice |
In character mode the memo distribution screens appears like this:
Organization of the memo distribution window
Memo distributions are entered either one at a time using the conventional numbered fields or you may apply previously entered memos.
Using graphical mode new entries are add to the lower list box. While in character mode, for a new entry, each distribution as it is entered is added to a table at the bottom of the window. Only the three most recent distributions are visible at one time.
The amount remaining to distribute displays continuously at the bottom of the window. This may be zero or negative. Note that the distribution process does not terminate automatically as soon as the amount remaining is reduced to zero.
For an existing entry, the distributions already on file are not displayed until requested individually.
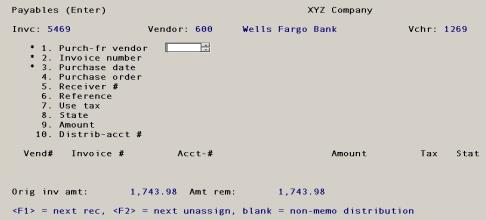
Enter the information for distributions as follows:
Transfer distributions from the purchase order?
This question only appears if:
(1) you interface to P/O, (2) this is a new voucher rather than an existing voucher, (3) you have not yet made your first distribution entry for this voucher and (4) you entered a purchase order number and receiver number on the payables header screen.
Answer Y to transfer the distributions, or N to not do so.
Options
Enter the purchase-from vendor number for this invoice, or use one of the options:
|
<F1> |
For the next memo record on file |
|
<F2> |
For the next assignable record on file |
|
blank |
For a non-memo distribution |
|
Format |
6 characters |
|
Example |
Enter 100 |
The entry for this field can be the same as the pay-to vendor, but should only be the same if you are using the memo to track sales tax.
If you entered a vendor number in the purchase-from vendor field, an entry is required for this field.
Enter the purchase-from vendor’s invoice number or use one of the options.
|
<F2> |
For the next unassigned memo record on file |
|
<SF2> |
For the previous unassigned record on file |
If this invoice number has already been used for this vendor, you see a warning message showing the dollar amount and whether it is already in Vendor History (means already posted) or Payables (means not yet posted). This protects you against paying the same invoice twice.
|
Format |
15 characters |
|
Example |
Type SYT700 |
|
Note |
It is recommended that you make the invoice number unique for each voucher entry per vendor. |
Enter the date on the purchase-from vendor’s invoice or the date you made the purchase.
|
Format |
MMDDYY The default is the today’s date |
|
Example |
Press <Enter> |
Enter the purchase order number that authorized the purchase from the purchase-from vendor. This field is optional, but you should not omit it for purchase orders processed by the Purchase Order module.
It is recognized that even if you interface to P/O you may be paying on a hand-written purchase order that never went through the P/O module. A purchase order number is accepted (after a warning) even if that number is not on file in P/O. However, if it is on file it cannot be for a different vendor than you have entered in the Vendor field
|
Format |
15 characters |
|
Example |
Type 1179 |
The entry of a receiver number is not allowed if the Purchase Order module is not installed.
Receiver numbers are numbers corresponding to the receiving paperwork for goods authorized by the purchase order.
You cannot enter a receiver that is for a different purchase order than the one specified in the Purchase order field.
You may enter receiver numbers without a purchase order number, but only for goods received without a purchase order.
It is considered that a purchase order receiving is uninvoiced until you have entered its receiver number here and it is posted in payables. It will not (normally) let a purchase order be purged until all its receivings have been invoiced. However, it is recognized that you sometimes have to pay a bill even though you cannot locate the proper paperwork, so an override capability (Clear uninvoiced receivings) is provided in the Purchase Order module. This also handles the case if more than one receiving is required for a purchase order.
These requirements mean that you cannot put two purchase orders and receivers into the same memo. The reverse is not true however. It is legitimate to pay the same purchase order and receiver partly on one memo and partly on another (if each invoice is for a different receiving).
|
Format |
999999 at each field |
|
Example |
(Does not occur in this example because not interfaced to P/O) |
Enter the desired reference information.
Once a memo is assigned to a payable and posted. the reference will be stored in invoice history and will print on different reports.
|
Format |
25 characters |
|
Example |
Type Paid with credit card |
This field is optional.
Enter the state sales tax amount associated with this invoice. This field is used with the state field to track sales tax paid to the state. The Tax By State Report may be used to report the amounts by state. The sales tax amount entered here is not added to the Amount field below.
|
Format |
9,999,999.99- |
|
Example |
Type 100 |
Enter the state to which the sales tax was paid. This field is entered automatically based on the state entered for the Purchase from vendor.
|
Format |
2 characters |
|
Example |
Entered automatically based on the state for the purchase from vendor |
Options
Enter the amount of the invoice, or use one of the following options:
|
<F1> |
To enter a percentage of the pay-to amount |
|
<F2> |
To use the entire amount remaining |
|
<F5> |
If purchase order is installed and you enter a P.O. number and re receiver number on the memo screen this is used to accept the total receiver amount |
A negative amount is accepted. A zero amount is also accepted for the purpose of entering a sales tax only.
|
Format |
999,999,999.99-(for amount) |
Options
The account number must already exist in the Valid G/L accounts. Enter the account number, or use one of the options:
|
<F1> |
For the next account on file in Valid G/L accounts. |
|
<SF1> |
For the previous account. |
|
<F2> |
For the default distribution account for the purchase-from vendor. If a purchase-from vendor has not been entered, F2 selects the default distribution for the pay-to vendor. |
|
Format |
Your standard account number format, as defined in Company information |
|
Example |
Press <F2> |
Select the Save button (or Ctrl+s) to save your entry. You may select the New button to enter another.
Character Mode
Field number to change?
Make any needed changes, or use the option:
|
<F1> |
To access the next memo record |
|
<SF1> |
To access a previous record |
|
<F3> |
To delete a record. |
Press <Enter> when there are no further changes; the memo you have just entered will be added to the file, and the cursor will be positioned at the first field for entry of the next memo.
This selection can only be accessed if you have checked (or entered Y) to the field Use memo tracking in the A/P Control information.
A memo transaction provides a purchase-from vendor and a pay-to vendor. This is useful for credit card payments and employee expense reporting. For example you may have already paid the purchase-from vendor with a credit card, but you have not yet paid the credit card pay-to vendor. When you enter the payable to the credit card company the memos are assignable to the payable when entering the payable distributions. The default distribution account assigned to each pay-to vendor may be used.
This selection allows you to enter memos in advance of entering the payable and assigning the memos to the payable when you enter the distributions. If you prefer, you may enter all or some of the memo distributions when you enter the payable. See Memo Distributions .
After posting a payable with memos vendor history that includes memo distributions identifies the actual purchase-from vendor for specific purchases that are being paid to a different vendor such as a credit card company or employee expense reimbursement account. Posting also updates the vendor record with period to date and year to date or next period memo purchase amounts. The Purchase Journal has an option to show memo purchases on the report.
Memos also provide a means of tracking sales tax per state. This may be useful for auditing purposes. A tax by state report provides state totals. See Tax By State Report in the Vendor History chapter.
Select
Memos from the Payables menu selection.
Graphical Mode
The memo entry screen is:
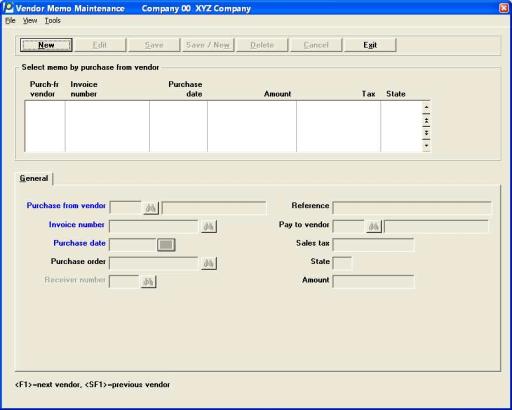
From this screen you may enter, edit and view memos. If there are any existing memos they will display in the list box.
The list box displays up to 6 memos at a time. You may sort the memos by purchase-from vendor number, invoice number or purchase date, all in ascending or descending order. Click on the column name or the arrow to the right of the column name to change the sort or use the View options. Only column names in red may be sorted.
To locate a memo, start typing a number or name, depending on which sort field is selected. You may also use the up/down arrows, Page up, Page down, Home and End keys to locate an item. The <F1> and <SF1> keys are the same as the up/down arrow keys.
Memos that display in the list box are available for changes or deletion. The fields for the selected memo display in the lower part of the screen.
When an memo is found, you may select the <Enter> key or Edit button to start editing.
You may select a button for editing, deleting or adding a new memo:
| Button | Keyboard | Description |
|
New |
Alt+n |
To enter a new memo |
|
Delete |
Alt+d |
To delete the memo selected in the list box |
|
Edit |
Alt+e |
To edit the memo selected in the list box |
|
Save |
Alt+s |
To save a new memo or changes to an edited memo |
|
Save/New |
Alt+w |
Same as Save button plus the New button |
|
Cancel |
Alt+c |
To cancel adding or editing an memo |
|
Exit |
Alt+x |
To exit the screen. You may also use the <Esc> key |
Menu Selections
At the top left of the screen menu selections are available. Most of these are the similar from screen to screen. If a menu selection is grayed out you will not be able to access it. The selections that are unique to this screen are explained here:
From the Print menu you may print Memos (see Memo Report), Tax by state (see Tax By State Report) and Vendor history (see Vendor History Report).
Character Mode
In character mode the following screen displays:
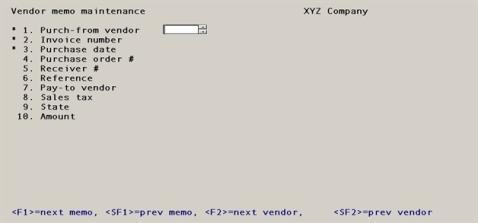
Enter the information for memos as follows:
The Purchase from vendor is the company or person to whom you already paid via a credit card or other means.
Enter the vendor number for this voucher, or use the option:
|
<F8> |
To locate a vendor by using the lookup |
|
Format |
6 characters |
|
Example |
Enter 100 |
Enter the purchase-from vendor’s invoice number. This field is required.
If this invoice number has already been used for this vendor, you see a warning message showing the dollar amount and whether it is already in Vendor History (means already posted) or Payables (means not yet posted). This protects you against paying the same invoice twice.
|
Format |
15 characters |
|
Example |
Type SYT700 |
|
Note |
It is strongly recommended that you always make the invoice number unique for each voucher entry per vendor. |
Enter the date on the purchase-from vendor's invoice or the date you made the purchase or use the option. This date is posted to history.
When posting a payable with a memo, the date that is used during posting to update the Vendor Period to date and Year to date or Next period is from the payable invoice date for the pay-to vendor payable; not the purchase-from vendor memo.
Options
|
<F4> |
To select a date by using the calendar lookup |
|
Format |
MMDDYY The default is the today’s date |
|
Example |
Press <Enter> |
Enter the purchase order number that authorized the purchase from the purchase-from vendor. This field is optional, but you should not omit it for purchase orders processed by the Purchase Order module.
It is recognized that even if you interface to P/O you may be paying on a hand-written purchase order that never went through the P/O module. A purchase order number is accepted (after a warning) even if that number is not on file in P/O. However, if it is on file it cannot be for a different vendor than you have entered in the Invoice number field.
|
Format |
15 characters |
|
Example |
Type 1179 |
Receiver numbers are numbers corresponding to the receiving paperwork for goods authorized by the purchase order.
You cannot enter a receiver that is for a different purchase order than the one specified in the P.O. # field.
You may enter receiver numbers without a purchase order number, but only for goods received without a purchase order.
With P/Os it is considered that a receiving is uninvoiced until you have entered its receiver number here. It will not (normally) let a purchase order be purged until all its receivings have been invoiced. However, it is recognized that you sometimes have to pay a bill even though you cannot locate the proper paperwork, so an override capability (Clear uninvoiced receivings) is provided in the Purchase Order module. This also handles the case if more than one receiving is required for a purchase order.
These requirements mean that you cannot put two purchase orders into the same memo. The reverse is not true however. It is legitimate to pay the same purchase order partly on one invoice and partly on another (if each invoice is for a different receiving).
|
Format |
999999 |
|
Example |
(Does not occur in this example because not interfaced to P/O) |
Once a memo is assigned to a payable and posted. the reference will be stored in invoice history and will print on different reports. Enter the desired reference.
|
Format |
25 characters |
|
Example |
Type Paid with credit card |
Options
Enter the pay to vendor number for this invoice, or use the option:
|
blank |
Assign the pay to vendor later |
|
Format |
6 characters |
|
Example |
Select Enter |
A pay to vendor is the company or person to which you are going to enter a payable and to whom you are going to make the payment.
You may enter a pay to vendor now or when you assign the memo to a payable distribution.
This field is optional.
Enter the state sales tax amount associated with this invoice. This field is used with the state field to track sales tax paid to the state. The Tax By State Report may be used to report the amounts by state. The sales tax amount entered here is not added to the Amount field below.
|
Format |
9,999,999.99- |
|
Example |
Type 100 |
This field is optional, but should be entered if you entered an amount in the Sales tax field.
Enter the state to which the sales tax in field 8 was paid.
|
Format |
2 characters |
|
Example |
Type DE |
Options
Enter the amount of the invoice.
A negative amount is accepted. A zero amount should only be used for the purpose of entering a sales tax only.
|
Format |
999,999,999.99- (for amount) |
Make any needed changes.
Select the Save button when there are no further changes; the memo you have just entered will be added to the file, and the cursor will be positioned at the Purchase from vendor field for entry of the next memo.
This selection lets you print an edit list of payables (vouchers) entered but not yet posted.
Select
Edit list from the Payables menu or Payables edit list from the Reports menu. You may also select Edit list from Payables (enter) Print menu.
You may view an example of the Payables Edit List in the Sample Reports appendix.
The Payables Edit List is identical to the format of the Payables Register.
This selection lets you adjust certain fields for a memo transaction in Vendor History. This selection can only be accessed if you have checked (or entered Y) to the field Use memo tracking in A/P Control information.
You may change the Invoice date, Purchase order, Reference, Sales tax, State and Amount.
Updating history is instant. There is no posting for memo adjustments. If you change an Amount the memo amount fields for the vendor (in Vendors (enter) or A/P distributions will not be updated. You must make other manual adjustments for those.
The fields that cannot be changed are purchase-from vendor, invoice number, pay-to vendor and voucher number.
Select
Memos adjustments from the Payables menu selection.
Graphical Mode
The memo adjustment screen is:
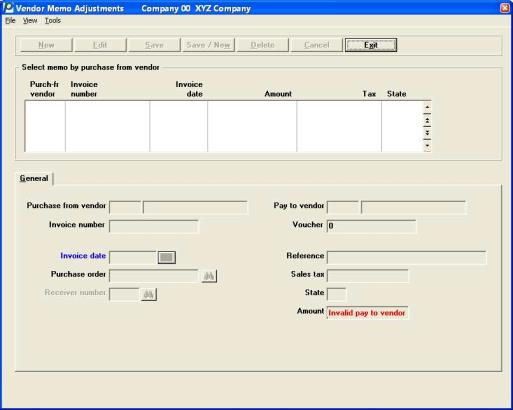
Existing memos display in the list box.
The list box displays up to 6 memos at a time. You may sort the memos by purchase-from vendor number, invoice number or purchase date, all in ascending or descending order. Click on the column name or the arrow to the right of the column name to change the sort or use the View options. Only column names in red may be sorted.
To locate a memo, start typing a number or name, depending on which sort field is selected. You may also use the up/down arrows, Page up, Page down, Home and End keys to locate an item. The <F1> and <SF1> keys are the same as the up/down arrow keys.
Memos that display in the list box are available for editing or deletion. The fields for the selected memo display in the lower part of the screen.
When an memo is found, you may select the <Enter> key or Edit button to start editing.
You may select a button for editing or deleting a memo:
| Button | Keyboard | Description |
|
Delete |
Alt+d |
To delete the memo selected in the list box |
|
Edit |
Alt+e |
To edit the memo selected in the list box |
|
Save |
Alt+s |
To save changes to an edited memo |
|
Cancel |
Alt+c |
To cancel editing an memo |
|
Exit |
Alt+x |
To exit the screen. You may also use the <Esc> key |
The New and Save/New buttons are inactive on this screen.
Menu Selections
At the top left of the screen menu selections are available. Most of these are the similar from screen to screen. If a menu selection is grayed out you will not be able to access it. The selections that are unique to this screen are explained here:
From the Print menu you may print Memos (see Memo Report), Tax by state (see Tax By State Report) and Vendor history (see Vendor History Report).
Character Mode
In character mode, the memo adjustment entry screen appears:
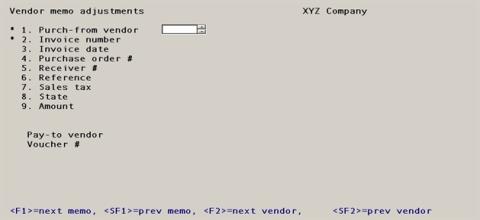
You cannot enter new transactions. You can only adjust existing memo transactions in history.
Enter the following information for memo adjustments:
Purchase from vendor
This is a display only field. You cannot change the purchase from vendor number.
Invoice number
This is a display only field. You cannot change the invoice number.
Enter the date on the purchase-from vendor’s invoice or the date you made the purchase.
|
Format |
MMDDYY The default is the today’s date |
|
Example |
Press <Enter> |
Enter the purchase order number that authorized the purchase from the purchase-from vendor. This field is optional, but you should not omit it for purchase orders processed by the Purchase Order module.
It is recognized that even if you interface to P/O you may be paying on a hand-written purchase order that never went through the P/O module. A purchase order number is accepted (after a warning) even if that number is not on file in P/O. However, if it is on file, it cannot be for a different purchase from vendor.
|
Format |
15 characters |
|
Example |
Type 1179 |
|
Note |
The purchase order will not be updated as invoiced. You must run Clear uninvoiced receivings in P/O if you enter an uninvoiced purchase order and receiver. |
Enter a new receiver number.
|
Format |
999999 at each field |
|
Example |
(Does not occur in this example because not interfaced to P/O) |
Once a memo is assigned to a payable and posted. the reference will be stored in invoice history and will print on different reports. Enter the desired reference.
|
Format |
25 characters |
|
Example |
Type Paid with credit card |
This field is optional.
Enter the state sales tax amount associated with this invoice. This field is used with the state field to track sales tax paid to the state. The Tax By State Report may be used to report the amounts by state. The sales tax amount entered here is not added to the Amount field below.
|
Format |
9,999,999.99- |
|
Example |
Type 100 |
Enter the state to which the sales tax was paid. It defaults to the purchase from vendor state.
|
Format |
2 characters |
|
Example |
Accept the default of VT |
Options
Enter the amount of the invoice.
A negative amount is accepted. A zero amount is also accepted for the purpose of entering a sales tax only.
|
Format |
999,999,999.99- (for amount) |
Character Mode
Make any needed changes, or use the option:
|
<F1> |
To access the next memo record |
|
<SF1> |
To access a previous record |
|
<F3> |
To delete a record. |
Press <Enter> when there are no further changes; the memo you have just entered will be changed, and the cursor will be positioned at Field #1 for locating the next memo.
This selection lets you print memos that are unassigned, assigned, vouchered and posted. Here is the definition for each:
Unassigned
This is a memo that has not been assigned a pay-to vendor and has not been vouchered
Assigned
An assigned memo has been assigned a pay-to vendor but has not been vouchered
Vouchered
A vouchered memo is assigned a pay-to vendor and has been attached to a payable distribution.
Posted
A posted memo has been vouchered and posted in payables to history.
All types are grouped by purchase from vendor.
Select
Memos from the Reports menu.
Graphical Mode
The following screen displays:
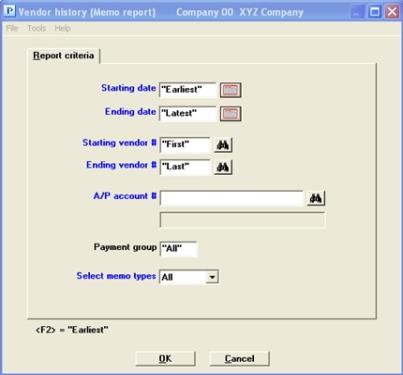
Character Mode
This screen displays:
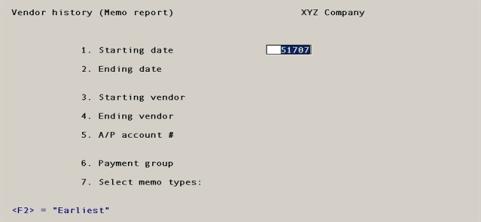
Enter the following fields:
The starting and ending invoice dates enable you to specify a date range that will be included on the report.
Enter a date or use the option:
|
<F2> |
For the “Earliest” starting date on file |
|
Format |
MMDDYY The default is the current system date. |
|
Example |
Press <Enter> |
All memos before or on this date will be included on the report.
Options
Enter a date or use the option:
|
<F2> |
For the “Latest” date on file |
|
Format |
MMDDYY The default is the current system date. |
|
Example |
Press <F2> |
Starting vendor #
Ending vendor #
Options
Enter the range of purchase from vendor numbers to be included on the report, or use one of the options:
|
<F1> |
For the next vendor on file |
|
<SF1> |
For the previous vendor |
|
<F2> |
For the “First” starting vendor number or “Last” ending vendor number |
|
Format |
6 characters for each field |
|
Example |
Press <F2> for each field |
Neither field is required to be a valid vendor number, but the range should enclose at least one vendor.
Enter the A/P account number for the purchase from vendor that you want to restrict the report to. This must be an existing entry in A/P accounts.
This field is required even if only one vendor has been entered in the Starting and Ending vendor # fields.
You may use one of the options:
|
<F1> |
For the next entry in A/P accounts. If there is only one entry on file, the <F1> and <SF1> options do not appear. |
|
<SF1> |
For the previous entry |
|
<F2> |
For the default A/P account from Control information |
|
<F5> |
For All items regardless of A/P account |
|
Format |
Your standard account number format, as defined in Company information |
|
Example |
Press <F5> |
This field is required even if only one vendor has been entered in the Starting and Ending vendor # fields.
Options
Enter the payment group of the purchase from vendors whose items are to be included in the report, or use the option:
|
<F5> |
To select All items regardless of which payment group (if any) the vendor belongs to. |
|
Format |
3 characters |
|
Example |
Press <F5> |
Selection is on the basis of the vendor’s current payment group. If you have moved a vendor from one payment group to another, his items prior to the change will still be selected.
You may leave this field blank, in which case items will be printed only for those vendors who do not belong to any payment group.
This allows you to select the memo types that will be printed.
| Character Mode | Graphical Mode | Description |
|
U |
Unposted |
For unposted memos only |
|
P |
Posted |
For memos that have been posted to vendor history |
|
A |
All |
For all memos |
|
Format |
Drop down list |
|
Example |
Select All |
Make any needed changes. Select OK to print the Vendor Memo Report.
Select
Post from the Payables menu. With Graphical mode you may also select Post from the Payables (Enter) Print menu.
The Payables Register is printed.
You may view an example of the Payables Register in the Sample Reports appendix.
The vouchers are posted to:
| • | The Vendors, A/P Open Items, A/P Distribution to G/L, and Vendor History. |
| • | If Job Cost is being used, the Job Details is also updated. |
| • | If Purchase Order is being used, receivings in the P/O Receiving History for the invoices posted are marked as invoiced. |
A regular voucher (type R) is posted as a new voucher to A/P Open Items and Vendor History. The purchases, period to date and year to date or next period fields in Vendors are updated for the vendor by the amount of the invoice. The distributions are posted to A/P Distribution to G/L. The invoice amount is posted as a credit (or debit, if negative) to the accounts payable account (specified in the A/P Control information), and the expense distributions are posted as debits (or credits, if negative).
If Using Job Cost with Retainage Payable
The amount that is posted to A/P Open Items is the distribution Amountless the Retainage. It is only the non-retainage amount that is shown on your Aged Open Items Report. Retained amounts are shown properly in Job Cost.
When a voucher that has retainage is posted to G/L, the retainage portion is posted as a credit to the retainage payable account and the non-retainage portion is posted as a credit to the accounts payable account.(Also see below for a description of posting retainage now due vouchers.)
For a non-A/P check voucher (type N), the cash account specified in the transaction record is credited by the check amount, and the discount account associated with the voucher is credited by the amount of the discount. Expense and job distributions are posted as debits.
The purchase, discount, payment, period to date and year to date or next period fields in Vendors are updated by the appropriate amounts for that vendor.
The accounts payable account and A/P Open Items are not affected by non-A/P check vouchers, but the check information is stored so that it appears on the next register that is printed from Prepare payments/Print checksand post.
When you are using positive pay, a positive pay file is generated for non-A/P checks. See the Appendix Implement Positive Pay and Direct Deposit for more information on the features and setup of positive pay.
Transfer to Check Reconciliation
Per the Check Reconciliation Control information you may be setup to automatically transfer checks to the C/R Check Book (CKBOOK) when payables posting. When posting a Non A/P check and Immediate check the Check Register indicates:
*** Check transferred to Check Reconciliation ***
Other payables types are not transferred because there is no payment.
If you are not setup to automatically transfer, you must run the Transfer checks\deposits function on the C/R menu to pull the check information into Check Reconciliation.
For an adjustment to distribution voucher (type A), the distributions are posted to A/P Distribution to G/L as they were entered.
The accounts payable account and A/P Open Items are not affected.
For a cancellation voucher (type C), the posting program searches for a voucher in A/P Open Items and Vendor History that matches the cancellation voucher’s invoice number, voucher number, and amount.
If a match is found, that voucher is deleted from A/P Open Items. A reversing entry is posted to Vendor History and the original entry is retained. The Vendors purchases year-to-date field is reduced by the amount of the invoice, and distributions for the cancellation voucher are posted (with their signs reversed) to A/P Distribution to G/L.
If no match is found, the cancellation voucher and its distributions are ignored.
Skip this section if not using Job Cost.
For a retainage now due voucher (type D), there are three possibilities — the voucher may be entered as a regular voucher, a non-A/P check voucher, or a cancellation voucher.
| • | A regular retainage now due voucher is posted as a new voucher to A/P Open Items. This is when the retainage portion of the earlier invoice finally becomes a regular voucher, subject to the usual accounts payable aging. The voucher amount is posted to A/P Distribution to G/L as both a debit to the retainage payable account and a credit to the accounts payable account. There are no other distributions. |
| • | A non-A/P retainage now due check voucher does not affect A/P Open Items. The voucher amount is posted to A/P Distribution to G/L as a debit to the retainage payable account, and a credit to the A/P Control information cash account entered for the voucher. If a discount was taken, this is posted as a credit to the discount account specified in the voucher. |
| • | A cancellation retainage now due voucher searches for a voucher in A/P Open Items that matches the cancellation voucher’s invoice number and amount. If a match is found, that voucher is deleted from A/P Open Items. If no match is found, the cancellation voucher is ignored. If the voucher is deleted, the retainage payable account is credited for the amount of the voucher, and the accounts payable account is debited for the same amount. |
If you are posting immediate checks and you are using positive pay, a positive pay file is generated during the posting of payables. See the Appendix Implement Positive Pay and Direct Deposit for more information on the features and setup of positive pay.
Transferring to Check Reconciliation
Per the Check Reconciliation Control information you may be setup to automatically transfer checks to the C/R Check Book (CKBOOK) when posting payables. When posting an immediate check the Check Register indicates:
*** Check transferred to Check Reconciliation ***
Non-A/P checks are also transferred. Other payables types are not.
If you are not setup to automatically transfer to C/R, you must run the Transfer checks\deposits function on the C/R menu to pull the check information into Check Reconciliation.
This selection imports vouchers from an external accounting system. It will transfer records from an external text file into A/P Payables. Only regular transactions are imported.
After importing external vouchers, you may print the imported records using the Edit list selection on the Payables menu. You may also review and edit transactions using the Enter selection. When that is completed, you may post the payables.
Setting up an external cross reference for the G/L account numbers is necessary before running this import. You do this using Account links under the CTL menu. Comparing the external system account numbers to the PBS numbers, they can be the same or different, but regardless, they still have to entered as an external cross reference in Account links. See the External Cross Reference chapter in the System documentation. Before external cross references can be entered you must enter the Chart of accounts in G/L.
Although this feature is intended to import vouchers exported from NCR Counterpoint™ and Counterpoint 7, it could be used for importing vouchers from any system, as long as the data is formatted in the way expected by the program. A fixed length file format is required. For the field layout see Import Layout.
The Import function is not checked by date control as defined in the A/P Control information.
The file name the program expects is IMPVCHxx.DAT with xx being the Company ID. It must be located in the top-level PBS folder. The Company ID must match the company you are logged into.
Select
Import from the Payables menu.
Also, you may select Enter from the Payables menu. If you use graphical mode and if you see this message: Click here to import vouchers. Click on the message and the import process will start.
In both cases a screen similar to the following displays:
Select import or enter I to use the terms from the import file or select vendor or enter V to use the terms from the PBS vendor record. The default is to use the import terms.
If you use vendor terms the program will apply vendor discounts regardess if the date has passed to apply the discount.
Cross reference accounts are defined in the Account links menu selection found under CTL. This allows you to map accounts from an external system to the PBS accounts. This must be done before you run this selection.
You have two cross reference choices. Use the one the cross reference that is set up in Accounts links.
Select either 1st external cross reference or 2nd external cross reference.
In character mode, enter 1 for the first external cross reference or 2 for the second external cross reference.
Select Ok to continue the import or Cancel to exit the screen without importing the file.
In character mode enter Y to continue or N to return to the menu without importing.
When you select OK, this message displays:
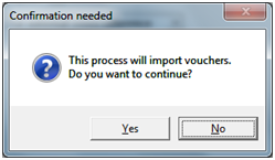
Select Yes to continue or No to return to the menu without importing.
When you select Yes, the import will proceed and a voucher import report is printed.
Print the Edit list to verify the data is correct. If needed, edit the data using Payables (Enter). Post when you are ready. The transactions will become open items.
File Backup
As part of the import process, the file is moved to a folder path of (top-level PBS)\BACKUP\00 (assuming 00 is the PBS Company ID used). The data is imported from that file with the same name. The file is renamed after it is imported. The new name includes the date and time that it is imported. Here is an example: IMPVCH00-2014101611070643.DAT.
If the file has data with errors it is also moved to the (top-level PBS)\BACKUP\00 folder. If a new IMPVCH00.DAT file happens to exist in the top-level PBS, the import program will merge the data with the IMPVCH00.DAT folder in the \BACKUP\00 folder.
WARNING: If there were errors and you have fixed the errors and want to re-import, do not copy the IMPVCH00.DAT from the BACKUP folder to the top-level PBS folder and re-import. You may move it, but do not copy it. If you copy it the program will merge and import both the IMPVCH00 from the top-level and the one from BACKUP.
If a file is more than 30 days old, it gets automatically deleted from the backup folder when you run the import on the 31st or more days. If you want to keep files that are more than 30 days old, you must move them to another folder.
Warnings and Errors
Warnings and errors are printed on a report.
Warnings are not severe and in many cases they can be ignored. Errors are important and require that you fix the data in the text file before you can import. The file name is IMPVCHxx.DAT with xx being the Company ID. It is located in the top-level PBS folder. For field imformation see Import Layout.
You may see this message: Errors found during import. Would you like to view the import now?
You can read the errors and warnings on the report.
Examples of errors are:
Vendor not on file
Distribution without valid voucher
After you print or view the report, if the report has errors, this message displays: Errors found during import. Import file anyway?
If you select Yes, the file imports.
If you select No, you may create a new IMPVCHxx.DAT file or edit the existing IMPVCHxx.DAT file and import again.
If the report has warnings only, the above message does not display and the data is imported regardless. An example of a warning is:
Purchase order not on file
In either case, if you imported a file with errors or warnings, you may have to correct the data in Payables (Enter) before you can post. Running the edit list will also help you find errors.
There are two layouts for this import; voucher and distributions.
This is the voucher layout:
| Position | Length | Description | Requirement |
|---|---|---|---|
| 1 | 8 | Literal <*VCHR*> | Must be <*VCHR*> |
| 9 | 6 | Vendor number | Must be a valid PBS vendor |
| 15 | 24 | Not used | |
| 39 | 12 | Discount amount | Must be zeros if not used |
| 51 | 8 | Discount date | Must be zeros if not used. It cannot be less than the invoice date and in YYYYMMDD format |
| 59 | 7 | Not used | |
| 66 | 5 | Discount percent | Must be zeros if not used. Two digit whole number with two decimal digits and a trailing sign. The decimal point is implied. |
| 71 | 8 | Distribution date | Must not be zero and in YYYYMMDD format |
| 79 | 8 |
Due date |
Must be zeros if not used. It cannot be less than the invoice date and in YYYYMMDD format |
|
87 |
12 |
Invoice amount |
Nine-digit whole number with two decimal digits and a trailing sign. Must not be zero |
|
99 |
8 |
Invoice date |
Must not be zero and in YYYYMMDD format |
|
107 |
15 |
Invoice number |
Cannot be blank. It is imported as is. |
|
122 |
12 |
Non-discount amount |
Nine-digit whole number with two decimal digits and a trailing sign. Must be zero if not used |
|
134 |
15 |
Purchase order number |
When not used may be spaces. |
|
149 |
25 |
Reference |
Spaces when not used. Imported as is |
|
174 |
40 |
Discount account number |
Spaces when not used. Imported as is |
There can be multiple distributions per voucher. This is the distribution layout:
| Position | Length | Description | Requirement |
|---|---|---|---|
|
1 |
8 |
Literal <*DIST*> |
Must contain <*DIST*> |
|
9 |
12 |
Distribution amount |
Nine-digit whole number with two decimal digits and a trailing sign. The decimal point is implied |
|
21 |
15 |
Invoice number |
Must match an invoice number in a voucher |
|
36 |
40 |
Distribution account |
Must be in the cross-reference mappings |
You must have Data Import Manager to use this function. Data Import Manager allows you to match the specifications of the file being imported by entering import specifications. The fields may be in any order and it may be a fixed lenth file or csv file format. For information on setting up and using data import see the Data Import Manager documentation.
Data Import Manager is licensed separately and may not be available on your system.
Select
Data import from the Payables menu.
As long as the import file exists the data will be imported into Payables (Enter).
You may edit the data using Payables (Enter). Please verify the data by running the edit list before you post. The data import function is not affected by date controls as defined in the A/P Control information. You must verify that the dates are correct before you post. Posting turns the transactions into open items.