This chapter contains the following topic:
Introduction to Purge Open Items
The Purge Open Items selection enables you either to purge (completely remove) fully paid open items (vouchers, etc.) from A/P Open Items, or to print a report showing which items can be purged.
If you have chosen (in Control information) to keep vendor history, you can review these items in Vendor History or print a report including them, using the Vendor history report. See Vendor History Report.
Open items are retained and used to void posted checks when necessary. They are invisible (i.e., do not appear on any reports or screens), but remain for future reference.
Since they are used in voiding posted checks, you should purge them only after you know that no checks associated with these fully paid open items will be voided.
For example, if all vouchers with a due date up to January 31 were paid in January, and all these January checks have been cashed or are otherwise accounted for, you can purge all fully paid open items with a due date up to January 31. You would set the first field displayed, Cut-off due date, to January 31.
Be aware that this selection does not purge vendor history. There is a separate selection, for that purpose. See Purging Vendor History. To continue the example, you might wish to purge vendor history as of January 31 at the same time that you run Purge open items. Since vendor history is available for other purposes than for voiding checks (specifically, for printing historical reports), you might prefer to keep vendor history longer than open items.
See an example of the Fully Paid Open Items Purge Report in the Sample Reports appendix.
Select
Purge from the Open items menu.
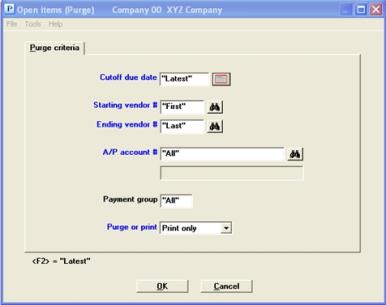
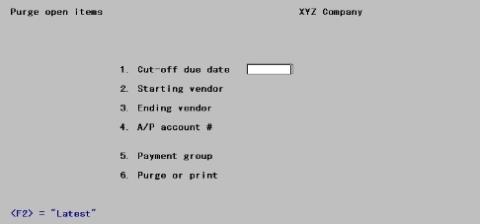
The following screen appears:
Graphical Mode
Character Mode
Enter the following information:
This is the latest due date for which fully paid open items are to be purged.
Options
Enter the date or use the option:
|
<F2> |
For the Latest date. This will purge all eligible fully paid open items regardless of due date. |
|
<F4> |
To select a date from the date lookup. You may also access the date lookup by clicking on the calendar button. Using character mode select <F7> for the calendar lookup |
|
Format |
MMDDYY There is no default. |
|
Example |
Press <F2> |
Starting vendor #
Ending vendor #
Options
Enter the range of vendor numbers for which fully paid open items are to be purged, or use the option:
|
<F2> |
For the First starting vendor number or Last ending vendor number |
Neither field is required to be a valid vendor number, but the range should enclose at least one vendor.
|
Format |
6 characters for each field |
|
Example |
Press <F2> at each field |
This field is required even if only one vendor has been entered in the Starting and Ending vendor # fields.
Enter the A/P account number for which fully paid open items are to be purged. This must be an existing entry in A/P accounts.
Options
You may use one of the options:
|
<F1> |
For the next entry in A/P accounts. If there is only one entry, the <F1> and <SF1> options do not appear. |
|
<SF1> |
For the previous entry |
|
<F2> |
For the default A/P account from Control information |
|
<F5> |
For All open items regardless of A/P account |
Selection is on the basis of the vendor’s current A/P account. If you have transferred a vendor from one A/P account to another, his items prior to the change will still be purged.
|
Format |
Your standard account number format, as defined in Company information |
|
Example |
Press <F5> |
This field is required even if only one vendor has been entered in Fields #2 and 3.
Options
Enter the payment group of the vendors whose fully-paid open items are to be purged, or use the option:
|
<F5> |
To purge All open items regardless of which payment group (if any) the vendor belongs to. |
Selection is on the basis of the vendor’s current payment group. If you have transferred a vendor from one payment group to another, his items prior to the change will still be purged.
You may leave this field blank, in which case items will be purged only for those vendors who do not belong to any payment group.
|
Format |
3 characters |
|
Example |
Press <F5> |
Select one of the following:
| Character Mode | Graphical Mode | Description |
|
1 |
Print only |
To print a list of items eligible to be purged, without purging. You could use this to verify what you are purging before committing to the actual purge. |
|
2 |
Purge only |
To purge the fully paid open items which meet all the criteria entered above, without printing a list. You could select this if you had already printed a list. |
|
3 |
Print and purge |
To print a list and purge the items |
If you choose either of the purge options, you are warned that you will no longer be able to void checks for the items purged, and required to verify that you really intend to do this.
|
Format |
Graphical: Drop down list Character: One digit from the list above |
|
Example |
Type 1 |
Make any needed changes. Select OK and there will be a period of processing as eligible items are either purged or printed or both. The report is not a register and may be displayed on the screen.
Select Cancel to not purge any open items.
A purging program cannot be canceled. It must proceed to completion.