This chapter contains the following topics:
The Distributions to G/L selection enables you to print a report showing the distributions to General Ledger accounts made in the A/P module. These are contained in A/P Distributions.
The report may be used to drive a manual General Ledger module, or the data may be used to drive a General Ledger computer module:
| • | If you interface to the G/L module, the transfer of information is initiated from within that module and is described in the G/L User documentation. |
| • | If you use some other G/L module, you can export this data using the data utilities described in the PBS Administration documentation. You must then reformat the information into a format usable by your system. |
| • | You may also view and export this data and much more data using ODBC . See your PBS provider for more information on obtaining the ODBC interface. |
Whether your G/L module is PBS, manual, or foreign, use the Distributions to G/L selection to purge the A/P Distributions after the data has been transferred.
The report is presented in two sections:
| • | The first section shows distributions which you entered directly (as expense distributions in Payables). |
| • | The second section shows automatic distributions. These are distributions automatically created by the various A/P functions during A/P processing, including distributions to your cash accounts, your discount accounts, and your accounts payable accounts. Each account prints on a separate page. |
Select
Distributions to G/L from the Reports menu.
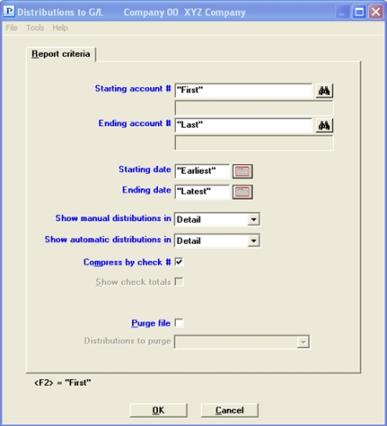
Graphical Mode
The following screen appears:
Character Mode
The following screen appears:
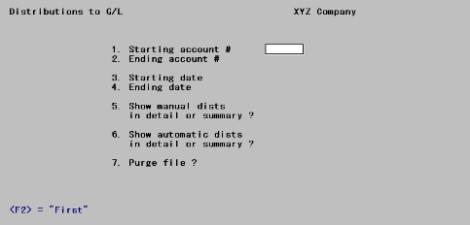
Enter the following information:
2. Ending account #
Enter the range of account numbers to be included. It is not required that either be a valid account number, but together they should enclose at least one account in Valid G/L accounts. If you intend to interface these distributions to the General Ledger module, each account in the range must be present in the G/L Chart of accounts selection.
Options
You may use the option:
|
<F2> |
For the <First> starting account number or <Last> ending account number |
|
Format |
Your standard account number format, as defined in Company information |
|
Example |
Press <F2> at each field |
|
Note |
When you plan to purge A/P Distributions, the range of accounts must be <First> through <Last> so that the distribution report stays in balance. |
Ending date
Options
Enter the range of distribution dates to be included, or use the option:
|
<F2> |
For the <Earliest> starting date or <Latest> ending date |
|
Format |
MMDDYY at each field |
|
Example |
Press <F2> at each field |
Show automatic distributions in
Manual distributions are those entered directly to distribute expenses during Payables.
Automatic distributions are those generated automatically by the system, rather than those manually entered. They include distributions to the accounts payable, cash, and discount accounts.
You can control for each type of distribution whether you want detail or summary information on the report. Enter either:
| Character mode | Graphical Mode | Description |
|
D |
Detail |
All distributions through the cut-off date appear |
|
S |
Summary by date |
Only one total will appear for each day for each account. |
|
Format |
Drop down list |
|
Example |
Select Detail at each field |
For cash accounts, if this field is checked, there will only be one line per check. If this field is not checked, multiple lines may print for each check.
|
Format |
Check box, where checked is yes and unchecked is no. The default is checked |
|
Example |
Select <Enter> for the default |
If the Compress by check # field is checked (yes), this field cannot be entered.
For cash accounts, if this field is checked, totals will print by check if there are multiple lines per check.
If this field is not checked, date totals will print.
|
Format |
Check box, where checked is yes and unchecked is no. The default is unchecked |
|
Example |
Cannot be entered in this example |
If the Starting and Ending account # fields above are anything other than "First" to "Last", this field cannot be entered and may not be entered (whether or not General Ledger is interfaced). The reason for this is that purging only some accounts would put A/P Distributions to G/L out of balance.
Otherwise, check this box to purge the data when printing the report, or leave it unchecked if you do not wish to purge the data.
|
Format |
Check box, where checked is yes and unchecked is no. The default is unchecked |
|
Example |
Select <Enter> for the default |
In a multi-user environment, you should not purge distributions while another user is posting payables, A/P checks, or A/P open item adjustments.
If you answer checked the box for yes:
| • | If G/L is not interfaced, all information in the A/P Distribution file within the date range will be purged after the report is printed. |
| • | If G/L is interfaced, the Distributions to purge field can be entered so you can control what is purged. This feature allows you to transfer the distributions to G/L in stages, using several executions for different account ranges and/or date ranges. |
This field can be entered only if you are interfaced to G/L and have checked the Purge file field.
Select which distributions to purge:
| Character Mode | Graphical Mode | Description |
|
1 |
all dists in range |
All distributions within the date range entered above will be purged, regardless of whether they have already been interfaced to G/L |
|
2 |
only interfaced dists in range |
Only those distributions will be purged which are within the date range and which have already been interfaced to G/L |
|
Format |
Drop down list |
|
Example |
Cannot be entered with this example |
Make any needed changes. Select OK to print the report and purge when selected or Cancel to do neither.
If you have chosen to purge, there will be a period of processing while the data is being purged. The report is considered a register; it may be printed to disk or to a printer, but not displayed on the screen.
If there is nothing to print or purge in the range selected, a window with the message "No distributions for the ranges selected" will display.
The report includes both the vendor name and the reference from the payable transaction.
For checks written, both the check number and the cash account against which the check was cut appear on the report.
See a Payables Distributions to General Ledger example in the Sample Reports appendix.
The Payables Distributions to General Ledger report lists the debits and credits which must be entered into your manual ledger.
You should print out this report at the end of an accounting period after all A/P transactions have been entered and posted for the period.
Back up your data and then print this report. All accounts should be printed. The date range should be from Earliest to the date at the end of your accounting period. Specify that the data should be purged. By purging the distributions which are printed on the report, the only distributions remaining, if any, will be for transactions which apply to the future accounting periods.
You may print the report to disk and then obtain a printed copy using Print reports from disk. In this way, you can retain a copy of the report on the hard disk in case a spare copy of the report should be needed.
The A/P Distributions to G/L contains debits and credits (created by A/P transactions) that must be transferred to General Ledger.
The distributions are actually transferred by selecting Get distributions from the G/L Distributions menu, and then specifying that you want to get distributions from the A/P module. Refer to Distributions chapter in the G/L User documentation.
Prior to running Get distributions, print the Payables Distributions to G/L Report. All accounts should be printed. The date range should be from Earliest to the end of your accounting period. Do not specify that the file is to be purged. If you purge distributions here in A/P before transferring them to the G/L module, you would have to enter these distributions again manually in the G/L module, using General journal. This defeats the purpose of the Get distributions selection.
The purpose of printing this report is to obtain an accurate list of the debits and credits that are to be transferred to G/L.
You may print the report to disk and then obtain a printed copy using Print reports from disk. In this way, you can retain a copy of the report on the hard disk in case a spare copy of the report is needed.
After printing the report, back up your data and run Get distributions. When running this selection, specify that the distributions are to be purged as they are copied to General Journal Transactions. If a power failure (and computer crash) should occur while running Get distributions, simply restore your backup and repeat the procedure.
Once Get distributions has been run, print a General Journal Entry Edit list and compare this report with the Payables Distribution to G/L Report to verify that all debits and credits have been transferred. The debits and credits will only be comparable if you have purged the distributions each period. If you have not purged A/P Distributions in a previous period, the reports will not be comparable.
Another choice is to:
| 1. | Back up your data. |
| 2. | Run G/L Get distributions, specifying that distributions are not to be purged. |
| 3. | Run A/P Distributions to G/L, specifying that the data is to be purged and only interfaced distributions are to be purged. |
| 4. | Print the General Journal entry Edit List. The debits and credits printed on the edit list should be comparable to the debits and credits on the Payables Distributions to G/L report, provided that you have followed this procedure each period. If you have not purged Distributions in a previous period, the reports are not comparable. |
|
Note |
If you specify that distributions are not to be purged by Get distributions, and you run Get distributions again, you will not transfer the same distribution from A/P to G/L more than once (Get distributions prevents this). If, after step 2. in the alternate procedure above, you discover additional A/P transactions for the accounting period which have not yet been entered into A/P, simply enter and post these transactions in A/P, and repeat the alternate procedure starting with step 1. |