This chapter contains the following topics:
The Sales Reps selection enables you to enter sales representatives in Accounts Receivable.
If you unchecked the box or answered N to the question Use sales reps in Control information, this chapter does not apply.
Otherwise, you are required to specify on each invoice what sales representative made the sale. You must also state for each customer what sales representative is primarily responsible for that customer.
Select
Sales reps from the Master Information menu.
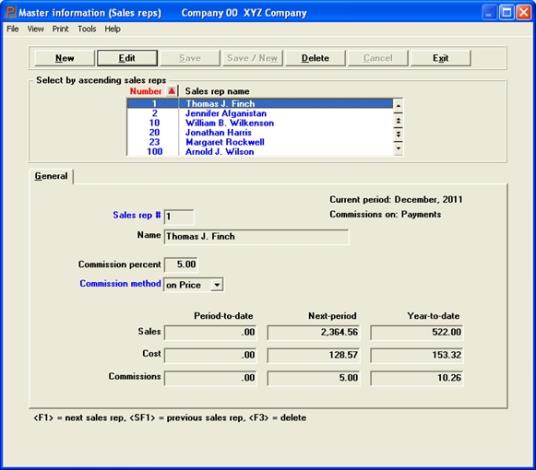
The following screen appears:
Graphical Mode:

The list box displays up to 6 sales reps at a time. You may sort the sales reps by sales rep number in ascending or descending order. Only column names in red may be sorted. To select or change the sort field direction, click on the column name or the arrow to the right of the column name or use the View options.
To locate a sales rep, start typing the number or use the arrow keys, <PgDn>/<PgUp>, and <Home>/<End> keys to find the sales rep. The <F1> and <SF1> keys function the same as the up/down arrow keys.
Sales reps that display in the list box are available for changes or deletion. The fields for the selected sales rep display in the lower part of the screen.
When a sales rep is found, you may select the <Enter> key or Edit button to start editing.
You have the following options with the buttons and keyboard equivalents:
| Button | Keyboard | Description |
|---|---|---|
|
New |
Alt+n |
For entering a new sales rep |
|
Edit |
Alt+e |
For editing an existing sales rep |
|
Save |
Alt+s |
For saving a new sales rep or for saving the changes to an existing sales rep |
|
Save/New |
Alt+w |
This is a combination of the Save and New buttons |
|
Delete |
Alt+d |
To delete a sales rep. |
|
Cancel |
Alt+c |
To cancel adding or editing a sales rep. Your entry will not be saved and the record will revert back to its previous state |
|
Exit |
Alt+x |
To exit the window and return to the menu |
Menu Selections
There are several menu selections that are common to every screen and some that are unique to a screen. See the System documentation for a description of the common menu selections. The Print menu selection is unique to this screen and it allows you to print a list of sales reps. See Printing a List of Sales Reps
For general users, the menu selections can and may be restricted based on the assigned menu.
Character Mode:

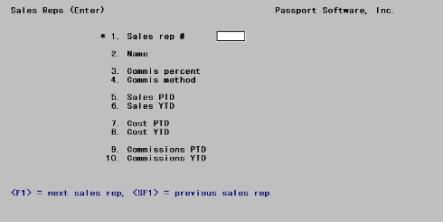
From this screen you can work with both new and existing sales representatives. If an entry already exists for the sales representative number you specify, it will appear for you to change or delete.
Enter the following information:
Options
Enter the sales representative number, or use one of the options:
|
<F1> |
For the next sales representative entry on file |
|
<SF1> |
For the previous entry |
|
Format |
3 characters |
|
Example |
Type 15A |
Enter the sales representative’s name. It will appear on screens and reports in the same format as entered (last name first or first name first).
The name field is optional, and if present need not be unique.
|
Format |
25 characters |
|
Example |
Type D.W. Langford |
If you have specified (in the Sales rep / commissions section of A/R Control information) that you do not pay sales representatives any commission, or that the commission is a function of the customer rather than the sales representative, this field may not be changed.
Options
Otherwise, enter the commission percent for this sales representative, or use the option:
|
<F2> |
For the default commission percent from Control information |
|
Format |
99.999 |
|
Example |
Press <F2> to accept the default. |
If you have specified (in the Control information Use commissions field) that you do not pay sales representatives any commission, or that the commission is a function of the customer rather than the sales representative, this field may not be changed.
If you have specified (also in Control information) that commissions are a function of the sales representative but that commissions on margin are not allowed, this field automatically displays as on price and cannot be changed.
Otherwise, enter P if the percent in the previous field is a percent of the price,) or M if it is a percent of the margin (price minus cost). Your entry here will provide the default for this sales representative’s invoices, but the amount may be overridden on individual invoices.
If you select M, an item sold at a loss will reduce the sales representative’s commission.
|
Format |
Graphical: Drop-down box. Either On priceor On margin. The default is On price. Character: One letter, either P or M. The default is P. |
|
Example |
Press <Enter> |
Period-to-date, Next-period and Year-to-date Fields
Fields #5 through 10 are updated by other functions in this module.
| • | New entries allow you to enter these fields in order to set up the system upon initial installation of your A/R module. |
| • | Existing entries are protected against change. Authorized users may override this protection, as described in the System User documentation. |
Options
Enter the amount for this sales representative’s period-to-date sales, or use the option:
|
<F2> |
In character mode to set all amount fields to zero |
|
Format |
999,999,999,999.99- |
|
Example |
Graphical: Leave the field with an amount of .00 Character: Press <F2> |
Normally you should not enter anything in this field. It is updated during posting when you have started to work in the next period before you have closed the current period.
|
Format |
999,999,999,999.99- |
|
Example |
Graphical: Leave the field with an amount of .00 Character: (In this example, the cursor does not move to this field because you pressed <F2> at Sales Period-to-date field.) |
Enter the sales representative’s year-to-date sales.
|
Format |
999,999,999,999.99- |
|
Example |
Graphical: Leave the field with an amount of .00 Character: (In this example, the cursor does not move to this field because you pressed <F2> at Sales Period-to-date field.) |
Cost Period-to-date, Cost Next-period and
Cost Year-to-date
Enter the period-to-date and year-to-date cost of goods sold for the sales representative.
|
Format |
999,999,999,999.99- |
|
Example |
Graphical: Leave the field with an amount of .00 Character: (In this example, the cursor does not move to this field because you pressed <F2> at Sales Period-to-date field.) |
Commissions Period-to-date, Commissions Next-period and
Commissions Year-to-date
Enter the period-to-date and year-to-date commissions for the sales representative.
|
Format |
99,999,999,999.99- |
|
Example |
Graphical: Leave the field with an amount of .00 Character: (In this example, the cursor does not move to this field because you pressed <F2> at Sales Period-to-date field.) |
Graphical Mode
Click on Save or Save/New to record your entry or Cancel to remove your new entry or changes to an existing entry.
Character Mode
Make any needed changes by entering a field number and editing the field. To save your entry press <Enter>. For an existing entry you may use one of the options:
|
<F1> |
For the next sales representative entry on file |
|
<SF1> |
For the previous entry |
|
<F3> |
To delete this entry |
Practice
For practice, and to provide data for use in examples in subsequent chapters, enter additional sales representatives as follows. (Press <F2> at the Sales Period-to-date field for each sales representative.)
|
SALES REP # |
NAME |
|
1 |
Thomas J. Finch |
|
10 |
William B. Wilkenson |
|
20 |
Jonathan Harris |
|
23 |
Margaret Rockwell |
|
100 |
Arnold J. Wilson |
|
789 |
Abram Goldberger |
|
JAK |
Jack Smithson |
Select
Sales reps from the Reports, general menu.
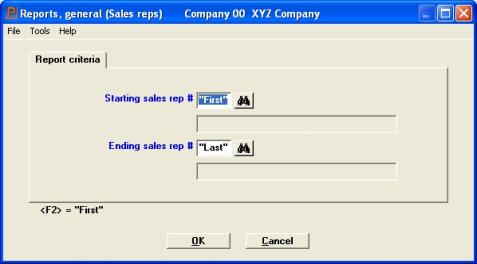
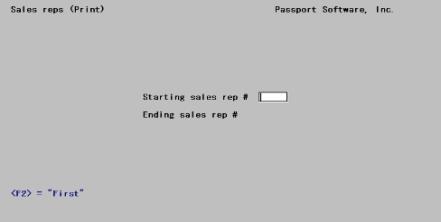
The following screen appears:
Graphical Mode

Character Mode

Enter the following information:
Starting sales rep #
Ending sales rep #
Options
Enter the range of sales representatives to be included on the report, or use the option:
|
<F2> |
For the First starting sales representative or Last ending sales representative |
|
Format |
3 characters |
|
Example |
Press <F2> at each field. |
Select OK to print the report or Cancel to not print.
Character Mode
Answer Y to re-enter the screen, or N to print the report.
|
Format |
3 characters |
|
Example |
Press <F2> at both fields |