This chapter contains the following topics:
The Customers selection enables you to enter information about your customers, such as codes for payment terms, a tax code, an A/R account, and (if you use them in your business) a sales representative and a ship-via method.
Each of these codes should have already been entered in its own function, so that it will be available. See the A/R Accounts, Ship-to Addresses, Ship-Via, Terms, Tax Codes, and Sales Reps chapters.
Each customer is identified by a twelve-character customer number. This number can be numerals, letters, or a combination of both, depending on your preference.
You can print a customer list or labels in order by either customer number, or customer name. You can also print a log of changes made to customer information if you specified in Company information that change logs were to be used.
Multiple contacts may be entered for each customer. You may enter and retain notes on each customer with a date and time stamp.
There are four tabs for entering a customer.
Select
Customers from the A/R menu.
Graphical Mode
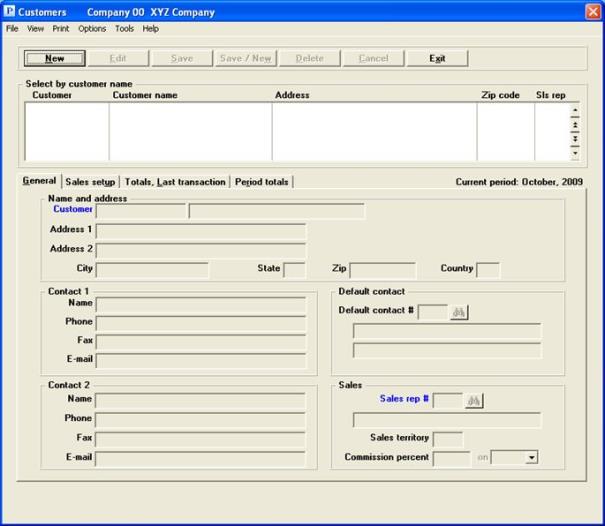
The following screen appears:

From this screen you can work with both new and existing customers.
The list box displays up to 6 customers at a time. You may sort the customers by customer number, customer name, zip code or sales rep all in ascending or descending order. Only column names in red may be sorted. To select or change the sort field, click on the column name or the arrow to the right of the column name or use the View options.
To locate a customer, start typing the number or name depending on which sort field is selected or use the arrow keys, <PgDn>/<PgUp>, and <Home>/<End> keys to find the customer. The <F1> and <SF1> keys function the same as the up/down arrow keys.
Customers that display in the list box are available for changes or deletion. The fields for the selected customer display in the lower part of the screen.
When a customer is found, you may select the <Enter> key or Edit button to start editing.
You have the following options with the buttons and keyboard equivalents:
| Button | Keyboard | Description |
|---|---|---|
|
New |
Alt+n |
For entering a new customer |
|
Edit |
Alt+e |
For editing an existing customer |
|
Save |
Alt+s |
For saving a new customer or for saving the changes to an existing customer |
|
Save/New |
Alt+w |
This is a combination of the Save and New buttons |
|
Delete |
Alt+d |
To delete a customer. Certain conditions must be met before a customer can be deleted. See Deleting Customers |
|
Cancel |
Alt+c |
To cancel adding or editing a customer. Your entry will not be saved and the record will revert back to its previous state |
|
Exit |
Alt+x |
To exit the window and return to the menu |
The current period from Control information appears in the heading.
Entry of fields in blue are required when adding a new customer.
Menu Selections
For general users, the menu selections can and may be restricted based on the assigned menu. Also, if Order Entry is not licensed or not installed then the Order Entry menu selections will not be available for any user.
There are two entry functions accessible from the customer screen. You may access customer Contacts via the <F7> key or from the Customer contacts under the Options menu. And you may access Customer Notes with the <F6> key or from the Customer notes under the Options menu.
Other Options menu selections include:
| Options main menu selection | Sub menu selection | Documentation |
|---|---|---|
|
View accounts receivable |
Customers open items |
|
|
View accounts receivable |
Invoices |
|
|
View accounts receivable |
Invoice history |
|
|
View accounts receivable |
Recurring bills |
|
|
View accounts receivable |
Standard bills |
|
|
View accounts receivable |
Customer history by date |
|
|
View accounts receivable |
Customer history by doc # |
|
|
View order entry |
Orders |
See O/E user documentation |
|
View order entry |
Full order inquiry |
See O/E user documentation |
|
View order entry |
Orders for an item |
See O/E user documentation |
|
View order entry |
Invoice history by customer |
See O/E user documentation |
|
View order entry |
Invoice history by invoice |
See O/E user documentation |
|
View order entry |
Invoice history by item |
See O/E user documentation |
|
Purge customer history |
|
Under the print menu selections you may access the following:
| Menu selection | Documentation |
|---|---|
| By customer number | Print by Customer Number |
| By customer name | Print by Customer Name |
| Change log | Print a Change Log |
| Customer history | Printing a Customer History Report |
| Customer labels | Print Customer Labels |
| Statements | Statements |
Character Mode
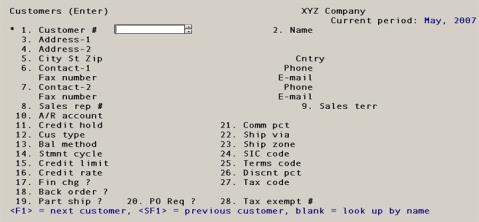
The following screen displays:
|
Note |
For an existing customer, an ampersand (&) to the left of the customer caption indicates the presence of one or more notes, which you may view using <F6> or selecting Customer notes from the Options menu. Printing the notes is an option with the By customer # and By customer name reports. |
Several tabs are required to contain all the information needed for a single customer.
Name and address
Enter the following information:
There are two fields to identify the customer: number and name. The next several paragraphs document the number. See the (Name) field below.
The customer number does not have to be a number; you may use non-numeric codes if you prefer.
| • | Numeric customer numbers are listed on reports according to their numeric value. Thus, customer 34 appears before customer 123. Leading spaces or zeroes are discarded; 0123 is the same customer as 123. |
| • | Alphanumeric customer numbers appear on reports in alphabetic sequence. Thus customer 34A appears after customer 123A. Lower-case characters may be entered but are converted to upper-case. Leading spaces are not discarded; thus ABC is a different customer from ABC, but SMITH may be entered as Smith. |
| • | You may use characters such as an apostrophe in the customer name. However, if you are creating PDF files for invoices the customer number becomes part of the file name. So you cannot use a character such as an apostrophe as part of a customer number when generating a PDF file name. This applies to any other characters that cannot be used in a file name. When creating a PDF file it may remove those characters. Other characters you should not use for a customer name include: \\/:*?\"<>|~`@#$%^&()[]{}. |
An ampersand (&) to the left of the word Customer indicates that there are one or more notes present for this existing customer.
You may enter miscellaneous customer numbers for occasional or one-time customers. Many individual customers can share the same customer number.
| • | This feature allows you to record information and maintain history for casual customers as a group, without burdening your files with useless information. |
| • | You may have more than one miscellaneous customer on file (for different categories of customers). |
| • | The miscellaneous customer number is recognized by the fact that its first character is always an asterisk (*). |
| • | Since the miscellaneous customer is a generic customer rather than an actual person or corporation, any name or address that you enter here is ignored when you enter a document in the Invoices or Miscellaneous charges selections in this module. This also applies to certain selections in O/E, C/O and POS (if you use any of those modules). Instead you must provide, for each entry, whatever information is needed to individualize the customer for that particular document. |
|
Format |
12 characters |
|
Example |
Type 200 |
This field is optional, but should not be omitted. It is needed to mail invoices and other documents. Some reports are available in customer name sequence as well as number sequence. Finally, many selections allow you to search for an existing customer by either name or number.
Although duplicate names for different customers are not prohibited, they are apt to cause confusion when you attempt to look up the customer by name.
If the company name to be entered starts with The (e.g. The Ace Company) you might want to enter the company name as Ace Company, The. This allows the Customers by Customer Name Report to print this company with all the other A’s (e.g., after Abbot Enterprises, but before Advanced Associates.)
Options
Use the option:
|
<F3> |
To toggle between entering a person’s name or a company’s name |
|
Format |
25 characters |
|
Example |
Type 21st Century Enterprises |
|
Note |
Invoices and statements may be stored as PDF files that can be emailed to customers. The PDF files are stored with the customer name as part of the PDF file name. If you have customers with special characters within their name, these special characters are converted to a Z when generating a PDF file. Special characters include "~!@#$%^&*()+`{}|[]\:;'<>?/". If you are going to send the forms to PDF files, to avoid any confusion, we recommend that you do not use special characters within customer names. |
If you selected <F3> at the Name field, it splits into two subfields allowing entry of a personal name and a surname.
When printing the Customers by Customer Name Report, the last name will be used for alphabetical placement. For instance, if you enter John Smith after pressing <F3>, and then print a Customers by Customer Name Report, this customer would print after Sara Samuels but before Barry Spencer.
In any future selection where you look up this customer by name rather than number, remember to enter him as Smith, not as John Smith.
In the To distinguish John W Smith from John H Smith when using this option, do one of the following:
| • | Enter SmithbbbbbbbbbJohnbW, where the nine b’s are spaces required to pad out the surname to its full 14 characters. |
| • | Enter Smith to find the first entry of that name. Then press <F1>or down arrow until you reach the particular Smith you want. |
You may if you wish enter personal names without using the<F3> option, either as Smith, John or as John Smith; however you should pick one method and apply it consistently. The <F3> method merely forces all the surnames to be the same length (fourteen characters). This improves the alphabetization and gives a neater appearance to certain printed reports.
Options
Enter the individual’s first name (and middle initial if you wish); or use the following option:
|
<F3> |
To return to entering a company’s name |
|
Format |
10 characters |
|
Example |
(Does not occur in this example because you have entered a company name) |
Enter the customer’s surname.
|
Format |
14 characters |
|
Example |
(Does not occur in this example) |
All address fields are all optional, but should not be omitted if you intend to send invoices, quotations, or other documents by mail.
Enter the first line of the customer’s address.
|
Format |
25 characters |
|
Example |
Type P.O. Box 4545 |
Enter the second line of the customer’s address.
|
Format |
30 characters |
|
Example |
Type 670 Mason St. |
Enter the customer’s city.
|
Format |
15 characters |
|
Example |
Type San Francisco |
Enter the customer’s state or province code where applicable.
Passport recommends that you use the standard Post Office state abbreviations for customers within the United States.
|
Format |
Two characters. Lower-case is converted to upper. |
|
Example |
Type CA |
Enter the customer’s postal code.
|
Format |
10 characters |
|
Example |
97582-4545 |
Enter a free-form country code. Any entry, including blank, is considered valid.
|
Format |
Three characters. The default is blank. |
|
Example |
Press <Enter> |
The contact and phone number are printed on various reports besides the Customers reports (by name and number). These include Customers by Name report, Aging report, Cash Projection report, and Collections report.
Each contact has a contact name, an e-mail address, and up to two phone numbers.
| • | Both contacts are optional, and either may be left blank. |
| • | The two sets of contact fields are independent of one another (if a primary contact is deleted, the secondary contact is not promoted to primary). |
| • | A contact may have a phone number without a person’s name, and vice versa. |
| • | You may have a secondary contact even though you do not have a primary contact; however be aware that some reports may print only the primary contact. |
| • | If you have more than two contacts, you may enter as many more as you need. You may enter these additional contacts even though you have not entered a primary or secondary contact. See the Contacts section. |
| • | If this customer has more than one address that you ship to, you can enter a primary and secondary contact for each such address in Ship-to addresses. See the Ship-to Addresses chapter. |
Name
Enter the name of the primary and secondary persons to contact at the customer’s location.
|
Format |
25 characters at each field |
|
Example |
Type Lou Mandell for Contact-1 Type Danny Smith for Contact-2 |
Phone
Enter the phone number of the primary and secondary contact.
|
Format |
25 characters at each field. Lower-case letters are converted to upper-case. If you answered Y to Use customer # as phone-1 in Control information, the customer number appears as the default for Contact-1. The assumption is that you have already assigned the customer’s phone number as his Customer number field (a convenient method of ensuring uniqueness). |
|
Example |
Type 415-555-7844 for Contact-1 Type 415-555-7846 for Contact-2 |
Fax
Enter the fax number of the two contacts.
|
Format |
25 characters. Lower-case letters are converted to upper-case. |
|
Example |
Type 415-555-7845 for Contact-1 Press <Enter> to leave Contact-2 blank |
Enter the e-mail address of the two contacts.
|
Format |
25 characters. Lower-case letters are retained. |
|
Example |
Type LM21C@XYZ.COM for Contact-1 Press <Enter> to leave Contact-2 blank |
Default Contact
In order to enter this field, you must first enter a contact. A contact can entered by selecting the <F7> key or clicking on Customer contacts from the Options menu.
Enter the default contact from the contacts file/table to be used when emailing PDF files.
This field is optional but important if you are emailing PDF files such as A/R invoices, Statements, O/E invoices, POS invoices or C/O invoices to your customers. Then, the email address from the default contact entered here is used. For information on emailing via customer contacts, see the E-mail field and Email documents field from the Contacts section later in this chapter.
|
Format |
4 digits |
|
Example |
Press <Enter> |
There is a setup procedure for emailing forms. Please see the Administration documentation appendix Email Configuration for more information.
Once emailing is configured in PBS, you have generated PDF files and you want to start emailing these files, see the PDF Form File Processing chapter in PBS System documentation.
Sales
If you specified in Control information that you don't use sales representatives, this field may not be entered.
Options
Otherwise, this is the number of the sales representative assigned to this customer’s account. It will appear as the default when entering an invoice for this customer (but can be overridden as needed). Enter a valid sales representative number, or use one of the options:
|
<F1> |
For the next entry in Sales reps |
|
<SF1> |
For the previous sales representative |
|
Format |
3 characters |
|
Example |
Type 15A |
Sales territory is optional. It is not required for A/R, but may be used in Sales Analysis or in ODBC compliant products.
Notice that each customer (and each invoice) is assigned both a sales territory and a sales representative. This may appear redundant (unless you assign more than one representative to each territory or more than one territory to each representative). The advantage is that you can monitor the performance of your sales representatives independently of their territories. This is especially useful if your salesman turnover is high or if you move them around frequently. Also, the Sales Analysis module offers you a choice of classifying sales either by the representative making the sale or the representative currently responsible for the customer.
There is no standardized list of sales territories, as there is of representatives; so the program accepts any input without validating it.
|
Format |
3 characters |
|
Example |
Press <Enter> to leave blank. |
You may have specified (in Control information) that you do not use sales representatives, or that you do use them but do not pay them by commission, or that the commission which you pay depends on the sales representative rather than the customer. In all of these cases this field may not be changed or entered.
Options
Otherwise, enter the commission percent, or use the option:
|
<F2> |
For the default commission percent from Control information |
|
Format |
99.999 |
|
Example |
Type 2.5 |
If the previous field is present and contains a non-zero percent, this field must be entered. It defines whether the commission is calculated as a percent of the price or the margin (price minus cost). If Control information indicates that commissions are always on price, the field is forced to on Price and may not be changed.
Otherwise, enter Price or Margin.
|
Format |
Drop down list, either Price or Margin. The default is whichever method was chosen as default in Control information. |
|
Example |
Press <Enter> to accept the default. |
Select the <Enter> key to move to the next tab.
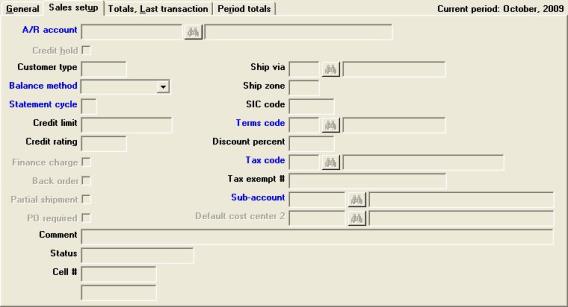
The following tab displays:
Options
Enter the number of the A/R account to which documents for this customer are to be posted, or use one of the options:
|
<F1> |
For the next entry in A/R accounts. If you have only entered one A/R account this option and the next do not appear. |
|
<SF1> |
For the previous A/R account |
|
<F2> |
For the default A/R account from Control information |
|
Note |
A customer’s A/R account does not normally change during his lifetime; but if this does happen, A/R will no longer be in agreement with PBS General Ledger. |
Specifically, the outstanding receivables for that A/R account (as shown in the A/R Aging Report) will not add up to the A/R account balance in G/L.
Therefore, whenever you change this field:
| • | Run an aging report (by invoice date) and obtain the A/R balance for the customer at the end of the period. |
| • | Enter a G/L journal transaction which credits the customer’s old A/R account and debits the customer’s new A/R account (or vice versa if the customer has a credit balance on the aging report). |
| • | Change the customer’s A/R account to the new A/R account as described above. |
|
Format |
Your standard account number format, as specified in Company information |
|
Example |
Press <F2> |
Check the box to stop invoices for this customer due to credit problems.
When you put a customer on credit hold, invoices will not be produced (whether or not the credit limit is exceeded). A message will appear stating the customer is on credit hold, and no sales will be allowed. Credit hold does not prevent changes to invoices created before the credit hold was applied. Additionally, files related to this customer will not be updated during invoice creation.
You can use this feature even though you selected to not Do credit checking in Control information.
|
Format |
Graphical: Check box. The default is unchecked. |
|
Example |
Select <Enter> to skip this field |
Enter the customer type. This field is optional and is not used within A/R itself, but it finds its use in other PBS applications:
| • | In Sales Analysis, it lets you evaluate sales information for different customer types in order to determine their relative profitability. |
| • | In Inventory Control and Order Entry , it lets you define price codes to tailor your prices according to the type of customer. |
If you use none of these, you may still want to categorize customers by type for your own information.
|
Format |
5 characters |
|
Example |
Type RET (for retail) |
Enter the method you use in handling this customer’s account: either Balance forward or Open item.
| • | Payments received from balance-forward customers are applied to their current account balance. |
| • | Payments received from open-item customers are applied to specific receivables. For instance, if a customer disputes an earlier invoice but willingly pays a more recent one, you may not be legally entitled to apply his payment to the disputed invoice. |
Miscellaneous customers should be assigned a balance method of Open item so that specific items can be selected for payment.
For a cash-with-sale transaction for a miscellaneous customer, you should use the Non-A/R cash feature of Cash receipts. See the Cash Receipts chapter.
If you change the accounting method from balance forward to open item for an existing customer who has open items on file, you must change the apply-to numbers for each of that customer’s open items in order to apply payments properly. Refer to the Change Apply-to Number or Due Date and Fully Paid Open Items chapters for more information.
|
Format |
Drop down list |
|
Example |
Select Open item |
Enter the statement cycle code to specify how often statements are to be printed for this customer. When you print statements, you specify which cycle you are printing. You can print up to five cycles at once (as for instance when the end of a week corresponds to the end of a month, so that both monthly and weekly customers are billed).
This field is required, even if you only use one statement cycle.
Suggested statement cycle codes are W (weekly), M (monthly), or Q (quarterly). You are not limited to these suggestions; any letter, number, or punctuation character is allowed.
|
Format |
One character |
|
Example |
Type M |
This credit limit is compared to the customer’s balance upon entry of an invoice (and several other documents). The operator must individually approve invoices which would put the customer over his credit limit.
This field is required, even though you unchecked (no) the check box Do credit checking in Control information (in which case it will be informational only).
Options
Enter the customer’s credit limit, or use the option:
|
<F2> |
For unlimited credit |
|
Format |
999,999,999,999 |
|
Example |
Type 20000 |
You may enter the customer’s credit rating here. This field is optional and is informational only; if used, it is not checked against a Dun & Bradstreet (or any other) rating.
To control customer credit, use the Credit hold and Credit limit fields, singly or in combination.
|
Format |
4 characters |
|
Example |
Type AA |
Check this box to specify that finance charges on past-due items will be calculated automatically (by the Finance charges selection) for this customer. Uncheck the box if finance charges are only to be applied manually. See Finance Charges
This field is required even if no finance charge percent is specified in Control information.
|
Format |
Check box with checked being yes and unchecked is no, the default is checked |
|
Example |
Press <Enter> for the default of checked. |
Check this box if this customer accepts back orders, or uncheck it if he does not. This field is required. If you uncheck it, you will be warned during order entry if you attempt back-ordering for this customer (but not actually prevented from doing so).
|
Format |
Check box with checked being yes and unchecked is no, the default is checked |
|
Example |
Press <Enter> for the default of checked. |
Check this box if this customer accepts partial shipments, or uncheck it he does not. This field is required; however, it is used by Order Entry rather than by Accounts Receivable.
If you uncheck it for no, you will be warned during order entry if you try to send a partial shipment to this customer (but not actually prevented from doing so).
|
Format |
Check box with checked being yes and unchecked is no, the default is checked |
|
Example |
Press <Enter> for the default of checked. |
If you are not interfaced to Order Entry or Point of Sale, this field may not be entered.
Otherwise, this controls whether or not your purchase order number may be omitted from O/E Orders, P/S Transactions and C/O Customer orders. Check this box if this is required, or uncheck it if it may be left blank.
Whatever you enter here, entering your customer’s purchase order number in Invoices is always optional.
|
Format |
Check box with checked being yes and unchecked is no, the default is checked |
|
Example |
Press <Enter> for the default of checked. |
This field is available for any comment you want to make. It is available in several locations in A/R and O/E.
|
Format |
66 characters |
|
Example |
Type Closed vacation Aug. 8-20 |
There may be up to three additional fields that can be entered on this tab. The names of these fields are entered in the Control information. If a name has not been entered in Control information, you cannot enter the field here. See the Optional Customer Fields section in the Control information chapter.
You can use these fields to store any information that you want, but it will be available to you only on this screen and will not appear on any report. There is no formatting for these fields; for instance, you can use one of them to hold a date but the slashes will not appear unless you key them in yourself.
This becomes the default value for entering ship-via codes in this customer’s invoices.
This field is not required, and may be omitted even if you have checked (Yes) to the field Use ship-vias in Control information. Conversely, you may enter a ship-via here even if you have unchecked (no) to that field.
Any non-blank value must be a valid entry in Ship-via. See the Ship-Via chapter.
Options
Enter the customer’s preferred shipping method, or use one of the options:
|
<F1> |
For the next entry in Ship-via codes |
|
<SF1> |
For the previous entry |
|
Format |
3 characters. There is no default. |
|
Example |
Type P |
If your freight charges are based on the customer’s distance from your headquarters, you may assign a shipping zone to your customers. This field is optional, and if present may be in any format.
|
Format |
2 characters. There is no default. |
|
Example |
Type 3 |
The Standard Industry Code (SIC) is optional and is not used in A/R. If you use the Sales Analysis module, you can use this code to analyze your profitability by industry.
|
Format |
6 characters |
|
Example |
Type 313145 |
Options
Enter the terms code that applies to this customer. This field is required, and must already be present in the Terms selection. See the Terms chapter. You may use one of the options:
|
<F1> |
For the next entry in Terms. |
|
<SF1> |
For the previous entry |
|
Format |
3 characters |
|
Example |
Type 3 |
Enter the discount percent generally allowed this customer. This will become the default value for the discount applied to the invoice as a whole when you enter the totals screen of the invoice (and of the order, if you use the Order Entry module).
If you have specified in the Discount type field in Control information that you do not allow invoice discounts, this field is not used.
This entry is not used as the default for the line item discount, nor does it have anything to do with the discount for early payment specified in the terms code.
|
Format |
99.999 The default is blank for no discount. |
|
Example |
Type 5 to specify 5% as the trade discount for this customer. |
Enter the tax code that applies to this customer. This field is required, and is used as the default when entering invoices, orders, and other documents for this customer.
| • | If the customer is tax-exempt or lives in a jurisdiction which does not have sales tax, enter the dummy tax code with a zero tax percentage which you have previously defined for the purpose in the Tax codes selection. See the Tax Codes chapter. |
| • | If this customer has more than one address that you ship to, you can enter in the Ship-to addresses selection the appropriate tax code (and tax exemption number) for each one. See the Ship-to Addresses chapter. |
| • | If the customer is a miscellaneous customer, his residence (and hence his tax code) is unpredictable. Although you must enter some tax code here to satisfy the syntax, it doesn't matter which code you enter. For miscellaneous customers the Invoices selection requires the user to select a tax code without regard to the customer default. |
Options
You may use one of the options:
|
<F1> |
For the next entry in Tax codes |
|
<SF1> |
For the previous entry |
|
<F8> |
To select a tax code via the data lookup |
|
Format |
3 letters |
|
Example |
Type CAL |
If the customer is exempt from taxes, enter his tax-exempt number. If this customer has more than one address that you ship to, you can enter in the Ship-to addresses selection the appropriate tax exemption number for each one. See the Ship-to Addresses chapter.
|
Format |
20 characters |
|
Example |
Press <Enter> to leave this field blank |
Cost Center or sub-acct displays here, depending upon the account structure defined in Company Information.
When entering invoices, orders, etc; each line needs a sales account number. Control information indicates the source of the cost center or sub-acct used in the sales account. It may be from the customer (this entry), from the inventory items, or simply entered on the header screen for the sale.
If you do not use this entry for this purpose, it may still be useful for Sales Analysis and ODBC reporting.
|
Format |
Size and type as defined in Company information. |
|
Example |
Press <Enter> |
Press <Enter> to proceed to the next screen.
<F3> or selecting the Delete button is used to delete a customer, but it only works when all the following conditions are met:
| • | The customer has no open items |
| • | The customer has no customer history |
| • | There is no unposted nonzero balance |
| • | The totals (sales and costs) for the current and next period are zero for the customer |
Other checks are also made. If you cannot delete a customer for some reason, you will be informed.
Before you delete a customer with history on file, you should purge that customer's history first. Purging means that it is gone forever. However you may run reports of the data prior to purging.
| • | You are required to purge customer history before you remove the customer. See Purging Customer History in the Customer History chapter. |
| • | To purge invoice history, see Printing the Invoice History Report in the Invoice History chapter. |
| • | If you have Point of Sale, use the Invoice history report in P/S to purge invoice history. |
If you use PBS Sales Analysis, and S/A Control information specifies that the Customer comparative feature is in use, sales history for a customer will not be lost altogether upon deletion of that customer. Though no longer individually accessible, the history will be rolled into a generic sales bucket where it will remain available for analysis reporting.
Graphical Mode
Press <F7> or select Customer contacts from the Options menu. The following window displays:
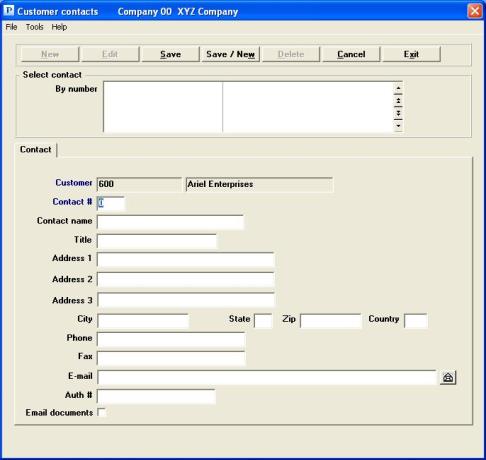
You may use the buttons for the following:
| Button | Keyboard | Description |
|---|---|---|
|
New |
Alt+n |
For entering a new contact |
|
Edit |
Alt+e |
For editing an existing contact |
|
Save |
Alt+s |
For saving the addition of the new contact or for saving the changes to an existing contact |
|
Save/New |
Alt+w |
This is a combination of the Save and New buttons |
|
Delete |
Alt+d |
To delete a contact |
|
Cancel |
Alt+c |
To cancel adding or editing a contact. Your entries will not be saved |
|
Exit |
Alt+x |
To exit the Window |
Options
Up to 6 existing contacts display in the list box. To locate an existing contact you may use one of the options:
|
Down arrow or <F1> |
For the next contact in contact number sequence |
|
Up arrow or <SF1> |
For the previous contact |
|
Page Down |
For the next group of six contacts |
|
Page Up |
For the previous group of six contacts |
|
End |
For the last contact |
|
Home |
For the first contact |
|
<F1> |
For the next contact for this customer |
|
<SF1> |
For the previous contact |
|
<F3> |
To delete this contact |
Character Mode
Select <F7> and the following screen displays:
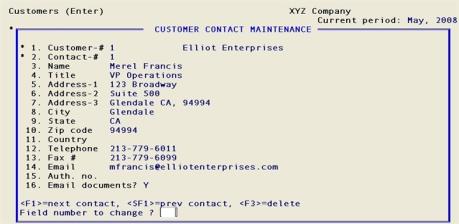
From this screen you may work with new or existing contacts for this customer. Each customer may have up to 999 contacts in addition to the ones defined in the Contact 1 Contact 2 fields on the customer General tab.
There is no relation between the contacts you maintain here and the ones in the Contact 1 Contact 2 fields on the customer record. For instance, if you blank out the contact 1, the first contact in this window does not migrate to that field to fill the gap.
| • | If you need many contacts, you may wish to ignore the Contact 1 and Contact 2 fields on the customer screen altogether and enter all your contacts in this window (so you will always know where to look for them). |
| • | Be aware however that the View selections, and most reports, show only the contacts in Contact 1 and Contact 2 fields on the customer tab. |
| • | Contact maintenance is possible only when changing an existing customer, not when adding a new customer. |
| • | In order to email PDF documents to customers, you must enter at least one contact to automate the process. |
The Contact # field is required. Both the Customer and Contact # fields cannot be changed on an existing contact; all the other fields on the screen are optional.
Options
You may use the options:
|
<F1> |
For the next contact for this customer |
|
<SF1> |
For the previous contact for this customer |
Enter the following information:
This field is entered automatically and cannot be changed. It is the same as the customer you were last on.
Enter a number to distinguish this contact from the customer’s other contacts. Two contacts for different customers may have the same contact number, but not two contacts for the same customer.
|
Format |
9999 |
|
Example |
Type 3 |
Enter the name of this contact.
|
Format |
25 characters |
|
Example |
Type Richard R. Roe |
Enter the position (title) of your contact.
|
Format |
20 characters |
|
Example |
Type Purchasing agent |
Enter the address of your contact. At the Address 1 field you may also use the option:
|
<F2> |
To enter the customer’s address in Address 1 through Fax, and to move the cursor to the Email field |
|
Format |
20 characters for line 1 30 characters for lines 2 and 3 |
|
Example |
Type 671 Dixon Ave for line 1 Type Suite 4010 for line 2 Press <Enter> for line 3 |
Enter the city of your contact.
|
Format |
15 characters |
|
Example |
Type San Francisco |
Enter the state of your contact.
|
Format |
2 characters |
|
Example |
Type CA |
Enter the state of your contact.
|
Format |
10 characters |
|
Example |
Type 98891-1212 |
Enter the country of your contact.
|
Format |
3 characters |
|
Example |
Press <Enter> |
Enter the voice and Fax telephone numbers of this contact.
|
Format |
25 characters at each field |
|
Example |
Type 415-555-7847 voice phone Type 415-555-7848 Fax phone |
Enter an email address for this contact.
While the contents of this field is highlighted, you may select <Ctrl+E>, select Email from the Tools menu or click on the email button to open your default email application and populate the Send to field with the address in this field.
A contact email address is needed for emailing PDF documents to customers, such as A/R invoices, Statements, O/E invoices, POS invoices or C/O invoices.
For a complete email configuration overview open the PBS Administration documentation and read the Email Configuration appendix. In order to email documents, you must also check the Email documents box. You should also enter the default contact on the customer record. See the Default contact # field.
Once emailing is configured in PBS, you have generated PDF files and you want to start emailing these files, see the PDF Form File Processing chapter in PBS System documentation.
|
Format |
60 characters |
|
Example |
Type rroe@21stcenturyenterprises.com |
Enter the security code which you have provided to the customer. You can use this to validate phone calls received from anyone ordering in the customer’s name.
|
Format |
20 characters |
|
Example |
Press <Enter> |
If you want to use this contact when emailing PDF documents such as A/R invoices, Statements, O/E invoices, POS invoices or C/O invoices, check this box. You must have an entry in the E-mail field. You should also enter the default contact on the customer record. See the Default contact # field.
|
Format |
Check box, using the <Space bar> checked is yes and unchecked is no |
|
Example |
Leave it defaulted as unchecked |
If you are not using this contact for emailing, leave it unchecked.
For a complete email configuration overview open the PBS Administration documentation and read the Email Configuration appendix.
Once emailing is configured in PBS, you have generated PDF files and you want to start emailing these files, see the PDF Form File Processing chapter in PBS System documentation.
Make any desired changes. Press <Enter> to enter a new contact.
To exit the screen, press <Esc> or select the Exit button.
Cancel Entry?
If you select Exit and you are editing an existing contact or you are adding a new contact then this window displays.
|
Format |
Yes/No button window |
|
Example |
Select Yes to cancel the editing |
Graphical Mode
The next tab displays:
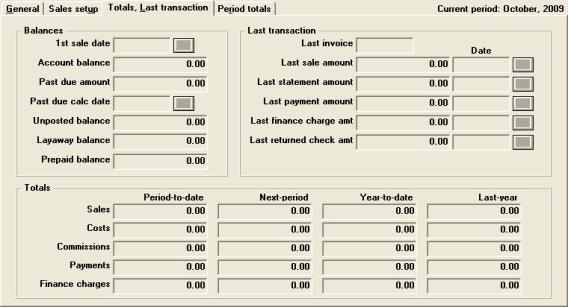
The fields on this screen are automatically maintained by other functions within A/R.
| • | You would normally enter data into these fields when using A/R for the first time. An option is provided to default all the amounts to zero and the dates to NONE. |
| • | For existing customers, these fields are protected against change. Authorized users can override this protection as described in the System User documentation. |
Character Mode
The second screen appears:
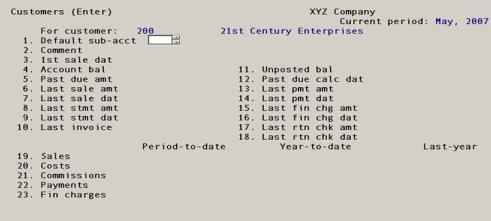
Unused date fields are entered as blank and display as NONE. For instance, if the customer has never returned any merchandise the last return date is NONE.
Enter the following information:
Balances
Enter the date of the first sale made to this customer, or press <Enter> if this date is not known.
In graphical mode, select the Save button to save all the amount fields as zero on the Totals, Last transaction and Period totals tabs and the date fields to blank.
Options
For a new customer in Character mode only, you may use the option:
|
<F2> |
To set all amount fields to zero and all date fields to NONE |
|
Format |
MMDDYY The default is the system date. |
|
Example |
Type 33105 |
This field is the customer’s outstanding account balance, reflecting all posted transactions. Refer to Unposted balance field below for the unposted balance.
Unless you are making some kind of correction, you should always skip this field when adding a new customer.
If this field is suspected of having an incrorrect amount, see Calculate Past-due Amounts for a procedure on how to correct it.
|
Format |
999,999,999,999.99- |
|
Example |
Press <Enter> to set this field to zero |
Enter the past due amount or press <Enter> to leave this field blank.
The selection Set customer account balances is used to set the field to its correct value. Refer to the Calculate Past-due Amounts chapter.
|
Format |
999,999,999,999.99- |
|
Example |
Press <Enter> |
This field contains the date that the past due amount was calculated.
The selection Set customer account balances is used to set the field to its correct value. Refer to the Set Customer Account Balances chapter.
|
Format |
MMDDYY |
|
Example |
Press <Enter> |
This field contains the algebraic sum of the following:
| • | Unposted miscellaneous charge entries |
| • | Unposted cash receipts |
| • | Unposted finance charges |
| • | Unposted invoices |
| • | Unposted returned checks |
| • | Unposted orders in O/E (if used) |
| • | Unposted transactions in P/S (if used) |
| • | Unposted orders in C/O (if used) |
Cash receipts (in A/R), credit memos (in A/R) and RMAs (in O/E ) reduce the total unposted balance. All other entries increase the unposted balance.
The posted balance and unposted balance are added together and compared to the customer’s credit limit. If the credit limit has been exceeded, you will be alerted to this fact during entry of miscellaneous charge transactions, orders (in O/E), and invoices. Refer to the O/E User documentation for full details as to exactly when credit checking is performed.
When miscellaneous charge transactions, orders and invoices are posted, the unposted balance is reduced and the account balance field is increased. When cash receipts are posted, the unposted balance is increased and the account balance field is decreased.
Unless you are making some kind of correction, you should always skip this field when adding a new customer.
If this field is suspected of having an incrorrect amount, see Set Customer Account Balances for a procedure on how to correct it.
|
Format |
9,999,999,999.99- |
|
Example |
Press <Enter> to skip this field. |
|
Note |
The Past due calc date, Unposted balance, Last invoice, Last sale amount/Date, Last statement amount/Date, last payment amount/Date, last finance charge amt/Date and Last returned check amt/Date fields are updated regardless of whether the document date is within the current period. |
Layaway balance
If you have the Point of Sale module and the POS User is allowed to enter layaway transaction payments then a non-zero amount will display in this field after a layaway payment is posted for this customer.
This field is display-only and shows the total layaway payments in open items for this customer.
Entering and posting a new layaway cash, check, or credit card payment for the POS layaway transaction increases this amount. Completing and posting a fully paid layaway or refunding and posting a layaway payment reduces this amount.
Prepaid balance
If the A/R Control information field Process prepaid cash must be checked in order to use prepaid cash processing.
This field is display-only and shows the total prepaid open item amounts for this customer.
Entering and posting a new prepaid cash amount in cash receipts increases this amount. Applying a prepaid cash amount to an invoice in A/R Invoices or to an O/E Order or Invoice and then posting the invoice reduces this amount.
Last sale
This is the document number of the most recent apply-to A/R document (most often an invoice) for this customer. The format of this number will normally conform to your default document number format (defined in A/R Control information for A/R invoices), but this is not a requirement.
Enter the number of the last invoice, or press <Enter> to leave this field blank.
|
Format |
8 characters. Lower-case is allowed. |
|
Example |
Press <Enter> to indicate that no apply-to document has yet been issued for this customer. |
Enter the amount of the last sale to this customer. The amount is automatically updated when an invoice is posted.
|
Format |
Press <Enter> |
|
Example |
999,999,999,999.99- |
This field contains the date of the last sale made to this customer. It is automatically updated when an invoice is posted.
|
Format |
MMDDYY |
|
Example |
Press <Enter> |
This field contains the amount on the last statement to this customer. It is automatically updated when statements are printed.
|
Format |
999,999,999,999.99- |
|
Example |
Press <Enter> |
This field contains the date of the last statement printed for this customer. It is automatically updated when statements are printed.
|
Format |
MMDDYY |
|
Example |
Press <Enter> |
This field contains the amount of the last payment from this customer. It is automatically updated when cash receipts are posted.
|
Format |
999,999,999,999.99- |
|
Example |
Press <Enter> |
This field contains the date of the last payment received from this customer. It is automatically updated when cash receipts are posted.
|
Format |
MMDDYY |
|
Example |
Press <Enter> |
This field contains the amount of the last finance charges posted for this customer. It is automatically updated when any finance charge is posted.
|
Format |
9,999,999,999.99- |
|
Example |
Press <Enter> |
This field contains the last date finance charges were posted for this customer. It is automatically updated when any finance charge is posted.
|
Format |
MMDDYY |
|
Example |
Press <Enter> |
This field contains the amount of the last check that was returned by the bank for this customer. It is automatically updated when a returned check is posted.
|
Format |
9,999,999,999.99- |
|
Example |
Press <Enter> |
This field contains the last date a check was returned by the bank for this customer. It is automatically updated when a returned check is posted. Leave this field blank to indicate a returned check. See the Returned Checks chapter.
|
Format |
MMDDYY |
|
Example |
Press <Enter> |
Totals
The remaining fields on the screen are in the form of a table showing period-to-date, next-period, year-to-date, and last-year totals in successive columns. The next-period fields are only accessible using graphical mode.
These figures are updated whenever an A/R, O/E, POS, C/O and T/B document for this customer is posted. When the document date is within the current period the period-to-date field is updated and the amount is added to the year-to-date. If the date is within the next period the posted amounts are written only to the next-period fields.
When Close a period is run, the next-period field is rolled to the period-to date field and the next-period amount is added to the year-to-date amount.
The year-to-date column is rolled to the last-year column when Close a period is run at the end of your accounting year. See Close a Period.
Enter the sales for the period-to-date, next-period, year-to-date, and last year.
The next-period fields are only accessible using graphical mode. When adding a new customer set the next-period field to zero.
|
Format |
999,999,999,999.99- |
|
Example |
For period-to-date, type 2240.75 For year-to-date, type 27699.51 For last-year, press <Enter> |
Enter the costs for the period-to-date, next-period, year-to-date, and last year.
The next-period fields are only accessible using graphical mode. When adding a new customer set the next-period field to zero.
|
Format |
999,999,999,999.99- |
|
Example |
For period-to-date, type 1623.05 For year-to-date, type 20137.87 For last-year, press <Enter> |
Enter the total commissions for the period-to-date, next-period, year-to-date, and last year.
The next-period fields are only accessible using graphical mode. When adding a new customer set the next-period field to zero.
|
Format |
999,999,999,999.99- |
|
Example |
For period-to-date, type 22.41 For year-to-date, type 277 For last-year, press <Enter> |
Enter the total payments for the period-to-date, next-period, year-to-date, and last year.
The next-period fields are only accessible using graphical mode. When adding a new customer set the next-period field to zero.
|
Format |
999,999,999,999.99- |
|
Example |
Press <Enter> at each field |
Enter the total finance charges for the period-to-date, next-period, year-to-date, and last year.
The next-period fields are only accessible using graphical mode. When adding a new customer set the next-period field to zero.
|
Format |
9,999,999,999.99- |
|
Example |
Press <Enter> at each field |
Make any needed changes. Press <Enter> to proceed to the next tab.
Graphical Mode
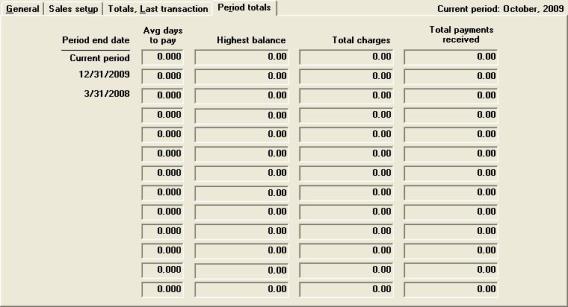
The fourth tab contains historical information about the customer.
This data posted to these fields are useful for detecting trends and evaluating a customer’s credit worthiness. You would not normally enter data in any of these fields, except perhaps upon initial installation of the A/R module.
| • | Each row is a separate period (up to thirteen of them). The periods cross the fiscal year boundary. However, if you have installed A/R within the last year, you will see only the periods you have closed. |
| • | The columns display the average time the customer took to pay a bill, the highest balance he had during a period, and his total charges and total payments during the period. |
This fields on this screen are protected from change; refer to the System User documentation for an explanation of how authorized users may override this protection.
Character Mode
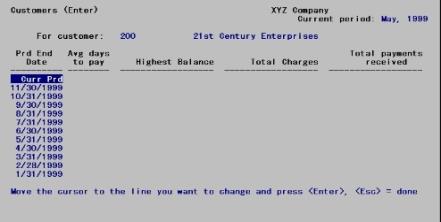
Enter information as follows:
Options
You may also use one of the options:
|
<F6> |
(For an existing entry only) To enter or change notes specific to this customer. Go to the graphical version of Customer Notes.
For the character version of notes, refer to the Using Notes section in the Use of Function Keys, Toolbar and Menu chapter of the System User documentation. |
Period End Date
In Character Mode the cursor moves to this field in the first line of the table (the current period).
| • | For an existing entry the cursor moves here only if you have answered Y to the previous question. |
| • | For a new entry, the cursor moves here automatically and the question is not asked. You can enter data freely in the current period, but every other period is a protected change. |
Options
Data entry into this line is not done in the usual way, by moving left to right across the line. Instead you open a window for data entry. Your choices are:
|
<Enter> |
To open a window for entry of all fields on this line |
|
<Esc> |
To terminate entry of period data. Continue processing at Do you want to change any period ?. |
|
<Up> |
To move to a different period among those displayed. These options are only available if more than one period is displayed. |
If you press <Enter>, the following window appears:
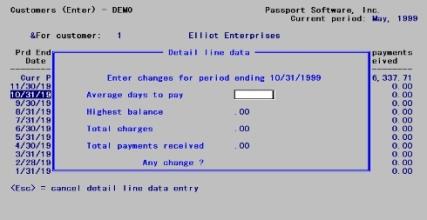
The window heading Enter changes for indicates which period is being processed (in the example this is current period).
Enter the following information:
Options
Enter the time the customer takes to pay a bill.
|
Format |
999.999 |
|
Example |
Press <Enter> |
Enter the customer’s highest balance during this period.
|
Format |
999,999,999,999.99- |
|
Example |
Press <Enter> |
Enter the total charges billed for this customer during this period.
|
Format |
999,999,999,999.99- |
|
Example |
Press <Enter> |
Enter the total payments received from this customer during this period.
|
Format |
999,999,999,999.99- |
|
Example |
Press <Enter> |
Enter notes for customer ?
This question window is asked only if this is a new entry, and only after you have finished entering period data.
Select Yes to enter a note. Select No to terminate processing of this customer.
In graphical mode the following screen displays:
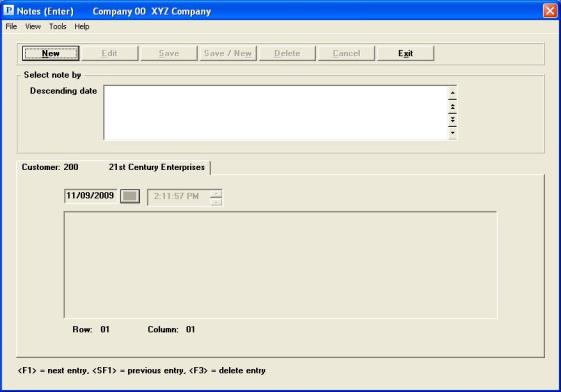
Enter notes for the customer. The text will wrap around and the end of each line.
|
Format |
10 lines of 77 characters each |
|
Example |
No example |
Options
When Point of Sale is installed, you may enter a customer memo that displays as soon as you enter the customer number on the POS transaction screen. Use the <F1> key for entry of a customer memo.
|
<F1> |
To toggle the note to a customer memo |
|
Example |
Not used in this instance |
This selection lets you print customers in number sequence.
The report includes Period Information for up to thirteen prior periods. This in turn is summarized by quarter, based on the calendar year. If your periods do not correspond closely to months, you may see more or fewer than three periods in a quarter.
See a sample Customers By Customer Number report in the Sample Reports appendix.
Select
By customer # from the Reports, customer menu.
Graphical Mode
The following screen appears:
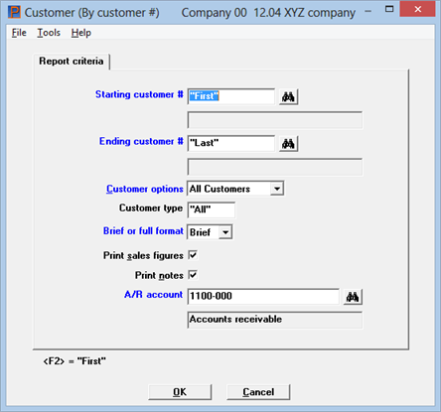
Defaults are selected for each field. Change any default as needed and select the OK button to print or Cancel button to not print the report.
Character Mode
The following screen appears:
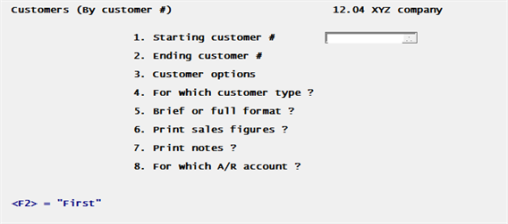
Enter the following information as needed:
Starting customer #
Ending customer #
Options
Specify the range of customers numbers to include. You may use the option:
|
<F2> |
For the "First" starting customer number or the "Last" ending customer number |
|
Format |
12 characters each |
|
Example |
Press <F2> at each field |
Select either All customers, On credit hold only or Inactive only. In character mode enter either A, C or I.
A credit hold customer has the Credit hold field checked in the customer record. An inactive customer is one with no sales year-to-date.
|
Format |
Drop down menu |
|
Example |
Press <Enter> to accept the default of All customers. |
Enter a customer type to include on this report or use one of the options:
|
<F5> |
For all customer types |
|
<Enter> |
For blank customer types |
|
Format |
Up to three characters, the default is "All" |
|
Example |
Select <Enter> for the default |
Select Brief format or Full format.
The brief format prints only one line per customer. The full format prints all of the information that is contained in Customers (except for sales figures, which are controlled by your response to the next question). The Period Information Summary prints for both brief and full format.
|
Format |
Drop down list, the default is Brief |
|
Example |
Select Full |
Check the box to have the period-to-date, year-to-date, and last-year figures appear on the list.
|
Format |
Check box, checked is yes and unchecked is no, the default is checked |
|
Example |
Press <Enter> to accept the default. |
If you want the customer notes to appear on the list, check the box.
|
Format |
Check box, checked is yes and unchecked is no, the default is checked |
|
Example |
Press <Enter> to accept the default. |
If you only use a single A/R account (that is, there is only one entry in the A/R accounts selection), this field is filled automatically.
Options
Otherwise, you can restrict the report to only those customers with a specific account number. Enter an A/R account number, or use one of the options:
|
<F1> |
For the next entry in A/R accounts. |
|
<SF1> |
For the previous A/R account |
|
<F2> |
For the default A/R account from Control information |
|
<F5> |
For "All" customers regardless of their A/R accounts |
|
Format |
Your standard account number format as specified in Company information, the default is the default account in Control information |
|
Example |
Press <F5> |
Make any needed changes. Press <Enter> or click on the OK button to print the Customers by customer number report. Press <Esc> or select Cancel to return to the menu.
This selection lets you print customers in name sequence.
Note that customers entered in first name / surname format are listed by their surnames.
See a Customer By Customer Name report example in the Sample Reports appendix.
Select
By customer name from the Reports, customer menu.
Graphical Mode
The following screen appears:
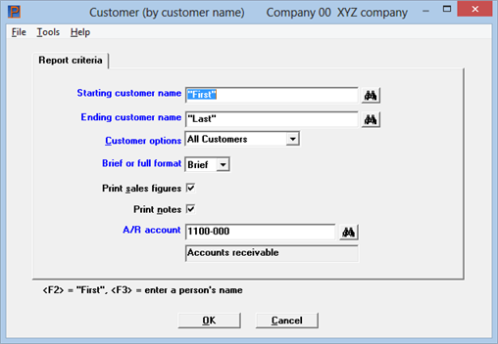
Defaults are selected for each field. Change any default as needed and select the OK button to print or Cancel button to not print the report.
Character Mode
The following screen appears:
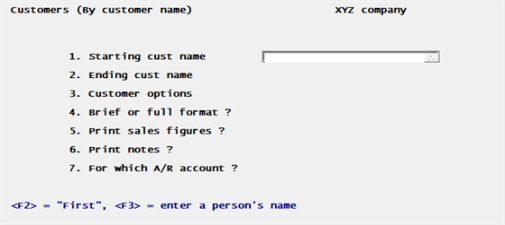
Enter the following information as needed:
Starting customer name
Ending customer name
Options
Specify the range of customer names to include. At each field you specify the range of customers numbers to include. You may use the option:
|
<F2> |
For the First starting customer number or the Last ending customer number |
|
Format |
12 characters each |
|
Example |
Press <F2> at each field |
You may use one of the options:
|
<F2> |
For the First starting customer name or the Last ending customer name |
|
<F3> |
To toggle between entering a company’s name or a person’s name |
|
Format |
25 characters at each field If Person's name, 14 for last name and 10 for first name |
|
Example |
Press <F2> at each field |
Select either All customers, On credit hold only or Inactive only. In character mode enter the corresponding A, C or I.
A credit hold customer has the Credit hold checked in the customer record. An inactive customer is one with no sales year-to-date.
|
Format |
Drop down menu |
|
Example |
Press <Enter> to accept the default of All customers. |
Enter Brief format or Full format.
The brief format prints only one line per customer. The full format prints all of the information that is contained in Customers (except for sales figures, which are controlled by your response to the next question). The Period Information Summary prints for both brief and full format.
|
Format |
Drop down list, the default is Brief |
|
Example |
Select <Enter> for the default of Brief |
Check this box to have the period-to-date, year-to-date, and last-year figures appear on the list.
|
Format |
Check box, checked is yes and unchecked is no. The default is checked. |
|
Example |
Press <Enter> to accept the default. |
If you want the customer notes to appear on the list, check this box.
|
Format |
Check box, checked is yes and unchecked is no. The default is checked. |
|
Example |
Select the <Space bar> to uncheck the box |
If you only use a single A/R account (that is, there is only one entry in the A/R accounts selection), this field is filled automatically.
Options
Otherwise, you can restrict the report to only those customers with a specific account number. Enter an A/R account number, or use one of the options:
|
<F1> |
For the next entry in A/R accounts. |
|
<SF1> |
For the previous A/R account |
|
<F2> |
For the default A/R account from Control information |
|
<F5> |
For All customers regardless of their A/R accounts |
|
Format |
Your standard account number format as specified in Company information |
|
Example |
Press <F5> to include customers regardless of A/R account number. |
Make any needed changes. Press <Enter> or click on the OK button to print the Customers by customer name report. Press <Esc> or select Cancel to return to the menu.
The Print customer labels selection can be used to print mailing labels for customer statements, promotional mailings, etc. You can print labels for one or all customer types, for customers with a last sale on or before a specified date or to include customers who do not have a last sale date, and for one or all statement cycles.
Label formats are predefined and you may not alter them.
Blank lines are not printed on labels; the remaining lines are moved upwards to close the gap.
Select
Customer labels from the Reports, customer menu.
Graphical Mode
The following screen appears:
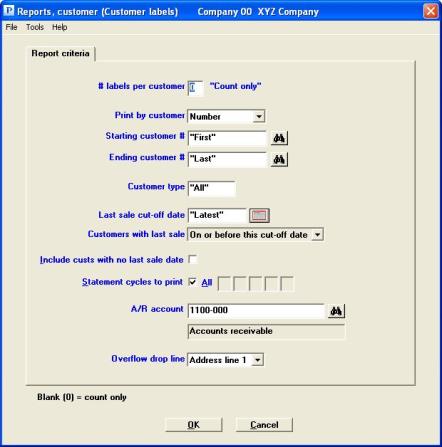
Defaults are selected for each field. Change any default as needed and select the OK button to print or Cancel button to not print labels.
Character Mode
The following screen appears:
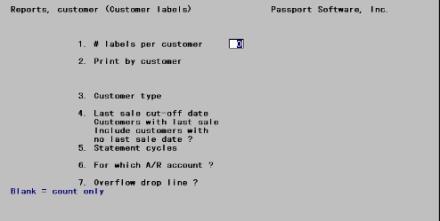
Enter the following information as needed:
Enter the number of labels to be printed per customer. Leaving this field blank causes the program to do a dry run through all the labels specified (without actually printing anything), and then to report back the number of labels which would have been printed under the specified conditions. This feature is sometimes useful; e.g., in estimating postage before spoiling any labels.
|
Format |
One digit, or press <Enter> to default to “Count only” |
|
Example |
Press <Enter> |
Select the order in which to print labels: Customer name, Number, Sales representative, or Zip code.
If you have specified (in Control information) that you do not use sales representatives, the Sales rep option is not available.
|
Format |
Drop down list. The default is number. |
|
Example |
Select Zip code |
Options
Type in the range you want to select of whatever you have chosen to print by. You may use one of the options:
|
<F2> |
For First or Last of whichever print-by item has been specified. |
|
<F3> |
To toggle between entering a company’s name or a person’s name. This option only appears when printing by customer name. |
|
Format |
12 characters (customer number) 25 characters (company’s name) 14 characters (person’s surname) 10 characters (person’s personal name) 10 characters (zip code) 3 characters (sales representative) |
|
Example |
Press <F2> at each field |
Options
To print labels for only one customer type, enter it here; or use the option:
|
<F5> |
For All types |
Customer type is optional in Customers, so a blank entry is valid here. If used, it will select only those customers that do not have a customer type.
|
Format |
5 characters, default is "All" |
|
Example |
Select <Enter> for the default of "All" |
You may choose to select customers for printing on the basis of the date of their last sale.
Enter a date, or use the option:
|
<F2> |
For Latest (print labels regardless of last sale date) |
|
Format |
MMDDYY, default is "Latest" |
|
Example |
Selected <Enter> for the default of "Latest" |
If you entered a date in the preceding field, select either After this cutoff date, or a last sale On or before the date.
|
Format |
Drop down list |
|
Example |
(Cannot be entered because <F2> for "Latest" was selected on the previous field) |
Include custs with no last sale date
Check this box if you wish to include customers who do not have a last-sales date. These would typically be new customers who have not bought anything yet.
|
Format |
Check box, checked is yes and unchecked is no. The default is unchecked. |
|
Example |
Check the box using the <Space bar> or mouse |
You may print labels for customers who receive statements on selected billing cycles, or print labels regardless of billing cycles.
Enter up to five statement cycle codes. The first blank terminates data entry. Any value may be entered for statement cycles, even duplicate values.
Options
In the first subfield you may use the option:
|
<F5> |
For All statement cycles |
|
Format |
One character, the default is All |
|
Example |
Select the <Enter> key for the default |
If you only use a single A/R account (that is, there is only one entry in the A/R accounts selection), this field is filled automatically.
Options
Otherwise, you can restrict the report to only those customers with a specific account number. Enter an A/R account number, or use one of the options:
|
<F1> |
For the next entry in A/R accounts. |
|
<SF1> |
For the previous A/R account |
|
<F2> |
For the default A/R account from Control information |
|
<F5> |
For All customers regardless of their A/R accounts |
|
Format |
Your standard account number format as specified in Company information |
|
Example |
Press <F5> to include customers regardless of A/R account number. |
Six lines of text cannot be accommodated on either continuous form labels or the smaller laser labels. Enter which line will be excluded on the labels when there is not enough room to print all six lines of text.
Select among:
|
Address line 1 |
|
Address line 2 |
|
Country |
For example, if a street address is used as Address-1 and a post office box is used as Address-2 for the customer, you may decide to drop the street address portion of the mailing label since the post office box would be used for mailing purposes. Or, you could drop the country code for customers located in the United States.
Select or click on the OK button to continue. Select the Cancel button to exit and not count or print labels. When you select OK, the following window displays:
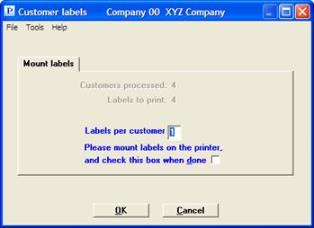
If you request a count only at the first field, you may print the selected labels after reviewing the counts and then enter a number other than zero in the Labels per customer field.
There are up to three enterable fields in this window:
This field can only be entered if you selected "Count only" in the # labels per customer field. If you want the labels to print, this box must be checked.
This field can only be entered if you selected "Count only" in the # labels per customer field. You then answer how many labels per customer are required.
Please mount labels on the printer and check this box when done
You are asked to mount labels on the printer and then check the box when ready.
You may be asked to select a printer or adjust alignment; refer to the Starting PBS, Menus and Printing chapter of the System User documentation.
Select Ok to print and Cancel to stop the selection. If you select OK, the next step is the select a printer. After you select a printer, the following screen displays if you are printing to a Company information laser printer:
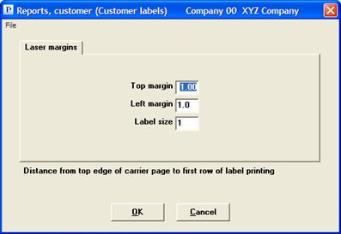
Enter the top margin or use the default.
Enter the left margin or use the default.
The choices available depend on the type of printer:
| • | For non-laser printers. |
You must use continuous-form labels, one- or two-across the page, 3-1/2 inches wide by 15/16 inch high. Mount the labels on the printer so that the print head is at the first line of the first label.
| • | For laser printers. |
Use 8 x 10 label sheets. You must select one of the following sizes:
|
1= 4 inches wide by 1 inch high, containing 20 labels per page. |
|
2= 4 inches wide by 1-1/3 inches high, containing 14 labels per page. |
|
3= 4 inches wide by 1-1/2 inches high, containing 14 labels per page. |
The Print change log selection enables you to print a log of all changes that have been made in Customers. It also tells you who made the change and when. You may optionally purge the data up to a cut-off date and print the purged data.
If you specified in Company information that you do not use change logs attempts to use it are rejected with the message “Change logs are not being used”.
You may view a Customer Change Log example in the Sample Reports appendix.
Select
Change log from the Reports, customer menu.
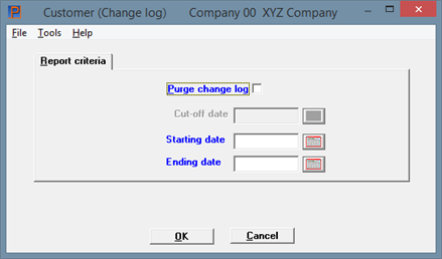
Graphical Mode
The following window displays:
Character Mode
The following screen appears:
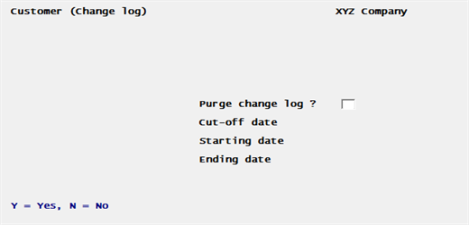
Enter the following fields:
You determine whether the data should be purged or not. If you check the box the records will be removed as they are printed up to the Cut-off date (next field). If you leave it unchecked, changes will remain and will appear the next time you print a change log (along with all the other changes that have accumulated in the interim).
|
Format |
Graphical mode: Check box where checked is yes and unchecked is no, the default is unchecked Character mode: Y or N. There is no default |
|
Example |
Press <Enter> to print the change data without purging it. |
This field is only available if you checked the box to the Purge change log field.
Enter the cut-off date to the last change date you want to purge or use the option:
|
<F2> |
For the system date (today's date) |
|
Format |
MMDDYY |
|
Example |
Select <F2> for the today's date |
Ending date
These fields are only available if you did not check the box to the Purge change log field.
Enter the range of change dates to include on the report or use the option:
|
<F2> |
For the "Earliest" starting date or "Latest" ending date |
Select OK and you will be asked to select a printer; refer to the Starting PBS, Menus and Printing chapter of the System User documentation. If you select Cancel you will be returned to the menu.
If you decided to purge there may be a pause while the log is printed and the data is purged.
This selection allows you to print a journal of customer sales for one customer or a range of customers. You may further define the report by specifying a date or range of dates, a sales rep or range of sales reps or a sales territory or range of territories.
Report data is based a combination of data from both AR Open Items and Customer History. After items are archived/purged from AR Opens and moved to Customer History they will appear in this report.
The program has additional output options which, besides printing to paper, will allow the output to be placed in a CSV/spreadsheet file (MS Excel compliant) or into an XML data file for further processing. XML is designed especially for web documents. It allows designers to create their own customized tags, enabling the definition, transmission, validation and interpretation of data between applications and between organizations.
The report sequence is customer ID, document date, document number and apply-to number.
You may view a Sales Journal example in the Sample Reports appendix.
Select
Sales Journal from the Reports, general menu.
A screen similar to this will be displayed:
Graphical Mode
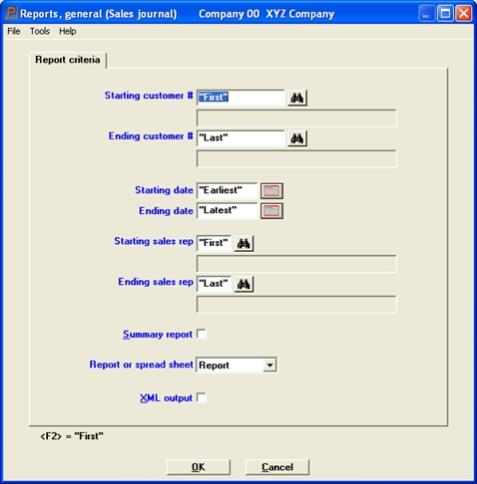
Character Mode
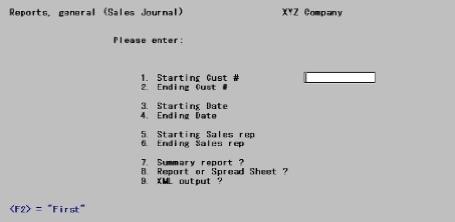
Enter the following information:
Options
Enter the number of the first customer you want to include in this report or use the option.
|
<F2> |
For the First customer number |
|
Format |
Up to 12 characters |
|
Example |
Press <F2> to include the first customer in this report |
Options
Enter the number of the last customer that you want to include in this report or use one of the options.
|
<F2> |
For the Last customer number |
|
<Enter> |
For the customer number entered in field 1 |
|
Format |
Up to 12 characters |
|
Example |
Press <F2> to include the last customer in this report |
Options
Enter the starting date for the range of invoices that you wish to include in this report or use the option.
|
<F2> |
For the earliest invoice |
|
Format |
MMYYDD |
|
Example |
Press <F2> for the earliest invoice |
Options
Enter the ending date for the range of invoices that you wish to include in this report or use the option.
|
<F2> |
For the latest invoice |
|
Format |
MMYYDD |
|
Example |
Press <F2> for the latest invoice |
If you specified in Control information that you do not use sales representatives, the next two fields display N/A (Not Applicable) and may not be entered.
Options
Enter a starting sales rep that will be included in this report or use the option.
|
<F2> |
For the First sales rep |
|
Format |
Up to three characters |
|
Example |
Press <F2> for the “First” sales rep |
Options
Depending on your answer to field 5, this could either be starting sales rep or starting territory.
Enter an ending sales rep that will be included in this report or use one of the options.
|
<F2> |
For the “Last” sales rep |
|
<Enter> |
For the sales rep number entered in field 5 |
|
Format |
Up to three characters |
|
Example |
Press <F2> for the last sales rep |
Enter N to print invoice detail on the report or Y to print a summary report. The default is N.
|
Format |
Graphical: Check box, where checked is Yes and unchecked is No. Character: One character, either Y or N |
|
Example |
Select <Enter> to use the default |
Options
Use one of the output type options.
| Character | Graphical | Description |
|
R |
Report |
To print the Sales Journal Report |
|
S |
Spreadsheet |
To create a comma delimited (CSV) file that can be imported into a spreadsheet application |
|
B |
Both |
To both print a Sales Journal Report and create a comma delimited file |
|
Format |
Graphical: Drop-down box. Choices as above. Character: 1 character, either R, S or B |
|
Example |
Enter B to print the Sales Journal Report and create a comma delimited file |
Spreadsheet (CSV) Output
When electing to print the report and output the report to a CSV file, a dialog box displays prompting you for a name for a name and a location for saving the CSV file. For more information on CSV, see Comma-delimited.
Accept the default location indicated at the top of the dialog box or select a new location. Enter a name for the file and press <Enter> or click the “Save” button to save the file.
If you wish to generate XML (Extensible Markup Language) output for this report, type X. If you do not want an XML output, press <Enter> or type N.
|
Format |
Graphical: Check box, where checked is Yes and unchecked is No. Character: One letter, either X or N |
|
Example |
Press <Enter> to not create and XML file |
XML is designed especially for web documents. It allows designers to create their own customized tags, enabling the definition, transmission, validation and interpretation of data between applications and between organizations.
Make any desired changes and then press <Enter> to generate the Sales Journal Report.
If you specified that you would like a printed report, you will be prompted for a printer.
In Windows, if you specified either CSV (comma delimited) or XML output, you will be prompted to enter a name for the output file and a location where the file will be saved.
In UNIX or Linux the file is written in the top-level PBS directory. The file name is ARSJNL.CSV or ARSJNL.XML respectively.
Select
Data import customers from the Utility menu.
Data Import is licensed separately and may not be available on your system. For information on using data import see the Data Import Manager documentation.