This chapter contains the following topics:
The View selection enables you to display your customers, invoices, recurring bills, and standard bills.
You can locate the information you want quickly, however, you cannot make changes to the information in this selection (except for notes). To make changes, use the Enter function within Invoices, Cash Receipts, or other transaction selections.
Different selections are used to view an invoice at different stages in its life cycle. Use View (Invoices) to see the invoice before it has been posted, but Invoice history (View) afterward.
| • | Viewing invoice history is documented in the Invoice History chapter section called Viewing Invoice History. |
| • | Once the invoice has been fully paid and purged from open items, you can no longer view it using View (Customers). Instead, view it via Customer history (View customer history by doc #). This is documented in the Customer History chapter section called View Customer History by Document Number. |
Select
View from the A/R menu.
There are several sub menu selections that include Customers, Invoices, Invoice history, Recurring bills and Standard bills. There is a section for each of these in this chapter.
Use this selection for a quick review of a customer’s account. All items for a customer are displayed from a starting date.
For each open item, the display includes the document number, type of document, document date, apply-to number, amount-1, amount-2, and total amount of the document.
The document types include:
|
I |
Invoice |
|
C |
Credit memo |
|
D |
Debit memo |
|
F |
Finance charge |
|
N |
Prepayment |
|
L |
Layaway |
|
B |
Balance forward |
| • | For document types I, C and D, amount-1 is the portion of document total that is subject to discount and amount-2 is the amount not subject to discount. |
| • | For document type F, amount-1 is the finance charge and amount-2 is not used. |
| • | For document type P, amount-1 is the cash receipt amount and amount-2 is the total of the discount and the allowance. |
| • | For document type N, amount-1 is the non-A/R prepaid cash receipt amount. The amount-2 will always have an amount of zero. Prepaid cash may be applied to A/R invoices, O/E orders, O/E select for billing orders and O/E invoices during the entry of these transactions. Using Prepaid cash is an option allowed per a setting in A/R Control information. |
| • | For document type L, amount-1 is the Point of Sale layaway cash receipt payment. The amount-2 will always have an amount of zero. Layaway payments are always assigned to an layaway transaction in Point of Sale. Each layaway partially pays and a P/S layaway transaction. |
| • | For document type B, balance forward, amount-1 is the full amount. A type B only exists when the customer has a balance forward balance method. See Balance method. |
Commissions
If commissions are paid on fully paid invoices, then the sales rep and commission amount display (if applicable per A/R Control information). The commission amounts shown are for documents which have not yet been logged as fully paid using Fully paid open items. Refer to the Fully Paid Open Items chapter.
Select
Customers from the View menu.
Graphical Mode
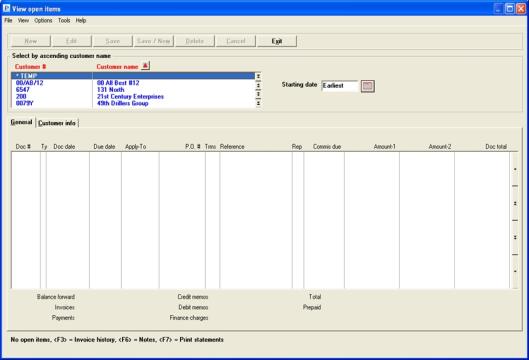
The following screen will display:

The Tab key moves the focus around the screen.
View Customer Open Items Upper List Box
The upper list box displays up to 6 customers at a time. You may sort the customers by customer number, and customer name both in ascending or descending order. Only column names in red may be sorted. To select a field or change the sort order, click on the column name or the arrow to the right of the column name or use the View options.
To locate a customer, start typing a customer name or use the arrow keys, <PgDn>/<PgUp>, and <Home>/<End> keys to find the customer. The <F1> and <SF1> keys function the same as the up/down arrow keys.
Lower List Box View Open Items Options
Once a customer is located, you have the additional following sort options for the open items in the lower list box:
|
<F2> |
To show all documents with the “Earliest” document at the top of the list. This is the default selection. The lower list box can also be sorted in descending date order |
|
<SF2> |
Show net unpaid documents only. The lower list box can be sorted in ascending or descending order by apply-to number. |
|
<F3> |
To enter the number and select a specific invoice. Use this to access the invoice history view functions.
Once the list of invoices from history displays, the invoice at the top of the list (1) should match the number you entered. If the number you entered is not in history, it will locate the closest greater number and display that. If the number entered is a larger number than any invoice in history, it will display the message No invoices in selected range.
See the Invoice History chapter for more information on the view invoice history features.
If you are interfaced with Point of Sale, then a window displays to allow you to select either A/R invoice history or POS invoice history.
In graphical mode, view POS invoice history is not available. |
|
<F5> |
Provide a summary of invoices. The lower list box can be sorted in ascending or descending order by apply-to number. |
|
<F6> |
To view and edit notes for the selected customer |
|
<SF6> |
Show details sorted by apply-to number. The lower list box can be sorted in ascending or descending order. |
|
<SF7> |
To print a statement for the selected customer. See the Statements chapter |
For a description of the types (Ty column) see the Open Item Document Types section.
Menu Selections
For general users, the menu selections can and may be restricted by the assigned menu. Also, if Order Entry is not licensed or not installed then the Order Entry menu selections will not be available for any user. The Options menu selections include:
| Options main menu selection | Sub menu selection | Documentation |
|---|---|---|
|
View accounts receivable |
Invoices |
|
|
View accounts receivable |
Invoice history |
|
|
View accounts receivable |
Customer history by date |
|
|
View accounts receivable |
Customer history by doc # |
|
|
View order entry |
Orders |
See O/E user documentation |
|
View order entry |
Full order inquiry |
See O/E user documentation |
|
View order entry |
Orders for an item |
See O/E user documentation |
|
View order entry |
Invoice history by customer |
See O/E user documentation |
|
View order entry |
Invoice history by invoice |
See O/E user documentation |
|
View order entry |
Invoice history by item |
See O/E user documentation |
|
Change apply-to # or due date |
|
When scrolling through customers, the General tab displays open items. The default display is "Earliest" as describes in the options below.
Enter the date of the earliest document to display. When you enter a date it will display the documents in document date order.
|
Format |
MMDDYY |
|
Example |
Press <F2> |
Character Mode Options
In character mode you may use the following options:
|
<F2> |
To start with “Earliest” document sorted by document date. This is the default selection. |
|
<F1> |
Show net unpaid documents sorted by apply-to number. |
|
<F3> |
To enter the number and select a specific invoice. Use this to access the invoice history view functions.
Once the list of invoices from history displays, the invoice at the top of the list (1) should match the number you entered. If the number you entered is not in history, it will locate the closest greater number and display that. If the number entered is a larger number than any invoice in history, it will display the message No invoices in selected range.
See the Viewing Invoice History section from the Invoice History chapter for more information on the view invoice history features.
If you are interfaced with Point of Sale, then a window displays to allow you to select either A/R invoice history or POS invoice history.
In graphical mode, view POS invoice history may not yet be available. |
|
<F5> |
Provide a summary sorted by apply-to number. |
|
<F6> |
Show details sorted by apply-to number. |
Up to 20 items can display at a time.
Select the Exit button to return to the menu.
Character Mode
The following screen will display:
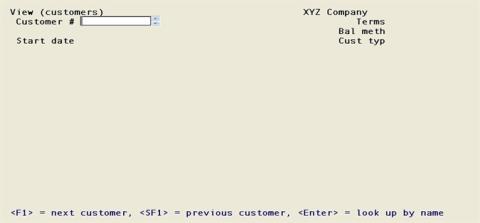
Enter the Customer # and Start date.
Customer #
Enter the customer number or use one of the options:
|
<F1> |
For the next customer in customer number order |
|
<SF1> |
For the previous customer |
|
blank |
To look up a customer by name |
Options
You may use the option:
|
Format |
12 characters |
|
Example |
Type 1 |
Upon selection of a customer, that customer’s name, address, customer type, terms, and balance method display. An ampersand (&) next to the customer number indicates that one or more notes exist for the customer.
Customer Name
If you left the customer number blank, enter the name (or just the leading characters of the name) of the customer you want to view. Upper / lower case is significant. You may use one of the options:
|
<F1> |
For the next customer, in customer name sequence |
|
<SF1> |
For the previous customer |
|
blank |
To return to looking up the customer by number |
Options
You may use the option:
|
Format |
25 characters |
|
Example |
(displays automatically in this example) |
Start date
See instructions for Starting date.
When you select <F2> for "Earliest, the a screen like the following appears:
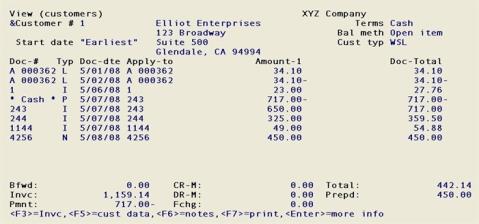
Up to fourteen documents display at one time.
Options
Select from these options:
|
<F1> |
To view the next screen (if there are more than fourteen items for this customer) |
|
<F2> |
To view the previous screen (if there are more than fourteen items for this customer) |
|
<F3> |
To enter a specific invoice number and drill down to the invoice history details.
Once the list of invoices from history displays, the invoice at the top of the list (1) should match the number you entered. If the number you entered is not in history, it will locate the closest greater number and display that. If the number entered is a larger number than any invoice in history, it will display the message No invoices in selected range.
Refer to the View Invoices section in this chapter. If you are using Point of Sale, refer to the View invoice history chapter in the Point of Sale user documentation. |
|
<F5> |
To view information about the customer (rather than the items for that customer). See section on next page for details. |
|
<F6> |
To view or enter notes for this customer. Refer to the Using Notes section of the Use of Function Keys, Toolbar and Windows chapter in the System User documentation. |
|
<F7> |
To print an immediate statement for the customer that is selected. See the Statements chapter. |
|
<Enter> |
To view additional information about the items displayed on the screen. You can cycle through five different screens showing: Amount-1 Amount-2 Due date, purchase order number and terms Reference, sales rep and commission due Customer period totals Press <Enter> one more time to return to the original screen. |
If commissions are paid on fully paid invoices, then the sales rep and commission amount are also shown (if applicable). The commission amounts shown are for documents which have not yet been logged as fully paid using Fully paid open items. Refer to the Fully Paid Open Items chapter.
Customer Data
When you select <F5> from the screen above, you may access customer data:
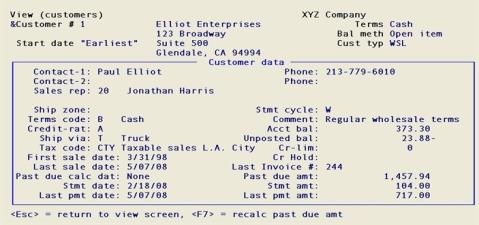
Customer data includes contact information, tax code information, first and last sales dates, date the past due was calculated, statement date, last payment date, account balance information and more.
Options
Your options at this point are:
|
<Esc> |
To return to the previous screen |
|
<F7> |
To recalculate past due amounts. Refer to the Calculate Past-due Amounts chapter. |
This selection lets you view unposted invoices, whether or not they have been printed. (To view an invoice after it has been posted, use the View invoice history selection.) See the Viewing Invoice History section of the Invoice History chapter.
Select
Invoices from the View menu.
There are three tabs in graphical mode: General, Line items and Totals.
General Tab
A screen like the following displays:
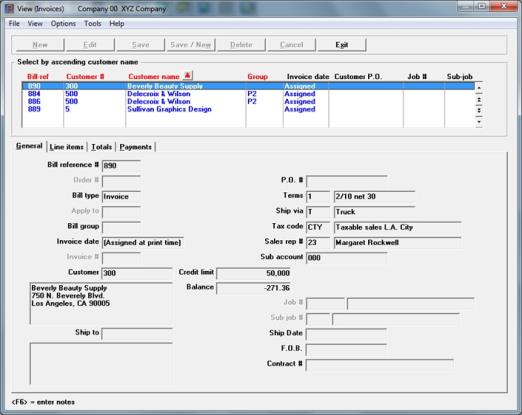
The list box displays up to 6 existing invoices, and credit memos, at a time. You may sort the invoices by bill reference number, group, customer number and customer name in ascending or descending order. Only column names in red may be sorted. To select a field or change the sort order, click on the column name or the arrow to the right of the column name or use the View options.
To locate an invoice, start typing a bill reference number or a number or name that matches the selected sort order. You may also use the up/down arrows, Page up, Page down, Home and End keys to locate an invoice. The <F1> and <SF1> keys function the same as the up/down arrow keys.
Invoices that display in the list box are available for viewing only. The fields for the selected invoice display in the lower part of the screen.
Options Menu
From the Options menu selection you may select to view any of the following:
| Sub menu selection | Documentation |
|---|---|
|
View invoice history |
|
|
View customer open items |
|
|
View customer history by date |
|
|
View customer history by doc # |
|
|
View recurring bills |
Options
You have the option to select Invoice notes. You may enter, edit or delete existing notes.
You may also select it with this function key:
|
<F6> |
To display or enter notes about this customer. In character mode, refer to the Using Notes section of the Use of Functions keys, Toolbar and Menus chapter of the System User documentation. |
Line items tab
When the Line items tab is selected, a tab like the following displays:
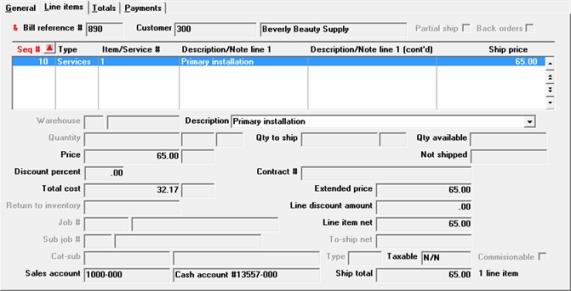
You may sort the lines by sequence number in ascending or descending order. Only column names in red may be sorted. To select or change the sort order, click on the column name or the arrow to the right of the column name or use the View options.
Type in the line sequence number to locate the line. You may also use the up/down arrow keys, page up, page down, home and end keys to find the line. The <F1> and <SF1> keys function the same as the up/down arrow keys.
Invoice lines that display in the list box are available for viewing only.
If there is more than one line of description you may select this drop down list to view the other description lines.
Totals Tab
The invoice totals, freight, miscellaneous charges, payment details, sales tax, commission, overall discount and comment display on this tab.
If you are using PBS Multi-payment processing, per A/R Control information, then the payments tab displays. For more information, see the PBS Multi-payment Setup appendix. Payments can only be seen in Graphical Mode.
It shows the payments made for the invoice. The payment code, payment description, payment amount, check number, last 4 digits of the credit card number, credit card expiration date and authorization code display.
The payment amount and original payment amount will always be the same for A/R invoices.
Select the Exit button when finished.
The following screen displays:
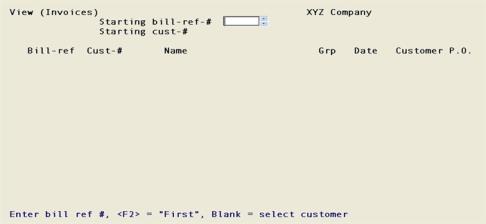
From this screen you can view up to sixteen invoices at a time. Invoices are displayed in sequence by bill reference number within customer number. Multiple customers will display on the screen if space allows.
Starting bill-ref-#
Enter the starting bill reference number. The screen will fill with invoices.
Options
You may also use the option:
|
<F2> |
For the unposted invoice with the lowest bill reference number |
You may leave this field blank to look up by customer number.
|
Format |
999999 |
|
Example |
Press <Enter> |
Starting cust-#
If you have left the starting bill reference number blank, the cursor moves to this field. Enter the number of the first customer whose invoices you want to view, or use one of the options:
Options
You may use the option:
|
<F2> |
For the First customer, in customer number sequence |
|
blank |
To look up customer by name |
|
Format |
12 characters |
|
Example |
Press <F2> |
(Customer name)
If you left the customer number blank, enter the name (or just the leading characters of the name) of the customer you want to view. Upper / lower case is significant.
Options
You may use one of the options:
|
<F2> |
For the First customer, in customer name sequence |
|
blank |
To return to the Bill-ref-# field |
|
Format |
25 characters |
|
Example |
(displays automatically in this example) |
For a more detailed inquiry into any particular invoice, select its screen line number (in the leftmost column), or use one of the options.
Options
You may use the option:
|
<F1> |
(If more invoices exit) To view additional invoices |
|
<F2> |
(If interfaced to J/C) To toggle between viewing the purchase order numbers and the job / sub-job numbers |
|
Format |
99 |
|
Example |
Type 1 to select an invoice |
In character mode the header information for that invoice displays:
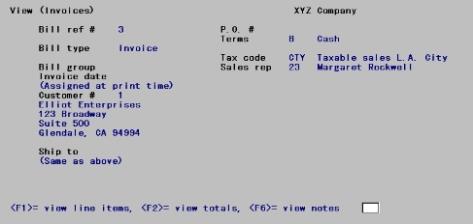
If this invoice has already been printed, the Invoice # also appears beneath Invoice date. (The invoice number is assigned at the time the invoice is printed.)
An ampersand (&) appears to the left of the Bill ref # when there is an existing note[s] for this invoice.
When you are finished viewing this screen, use one of the options.
Options
You may use the option:
|
<Esc> |
To select another invoice |
|
<F1> |
To view line items for this invoice |
|
<F2> |
To view totals |
|
<F6> |
To view or change notes for this invoice. Refer to the Using Notes section of the Use of Function Keys, Toolbar and Menus chapter in the System User documentation. |
|
Format |
(Only option key input is accepted) |
|
Example |
Press <F1> to view line items. |
Press <F1> from the header screen or the totals screen to view line items. Each line item has a screen line number immediately to the left of the sequence number.
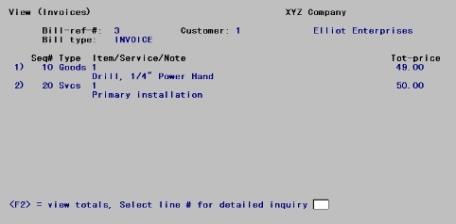
Select the screen line number for detailed inquiry into a line item, or use one of the options.
Options
You may use the option:
|
<F2> |
To view totals |
|
<F1> |
To display the rest of the items (if there are more than can be displayed on one screen) |
|
<Esc> |
To select another invoice |
|
Format |
99 |
|
Example |
Type 1 |
A screen similar to the line item screen in Invoices appears. The screen’s appearance depends on the type of line item. A goods line item is shown below:
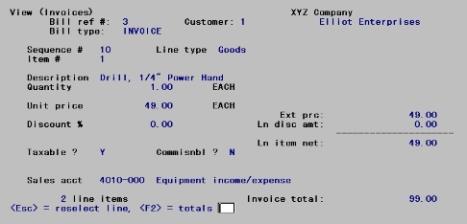
Press <Esc> to select another line item to view, or use the option.
Options
You may use the option:
|
<F2> |
To view totals |
You can view totals information by pressing <F2> from either the header screen or the line item screen.
The following screen appears:
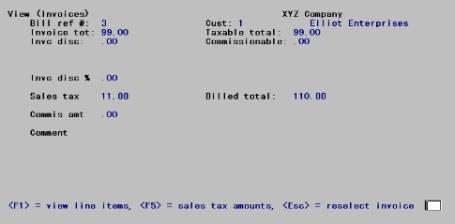
Press <Esc> to select another invoice to view, or use one of the options.
Options
You may use the option:
|
<F1> |
To view line items for this invoice |
|
<F5> |
To view sales tax |
If you press <F5>, the following screen appears:
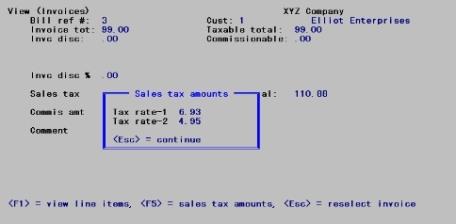
When through viewing sales tax information, press <Esc>.
This selection lets you view what recurring bills are ready for invoicing.
Select
Recurring bills from the View menu.
The following screen appears:
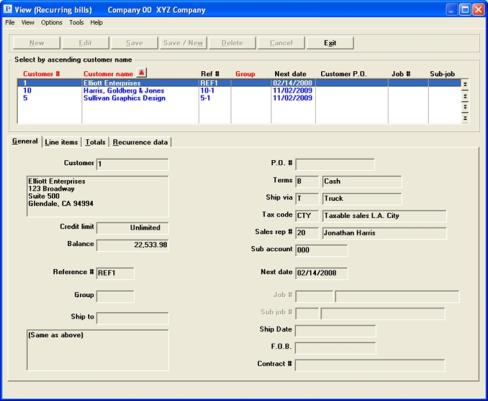
The list box displays up to 6 existing recurring bills at a time. You may sort the recurring bills by group, customer number and customer name in ascending or descending order. Only column names in red may be sorted. To select a field or change the sort order, click on the column name or the arrow to the right of the column name or use the View options.
Depending on the sort field selected, type the group number, customer number and customer name to locate the recurring bill or use the arrow keys, <PgDn>/<PgUp>, and <Home>/<End> keys to find it. The <F1> and <SF1> keys function the same as the up/down arrow keys.
You also have the following options to locate a recurring bill:
Options
|
Down arrow or <F1> |
For the next recurring bill |
|
Up arrow or <SF1> |
For the previous recurring bill |
|
Page Down |
For the next group of five recurring bills |
|
Page Up |
For the previous group of five recurring bills |
|
End |
For the last recurring bill |
|
Home |
For the first recurring bill |
There are four tabs which include General (header), Line items, Totals and Recurrence data.
The following screen appears:
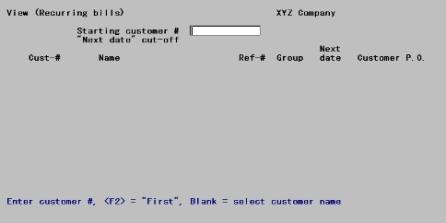
Starting customer #
Enter the number of the customer you want to start looking from, or use one of the options.
Options
You may use the option:
|
<F2> |
To start from the First customer |
|
<Enter> |
To select by customer name. |
|
Format |
12 characters |
|
Example |
Press <F2> |
Customer Name
If you left the customer number blank, enter the name (or just the leading characters of the name) of the customer you want to view. Upper / lower case is significant. You may use one of the options:
Options
You may use one of the options:
|
<F2> |
For the First customer, in customer name sequence |
|
blank |
To return to the customer number field |
|
Format |
25 characters |
|
Example |
(displays automatically in this example) |
“Next Date” Cut-off
Recurring bills due to be invoiced on or before this date will appear on the screen. Enter a date, or use the option.
Options
You may use the option:
|
<F2> |
For the Earliest date |
|
Format |
MMDDYY The default is the system (current) date |
|
Example |
Press <F2> |
The following screen appears:
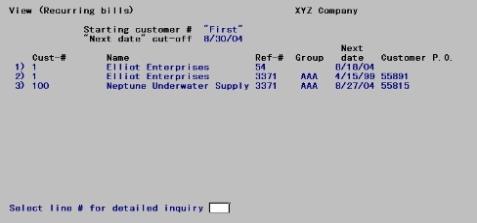
The recurring bills are listed, one line per bill, up to fifteen on each screen.
Enter the line number (from the first column) of the recurring bill you wish to view, or use one of the options.
Options
You may use the option:
|
<Esc> |
To start a new selection of recurring bills |
|
<F1> |
(If more recurring bills exist) To view additional recurring bills |
|
<F2> |
(If interfaced to J/C) To toggle between viewing the purchase order numbers and the job / sub-job numbers |
|
Format |
99 |
|
Example |
Type 2 to select a bill |
The following screen appears:
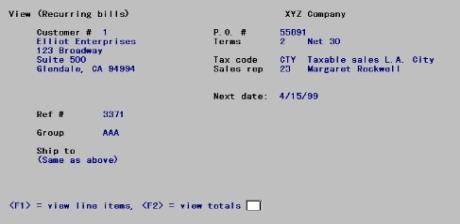
When you are finished viewing this screen, use one of the options.
Options
You may use the option:
|
<Esc> |
To select another recurring bill |
|
<F1> |
To view line items for this recurring bill |
|
<F2> |
To view totals |
|
Example |
Press <F1> to display line-item information |
Press <F1> from the header screen or the totals screen to view line items. Each line item has a screen line number immediately to the left of the sequence number.
The following screen appears:
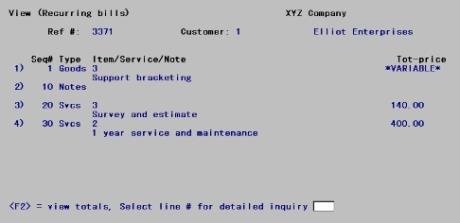
Up to seven lines appear on one screen. Select the screen line number for detailed inquiry into a line item, or use one of the options.
Options
You may use the option:
|
<F2> |
To view totals |
|
<F1> |
To display the rest of the items (if there are more than can be displayed on one screen) |
|
<Esc> |
To select another invoice |
|
Format |
99 |
|
Example |
Type 1 |
A screen similar to the line-item screen in Invoices appears. The screen’s appearance depends on the type of line item. A services line item is shown below.
The following screen appears:
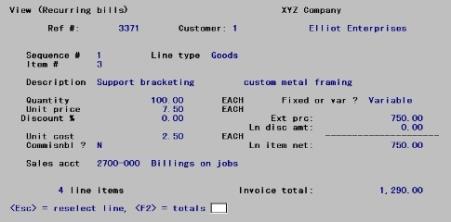
Press <Esc> to select another line item to view, or use the option.
Options
You may use the option:
|
<F2> |
To view totals |
You can view totals information by pressing <F2> from either the header screen or the line-item screen.
The following screen appears:
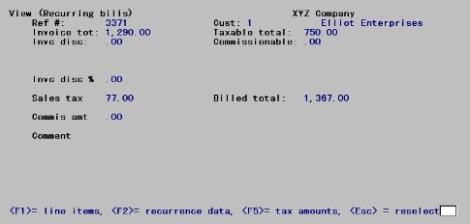
Press <Esc> to select another invoice to view, or use one of the options.
Options
You may use the option:
|
<F1> |
To view line items for this recurring bill |
|
<F2> |
To view recurrence data |
|
<F5> |
To view sales tax |
If you press <F5>, the following screen appears:
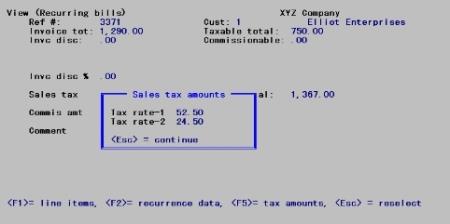
The example above is for a tax code containing only one tax rate; had there been more, each rate would appear separately.
When through viewing sales tax information, press <Esc>.
From the totals screen, press <F2> to view recurrence information.
The following screen appears:
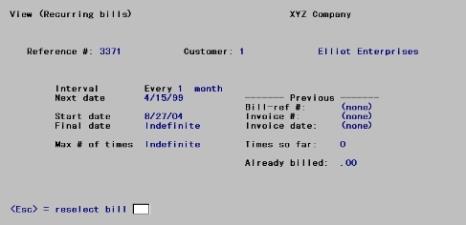
When through viewing recurrence information for this bill, press <Esc> to reselect another recurring bill to view.
Select
Standard bills from the View menu.
A screen similar to the following appears:
Graphical Mode
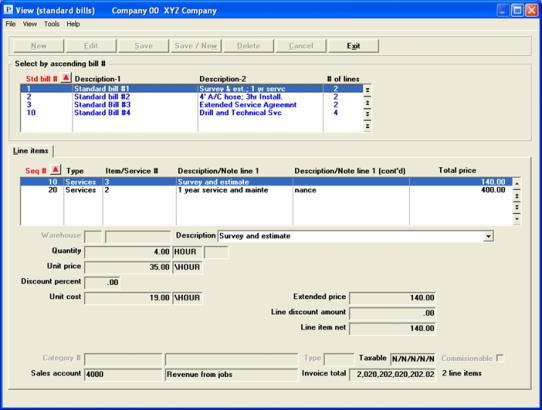
The list box displays up to 6 standard bills at a time. You may sort the standard bills by standard bill number in ascending or descending order. Only column names in red may be sorted. To select a field or change the sort order, click on the column name or the arrow to the right of the column name or use the View options.
Type the standard bill number to locate the standard bill or use the arrow keys, <PgDn>/<PgUp>, and <Home>/<End> keys to find it. The <F1> and <SF1> keys function the same as the up/down arrow keys.
You also have the following options to locate a standard bill.
The lines for selected standard bill display in lower list box. You may sort the standard bill lines by sequence number in ascending or descending order.
Place the focus in the lower list box and enter the sequence number to find the line or use the same function keys as listed for the upper list box to locate the line.
If there is more than one line of description, to view the other description lines select the drop down list.
Character Mode
The following screen appears:
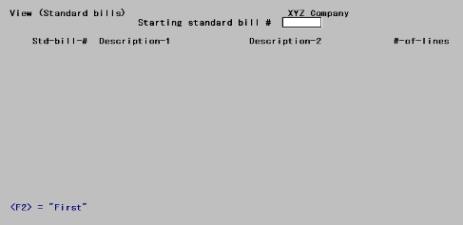
Starting standard bill #
Enter the number of the first standard bill you want to list, or use the option.
Options
You may use the option:
|
<F2> |
To start from the First standard bill |
|
Format |
6 characters |
|
Example |
Press <F2> |
The following screen appears:
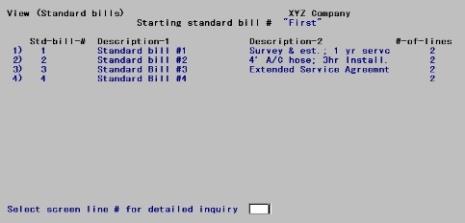
The standard bills are listed, one line per bill. Up to seventeen bills fill one screen.
Enter the line number (from the first column) of the standard bill you wish to view, or use one of the options.
Options
You may use an option:
|
<Esc> |
To start a new selection of standard bills |
|
<F1> |
(If more standard bills exist) To view additional standard bills |
|
Format |
99 |
|
Example |
Type 2 to select a bill |
Character View standard bills line-items
Each line item has a screen line number immediately to the left of the sequence number.
The following screen appears:
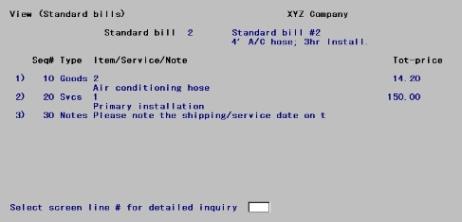
Up to seven lines appear on one screen. Select the screen line number for detailed inquiry into a line item, or use one of the options.
Options
You may use the option:
|
<F1> |
To display the rest of the items (if there are more than can be displayed on one screen) |
|
<Esc> |
To select another standard bill |
|
Format |
99 |
|
Example |
Type 2 |
A screen similar to the line-item screen in Invoices appears. The screen’s appearance depends on the type of line item. A services line item is shown below.
The following screen appears:
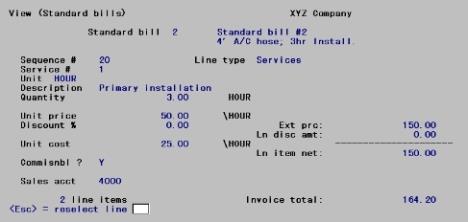
Press <Esc> to select another line item to view.