This chapter contains the following topics:
Introduction to Change Apply-to Number or Due Date
Changing Customer Balance Methods
Purging Open Items For Open-item Customers
The Change apply-to number or due date selection lets you change an A/R open item directly, without going through any posting process.
This is only done on an exception basis; normally an open item is paid when cash receipts are applied to it, and eventually purged. The two changes possible are to the due date and to the apply-to number.
Reasons for changing the due date are varied. This might be required if the due date was entered incorrectly or if there was a change in customer terms for an open item.
The usual reason for changing an apply-to number is to apply an open credit to a specific invoice. This situation can occur when a payment (e.g. a deposit) is received from an open item customer prior to the time at which the invoice is entered into A/R. The deposit would be entered as an Open credit using Cash Receipts at the time it is received. Later, when the invoice is entered and posted using Invoices, you would then use Change apply-to number or due date to change the apply-to number of the payment to be the same as the document number of the invoice. In this way, the payment is applied to the invoice.
The Change apply-to number or due date procedure should only be used if the payment is equal to or less than the balance due on the invoice. If the open credit is greater than the balance due on the invoice, you will need to follow the second method shown in the Applying Open Credit section of the Cash Receipts chapter.
|
Note |
You may prefer to use the pre-paid cash feature. This allows you to enter pre-paid cash, which you later apply to an invoice in A/R or an order/invoice in O/E as they are being entered. This would eliminate the step of applying the cash later and modifying the apply-to number. See the Process prepaid cash field in the Control information chapter. |
When entering sales, balance forward customers have zero assigned automatically to the apply-to number of every document.
If you change a customer’s balance method from balance forward to open item, you must change the apply-to number of every existing document for that customer, so payments can be properly applied to invoices.
Select
Change apply-to # or due date from the Open items menu.
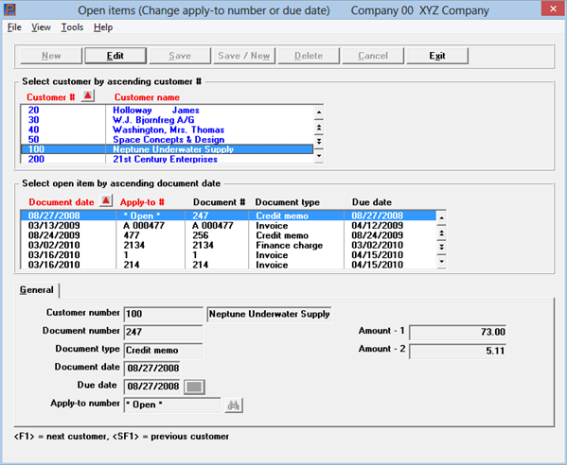
The following screen appears:

This selection is also available from the Options menu after selecting Customers under A/R View.
The Tab key moves the focus around the screen.
Change Apply-to Number or Due Date Upper List Box
The upper list box displays up to 6 customers at a time. You may sort the customers by customer number or customer name, both in ascending or descending order. Only column names in red may be sorted. To select a field or change the sort order, click on the column name or the arrow to the right of the column name or use the View options from the menu above.
To locate a customer, start typing a customer number, or name if that column is selection, or use the arrow keys, <PgDn>/<PgUp>, and <Home>/<End> keys to find the customer. The <F1> and <SF1> keys function the same as the up/down arrow keys.
Lower List Box Change Apply-to Number or Due Date Options
Once a customer is located, you may tab to the lower list box to locate the open item transaction. You may sort the open items by Customer date and Apply-to #.
To locate an open item, start typing a document date or apply-to #. You may also use the arrow keys, <PgDn>/<PgUp>, and <Home>/<End> keys to find the open item transaction. The <F1> and <SF1> keys function the same as the up/down arrow keys.
Once you have found the correct document, to change it select the Edit button or <Alt+e>. The Due date and Apply-to number fields are now editable.
You do not have to change the Due date if you are changing a customer from Balance forward to Open item.
However, if you need to change the Due date for some other reason, as explained in Due Date, modify the date in this field.
Enter a new date or click on the date lookup to locate a date and return it to the field. You may also access the date lookup with the <F4> key.
|
Format |
MMDDYY |
|
Example |
Type 40115 to specify the new due date as 4/01/15. |
The old Apply-to # displays. Enter the number of the document to which you want to apply this open item. You may also click on the lookup and return the document number from the lookup. Select <F8> or click on the lookup button also accesses the lookup.
|
Format |
8 characters |
|
Example |
Type 2002 |
Select the Save button or <Alt+s> to save your changes.
If you do not want to save your changes, select Cancel or <Alt+c> to retain the original record.
One you are finished editing or viewing open items, select the Exit button or <Alt+x> to close the window.

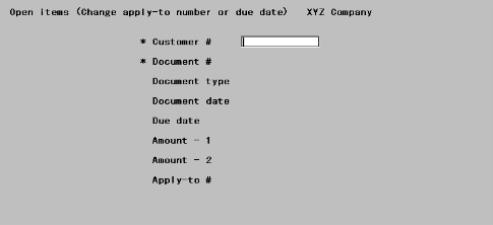
Enter the following information:
Customer #
Enter the customer number of the document to be changed.
|
Format |
12 characters |
|
Example |
Type 100 |
Document #
Enter the document number of the document to change. Leave this blank for a cash entry.
|
Format |
8 characters |
|
Example |
Type 201 |
Right Open Item ?
The information for that open item displays.
Answer N for the next A/R open item with the same customer number and document number.
Answer Y to change this open item.
|
Format |
One letter, either Y or N. The default is Y. |
|
Example |
Answer Y to indicate this is the right open item. |
Change Apply-to # or Due Date ?
|
Format |
One character, either A or D |
|
Example |
Type A |
Apply-to #
If you entered A, the cursor will be positioned here. The old Apply-to # will be cleared, allowing you to enter the number of the document to which you want to apply this open item.
|
Format |
8 characters |
|
Example |
Type 2002 |
Is Change Ok ?
Answer Y or N as appropriate. If you answer N, the open item is restored to its original form.
|
Format |
One letter, either Y or N. The default is Y. |
|
Example |
Answer Y |
|
Note |
When the Aging Report, Collections Report, or Cash Projection Report is printed, the changed document may now show up in a different aging period since the document it now applies to may be in a different period. |
Due Date
If you entered D the cursor will be positioned here. Changes to the due date are made in the same way.
|
Format |
MMDDYY |
|
Example |
Type 200 for the customer number, then type 3002 for the document number. Answer Y when you asked if this is the right A/R open item. To change the due date, type D, then type 40105 to specify the new due date as 4/01/05. |
It is possible that a number of invoices were intended to be paid off by one payment, but they will not purge when the Purge open items function is run because the apply-to numbers do not match.
This function enables you to change the apply-to number of one document to match the apply-to or document number of another document. The next time you purge A/R Open Items both documents will be removed if their amounts add up to zero.
For example, to match up the following invoices to one payment, it is
necessary to change all the apply-to numbers to match.
|
Doc No |
Type |
Apply-to |
Amount |
|
2002 |
I |
2002 |
25.00 |
|
2003 |
I |
2003 |
25.00 |
|
2004 |
I |
2004 |
50.00 |
|
5000 |
P |
2002 |
100.00 |
Change all apply-to numbers to 7777:
|
Doc No |
Type |
Apply-to |
Amount |
|
2002 |
I |
7777 |
25.00 |
|
2003 |
I |
7777 |
25.00 |
|
2004 |
I |
7777 |
50.00 |
|
5000 |
P |
7777 |
100.00 |
As a result, all of these documents will be purged the next time open items are purged. For purging instructions, see the Fully Paid Open Items chapter.
Use this report to print open items.
It may be run at any time. However the report is useful as a edit list before and after either changing due dates or apply to numbers or purging open items.
Select
Open items from the Reports, general menu.
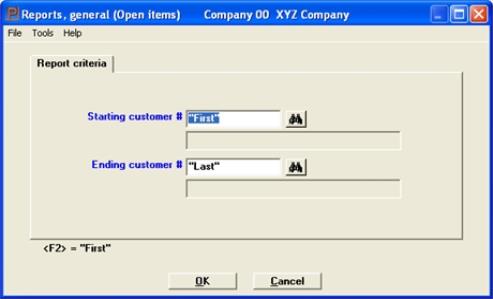
The following screen appears:
Graphical Mode

Enter the following information:
Starting customer #
Ending customer #
Options
Enter the range of customers to have open items be included on the report, or use the option:
|
<F2> |
For the "First" starting customer number or "Last" customer number |
|
Format |
12 characters |
|
Example |
Press <F2> at each field. |
In graphical mode select OK to print the report or Cancel to return to the menu without printing.
Any change ?
In character mode answer Y to re-enter the screen, or N to print the report.