This chapter contains the following topics:
Introduction to the Aging Report
The Aging Report selection is a report showing each customer’s account balance in each of four aging periods which you choose.
The report may be printed on a printer and output as a comma delimited file (CSV) for viewing in a spreadsheet program like Excel. See Comma-delimited
The Aging Report is useful in two ways:
| • | It shows, as of a particular date, that the total of customer accounts equals the total recorded in the applicable accounts receivable account. |
| • | It may be used as an aid in preparing financial statements, since the balance sheet must show the true value of receivables not including credit balance customers. Customers with a credit balance can be shown separately, since these are actually liabilities and need to be shown as such on the balance sheet. |
You can define aging periods either by days (0-30 days, 31-60 days, etc.) or by specific dates (e.g., 3/16/90 to 4/15/90, 2/1/90 to 2/28/90, etc.).
Four aging periods, or buckets, are set up according to an aging date you specify:
|
bucket 4 |
bucket 3 |
bucket 2 |
bucket 1 |
aging date |
|
oldest period |
next oldest period |
next oldest period |
newest period |
now |
You can use the default aging periods you entered in Control information or enter period definitions for this report only.
You can specify whether you want the Aging Report to show detail of the overdue items (in two possible formats), to show summary information only or to show a one-line condensed form of the data.
Different aging methods are used for balance forward and open item customers. Each is described below.
Each invoice, debit memo, and finance charge dated on or before the aging date is put into a bucket according to either its document date or due date.
The sum total of payments and credit memos is obtained and applied to the items in the buckets, starting with the earliest bucket, until the credit is used up.
The customer’s balance in each bucket is obtained and shown on the Aging Report.
For example, suppose total debits in bucket 4 were $1,000, in bucket 3 were $800, in bucket 2 were $2,000, and in bucket 1 were $1,000. Suppose the sum total of payments and credit memos was $2,400.
|
|
Sum total payments and credit memos applied to items in buckets, starting with the earliest bucket. |
Totals |
|||
|
Debits |
-$1,000 |
-$800 |
-$2,000 |
-$1,000 |
$4,800 |
|
Credits |
$1,000 |
$800 |
$1,600 |
$0 |
$3,400 |
|
Balance Due |
$0 |
$0 |
$1,400 |
$1,000 |
$1,400 |
|
Buckets |
Bucket 4 |
Bucket 3 |
Bucket 2 |
Bucket 1 |
|
|
Periods |
Oldest Period |
Next oldest period |
Next oldest period |
Newest Period |
|
$1,000 of the credit would be applied to bucket 4, leaving a balance due of $0. $800 of the credit would be applied to bucket 3, leaving a balance due of $0. The remaining $600 of credit would be applied to bucket 2, leaving a balance due of $1,400.
The Aging Report would show a balance due of $0 in periods 3 and 4, $1,400 in period 2, and $1,000 in period 1.
For open item customers, documents are grouped by apply-to number and one aging date is chosen for the entire group of documents.
A group of documents with the same apply-to number will be referred to in this section as an apply-to group in order to more easily explain how the aging date is determined.
The date chosen for an apply-to group is the date of a specific document within the apply-to group. This document is called the base document for the apply-to group, i.e., the document upon which the aging of the apply-to group is based.
Normally the base document would be an invoice, and other documents with the same apply-to number are payments or credit memos which have been applied to that invoice. However, the base document could also be a debit memo, finance charge, balance forward document, credit memo, or payment. For example, an open credit on account which has not yet been applied to any invoice would be a base document for an apply-to group consisting of just the open credit.
Because of the flexibility of the Passport Business Solutions A/R, there are many cases that can arise in terms of the combination of documents that can be grouped together in an apply-to group.
The following description shows how the base document for an apply-to group is determined for all possible cases.
The Base Document is determined as follows:
| • | Step 1. Determine if there is a document whose document number is the same as the apply-to number. |
For this step, each document type is checked separately to determine if there is a document whose number is the same as the apply-to number.
The document types are checked in the following sequence until a base document is found:
A. Balance forward
B. Invoice
C. Debit memo
D. Finance charge
E. Credit memo
F. Payment
In checking document types A through F, if a document is found whose document number is the same as the apply-to number, then that document is the base document for the entire apply-to group.
If no base document is found in this step, then step 2 is used to determine the base document.
|
Note |
It is unlikely that a single document type would have more than one document whose document number is the same as the apply-to number. However, if this occurs, then it is the oldest document of that type which is taken as the base document. |
| • | Step 2. Determine if there is a debit document in the apply-to group. |
If a debit document is found, then it is the base document. If there is more than one debit document, then the oldest debit document is the base document.
If no base document is found in this step, then the apply-to group consists of all credit documents, and step 3 is used to determine the base document.
| • | Step 3. The oldest credit document is used as the base document. |
Documents in the apply-to group whose document dates are earlier than the earliest aging period are not considered in order to determine the base document. Documents whose document dates are after the aging date are not considered in order to determine the base document.
The document date of the base document is used to place the entire group into the correct aging bucket. The entire group consists of all documents, with the same apply-to number, whose document dates are dated on or before the aging date and which fall within the four aging buckets.
The diagram on the next page illustrates aging for open item customers.
All documents with the same apply-to number are considered in order to determine the base document.
The due date of the base document is used to place the entire group into the correct aging bucket.
If the due date of the base document is out of range (i.e., earlier than the earliest aging period or later than the aging date) then the entire apply-to group is considered to be out of range and is not included on the aging report.
When payments are entered using Cash receipts, no due date is entered for the check or cash. This is because the concept of due date does not really apply to a cash receipt. When aging by due date, however, payments must be considered to have due dates in order to be properly aged. Thus, when aging by due date, the due date for a payment is assumed to be the same as the document date (i.e., the receipt date of the payment).
An open credit on account would thus appear in the bucket corresponding to its receipt date (which is the same as its due date).
Aging Open Item Customers as Balance Forward Customers
If you wish, you may choose to age open item customers in the same fashion that balance forward customers are aged, as described above under Balance Forward Customers, by selecting Age open item customers like balance forward customers on the report parameter screen.
Select
Aging from the Reports, general menu in A/R.
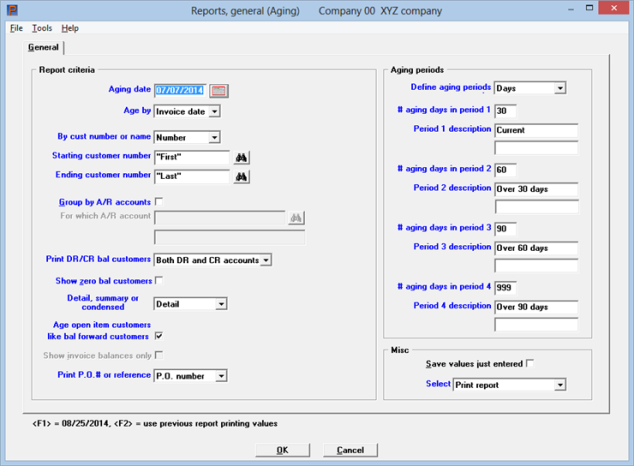
The following screen appears:
Graphical Mode

Character Mode
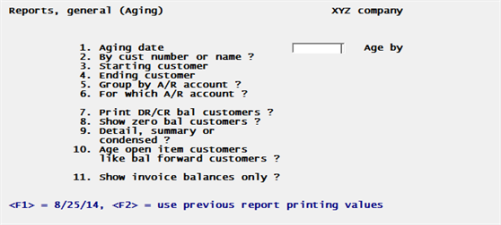
If you have saved the screen entries in a previous run (not necessarily in this session), you may use the option.
Options
You may use the option:
|
<F2> |
To restore the previous screen entries. They all display and you may change individual entries from Field number to change ? |
Otherwise, enter the following information:
This is the date which is used to calculate the age of items. Items later than this date will not be considered in calculating customer balances.
Enter the date or use one of the options:
Options
You may use the option:
|
<F1> |
For today’s date. |
|
Format |
MMDDYY |
|
Example |
Type 33115 |
You may assign items to aging periods by the due date or invoice date.
The Aging Report is usually run with an aging date that is the end of an accounting period, with the documents aged by invoice date. When the report is run in this fashion, the Aging Report serves as a cross-check against your General Ledger, since it will show outstanding receivables as of the aging date.
If you run the Aging Report by due date, then the aging date would usually be set to the current date. Run in this fashion, the Aging Report may be used to determine what receivables are overdue, and thus is actually being used as a collections report. Alternatively, you may use the Collections Report (refer to the Collections Report chapter) to obtain similar results.
Select Invoice date or type I to age open items by invoice date or select Due date or type D for by due date.
|
Format |
Graphical: Drop down list, either Invoice date or Due date Character: One letter, either I or D. The default is I. |
|
Example |
Type I |
Select Number or type 1 to print the open items in order by customer number, or select Name or type 2to print the open items in order by customer name.
|
Format |
Graphical: Drop-down list, either Number or Name. The default is Number Character: One digit, either 1 or 2. There is no default. |
|
Example |
Type 1 |
Starting customer number or name and
Ending customer number or name
Enter the range of numbers or names (whichever you have specified in By cust number or name) for which you want to print the report. At each field you may use one of the options.
Options
You may use the option:
|
<F1> |
To toggle between entering a personal name and a corporate name (if selecting customers by name) |
|
<F2> |
For the First starting customer number or name, or the Last ending customer |
|
Format |
12 characters (if entering customer number) 25 characters (if entering corporate name) Two subfields: (if entering a person’s name) 14 characters for surname 10 characters for personal name |
|
Example |
Type 200 for starting customer Type 300 for ending customer |
This field is grayed-out in Graphical mode or displays as Not applicable in Character mode if you selected to print by customer name.
Otherwise, check the box or answer Y to group the open items in order by A/R account number.
If you group the aging by A/R accounts, then you do NOT have the option to export to a spreadsheet CSV file. If you do not group by account you will have that option.
|
Format |
Graphical: Check box where checked is yes and unchecked is no Character: One letter, either Y or N. The default is Y. |
|
Example |
Answer Y |
This field displays as Not applicable if you selected to print by customer name, or if you responded N to Group by A/R account ?.
Otherwise, enter the A/R account number of the customers you want included on the report. This must be a valid entry in A/R accounts.
Options
You may use one of the options:
|
<F1> |
For the next A/R account. If only one A/R account exists, the <F1> and <SF1> options do not appear. |
|
<SF1> |
For the previous A/R account |
|
<F2> |
For the default A/R account from Control information |
|
<F5> |
For All customers regardless of their A/R account |
|
Format |
Click on Lookup Box to select an account Your standard account number format, as defined in CTL Company information |
|
Example |
Press <F5> |
Choose among:
| Character | Graphical | Description |
|
D |
DR accounts only |
to print only customers with a debit balance as of the aging date (Field #1) |
|
C |
CR accounts only |
to print only those with a credit balance |
| B | Both DR and CR accounts | to print both. This is the default |
|
Format |
Graphical: Drop-down list Character: One letter from the list above |
|
Example |
Type B |
If you entered either DR accounts only (D) or CR accounts only (C) in the Print DR/CR bal customers field, this field may not be entered.
Otherwise, check the fox or answer Y to include customers with zero balances along with those with debit and credit balances.
|
Format |
Graphical: Check box where checked is yes and unchecked is no Character: One letter, either Y or N. The default is Y. |
|
Example |
Answer Y |
Select Detail or type D to print a detailed report, select Summary, type S, for a summary report or select Condensed, type C for a condensed report.
The condensed report shows one line per customer which includes the customer number, name and shows the total account balance for each aging period. The summary report includes everything from the condensed report and also shows the sales rep, credit limit, terms, last payment date and contact information. The detailed report shows all the same data as the summary report, but also lists the open items for each customer.
|
Format |
Graphical: Drop-down list, Detail, Summary or Condensed Character: One letter, either D, S or C. The default is D. |
|
Example |
Type D |
Age open item customers like bal forward customers
Check the fox or answer Y to age open item customers like balance forward customers; that is, without reference to apply-to numbers.
|
Format |
Graphical: Check box where checked is yes and unchecked is no Character: One letter, either Y or N. The default is Y. |
|
Example |
Answer N |
If you checked the box, answered Y, toAge open item customers like bal forward customers, this field may not be entered.
Otherwise, uncheck the box or enter N if you want to view all documents relating to an invoice, or check the box or enter Y to show invoice balances only.
|
Format |
Graphical: Check box where checked is yes and unchecked is no Character: One letter, either Y or N. The default is N. |
|
Example |
Answer N |
This field appears only if you are printing a detail report.
If so, select P.O. # or type P to print the purchase order number for each overdue item, or select Reference or type R to print the reference.
|
Format |
Graphical: Drop-down list, select either P.O.# or Reference Character: Select letter, either P or R |
|
Example |
Type R |
Character Mode
A second screen then appears for you to define aging periods.
If you have saved the screen entries in a previous run (not necessarily in this session), you may use the option.
Options
Use the following option:
|
<F2> |
To restore the previous screen entries. They all display and you may change individual entries from Field number to change ? |
If you have not saved the screen entries, you may use the option:
|
<F2> |
For the aging periods from Control information |
Character and Graphical Mode
Otherwise, enter the following information:
Select Days or type D to define aging periods by days. Select Specific dates or type S to define them by specific dates.
|
Format |
Graphical: Drop down list, either Days or Specific dates Character: One letter, either D or S. There is no default. |
|
Example |
Type D or select Days |
The remainder of the screen varies considerably depending on your response to the Define aging periods field. Each case is considered separately.
Regardless of which method you choose, it is possible to define your oldest aging period in such a way that some open items on the report will be even older than the oldest period. Such line items will not be included in any aging period of the report.
Similarly, if you are aging by due date instead of invoice date, it is possible for the due date of some open items to be still in the future, and so those items will fall off the aging totals on the other end.
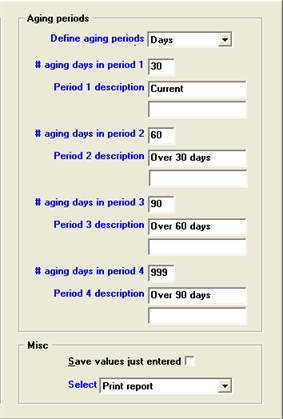
If you requested aging periods by days in the Define aging periods field, the screen now appears as follows (if you selected Specific dates for the Define aging periods field, skip ahead to the Aging Periods By Specific Dates section).
Graphical Mode
Character Mode
Fields are entered in numeric sequence, but to avoid much repetition similar fields are described together.
Enter the following information:
# aging days in period 1
# aging days in period 2
# aging days in period 3 and
# aging days in period 4
Period 1 is the most recent. Days must be in ascending order.
Despite the caption, what you enter here is not the number of days in each period. Instead, enter how many days it has been since the period ended, measuring backwards from the aging date entered on the first screen and displayed in the heading of this screen.
By convention, 999 represents all dates 999 or more days ago. This is usually entered in Field #8.
| • | If you want fewer than four aging periods, enter 999 for Period 3 or 2 in addition to Period 4. |
| • | If the highest number entered is less than 999, transactions older than that number of days will not be included in the report at all. |
|
Format |
999 at each field. The default is the number of days for this period in Control information |
|
Example |
Press <Enter> at each field |
Period 1 description
Period 2 description
Period 3 description and
Period 4 description
Enter a brief description of each aging period to print on the report.
Options
At each field, you may use the option:
|
<F1> |
For the default description for this period in Control information |
|
Format |
At each field, two lines of thirteen characters each |
|
Example |
Press <F1> |
Graphical Mode
If you have character mode, skip to the Character Mode section.
This field is only available in graphical mode.
Check this box to save the values you just entered for this screen.
|
Format |
Graphical: Check box where checked is yes and unchecked is no Character: See below |
|
Example |
Leave the box unchecked |
This field is only available in graphical mode. It defaults to Print report and cannot be changed if you checked the Group by A/R accounts field.
Select either Print report or Spread sheet and report.
After selecting Spread sheet and report, a dialog box displays prompting for a name and location of the CSV file. Accept the default location indicated at the top of the dialog box or select a new location. Enter a name for the file and press <Enter> or click the Save check box to save the report criteria. Then you are asked to select a printer.
See CSV Output
Select OK to print the report or Cancel to return to the menu without printing.
Make any needed changes, then press <Enter>.
Options
You may select one of the options.
|
1 |
Review the values, or parameters, you have entered for this report. |
|
2 |
Print this report |
|
3 |
Output report to CSV file and print report. |
If the values you have entered for the report have changed since the last time you ran the report, you will be given the option of saving your entries to use the next time you run the report.
When electing to print the report and output the report to a CSV file, a dialog box displays prompting you for a name for a name and a location for saving the CSV file. For more information on CSV, see Comma-delimited.
Accept the default location indicated at the top of the dialog box or select a new location. Enter a name for the file and press <Enter> or click the “Save” button to save the file.
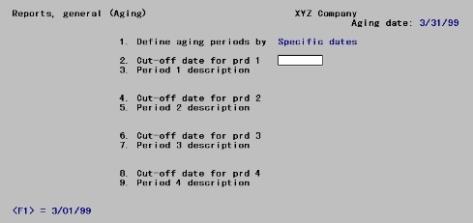
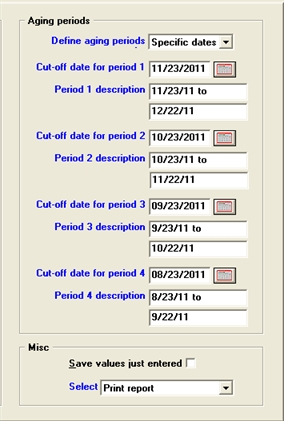
If you requested aging periods by specific dates in the Define aging periods field, the screen now appears as follows (if you select Days or entered D for the Define aging periods field, refer to the Aging Periods By Days preceding section).
Graphical Mode:
Character Mode:
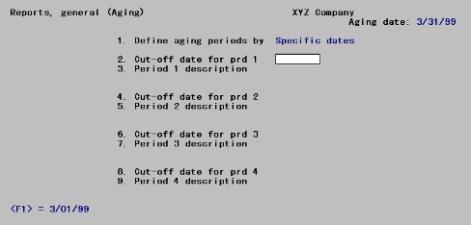
Enter the following information. Fields are entered in numeric sequence, but to avoid much repetition similar fields are described together.
Cut-off date for period 1
Cut-off date for period 2
Cut-off date for period 3 and
Cut-off date for period 4
These are the starting dates of each period. Period 1 is the most recent.
The ending dates are automatic and are not entered. Period 1 ends on the aging date entered on the first screen and displayed on the heading of this screen. Periods 2, 3, and 4 each end one day before the next period starts.
Enter the cut-off (starting) date for each period.
Options
For Period 1 you may use the option:
|
<F1> |
For a date thirty calendar days (not one calendar month) earlier than the aging date entered on the first screen and displayed in the heading of this screen. |
For Periods 2 and 3 you may use the option:
Options
For Period 4 you may use one of the options:
|
<F1> |
For a date one calendar month (not thirty days) earlier than the next period’s cut-off date. Dates at the end of a month are adjusted as necessary to allow for varying lengths of months. |
Options
You may use the option:
|
<F1> |
For a date one calendar month (not thirty days) earlier than the next period’s cut-off date. |
|
<F2> |
For Unlimited (meaning an infinitely remote date) |
|
Format |
MMDDYY |
|
Example |
(These fields cannot be entered in this example because you selected Days for Define aging periods field) |
Period 1 description
Period 2 description
Period 3 description and
Period 4 description
Enter a description of each period.
Options
At each field you may use the option:
|
<F1> |
For <mm/dd/yy to mmddyy>, where mm/dd/yy represents a date and the two dates are the starting and ending dates of the period as described above. If <F2> was chosen in Cut-off date for prd 4 field, pressing <F1> here results in Older than mm/dd/yy>. |
|
Format |
At each field, two lines of thirteen characters each |
|
Example |
Press <F2> |
Graphical Mode
If you are using character, then skip to the Character Mode section.
Save values just entered
Check this box to save the values you just entered for this screen.
|
Format |
Graphical: Check box where checked is yes and unchecked is no Character: See below |
|
Example |
Leave the box unchecked |
Select
Select Print report or Spread sheet and report.
After selecting Spread sheet and report the data is printed and output is sent to a CSV file, a dialog box will be displayed prompting you for a name for a name and a location for the CSV file.
Accept the default location indicated at the top of the dialog box or select a new location. Enter a name for the file and press <Enter> or click the “Save” button to save the file.
OK or Cancel
Select OK to print the report or Cancel to return to the menu without printing.
Make any needed changes, then press <Enter>.
Options
You may select one of the options:
|
1 |
Review the values, or parameters, you have entered for this report. |
|
2 |
Print this report |
|
3 |
Output report to CSV file and print report. |
If the values you have entered for the report have changed since the last time you ran the report, you will be given the option of saving your entries to use the next time you run the report.
When electing to print the report and output the report to a CSV file, a dialog box will be displayed prompting you for a name for a name and a location for the CSV file.
Accept the default location indicated at the top of the dialog box or select a new location. Enter a name for the file and press <Enter> or click the “Save” button to save the file.
When aging by due date, it is sometimes useful to include items which are past the aging date.
In order to include items past the aging date, you would move the aging date forward in time to the last date on which a receivable can be expected to be due, and then use the second parameter screen to control the aging periods appropriately. For example, if the aging date is July 31, 2016, and you know that there are no receivables posted which are due (based on the normal terms given by the company) after Sept 30, 2016, you would set the aging date as Sept 30, 2016. Then, using the second parameter screen, you could set your period cut-offs as follows:
|
Period 1 cut-off: |
July 1, 2016 |
|
Period 2 cut-off: |
June 1, 2016 |
|
Period 3 cut-off: |
May 1, 2016 |
|
Period 4 cut-off: |
(Unlimited) |
With this setup, all receivables due from July 1st through Sept 30th will appear together in the first bucket, all receivables due from June 1st through June 30th will appear in the second bucket, all receivables due from May 1st through May 31st will appear in the third bucket, and all receivables due on or before April 30th will appear in the fourth bucket.