This chapter contains the following topics:
Introduction to Initializing Data
Module and Multiple Company Initialization
This section enables you to initialize one or more data files and tables for a particular package.
Initialize means to create a new data file. When you initialize a data file that already exists, any information in it is completely erased and the file is recreated.
This function is included in case you need to initialize your data.
If you suspect you have a corrupted data file, do not initialize it or attempt other recovery actions without first checking with your PBS supplier. Also, see the Administrative instructions related to the Data (File) Recovery Utilities chapter. When ever possible, it is often better to restore a backup rather than initializing your data.
* CAUTION *
|
Note |
Do not use this function unless you really want to initialize your data. Initialized data means the information is completely erased. If you have to initialize your data, you may want to make a backup of the data or even the entire PBS directory and database before doing so. Certain data sets work together in tandem, such as headers and lines. If you initialize one you may need to initialize the others in the group. You should understand how data is grouped before you start this function. This relationship is not explained in this document. |
* CAUTION *
If you use the multi-company feature, be aware that initialization in the System Manager can do one thing that the other packages cannot; it can initialize data that encompass all companies. Almost all PBS data is specific to a particular company, but there are a few that are exceptions. Initializing one of these affects all companies. You will be warned when you attempt to do this.
You must be an administrative user of Passport Business Solutions in order the run these utilities. Refer to the PBS Users chapter for more information.
To Initialize System data execute this PBS initialization function:
For Windows
Start -> Programs -> Passport Business Solutions -> Init Utilities -> SY Initialization
For UNIX/Linux
Type the following:
cd /usr/pbs
or replace “/usr/pbs” with the name of your PBS top-level directory.
Then type the following:
syinit
If you are using multiple companies, enter the 2-character company-id. If the company is correct, answer Y. When prompted, enter a PBS Administrative User ID.
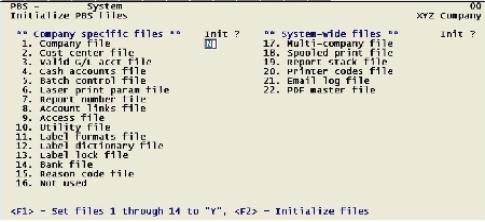
The following screen displays:

Answer <Y> for each file you want to initialize, or press <Enter> to default to <N> to skip initializing a file.
|
# |
File name as shown on screen |
Internal name (pathfinder) |
Description |
|
1. |
Company file |
Contains the Company information data. |
|
|
2. |
Cost center file |
Contains the list of cost centers or profit centers. |
|
|
3. |
Valid G/L acct file |
Contains the valid General Ledger accounts. |
|
|
4. |
Cash accounts file |
Contains the cash accounts. |
|
|
5. |
Batch control file |
Contains a list of the batches currently defined. |
|
|
6. |
Laser print param file |
Contains parameters associated with laser printers. |
|
|
7. |
Report number file |
This file is a quick index to reports printed to disk. The report number is used as the relative key of the record. If you select Y to initialize this file, you will be prompted to Enter disk report number. Enter the starting number for reports printed to disk. |
|
|
8. |
Account links file |
Equates your current account structure to any of three other structures. This file is also referred to as the <External Cross-Reference file> and the <External General Ledger file>. It is not to be confused with the <Cross-reference file>, which is used in reformatting account numbers and does not appear on this screen. |
|
|
9. |
Access file |
ACCESS |
When using the Menu-bar menu type the Access groups function may be used to move around the system rapidly. |
|
10. |
Utility file |
Under the Utility menu selection you may enter access to other applications. |
|
|
11. |
Label formats file |
This is the label format file. |
|
|
12. |
Label dictionary file |
The label dictionary file. |
|
|
13. |
Label lock file |
This is the label lock file. |
|
|
14, |
Bank file |
Bank accounts file. |
|
|
15. |
Reason code file |
Reason codes file. |
|
|
16. |
Payment file |
The payments file contains open payments associated with O/E orders, A/R invoices and cash receipts. |
|
|
17. |
Payment history file |
The payment history file contains posted payments. |
|
|
18. |
Payment codes file |
Payment codes file. |
|
|
19. |
Navigator distribution file |
This file contains the history of all posted distributions in the system. See note below on restoring the NADIST file. |
|
|
20. |
Multi-company file |
This file spans all companies. Initializing it will affect not just your company but every company in the system. Contains a list of companies. |
|
|
21. |
Spooled print file |
This file spans all companies. Initializing it will affect not just your company but every company in the system. There is one record for each spooled file. |
|
|
22. |
Report stack file |
This file spans all companies. Initializing this file will affect not just your company, but every company in the system. |
|
|
23. |
Printer codes file |
This is the printer codes file. If you initialize it when running multiple companies, it could effect printer settings for all companies. |
|
|
24. |
Email log file |
This is a log of each PDF form when it has been emailed or recreated via a reprint. |
|
|
25. |
PDF master file |
This file contains a list of the PDF files that have been generated while printing PDF forms. |
|
|
26. |
Help Graphical PBS |
This file has the links to the help for the graphical screens. |
|
|
27. |
User Help File |
This file contains user definable links to help. |
Field number to change?
Make any desired changes, then press <Enter> to initialize the files selected. Once processing is complete, the program returns to the operating system.
|
Note |
NADIST (Navigator Distribution File) Recovery after File Initialization When posting and writing to the NADSIST file a backup file is always being written as well. Therefore if the original NADIST file becomes corrupt you may initialize it and use the data recovery utilities to restore the back up file. You will find the back up in the RWxx directory of the company where you want to do a recovery. The name of this file is BKUNADxx.DAT. Copy the file to the top level PBS and change the name to NADISTxx.EXP and use the file recovering utilities to restore it. If you have run some distributions since the file was initialized, then be sure to select "Add records to existing data file". |
The <Cross-reference file> is used in reformatting account numbers and does not appear on the System initialization screen. In order to create new Cross-reference settings you can just re-enter the data. If you prefer, you can delete the Cross-reference file from the top-level PBS directory and PBS will re-create an initialized file when you access Reformat account number from the CTL menu. The file name is XREFFILxx.DAT and XREFILxx.vix with xx representing the company number. You must delete both the ‘.DAT’ and ‘.vix’.
BreakOut files are stored in the PSIB00 directory. BreakOut settings are stored per user in a file named BxxxFL.DAT and BxxxFL.vix with the xxx representing the PBS User ID. Unexpected BreakOut settings may occur and it is not always easy to find and fix the setting. If that occurs, you can delete the BreakOut file that contains all the BreakOut settings for the user. The BreakOut file gets automatically re-created when the user accesses the BreakOut utility from a PBS field via the <F12> key or clicking on the BreakOut button on the Tool bar. You must delete both the ‘.DAT’ and ‘.vix’ parts of the file.
Never delete the FUNCFL.DAT file from the PSIB00 directory.
If you prefer not to lose all the user’s BreakOut settings, you may export the BreakOut file, delete unneeded entries in the file and then restore it. To do this use the System Utilities - type SYUTIL from a command prompt.
To Initialize Accounts Payable data files, execute the Passport Business Solutions initialization function.
You must be an administrative user of Passport Business Solutions in order the run the data recovery utilities. Refer to the PBS Users chapter for more information.
For Windows
Start -> Programs -> Passport Business Solutions -> Init Utilities -> AP Initialization
For UNIX
Type the following:
cd /usr/pbs
or replace “/usr/pbs” with the name of your PBS top-level directory.
Then type the following:
apinit
If you are using multiple companies, enter the 2-character company-id. If the company is correct, answer Y. When prompted, enter an administrative User ID.
The following screen displays.
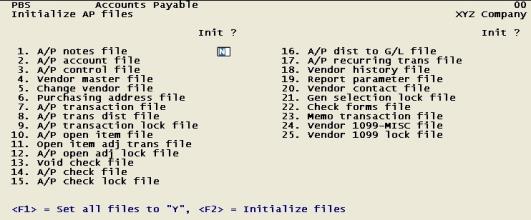
When this screen is first displayed, all its fields are blank. The cursor moves through each field in sequence until all have been traversed. You may then change any field.
Answer <Y> for each file you want to initialize, or press <Enter> to default to <N> to skip initializing a file. At any field (including “Field number to change ?”), you may use one of the options:
Options
|
<F1> |
To set all fields to Y. After the first use of this option, this key functions as a toggle; alternating between setting all fields to Y and to N. |
|
<F2> |
To initialize all files marked “Yes”, without waiting to reach “Field number to change ?”. You will be asked to confirm that you want to do this. |
|
Format |
One letter at each field, either Y or N. The default is N. |
|
Example |
Press <Enter> at each field. This displays as “Skipped”. |
The following table lists all the entries on the screen and provides a description of each file/table. The internal name of the file is given; this is useful when relating the file name to several features described in the this manual (pathfinder; data recovery utilities).
|
# |
File name as shown on screen |
Internal name (pathfinder) |
Description |
|
1. |
A/P notes file |
Notes you have entered in the various A/P selections, such as vendors, which allow notes |
|
|
2. |
A/P accounts file |
Contains all the G/L accounts which you have designated as A/P accounts |
|
|
3. |
A/P control file |
Parameters that define the basic structure of your A/P module |
|
|
4. |
Vendor master file |
Contains relevant vender information such as name, address, discount terms and year-to-date statistics. |
|
|
5. |
Change vendor file |
This file is used to log any changes or deletions which are made to the vendor file. It may be selectively purged after the Change Log is printed. |
|
|
6. |
Purchasing address file |
Contains one record for each ship-to address to which goods are delivered or at which services are performed. |
|
|
7. |
A/P transaction file |
This is a transaction file for payables transactions. The file is purged each time payables is posted. If batches are used, then only the payables in the batch are purged. |
|
|
8. |
A/P transaction distribution file |
Used to track the general ledger distributions for unposted payables entries. The file is purged each time payables is posted. If batches are used, then only the payables in the batch are purged. |
|
|
9. |
A/P transaction lock file |
Protects the A/P transaction file. |
|
|
10. |
A/P open item file |
Contains all of the open items (transactions that are currently outstanding for each vendor). |
|
|
11. |
Open item adjustment transaction file |
Contains adjustment transactions for open items. |
|
|
12. |
A/P open adjustment lock file |
Protects the A/P open item file. |
|
|
13. |
Void check file |
Contains all of the void check transactions that are current for each vendor. |
|
|
14. |
A/P check file |
Contains check records. The file is purged when the checks are posted. |
|
|
15. |
A/P check lock file |
Protects the A/P check file. |
|
|
16. |
A/P distributions to G/L file |
Used to generate the A/P Distribution to G/L Report. If the G/L module is used, this file is the input to the G/L get distributions interface program. This file would normally contain all of the detailed G/L distributions for one month or accounting period. |
|
|
17. |
A/P recurring file |
Contains one record for each recurring payable by vendor. |
|
|
18. |
Vendor history file |
Contains information on all vendor open items, vouchers, payments, paid vouchers and posted memos. |
|
|
19. |
Report parameter file |
Protects the returned checks file. |
|
|
20. |
Vendor contact file |
Additional contacts for vendors. |
|
|
21 |
General selection lock file |
A general lock file. |
|
|
22 |
Check forms file |
Contains user defined check and check stub formats. |
|
|
23 |
Memo transaction file |
Contains memo transactions |
|
|
24 |
Vendor 1099 miscellaneous file |
Contains 1099 miscellaneous information used for year-end reporting |
|
|
25 |
Vendor 1099 miscellaneous lock file |
The 1099 miscellaneous lock file. |
|
|
26. |
Pay-to file |
This contains the pay-to addresses. |
Field number to change ?
Make any needed changes. Press <Enter> to initialize the selected files. Files not selected are not affected. It is not required that any file be selected.
There will be a period of processing as the files are processed, and then the program closes.
Select <Esc> to cancel the operation.
To Initialize Accounts Receivable data files, execute the Passport Business Solutions initialization function.
You must be an administrative user of Passport Business Solutions in order the run the data recovery utilities. Refer to the PBS Users chapter for more information.
For Windows
Start -> Programs -> Passport Business Solutions > Init Utilities-> AR Initialization
For UNIX
Type the following:
cd /usr/pbs
or replace “/usr/pbs” with the name of your PBS top-level directory.
Then type the following:
arinit
If you are using multiple companies, enter the 2-character company-id. If the company is correct, answer Y. When prompted, enter an administrative User ID.
For space reasons, two screens are needed to contain all the files. You can switch between the two screens as needed. No files are initialized until you have approved both screens.
The following screen appears first:
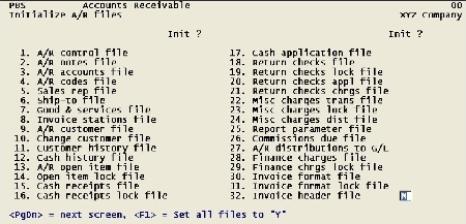
When this screen is first displayed, all its fields are blank except the first one. The cursor moves through each field in sequence until all have been traversed. You may then change any field.
Answer <Y> for each file you want to initialize, or press <Enter> to default to <N> to skip initializing a file. At any field (including “Field number to change ?”), you may use one of the options:
Options
|
<F1> |
To set all fields to Y. After the first use of this option, this key functions as a toggle; alternating between setting all fields to Y and to N. |
|
PgUp |
To return to the first field on the screen, if not there already. |
|
PgDn |
(1) To proceed to the last field on the screen, if not there already. (2) If already at the last field or at “Field number to change ?”, to proceed to the second screen, preserving all existing settings on the first screen. |
|
Format |
One letter at each field, either Y or N. The default is N. |
|
Example |
Press <Enter> at each field. This displays as “Skipped”. |
The following table lists all the entries on the screen and provides a description of each file/table. The internal name is useful when relating the data to several features described in the this documentation like pathfinder and data recovery utilities.
|
# |
File name as shown on screen |
Internal name pathfinder |
Description |
|
1. |
A/R control |
Control information. Parameters that define the basic structure of your A/R module |
|
|
2. |
A/R notes file |
Notes you have entered in the A/R invoice and customer selections which allow notes |
|
|
3. |
A/R accounts file |
Contains all the G/L accounts which you have designated as accounts receivable accounts. |
|
|
4. |
A/R codes file |
Contains the tax codes, terms codes, and ship-via codes used in the A/R and other modules |
|
|
5. |
Sales rep file |
Lists all active sales representatives. Used in customers, invoices, miscellaneous charges, and commissions due report printing. There should not be any data if you specified (in A/R Control information) that you do not use sales reps. |
|
|
6. |
Ship-to file |
Contains one record for each ship-to address to which goods are delivered or at which services are performed. |
|
|
7. |
Goods |
Contains one record for each item or service entered through Goods/Services |
|
|
8. |
Invoice |
Contains one record for each invoicing station |
|
|
9. |
A/R |
Contains relevant customer information such as name, address, credit status, shipping methods, discount terms, tax status, and year-to-date statistics |
|
|
10. |
Change customer file |
This file is used to log any changes or deletions which are made to the customer file. It may be selectively purged after the Change Log is printed. |
|
|
11. |
Customer history file |
Contains information on all fully-paid open items which have been purged from the A/R open item file. |
|
|
12. |
Cash |
Contains payment history. |
|
|
13. |
A/R open item file |
Contains all of the open items (transactions that are currently outstanding for each customer). |
|
|
14. |
Open item lock file |
Protects the A/R open item file. |
|
|
15. |
Cash receipts file |
This is a transaction file for cash receipts. It is purged when cash receipts are posted. |
|
|
16. |
Cash receipts lock file |
Protects the cash receipts file. |
|
|
17. |
Cash application file |
Contains a record for every invoice to which cash is applied during cash receipts processing. |
|
|
18. |
Returned checks file |
Contains information on checks that have been returned. |
|
|
19. |
Returned checks lock file |
Protects the returned checks file. |
|
|
20. |
Returned checks application file |
Contains a record for every invoice to which cash was applied during the original cash receipts processing. |
|
|
21. |
Returned checks charges file |
Contains a record of bank and customer charges charged because of a bad check. |
|
|
22. |
Misc charges trans file |
This is a transaction file for Miscellaneous charges transactions. The file is purged each time miscellaneous charges are posted. |
|
|
23. |
Misc charges lock file |
Protects the miscellaneous charges transaction file. |
|
|
24. |
Misc charges dist file |
Used to track the general ledger distributions for unposted miscellaneous charges entries. |
|
|
25. |
Report parameter file |
When you are entering the parameters to use in printing various reports, you can choose to save them. If you do, they are contained in this file. |
|
|
26. |
Commissions due file |
Contains a record for every sale for which a commission exists. Not present if you do not use sales representatives or do not pay them on commission. |
|
|
27. |
A/R distributions to G/L |
Used to generate the A/R Distribution to G/L Report. If the G/L module is used, this file is the input to the G/L interface program. This file would normally contain all of the detailed G/L distributions for one month or accounting period. |
|
|
28. |
Finance charges file |
Contains a record of finance charges assessed against a customer in a given period. This file is purged when finance charges are posted. |
|
|
29. |
Finance chrgs lock file |
Protects the finance charges file. |
|
|
30. |
Invoice format file |
Contains the complete descriptions of your invoice formats. |
|
|
31. |
Invoice format lock file |
Protects the invoice format file. |
|
|
32. |
Invoice header file |
Contains one record for each regular invoice. |
Field number to change ?
Make any needed changes.
Press <Enter> from a blank “Field number to change” to proceed to the next screen or select <Esc> to cancel.
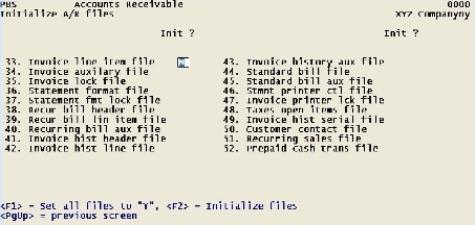
Continue to answer <Y> for each file you want to initialize, or press <Enter> to default to <N> to skip initializing a file. The cursor will move through each field in turn, and you will be able to correct any errors from “Field number to change?”. You may also use the options:
Options
|
<F1> |
To set all fields to Y. After the first use of this option, this key functions as a toggle; alternating between setting all fields to Y and to N. |
| <F2> |
To initialize all files marked “Yes”, without waiting to reach “Field number to change ?”. You will be asked to confirm that you want to do this. |
| PgUp |
(1) To return to the first field on the screen, if not there already. (2) If already at the first field or at “Field number to change ?”, to return to the previous screen. This is not the same as <Esc>, since all your settings on the second screen are preserved. |
| PgDn |
To proceed to the last field on the screen, if not there already. |
|
Format |
One letter at each field, either Y or N. The default is N. |
|
Example |
Press <Enter> at each field. This displays as “Skipped”. |
|
# |
File name as shown on screen |
Internal name PATHFILE |
Description |
|
33. |
Invoice line item file |
Contains one record for each line item for each regular invoice. |
|
|
34. |
Invoice auxiliary file |
Contains any overflow data on invoices: multi-line notes, comments, and miscellaneous ship-to addresses. |
|
|
35. |
Invoice lock file |
Protects the Invoice file. |
|
|
36. |
Statement format file |
Contains the complete descriptions of your statement formats. |
|
|
37. |
Statement format lock file |
Protects the statement format file. |
|
|
38. |
Recurring bill header file |
Contains one record for the header for each recurring bill. |
|
|
39. |
Recurring bill line item file |
Contains one record for each line item on each recurring bill. |
|
|
40. |
Recurring bill aux file |
Contains additional description for recurring bill line items, plus comments and miscellaneous deliver-to addresses for recurring bills. |
|
|
41. |
Invoice hist header file |
Contains one record for the header for each |
|
|
42. |
Invoice hist line file |
Contains one record for each line item for each historical invoice. |
|
|
43. |
Invoice |
Contains additional description for historical invoice line items, plus comments and miscellaneous deliver-to addresses for historical invoices. |
|
|
44. |
Standard bill file |
Contains one record for each standard bill line item, plus a single record for each standard bill header. |
|
|
45. |
Standard bill aux file |
Contains the additional description for standard bill line items. |
|
|
46. |
Statement printer ctl file |
Contains additional information about each printer for use in printing invoices and statements. |
|
|
47. |
Invoice printer lock file |
Protects the printer printing invoices. |
|
|
48. |
Taxes open item file |
One record per invoice for unreceived or new sales tax reporting. |
|
|
49. |
Invoice hist serial file |
Serial numbers for items in invoice history (O/E only). |
|
|
50. |
Customer contact file |
Additional contacts for customers. |
|
|
51. |
Recurring sales file |
Contains recurring sales transactions. |
|
|
52. |
Prepaid cash transaction file |
Contains prepaid cash, “N” type records copied from the open item file, that have been applied to O/E orders or A/R invoices. |
|
|
53. |
Customer CC profile file |
Customer credit card profile file. |
Field number to change ?
Make any needed changes. Press <Enter> to initialize all files selected (on either screen). There will be a period of processing as files are initialized, then the operating system prompt will reappear.
Unlike most Passport Business Solutions selections, this selection allows you to initiate processing (using <F2>) without waiting to reach Field number to change ?, but you can only do this from the second screen.
To Initialize Check Reconciliation data files, execute the Passport Business Solutions initialization function
You must be an administrative user of Passport Business Solutions in order the run the data recovery utilities. Refer to the PBS Users chapter for more information.
For Windows
Start -> Programs -> Passport Business Solutions -> Init Utilities -> CR Initialization
For UNIX
Type the following:
cd /usr/pbs
or replace “/usr/pbs” with the name of your PBS top-level
directory.
Then type the following:
crinit
If you are using multiple companies, enter the 2-character company-id. If the company is correct, answer Y. When prompted, enter an administrative User ID.
The screen displays as follows:
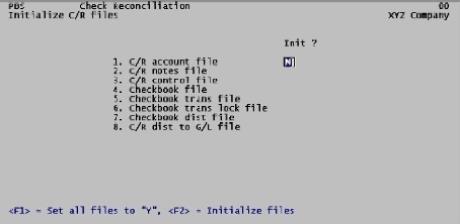
Answer <Y> for each file you want to initialize, or press <Enter> to default to <N> to skip initializing a file.
The following table lists all the entries on the screen and provides a description of each file/table. The internal name is useful when relating it to several features described in the this documentation like pathfinder and data recovery utilities.
|
# |
File name as shown on screen |
Internal name (pathfinder) |
Description |
|
1. |
C/R account file |
This file contains the checking accounts maintained in Check Reconciliation. |
|
|
2. |
C/R notes file |
This file contains the notes you have entered. |
|
|
3. |
C/R control file |
Contained within this file are parameters that define your check reconciliation structure. |
|
|
4. |
Checkbook file |
This file includes all checkbook items, including checks, deposits, adjustments, and balance forward entries. |
|
|
5. |
Checkbook transactions file |
This is a work file for checkbook transactions. The file is purged each time checks are posted. |
|
|
6. |
Checkbook lock file |
This file locks the checkbook file that contains posted transactions during reconciliation. |
|
|
7. |
Checkbook distributions file |
This file is used to track the general ledger distributions for unposted C/R entries. |
|
|
8. |
C/R distributions to G/L file |
This file contains one record for each G/L distribution generated by the C/R package for posted C/R entries. It is used to generate the C/R to G/L Distributions Report and (if the PBS General Ledger package is used) this file is the input to the G/L interface program. This file would normally contain all of the detailed G/L distributions for one month or accounting period. |
Field number to change ?
Make any needed changes. Press <Enter> to initialize the selected files. Files not selected are not affected. It is not required that any file be selected. There will be a period of processing as the files are processed, and then the program closes.
Select <Esc> to cancel.
To Initialize General Ledger data files, execute the Passport Business Solutions initialization function.
You must be an PBS administrative user in order to use this utility. Refer to the PBS Users chapter for more information.
For Windows
Start -> Programs -> Passport Business Solutions -> Init Utilities -> GL Initialization
For UNIX
Type the following:
cd /usr/psi
or replace “/usr/psi” with the name of your PBS top-level directory.
Then type the following:
glinit
If you are using multiple companies, enter the 2-character company-id. If the company is correct, answer Y. When prompted, enter an administrative User ID.
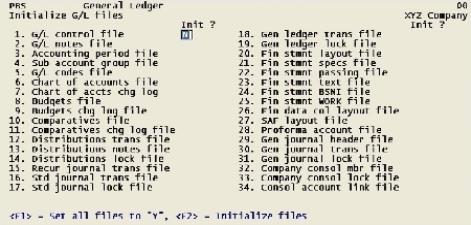
The following screen will appear:
|
Note |
Files 32, 33, and 34 can be initialized only if the company you are working with is a consolidation company. Refer to the Company Consolidation chapter in the System User documentation. |
When this screen is first displayed, all its fields are blank except the first one. The cursor moves through each field in sequence until all have been traversed. You may then change any field.
Answer <Y> for each file you want to initialize, or press <Enter> to default to <N> to skip initializing a file. At any field (including Field number to change?), you may use one of the options:
Options
|
<F1> |
To set all fields to Y. After the first use of this option, this key functions as a toggle; alternating between setting all fields to Y and to N. |
|
<F2> |
To initialize all files marked Yes, without waiting to reach Field number to change ?. You will be asked to confirm that you want to do this. |
|
Format |
One letter at each field, either Y or N. The default is N. |
|
Example |
Press <Enter> at each field. This displays as Skipped. |
1. G/L control file (GLCTLFXX)
(where xx = Company ID)
This file contains a number of parameters that define your general ledger structure. Each parameter defines specific values to be used in other programs.
This file contains all the notes you have entered in the various G/L selections which allow notes, except for notes entered through Distributions, which are not saved after posting.
3. Accounting period file (PRDFILXX)
The Accounting Period file defines all of the accounting periods in the fiscal year and designates the current and reporting periods.
4. Cost center (or sub account) group file (GRPFILXX)
This file contains one record for each cost center group defined.
This file contains the G/L codes for budget types.
6. Chart of accounts file (CHARTFXX)
The Chart of Accounts file defines all of the accounts to be used by General Ledger, and contains basic data about each account.
7. Chart of accts chg log (CNGCOAXX)
This file records changes to the Chart of Accounts record, and the record after the change was made. This file will be used only if the change log feature is used per Company information.
This file contains budgets you have entered through the Budgets selection.
9. Budgets chg log file (CNGBDGXX)
This file records changes to the Budget records. This file will be used only if the change log features are used per Company information.
10. Comparatives file (CMPRTVXX)
This file contains comparatives you have entered through the Comparatives selection.
11. Comparatives chg log file (CNGCMRXX)
This file records changes to the comparative records. This file will be used only if the change log feature is used per Company information.
12. Distributions trans file (GNJTRXXX)
This file contains transactions entered using G/L or interfaced from other modules. This file is cleared when distributions (entries) are posted.
13. Distribution notes file (GJNOTFXX)
This file contains the notes you have entered through the
Distributions selection for entries which have not yet been posted. (When distribution entries are posted, the notes are not saved.)
14. Distributions lock file (GNJLCKXX)
This file is used to protect the Distributions file.
15. Recur journal trans file (GLRCURXX)
This file contains recurring transaction information from which distributions entries are created periodically.
16. Std journal trans file (STJTRXXX)
This file contains standard journal transactions (entries).
17. Std journal lock file (STJLCKXX)
This file is used to protect the Standard Journal Transaction file.
18. Gen ledger trans file (TRXFILXX)
This file contains records from General Journal, distributions, and Standard Journal transactions after they are posted. It is the permanent G/L file.
19. Gen ledger lock file (TRXLCKXX)
This file is used to protect the General Ledger Transaction file.
20. Fin stmnt layout file (LAYOUTXX)
The Financial Statement Layout file contains the instructions that determine the appearance of each financial statement.
21. Fin stmnt specs file (FSSPECXX)
The Financial Statement Specification file contains one record for each statement to be printed.
22. Fin stmnt passing file (FSPASSXX)
This file is used to carry control information for statement printing.
23. Fin stmnt text file (TXTFILXX)
The Finish Statement Text file contains text that is to be printed on financial statements.
24. Fin stmnt BSNI file (GLBSNIXX)
The Financial Statement BSNI file contains the calculated balance sheet net income data.
25. Fin stmnt work file (FSWORKXX)
This is a temporary work file used to produce financial statements.
26. Fin data col layout file (LAYCOLXX)
The Financial Data Column Layout file contains the instructions that determine how the transaction file data is extracted.
27. Fin data extract work file
This is a work file used in automatically generating extract financial data.
28. SAF layout file (SAFLOFXX)
This is a work file used in automatically generating standard financial statement layouts for the source and application of funds reports.
29. Proforma account file (PROCOAXX)
The Proforma Account file contains the data records which will allow you to use a standardized balance sheet and operating statement from any chart of accounts.
30. Gen journal header file (MLTRXHXX)
The General Journal header account file contains General Journal header data for each journal entry number.
31. Gen journal trans file (MLTRXDXX)
The General journal trans file contains multi-line transaction records for General Journal.
32. Gen journal lock file (MLTLCKXX)
This file is used to protect the General Journal Transaction file.
33. Company consol mbr file (MEMSPCXX)
This file defines all member companies of consolidations and contains the cost center designation to be used for each member company.
34. Company consol lock file (CCNLCKXX)
This file is used to protect the Company Consolidation selection from other users in a multiple-user system.
35. Consol account link file (ACTLNKXX)
This file defines the links between the chart of accounts in each member company and in the consolidation company. It also contains a description of each account linked.
Field number to change ?
Make any needed changes. Press <Enter> to initialize the selected files. Files not selected are not affected. It is not required that any file be selected. There will be a period of processing as the files are processed, then the program closes.
Select <Esc> to cancel.
Initialize Inventory Control data by executing the Passport Business Solutions initialization function.
Only an authorized PBS administrative user can use this utility. Refer to the PBS Users chapter for more information.
For Windows
Start -> Programs -> Passport Business Solutions -> Init Utilities -> IC Initialization
For UNIX
Type the following:
cd /usr/psi
or replace “/usr/psi” with the name of your PBS top-level directory.
Then type the following:
icinit
If you are using multiple companies, enter the 2-character company-id. If the company is correct, answer Y. When prompted, enter an administrative User ID.
The first screen displays as follows:
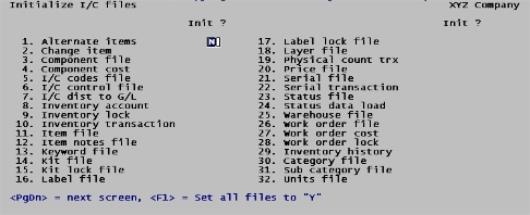
Answer <Y> for each file you want to initialize, or press <Enter> to default to <N> to skip initializing a file.
A brief description of each data file/table is listed below:
1.Alternate Items file (ALTITM)
This file contains alternate items you have defined for use with Inventory, Order Entry, or Accounts Receivable.
This is a log of the changes made to the Item file. It is needed only if the Change Log is used.
This file contains information for each kit component on a work order.
4.Component Cost file (CMPCST)
This file contains cost information for each kit component on a work order.
This file contains the pricing codes, commission codes, and taxable codes.
This file contains a number of parameters and default values. It also includes the control information for the saved formats for certain reports and import selections.
7.I/C Dist to G/L file (ICDIST)
This file is used to generate the I/C Distribution to G/L Report and contains the debit and credit distributions that can be interfaced to G/L, if using.
8.Inventory Account file (INVACT)
This file contains all inventory accounts to which I/C activity may be distributed.
9.Inventory Lock file (INVLCK)
This file is used to protect the Inventory Transaction file.
10.Inventory Transaction file (INVTRX)
This file contains the transactions entered using Inventory (or those that came from O/E, or A/R). The transactions remain in this file until removed during posting.
Each item of merchandise that is contained in inventory is identified in the Item file.
This file contains one record for each item note you have entered.
This file contains the keywords for each item, as well as all bar code information.
This file contains the definitions for each kit.
This file is used to protect the Kit file.
This file contains one record for each item label format that you set up.
This file is used to protect the Label file.
This file contains the LIFO/FIFO detail history records (layers).
19.Physical Count Trx file (ICPHXF)
This file contains the physical count transactions created using Physical count, when using the expanded physical count method. The transactions remain in this file until removed during the adjustment creation process.
This file contains all warehouse-specific prices, sale prices, and contract prices for items, as well as alternate selling unit information.
Each serial number associated with an inventory item is contained in this file, along with its related information. Lot numbers and historical detail for lot items are also stored in this file.
22.Serial Transaction file (ICTKXF)
This file contains serial transactions produced by entering inventory transactions for serialized items using Inventory (or those that came from O/E). It also contains transactions entered directly through Serial numbers. The serial transactions remain in this file until removed during the posting of the respective functions.
This file contains the records of quantities, costs, and prior period data for each item for each warehouse.
24.Status Data Load file (LODSTA)
This file contains the load requests entered using Status load file.
This file contains the warehouse codes.
This file contains information on all work orders entered.
27.Work Order Cost file (WKOCST)
This file contains cost information on all work orders entered.
28.Work Order Lock file (WKOLCK)
This file protects the Work Order file.
29.Inventory History file (ITXHIS)
This file contains historical information on past Inventory transaction.
Item categories are stored in this file.
This file contains item sub-category types.
Item units are stored in this file.
Field number to change ?
Make any changes or use one of the options:
|
<PgDn> |
For the next screen |
|
<F1> |
To set all files to Y. |
The second screen of the Initialize I/C feature appears after the completion of field #32, or using <PgDn>, and appears as follows:
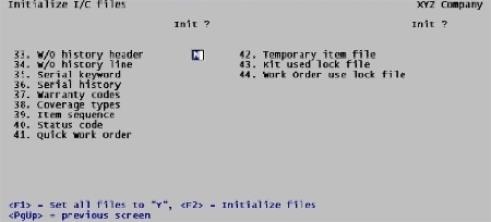
Continue to answer <Y> for each file you want to initialize, or press <Enter> to default to <N> to skip initializing a file.
33. Work Order history header (WKOHDR)
This file contains information on all work orders header entered.
34. Work Order history line (WKOLIN)
This file contains all Work Order files in use.
This file contains information on alphabetical order of terms used in the I/C manuals.
The serial units history information are stored in this file.
This file contains types of warranty codes.
Types of coverage are stored in this file.
This file contains information on all item sequence.
Status codes are stored in this file.
This file contains all the quick W/O in use.
42. Temporary item file (TMPITM)
Temporary items are stored in this file.
43. Kit used lock file (KUSLCK)
This file protects a working file.
44. Work order used lock file (WUSLCK)
This file protects a working file.
Field number to change ?
Make any needed changes, or use one of the options:
|
<PgUp> |
For the previous screen |
|
<F1> |
To set all files to Y |
|
<F2> |
To initialize the files |
|
<Esc> |
Cancel and close the program |
To Initialize Job Cost data files, execute the Passport Business Solutions initialization function.
To use this utility you must be a PBS administrative user to use this utility. Refer to the PBS Users chapter for more information.
For Windows
Start -> Programs -> Passport Business Solutions -> Init Utilities -> JC Initialization
For UNIX or Linux
Type the following:
cd /usr/psi
or replace “/usr/psi” with the name of your PBS top-level
directory.
Then type the following:
jcinit
If you are using multiple companies, enter the 2-character company-id. If the company is correct, answer Y. When prompted, enter an administrative User ID.
The following screen displays:
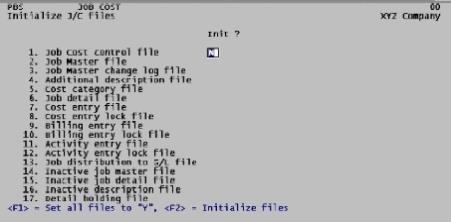
When this screen is first displayed, all its fields are blank except the first. The cursor moves through each field in sequence until all have been traversed. You can then change any field.
Options
Answer <Y> for each file you want to initialize, or press <Enter> to default to <N> to skip initializing a file. At any field (including Field number to change ?), you can use one of the options:
|
<F1> |
To set all fields to Y. After the first use of this option, this key functions as a toggle, alternating between setting all fields to Y and to N. |
|
<F2> |
To initialize all files marked Yes, without waiting to reach Field number to change ?. You will be asked to confirm that you want to do this. |
|
Format |
One letter at each field, either Y or N. The default is N. |
|
Example |
Press <Enter> at each field. This displays as Skipped. |
The following table lists all the entries on the screen and provides a description of each file. Cross-references are given to the Job Cost User documentation chapters where the contents of the data is described. In addition, the internal name of the file is given. This is useful when relating the file name to several features described in this documentation like pathfinder and data recovery utilities.
|
# |
File name shown on screen |
Job Cost Manual Chapter Reference |
Internal file name (pathfinder) |
Description/Contents of File |
|
1 |
Control Information |
JCCTLF |
Parameters defining your job cost structure |
|
|
2 |
Job Descriptions |
MSTFIL |
Full definition and specification of each job. Contains the identifying description record for each job and one or more cost item records, providing the component parts of each job |
|
|
3 |
Job Descriptions |
CNGMST |
Used to log changes or deletions made to the Job Master file. Can be selectively purged after the Change Log is printed. If you are not using the change log function (per the Company file), no data is put into this file. |
|
|
4 |
Job Descriptions |
DESCFL |
Additional description you can enter for the job header records or job cost item records |
|
|
5 |
Cost Categories |
CATFIL |
Master list of cost categories that are used on all your jobs |
|
|
6 |
Job Descriptions |
DTLFIL |
Complete record of all cost and billing transactions entered for jobs. These transactions stay in the Job Detail file until you specifically request to save them in another file (the Holding file or Inactive Job Detail file) or purge them.
All transactions entered directly in Job Cost and all transactions for jobs that were entered through other Passport Business Solutions modules |
|
|
7 |
Costing; Get Costs |
CSTTRX |
Temporary file for cost entries (transactions). Can be entered directly in the Job Cost module or interfaced into Job Cost from other Passport Business Solutions modules via the Get costs function. When cost transactions are posted, they are deleted from this file at the same time. |
|
|
8 |
Costing; Get Costs |
CSTLCK |
Protects the Cost Entry file during posting of cost transactions |
|
|
9 |
Billing and Payment |
BLPTRX |
Temporary file for billing and payment entries (transactions) entered directly in Job Cost. File is purged each time such transactions are posted. |
|
|
10 |
Billing and Payment |
BLPLCK |
Protects the Billing Entry file during the posting of billing and payment transactions |
|
|
11 |
Completion Estimates |
ACVTRX |
Temporary work file for activity transactions. Is completely purged each time activity transactions are posted. Activity transactions are another term for completion estimate transactions. |
|
|
12 |
Completion Estimates
|
ACVLCK |
Protects the Activity Entry file during posting of activity transactions. |
|
|
13 |
Billing and Payment; Costing‘ |
JCDIST |
Used only if you are not using all three of the PBS A/R, A/P, and PR modules. In this case, it holds all general ledger distributions resulting from cost transactions and billing and payment transactions entered directly in Job Cost. Can be selectively purged at any time. |
|
|
14 |
Utilities |
MSTFIX |
Saves jobs that have been closed, and that you want to remove from your active files and store for later use or review |
|
|
15 |
Utilities |
DTLFIX |
Saves the detailed transactions for the jobs saved in the Inactive Job Master file |
|
|
16 |
Utilities |
DESCFX |
Saves the additional description for the jobs saved in the Inactive Job Master file |
|
|
17 |
Utilities |
HLDFIL |
Temporarily saves or holds detailed transactions (from the Job Detail file) for jobs that are still active. Allows you to temporarily keep detailed transactions not current in a separate file, so they will not be included with the current detail |
Field number to change?
Make any needed changes. Press <Enter> to initialize the selected files. Files not selected are not affected. It is not required that any file be selected. There will be a period of processing as the files are processed, and then the program closes.
Select <Esc> to cancel.
To Initialize Order Entry data files, execute the Passport Business Solutions initialization function.
You must log in as a PBS administrative user to use this utility. Refer to the PBS Users chapter for more information.
For Windows
Start -> Programs -> Passport Business Solutions -> Init Utilities -> OE Initialization
For UNIX
Type the following:
cd /usr/pbs
or replace “/usr/pbs” with the name of your PBS top-level directory.
Then type the following:
oeinit
If you are using multiple companies, enter the 2-character company-id for the files you wish to initialize. If the company is correct, answer Y. When prompted, enter an administrative User ID.
The following screen appears:
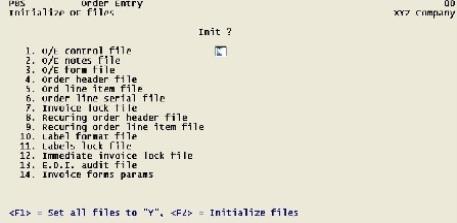
Answer <Y> for each file you want to initialize, or press <Enter> to default to <N> to skip initializing a file.
A brief description of each data file is listed below:
This file contains a number of module parameters and default values for Order Entry.
This file contains all the notes you have entered in the various O/E selections that allow notes. Notes associated with either orders, quotations, or recurring orders.
This file contains definitions for forms that can be printed from orders. The predefined invoice forms that are supplied with O/E are contained in this file, as well as any new forms that you may define.
This file contains a record for each unbilled order, unposted invoice, credit memo, quote, or RMA. If back order control is used, incomplete orders (those that contain back ordered items) remain in the file until back orders are filled.
5. Order line item file (LINITM)
This file contains a record for each line item associated with a specified order, invoice, credit memo, quote, or RMA. It is used to produce all order reports and is purged when the associated order, invoice, credit memo, quote, or RMA is removed from the Order Header file.
6. Order line serial file (OETKXF)
This file contains a record for each serial number or lot number associated with a specific line item on a particular order, invoice, credit memo, or RMA.
This file is used to protect the Order files.
8.Recurring order header file (OERHDR)
These files contain order header and line item detail for recurring orders that may be used repeatedly for creation of regular orders.
9.Recurring order line item file (LINITM)
This file contains order line item detail for recurring orders.
This file contains one record for each COD and shipping label format that you set up.
This file protects the Label Format file.
12.Immediate invoice lock file (IMILCK)
This file protects order files.
13. E.D.I. audit file (EDIAUD)
This file protects the E.D.I. audit file.
14. Invoice forms parameter (OEFPAR)
This file saves the parameters for printing forms.
Field number to change?
Make any needed changes. Press <Enter> to initialize the selected files. Files not selected are not affected. It is not required that any file be selected. There will be a period of processing as the files are processed, and then the program closes.
Select <Esc> to cancel.
To Initialize Purchase Order data files, execute the Passport Business Solutions initialization function.
You must log in as a administrative user authorized to use PBS software. Refer to the PBS Users chapter for more information.
For Windows
Start -> Programs -> Passport Business Solutions -> Init Utilities -> PO Initialization
For UNIX
Type the following:
cd /usr/psi
or replace “/usr/psi” with the name of your PBS top-level directory.
Then type the following:
poinit
If you are using multiple companies, enter the 2-character company-id for the files you wish to initialize. If the company is correct, answer Y. When prompted, enter an administrative User ID.
The following screen displays:
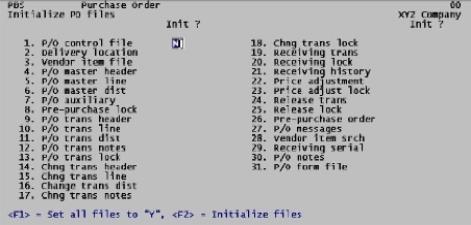
When this screen is first displayed, all its fields are blank. The cursor moves through each field in sequence until all have been traversed. You can then change any field.
Options
Answer <Y> for each file you want to initialize, or press <Enter> to default to <N> to skip initializing a file. At any field you can use one of the options:
|
<F1> |
To set all fields to Y. After the first use of this option, this key functions as a toggle, alternating between setting all fields to Y and to N. |
|
<F2> |
To initialize all files marked Yes, without waiting to reach Field number to change ?. You will be asked to confirm that you want to do this. |
|
Format |
One letter at each field, either Y or N. The default is N. |
|
Example |
Press <Enter> at each field. This displays as Skipped. |
The following table lists all the entries on the screen and provides a description of each file/table. Cross-references are given to the chapter(s) where the contents of the file are described. In addition, the internal name of the file is given; this is useful when relating the file name to several features described in this documentation (pathfinder; data recovery utilities).
|
# |
Screen File Name |
Purchase Order Manual Chapter Reference |
Internal file name |
Description |
|
1 |
Control Information |
POCTLF |
Contained within this file are a number of parameters that define your purchase order structure. Each parameter determines a specific procedure to be used in other modules. |
|
|
2 |
Deliver-to Locations |
WHSFIL |
Contains locations and addresses where items are to be stocked and received. It is the same file used in Inventory Control, where it is called the Warehouse File. If you are using Inventory Control, both modules will use the same file. |
|
|
3 |
Vendor Items; |
VENITM |
Contains the vendors you do business with and the items they provide. Vendor item records contain data about the vendor and the item. |
|
|
4 |
Purchase Orders |
POHDRF |
Contains one header record for each purchase order. |
|
|
5 |
Purchase Orders |
POLINF |
Contains line items associated with a specific purchase order. |
|
|
6 |
Purchase Orders |
PODIST |
Contains distribution records associated with a specific line item. |
|
|
7 |
Purchase Orders |
AUXFIL |
Contains special messages or manually entered deliver-to addresses associated with purchase order header records, and additional descriptions that have been entered for line item records. |
|
|
8 |
Pre-purchase Processing |
PRELCK |
Used to ensure that only one user issues purchase order numbers or prints the purchasing worksheet at a time. |
|
|
9 |
Purchase Orders |
HDRTRX |
Contains one header record for each purchase order transaction. |
|
|
10 |
Purchase Orders |
LINTRX |
Contains line items associated with a specific purchase order transaction. |
|
|
11 |
Purchase Orders |
DISTRX |
Contains distribution records associated with a specific purchase order transaction line item record. |
|
|
12 |
Purchase Orders |
LNNOTF |
Contains the notes associated with P.O. line items. |
|
|
13 |
Purchase Orders |
PCHLCK |
Used to protect the Purchase Order Transaction Files. |
|
|
14 |
Changes to Purchase Orders |
CNGHDR |
Contains header records of purchase orders that have been changed. |
|
|
15 |
Changes to Purchase Orders |
CNGLIN |
Contains line items associated with a specific purchase order that has been changed. |
|
|
16 |
Changes to Purchase Orders |
CNGDIS |
Contains distribution records associated with a specific purchase order line item that has been changed. |
|
|
17 |
Changes to Purchase Orders |
CNNOTF |
Contains the notes associated with change P.O. line items. |
|
|
18 |
Changes to Purchase Orders |
CNGLCK |
Used to protect the Change Transaction Files. |
|
|
19 |
Receivings |
RCVTRX |
For receiving transactions. When you receive items, they are entered into this file, and are cleared when posted to the permanent files. |
|
|
20 |
Receivings |
RCVLCK |
Used to protect the Receiving Transaction File. |
|
|
21 |
Receivings |
RCVHIS |
Contains the Receivings information after it has been posted. Receivings records remain on file until purged by the user. |
|
|
22 |
Adjust Receivings |
PRCADJ |
Contains the adjustments to prices entered for items received. When these adjustments are posted as the new prices, this file is cleared. |
|
|
23 |
Adjust Receivings |
PRCLCK |
Used for multi-user systems, and prevents users from doing incompatible actions while processing price adjustments. |
|
|
24 |
Releases |
RELTRX |
Contains release transactions that have been entered for blanket purchase orders. |
|
|
25 |
Receivings |
RELLCK |
Used to protect the Release Transaction File |
|
|
26 |
Pre-purchase processing |
PREFIL |
Contains issued purchase order numbers prior to processing. |
|
|
27 |
Purchase Order Messages |
POMSGS |
Contains messages entered for Purchase Orders. |
|
|
28 |
Vendor Items |
VENKEY |
Holds search receiving transactions. |
|
|
29 |
Receivings |
RCSTXF |
Holds serial receiving transactions |
|
|
30 |
Purchase Orders |
PONOTF |
Holds notes entered for Purchase Orders |
|
|
31 |
Purchase Order Forms |
POFRMF |
Contains user-defined forms templates. |
Field number to change?
Make any needed changes. Press <Enter> to initialize the selected files. Files not selected are not affected. It is not required that any file be selected. There will be a period of processing as the files are processed, and then the program closes.
Select <Esc> to cancel.
To Initialize Payroll data files, execute the Passport Business Solutions initialization function.
You must log in as a administrative user authorized to use PBS software.
Under Windows, Select
Start -> Programs -> Passport Business Solutions -> Init Utilities -> PR Initialization
Under Linux/UNIX
Ensure you are logged in as a user authorized to use PBS software. Refer to the PBS Users chapter for more information.
Type the following:
cd /usr/pbs
or replace “/usr/pbs” with the name of your PBS top-level
directory.
Then type the following:
prinit
If you are using multiple companies, enter the 2-character company-id for the files you wish to initialize. If the company is correct, answer Y. When prompted, enter an administrative User ID.
The following screen displays:
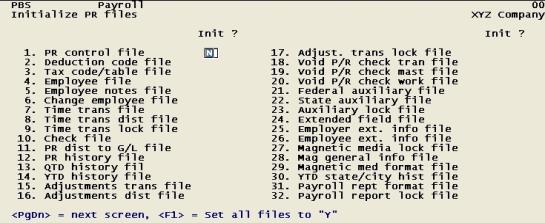
When this screen is first displayed, all its fields are blank except the first one. The cursor moves through each field in sequence until all have been traversed. You may then change any field.
Answer <Y> for each file you want to initialize, or press <Enter> to default to <N> to skip initializing a file. At any field (including “Field number to change ?”), you may use one of the options:
Options
|
<F1> |
To set all fields to Y. After the first use of this option, this key functions as a toggle; alternating between setting all fields to Y and to N. |
|
PgUp |
To return to the first field on the screen, if not there already. |
|
PgDn |
(1) To proceed to the last field on the screen, if not there already. (2) If already at the last field or at “Field number to change ?”, to proceed to the second screen, preserving all existing settings on the first screen. |
|
Format |
One letter at each field, either Y or N. The default is N. |
|
Example |
Press <Enter> at each field. This displays as “Skipped”. |
Enter the following information:
Contained within this file are a number of parameters that define your payroll structure. Each parameter provides information used by the Payroll system in its normal operation.
2.Deduction code file (DEDCOD)
Each possible earning other than wages and each deduction (other than withholding taxes, garnish amounts, loan repayments and union dues) are entered in this file along with parameters that define the accounting procedures to which each deduction/earning code is subject.
3.Tax code/table file (TAXCOD)
This file contains all of the tax codes and tables.
This file contains all information pertinent to all employees and non-employees who receive compensation through the Payroll module.
5.Employee notes files (PRNOTF)
This file contains all the notes you have entered in the various Payroll selections that allow notes.
6.Change employee file (CNGEMP)
This is a log of changes to the Employee File and who made them.
This is the main working file of the Payroll system. It is used for entry of time worked by your employees.
8.Time trans dist file (TIMDIS)
This field is used to temporarily store distributions to general ledger for the time worked entered in the previous file.
9.Time trans lock file (TIMLCK)
This file is used to protect the Time Transaction File, so that two users cannot post Time Worked entries at the same time.
This file is used to track payroll checks from the moment they are printed until they have been posted.
11.PR dist to G/L file (PRDIST)
This file contains one record for each General Ledger distribution generated by the Payroll module. It is used to generate the Payroll Distribution to G/L report and, if the Passport Business Solutions General Ledger module is used, this file is the input to the General Ledger interface program. This file normally contains all of the detailed G/L distributions for one month or accounting period.
This file contains detail for each check that was paid, one record per transaction. It is used to produce the Payroll History Report, Union Dues Report, and Employee Meals Report, as well as other reports.
This is a permanent file containing quarter-to-date totals for each employee and is used for tax reporting as well as various employee reports.
This is a permanent file containing, for each employee, one record for every earning and/or deduction category that the employee is subject to during the year.
15.Manual PR trans file (MANTRX)
This file is used to record manual adjustment payroll transactions.
16.Manual PR dist file (MANDIS)
This file is used to record any General Ledger distributions associated with manual payroll adjustments.
17.Manual trans lock file (MANLCK)
This file is used to protect the Manual PR Transaction File.
18. Void P/R check trans file (VDPCHK)
This file is used to record payroll check information to allow the user to void a check.
19. Void P/R check master file (VDMTRX)
This file is used to store payroll check detail information to be used during the void checks functions.
20. Void P/R check work file (VDMWRK)
This file is used to temporarily store payroll data during the void check processing.
21.Federal auxiliary file (EMPFAU)
This file contains federal information used in printing W-2 forms for each employee.
22.State auxiliary file (EMPSAU)
This file contains state information used in printing W-2 forms for each employee.
23.Auxiliary lock file (AUXLCK)
This file is used to protect the Auxiliary File.
24.Extended field file (EXDATA)
This file contains the user-defined extended field definitions.
25.Employer extended info file (EMPREX)
This file contains the user-defined extended employer information used for magnetic media reporting.
26.Employee extended info file (EMPEXT)
This file contains the user-defined extended employee information used for magnetic media reporting.
27.Magnetic media lock file (MAGLCK)
This file is used to protect the Magnetic Media Format File.
28.Mag general information file (MAGGNA)
This file contains the customized magnetic media General Appearance information.
29.Magnetic media format file (MAGFMT)
This file contains the customized magnetic media report formats.
30.YTD state/city history file (SCDHIS)
This file contains the year to date history for state and city taxes.
31. Payroll report format file (RPTMFT)
This file contains the user defined customized report formats.
32. Payroll report lock file (RPTLCK)
This file is used to protect the Payroll Report file.
Field number to change ?
Make any needed changes.
Press <Enter> from a blank “Field number to change” to proceed to the next screen or select <Esc> to cancel.
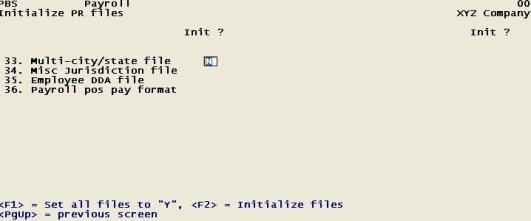
Continue to answer <Y> for each file you want to initialize, or press <Enter> to default to <N> to skip initializing a file. The cursor will move through each field in turn, and you will be able to correct any errors from “Field number to change?”. You may also use the options:
Options
|
<F1> |
To set all fields to Y. After the first use of this option, this key functions as a toggle; alternating between setting all fields to Y and to N. |
|
<F2> |
To initialize all files marked “Yes”, without waiting to reach “Field number to change ?”. You will be asked to confirm that you want to do this. |
|
PgUp |
(1) To return to the first field on the screen, if not there already. (2) If already at the first field or at “Field number to change ?”, to return to the previous screen. This is not the same as <Esc>, since all your settings on the second screen are preserved. |
|
PgDn |
To proceed to the last field on the screen, if not there already. |
|
Format |
One letter at each field, either Y or N. The default is N. |
|
Example |
Press <Enter> at each field. This displays as “Skipped”. |
33. Multi-city multi-state file (MCSFIL)
This file contains information about those employees who are liable for taxes to more than one state and/or to more than one city.
34. Jurisdictions file (MJRFIL)
This file contains miscellaneous jurisdiction information for federal and state reporting requirements.
35. Employee DDA file (EMPDDA)
This file contains bank account information for each employee.
36. Payroll positive pay format file (PRFRMF)
This file contains positive pay file formats.
37. Employee auxiliary file (EMPAUX)
This file contains employee auxiliary records.
38. Time trans history file (TIMHIS)
This file contains employee auxiliary records.
39. Manual transaction history file (MANHIS)
This file contains employee auxiliary records.
Field number to change ?
To Initialize Point of Sale data files, execute the Passport Business Solutions initialization function.
For Windows
Start -> Programs -> Passport Business Solutions -> Init Utilities -> PS Initialization
For UNIX
Ensure you are logged in as a user authorized to use PBS software. Refer to the PBS Users chapter for more information.
Type the following:
cd /usr/pbs
or replace “/usr/pbs” with the name of your Passport top-level directory.
Then type the following:
psinit
If you are using multiple companies, enter the 2-character company-id for the files you wish to initialize. If the company is correct, answer Y. When prompted, enter an administrative User ID.
The following screen displays.
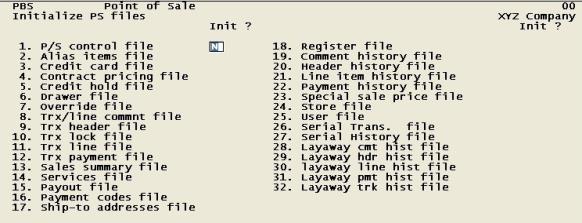
When this screen is first displayed, all its fields are blank. The cursor moves through each field in sequence until all have been traversed. You may then change any field.
Answer <Y> for each file you want to initialize, or press <Enter> to default to <N> to skip initializing a file.
|
Format |
One letter at each field, either Y or N. The default is N. |
|
Example |
Press <Enter> at each field. This displays as “Skipped”. |
The following table lists all the entries on the screen and provides a description of each file. The internal name of the file is given; this is useful when relating the file name to several features described earlier this manual (pathfinder; data recovery utilities).
|
# |
File name as shown on screen |
Internal namepathfinder |
Description |
|
1. |
P/S control file |
This file contains parameters that define the basic operation of your Point of Sale module |
|
|
2. |
Alias items file |
This file contains alias item numbers that refer to I/C items and P/S services. |
|
|
3. |
Credit card file |
Customer credit card information is contained in this file. |
|
|
4. |
Contract pricing file |
This file maintains special pricing for specific customers. Special pricing can be offered for a certain item or service or an entire category of items or services. |
|
|
5. |
Customer restrictions file |
Customer payment restrictions are maintained in this file. |
|
|
6. |
Drawer file |
When drawers are opened, they are added to this file. During posting, closed drawers are removed from this file. |
|
|
7. |
Override file |
This file contains all price or credit overrides that are done during transaction processing. This information is moved to history during posting. |
|
|
8. |
Trx/line commnt file |
Line item and transaction comments that are entered during transaction processing are stored in this file. |
|
|
9. |
Trx header file |
This file contains one record of bill-to/ship-to and related information for each unposted transaction |
|
|
10. |
Trx lock file |
This file is used to protect transaction files during processes that require exclusive use of certain Point of Sale files. |
|
|
11. |
Trx line file |
This file contains line items information for unposted transactions. |
|
|
12. |
Trx payment file |
This file contains unposted payments. |
|
|
13. |
Sales summary file |
This file keeps a cumulative history of sales to report by category, by customer, by item, by sales rep and by sales volume. |
|
|
14. |
Services file |
This file stores services that your company offers. |
|
|
15. |
Payout file |
This file contains a record for each payout that occurs during transaction processing. |
|
|
16. |
Payment codes file |
This file contains Point of Sale payment codes for cash, credit cards, checks, etc. |
|
|
17. |
Ship-to addresses file |
This file contains alternate ship-to addresses for customers. |
|
|
18. |
Posted payments file |
This files stores payments that were made during transaction processing and have been posted. |
|
|
19. |
Register file |
This file contains information descriptive of registers used during transaction processing. |
|
|
20. |
Comment history file |
This file stores line item and transaction comments that were entered during transaction processing and have been posted. |
|
|
21. |
Header history file |
This file contains one record of historical bill-to/ship-to information for each posted transaction. |
|
|
22. |
Line item history file |
This file contains historical line item information for posted transactions. |
|
|
23. |
Payment history file |
This file contains historical payment information of posted transactions. |
|
|
24. |
Special sale price file |
This file stores special sale prices that apply to specific items or services and for entire categories of items for a specific period of time. |
|
|
25. |
Store file |
This file contains information specific to the operation of each store. |
|
|
26. |
User file |
This file contains information specific to users of the Point of Sale module. |
|
|
27. |
Serial transaction file |
This file contains the serial and lot number transaction information. |
|
|
28. |
Serial history file |
This file contains the serial and lot number transaction history information. |
|
|
29. |
Layaway comments history file |
This file stores line item and transaction comments for canceled or forfeited layaway transactions. |
|
|
30. |
Layaway header history file |
This file stores header information for canceled or forfeited layaway transactions. |
|
|
31. |
Layaway line history ifle |
This file stores line information for canceled or forfeited layaway transactions. |
|
|
32. |
Layaway payment history file |
This file stores payment information for canceled or forfeited layaway transactions. |
|
|
33. |
Layaway serialization/lot tracking file |
This file stores item serial and lot information for canceled or forfeited layaway transactions. |
Field number to change ?
Make any needed changes.
Press <Enter> to initialize all selected files. There will be a period of processing as files are initialized, then the program will close.
Press <ESC> to cancel the operation.
To Initialize Sales Analysis data files, execute the Passport Business Solutions initialization function.
You must be logged in as an administrative user authorized to use PBS utilities. Refer to the PBS Users chapter for more information.
For Windows
Start -> Programs -> Passport Business Solutions -> Init Utilities -> SA Initialization
For UNIX
Type the following:
cd /usr/pbs
or replace “/usr/pbs” with the name of your Passport top-level directory.
Then type the following:
sainit
If you are using multiple companies, enter the 2-character company-id for the files you wish to initialize. If the company is correct, answer Y. When prompted, enter an administrative User ID.
A screen similar to this appears:
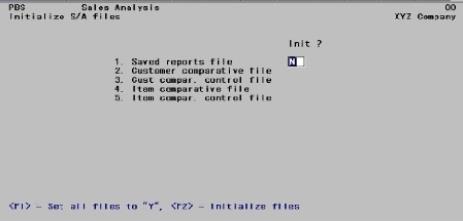
Answer <Y> for each file you want to initialize, or press <Enter> to default to <N> to skip initializing the data.
The following table lists all the entries on the screen and provides a description of each file/tables. Cross-references are given to the chapter[s] where the data contents. In addition, the internal name of the file is given; this is useful when relating the file name to several features described in this documentation like pathfinder and data recovery utilities.
|
# |
Screen File Name |
Sales Analysis Manual Chapter Reference |
Internal File Name |
Description |
|
1. |
Saved report file |
Common Features |
Stores saved report selection parameters |
|
|
2. |
Customer comparative file |
Customer |
Contains historical information on sales by customer |
|
|
3. |
Cust comparative |
Control Information |
Contains parameters needed to interface to A/R for obtaining the customer comparative reports. |
|
|
4. |
Item comparative file |
Item Comparatives |
Contains historical information on sales by item |
|
|
5. |
Item comparative |
Control Information |
Contains parameters needed to interface to I/C for obtaining the item comparative reports. |
Field number to change?
Make any needed changes. Press <Enter> to initialize the selected files. Files not selected are not affected. It is not required that any file be selected. There will be a period of processing as the files are processed, and then the program closes.
Select <Esc> to cancel.
To Initialize Professional Time and Billing data files execute the Passport Business Solutions initialization function.
For Windows
Start -> Programs -> Passport Business Solutions -> Init Utilities -> TB Initialization
For UNIX
Ensure you are logged in as an administrative user to use PBS data recovery utilities. Refer to the PBS Users chapter for more information.
Type the following:
cd /usr/pbs
or replace “/usr/pbs” with the name of your PBS top-level
directory.
Then type the following:
tbinit
If you are using multiple companies, enter the 2-character company-id for the files you wish to initialize. If the company is correct, answer Y. When prompted, enter an administrative User ID.
For space reasons, two screens are needed to contain all the files. You can switch between the two screens as needed. No files are initialized until you have approved both screens.
Two screens are required for all the files in this module. The following appears first:
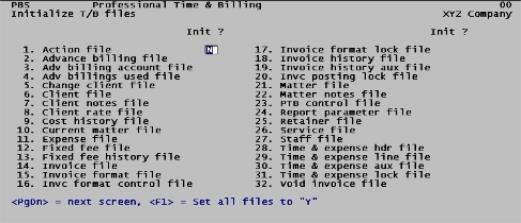
When this screen is first displayed, all its fields are blank except the first one. The cursor moves through each field in sequence until all have been traversed. You may then change any field.
Answer <Y> for each file you want to initialize, or press <Enter> to default to <N> to skip initializing a file. At any field (including “Field number to change ?”), you may use one of the options:
Options
|
<F1> |
To set all fields to Y. After the first use of this option, this key functions as a toggle; alternating between setting all fields to Y and to N. |
| PgUp |
To return to the first field on the screen, if not there already. |
| PgDn |
(1) To proceed to the last field on the screen, if not there already. (2) If already at the last field or at “Field number to change ?”, to proceed to the second screen, preserving all existing settings on the first screen. |
|
Format |
One letter at each field, either Y or N. The default is N. |
|
Example |
Press <Enter> at each field. This displays as “Skipped”. |
The following table lists all the entries on the screen and provides a description of each file. The internal name of the file is given; this is useful when relating the file name to several features described in the earlier in this manual (pathfinder; data recovery utilities).
|
# |
File name as shown on screen |
Internal name pathfinder |
Description |
|
1. |
Action file |
Contains the action codes and descriptions. |
|
|
2. |
Advance billing file |
Contains one record for each billing on account which has not yet been fully used to “pay” for WIP during billing. |
|
|
3. |
Advance billing account file |
Contains the advance billing account numbers, description, statement type and comments. These accounts must also exist in the Valid G/L Accounts File. |
|
|
4. |
Advance billings used file |
This file contains a record for each use of a billing on account to “pay” for a WIP during billing. |
|
|
5. |
Change client file |
Contains one record made for each change made to the client file. |
|
|
6. |
Client file |
Contains relevant client information such as name, address, billing method, discount terms, tax status, and period /year-to-date statistics. (Whenever a new client is entered, a record is created both the Client File in PTB and Customer File in A/R.) |
|
|
7. |
Client notes file |
Contains notes you have entered for clients. |
|
|
8. |
Client rate file |
This file may be used to enter client-specific billing rates for staff. |
|
|
9. |
Cost history file |
Contains cost information for non-billable “by the hour” services and non-billable “cost plus” expenses from posted time and expense sheets. |
|
|
10. |
Current matter file |
For each client, the matter to which periodic advance billing retainers are to be applied is entered in this file. |
|
|
11. |
Expense file |
This file contains one record for each expense code entered through Expenses. |
|
|
12. |
Fixed fee file |
Contains one record for each fixed fee billing, contingent fee billing, and billing adjustment that has not been invoiced. |
|
|
13. |
Fixed fee history file |
Contains time and expense history for fixed fee matters. |
|
|
14. |
Invoice file |
Contains one record for each invoice. |
|
|
15. |
Invoice format file |
This file contains the complete descriptions of the header areas, line items areas, and footer areas of your invoice formats. |
|
|
16. |
Invoice format control file |
This file contains the General Appearance information for your invoice formats. |
|
|
17. |
Invoice format lock file |
This file protects the Invoice Format File. |
|
|
18. |
Invoice history file |
This file contains the history information for posted invoices. |
|
|
19. |
Invoice history auxiliary file |
This file contains the billing descriptions for posted invoices. |
|
|
20. |
Invoice posting lock file |
|
This file protects the billing files during invoice posting. |
|
21. |
Matter file |
Contains basic information about each matter undertaken for each client. |
|
|
22. |
Matter notes file |
Contains notes you have entered in matters. |
|
|
23. |
PTB control file |
Parameters that define the basic structure of your T/B module |
|
|
24. |
Report parameter file |
When you are entering the parameters to use in printing various reports, you can choose to save them. If you do, they are contained in this file. |
|
|
25. |
Retainer file |
The file contains one record for each retainer. |
|
|
26. |
Service file |
Contains the service description, period/year-to-date fields and accounts. |
|
|
27. |
Staff file |
Contains information about the staff including rates. |
|
|
28. |
Time & expense header file |
This file contains one record for each time & expense sheet. |
|
|
29. |
Time & expense line file |
This file contains one record for each service or expense line entered on a time & expense sheet. |
|
|
30. |
Time & expense auxiliary file |
This file contains billing descriptions entered for billable lines on the time & expense sheets. |
|
|
31. |
Time & expense lock file |
This file is used to protect the time & expense files during posting. |
|
|
32. |
Void invoice file |
This file contains one record for each voided invoice. |
Field number to change ?
Make any needed changes or select the <Esc> key to cancel.
Press <Enter> from a blank “Field number to change” to proceed to the next screen.
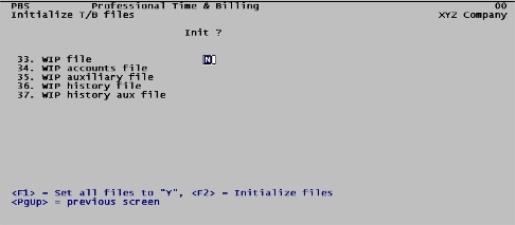
Continue to answer <Y> for each file you want to initialize, or press <Enter> to default to <N> to skip initializing a file. The cursor will move through each field in turn, and you will be able to correct any errors from “Field number to change?”. You may also use the options:
Options
|
<F1> |
To set all fields to Y. After the first use of this option, this key functions as a toggle; alternating between setting all fields to Y and to N. |
|
<F2> |
To initialize all files marked “Yes”, without waiting to reach “Field number to change ?”. You will be asked to confirm that you want to do this. |
|
PgUp |
(1) To return to the first field on the screen, if not there already. (2) If already at the first field or at “Field number to change ?”, to return to the previous screen. This is not the same as <Esc>, since all your settings on the second screen are preserved. |
|
PgDn |
To proceed to the last field on the screen, if not there already. |
|
Format |
One letter at each field, either Y or N. The default is N. |
|
Example |
Press <Enter> at each field. This displays as “Skipped”. |
|
# |
File name as shown on screen |
Internal name pathfinder |
Description |
|
33. |
WIP file |
This file contains one record for each unbilled service (for matters whose service billing terms are “by the hour”) and for each unbilled expense (for matters whose expense billing terms are “cost plus”). |
|
|
34. |
WIP accounts file |
Contains the work-in-process account number, description and comment. These accounts must also exist in the Valid G/L Accounts File. |
|
|
35. |
WIP auxiliary file |
This file contains any additional description entered for work-in-process items, plus any notes. |
|
|
36. |
WIP history file |
Work-in-process history information for posted invoices |
|
|
37. |
WIP history auxiliary file |
Work-in-process billing descriptions from posted invoices. |
Field number to change?
Make any needed changes. Press <Enter> to initialize the selected files. Files not selected are not affected. It is not required that any file be selected. There will be a period of processing as the files are processed, and then the program closes.
Select <Esc> to cancel.
To Initialize Customer Orders data files, execute the Passport Business Solutions initialization function.
For Windows and UNIX
Ensure you are logged in as an administrative user to use PBS data recovery utilities. Refer to the PBS Users chapter for more information.
From the PBS top-level, type the following:
coinit
If you are using multiple companies, enter the 2-character company-id for the files you wish to initialize. If the company is correct, answer Y. When prompted, enter an administrative User ID.
The following appears:
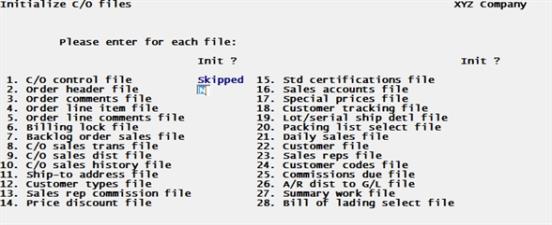
When this screen is first displayed, all its fields are blank except the first one. The cursor moves through each field in sequence until all have been traversed. You may then change any field.
Answer <Y> for each file you want to initialize, or press <Enter> to default to <N> to skip initializing a file.
|
Format |
One letter at each field, either Y or N. The default is N. |
|
Example |
Press <Enter> at each field. This displays as “Skipped”. |
The following table lists all the entries on the screen and provides a description of each file. The internal name of the file is given; this is useful when relating the file name to several features described earlier in this documentation like pathfinder and data recovery utilities.
|
# |
File name as shown on screen |
Internal name pathfinder |
Description |
|
1. |
C/O control file |
Customer orders control information |
|
|
2. |
Order header file |
Customer orders header records. |
|
|
3. |
Order comments file |
Order comments. |
|
|
4. |
Order line item file |
Order line items. |
|
|
5. |
Order line comments file |
Order line comments. |
|
|
6. |
Billing lock file |
Billing lock file. |
|
|
7. |
Backlog order sales file |
Backlog order sales file |
|
|
8. |
C/O sales trans file |
Sales transactions. |
|
|
9. |
C/O sales dist file |
Sales distributions. |
|
|
10. |
C/O sales history file |
Sales history. |
|
|
11. |
Ship-to history file |
|
Ship-to history. |
|
12. |
Customer type file |
Customer types. |
|
|
13. |
Sales rep commission file |
Sales rep commissions. |
|
|
14. |
Price discount file |
Price discounts. |
|
|
15. |
Std certifications file |
Standard certifications. |
|
|
16. |
Sales accounts file |
Sales accounts. |
|
|
17. |
Special prices file |
Special prices. |
|
|
18. |
Customer tracking file |
Customer tracking. |
|
|
19. |
Lot/serial ship detl file |
Lot and serial shipping details. |
|
|
20. |
Packing list select file |
Packing list selected. |
|
|
21. |
Daily sales file |
Daily sales. |
|
|
22. |
Customer file |
Customers. Normally the customers in A/R are used and there is no data in here. |
|
|
23. |
Sales rep file |
Sales reps. Normally the sales reps in A/R are used and there is no data in here. |
|
|
24. |
Customer codes file |
Customer codes. |
|
|
25. |
Commissions due file |
Commissions due. |
|
|
26. |
A/R dist to G/L file |
Distributions to G/L |
|
|
27. |
Summary work file |
BOSSRT |
Summary work. |
|
28. |
Bill of lading select file |
BOLSEL |
Billing of lading selected. |
|
29. |
Form design file |
COFRMF |
Custom invoice design file. |
Continue to answer <Y> for each file you want to initialize, or press <Enter> to default to <N> to skip initializing a file. The cursor will move through each field in turn, and you will be able to correct any errors from “Field number to change?”. You may also use the options:
Options
| PgUp |
(1) To return to the first field on the screen, if not there already. (2) If already at the first field or at “Field number to change ?”, to return to the previous screen. This is not the same as <Esc>, since all your settings on the second screen are preserved. |
| PgDn |
To proceed to the last field on the screen, if not there already. |
|
30. |
Customer P.O. header file |
CPOHDR |
|
|
31. |
Customer P.O. detail file |
CPODTL |
|
|
32. |
Customer P.O. allowances file |
CPOALW |
|
|
33. |
Customer P.O. notes file |
CPONTE |
|
|
34. |
Customer P.O. names file |
CPONAM |
|
|
35. |
Customer P.O. terms file |
CPOTRM |
|
|
36. |
EDI item file |
EDIITM |
|
|
37. |
EDI trading partners file |
EDICUS |
|
|
38. |
Standard carrier codes file |
SCACOD |
|
|
39. |
EDI lock files |
CPOLCK |
|
|
40. |
EDI 'C' file |
EDIIVC |
|
|
41. |
EDI 'D' file |
EDIIVD |
|
|
42. |
EDI item comment file |
EDITCM |
|
To Initialize Inventory Management data files or tables, execute the Passport Business Solutions initialization function.
For Windows and UNIX
Ensure you are logged in as an administrative user to use PBS data recovery utilities. Refer to the PBS Users chapter for more information.
From the PBS top-level, type the following:
iminit
If you are using multiple companies, enter the 2-character company-id for the files you wish to initialize. If the company is correct, answer Y. When prompted, enter an administrative User ID.
When this screen is first displayed, all its fields are blank except the first one. The cursor moves through each field in sequence until all have been traversed. You may then change any field.
Answer <Y> for each file you want to initialize, or press <Enter> to default to <N> to skip initializing a file.
|
Format |
One letter at each field, either Y or N. The default is N. |
|
Example |
Press <Enter> at each field. This displays as “Skipped”. |
The following table lists all the entries on the screen and provides a description of each file. The internal name of the file is given; this is useful when relating the file name to several features described earlier in this manual (pathfinder; data recovery utilities).
|
# |
File name as shown on screen |
Internal name pathfinder |
Description |
|
1. |
I/M control file |
I/M Control information |
|
|
2. |
Item master file |
Item master records |
|
|
3. |
Item comments file |
Item comments |
|
|
4. |
Branch whse item file |
Branch warehouse items |
|
|
5. |
Purchase order item file |
Purchase order items |
|
|
6. |
Shop order file |
Shop orders |
|
|
7. |
Shop order comments file |
Shop order comments |
|
|
8. |
Shop order mtl reg file |
Shop order material |
|
|
9. |
Physical count file |
Physical count |
|
|
10. |
Inven trans history file |
Inventory transaction history |
|
|
11. |
Matl usage variance file |
Material usage variance |
|
|
12. |
G/L dist lock file |
Distribution lock data |
|
|
13. |
G/L dist work files |
Distribution work data |
|
|
14. |
Item type code file |
Item types |
|
|
15. |
Warehouse code file |
Warehouse codes |
|
|
16. |
Inv cost category file |
Inventory cost categories |
|
|
17. |
Product category file |
Product categories |
|
|
18. |
Warehouse accounts file |
Warehouse accounts |
|
|
19. |
Period qty sold file |
Period quantity sold |
|
|
20. |
Lot/serial # hist file |
Lot and serial number history |
|
|
21. |
On hand detail file |
On hand details |
|
|
22. |
Sched exception dates file |
Schedule exception dates |
|
|
23. |
Freeze inventory file |
Physical count freeze of quantities |
|
|
24. |
Freeze on-hand inven. file |
On-hand inventory that is frozen |
|
|
25. |
Serial-# notes file |
Serial number notes |
To Initialize the manufacturing product purchasing data files or tables, execute the Passport Business Solutions initialization function.
For Windows and UNIX
Ensure you are logged in as an administrative user to use PBS data recovery utilities. Refer to the PBS Users chapter for more information.
From the PBS top-level, type the following:
ppinit
If you are using multiple companies, enter the 2-character company-id for the files you wish to initialize. If the company is correct, answer Y. When prompted, enter an administrative User ID.
When this screen is first displayed, all its fields are blank except the first one. The cursor moves through each field in sequence until all have been traversed. You may then change any field.
Answer <Y> for each file you want to initialize, or press <Enter> to default to <N> to skip initializing a file.
|
Format |
One letter at each field, either Y or N. The default is N. |
|
Example |
Press <Enter> at each field. This displays as “Skipped”. |
The following table lists all the entries on the screen and provides a description of each file. The internal name of the file is given; this is useful when relating the file name to several features described earlier in this manual (pathfinder; data recovery utilities).
This utility will initialize data files and SQL tables for an entire module for one or multiple companies. Use this utility with caution as this could remove ALL the data from your entire system.
In order to run this utility, you must be a PBS administrator.
From the top-level PBS folder
Select
INITPB
Enter your user ID and password.
A screen like the following displays:
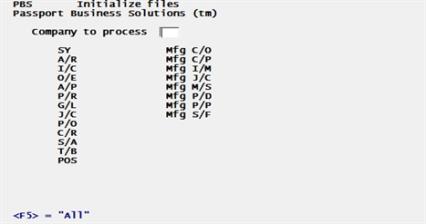
Enter the company number or select <F5> for all companies
Select the modules that you want to initialize.
Any change?
Select N to continue or Y to re-enter the screen.
When you select N to continue, then the files or SQL tables will be initialized for the companies and modules selected.