This chapter contains the following topics:
Batch Processing Company Information
Batch Processing Control Information
Batch processing enables you to group transactions into batches that can be used for transaction entry, editing, and posting.
These are the packages (Module) that potentially use batch processing:
| • | Accounts Receivable |
| • | Accounts Payable |
If you use none of these packages, you may skip this chapter.
Batch processing supports entry, editing, and posting by batch number. Passport Business Solutions provides three features when using batch processing:
| 1. | Transactions can be grouped so that you can run separate batch edit lists and batch postings. For example, if you have two clerks entering cash receipts, you can have them set up two batches and have each post his own. |
| 2. | You can require that the total for a group of transactions match an expected total before the group is posted. |
| 3. | You can print a list of all the batch postings. This list identifies missing journals/registers by comparing what was expected against what was actually entered. |
Multiple users (up to 99) can enter transactions into a single collective batch, or each user can enter into individual batches (or both). When a batch is complete, and when there are no longer any users entering transactions into that batch, it can be posted without interfering with another batch.
Setting up the Batch Control option is a two-part process. First, set up the batch option system-wide on the Control information tab/screen, then set the batch option for each software package.
It is not necessary to use Batch Controls for all your packages. For example, you may want to run batch in A/R but not in A/P. However, within any one package either all selections eligible for Batch Controls must be under batch control, or none of them must be.
Batches are identified by a unique number assigned automatically by the system. There is not a separate number sequence for each package or each selection; batches are numbered consecutively throughout all packages.
This chapter includes a generic overview of batch processing as it applies to all PBS packages, although only A/R examples are provided.
To initiate batch processing you must first activate the batch option in the Company information screen. There are two fields: one to indicate that batches are being used and the other is the last used batch number.
The Company information fields are explained in the PBS Administration documentation. Refer to that documentation for information about the batch control fields.
In addition to setting up the batch fields in the Company information screen, you must also set up the batch option in the Control information screen for each package. This feature allows you to use batch controls for some packages but not others, as desired.
The following illustrates an example using the Accounts Receivable package.
Select
Control information from the module menu. In many modules this is a main menu selection, but in A/P and A/R it is a submenu selection from Master information.
On the first tab you will see the Batch controls level field. Select the Edit button and then select the field.
Using character mode, from the Field # to change ? prompt of the Control information screen, enter the field number of the Batch controls level field (31 on the first screen in this example).
Batch controls level
Three levels of batch controls are supported:
|
Character Code |
Graphical Mode |
Description |
|
N |
No controls |
No batch control functions are used. |
|
P |
Partial controls |
Transactions are grouped into batches but control totals are not required. |
|
F |
Full control |
Control totals must be entered and must match the actual value before a batch is allowed to post. |
Even if you specify No controls, this package may interface to another package which does use batch controls. If so, while running this package you may be asked for (or told about) a batch number in the other package.
Exactly what control value is checked for each transaction type being posted will vary. See above.
For example, the total cash receipts and number of checks (transactions) may be necessary for a cash receipts batch. The totals to be entered are printed on the edit lists or journals.
You can assign menus to control which users are authorized to do so. Some PBS administrators expect the same operator to run an edit list, fix the totals, and then post the batches. Other administrators restrict this power to a supervisor. Refer to the PBS Users and PBS Menus chapters in the PBS Administration documentation for more information.
Do not turn batch processing on or off unless all transactions in the package are posted. If you do, pending unposted transactions may not get posted, or may be posted prematurely.
Enter the desired level of control.
|
Format |
Graphical: Drop down list Character: One letter from the list above |
|
Example |
Select Full controls (F in character) and then press <Enter> |
The batch control flag at the company level and that at the module level may each be set and cleared independently of one another; however, batch controls may not be used for any package unless both flags are set.
This section describes the routine daily use of batch controls. Five selections are used and will be described individually below.
|
Note |
If you have set the Use batch controls field in the Company information screen is unchecked (set to N), then none of these functions will be available. |
All these functions are accessed as follows:
Select
Batch totals from the CTL menu, then select the desired function from the submenu.
The Enter selection enables you to create a batch control record. This record defines a batch so that you can enter transactions into, or delete transactions from, a transaction entry screen that uses batches.
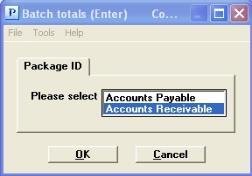
If batch controls are enabled, a window displays showing those package ID’s which are set up to use batch processing. A sample window listing Accounts Payable and Accounts Receivable displays below:
Select the Package ID.
If only one package is batch enabled, then this window will not display; instead, the default Package ID is automatically selected.
OK or Cancel
Select OK to continue or Cancel to return to the menu.
Character Mode
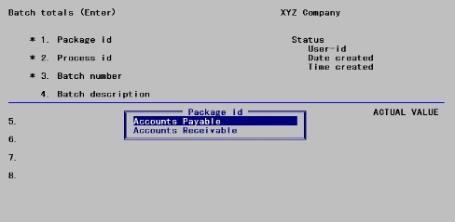
For the A/R example, select the Package ID and the following window displays:
Graphical Mode
Character Mode

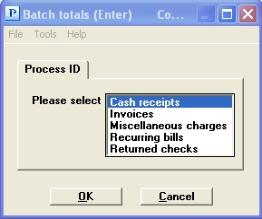
A process is any function of the package which requires batch controls. Each package has its own repertoire of processes, and each process is the name of a selection which supports posting. Each process maintains a count of items in the batch, and usually one or more hash totals.
Select the desired process ID by using <Up> or <Down> to highlight a selection, then press <Enter>. The bottom half of the screen will appear. The exact appearance of this screen is different for each process.
Graphical Mode
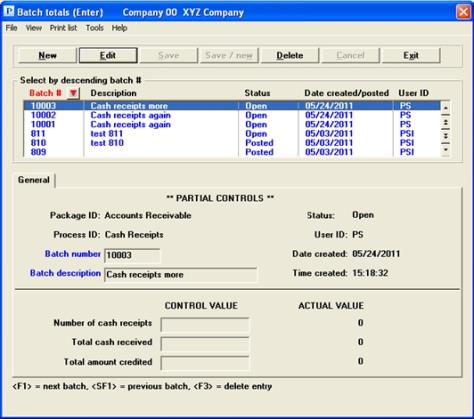
The list box displays up to 6 existing batches at a time. You may sort the list by batch # in ascending or descending order. Click on the column name or the arrow to the right of the column name to change the sort or use the View options. Only column names in red may be sorted.
To find a batch via the list box, the focus must be on the box (the data displays as blue). To locate a batch, start typing the number. You may also use the up/down arrows, Page up, Page down, Home and End keys to locate a batch. The <F1> and <SF1> keys function the same as the up/down arrow keys.
Batches that display in the list box are available for changes or deletion. The fields for the selected batch display in the lower part of the screen.
When a batch is found, you may select the <Enter> key or Edit button to start editing.
When you are adding or editing a batch you have the following button options:
| Button | Keyboard | Description |
|
New |
Alt+n |
Add a new batch |
|
Edit |
Alt+e |
Edit an existing batch |
|
Delete |
Alt+d |
To delete this batch. This option may only be used if the batch is empty, but not otherwise. To remove posted batches use the Purge menu selection. See Batch Purge |
|
Save |
Alt+s |
To save the record you added or edited |
|
Save/New |
Alt+w |
To save what you added or edited and start entering a new batch |
|
Cancel |
Alt+c |
To cancel adding or editing a batch |
|
Exit |
Alt+x |
To cancel adding or editing a batch. To exit to the menu. You may also use the <Esc> key |
Character Mode
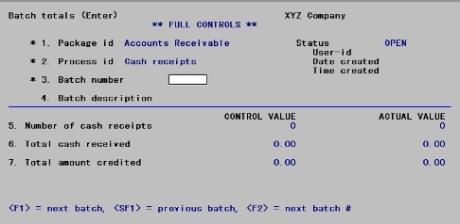
In this example, Cash receipts was selected as the Process ID.
This selection can be used for both new and existing batches, whether posted or not. Deleted and purged batches cannot be accessed.
Package ID
Displays the name of the package you selected.
Process ID
Displays the name of the process you selected.
Each batch is uniquely identified by a batch number. Batch numbers are not unique merely in one process or even one package, but throughout all packages in a company. A batch number cannot be reused until that batch has been purged or deleted.
Enter a batch number.
Options
You may use one of the options:
|
<F1> |
In character mode, for the next existing batch in this process |
|
<SF1> |
In character mode, for the previous batch |
|
<F2> |
To enter a new batch, giving it the next batch number available. Company information stores the highest batch number previously used |
|
Format |
999999 |
|
Example |
Type 123 |
Enter a description for the defined batch. The User-ID field is displayed automatically.
|
Format |
Up to 25 characters |
|
Example |
Type Section B receipts |
Status
User ID
Date posted
Time posted
These fields are informational and cannot be changed. They show when and by whom the batch was created (or posted), as well as its current status (for example, <Posted> or <Open>).
These fields can only be entered if using Full control. See Batch Process ID Totals for a list of the control fields by Process ID.
Each of these fields represents one of the process’s predefined control totals or hash totals. nnnn represents the name of the control, which varies from one process to another. There are never less than one, or more than three control totals in a batch.
A control total, sometimes called a hash total, is either a count of how many entries there are in the batch, or a total dollar amount of all entries in the batch. See Hash Totals
In this example, when you define the batch of cash receipts you must specify beforehand how many cash receipts are in the batch, and what the total dollar amount received and the total amount credited is for that batch. These figures display in the column headed Control Value.
The amounts actually calculated for the Cash receipts entries in this batch appear in the column headed Actual Value. Upon entering a new batch, these values are of course zero.
When processing an existing batch, you can change the control value. You would normally do this only if you have determined that a batch could not be posted because the control values were entered incorrectly.
You cannot change the actual values from this screen, for either new or existing entries. The actual values are automatically maintained as entries are added, deleted, or changed in the corresponding selection.
If you have specified partial controls for this package (in Control information), the amounts in the control value column are not entered. They display as (Not applicable). The amounts in the actual value column do display.
|
Format |
99999999—(for a count) |
|
|
999999999999.99—(for a dollar total) |
Options
Make any needed changes, or use one of the options:
|
<F1> |
For the next batch in this process |
|
<SF1> |
For the previous batch |
|
<F3> |
To delete this batch. This option may only be used if the batch is empty, but not otherwise. To remove posted batches use the Purge menu selection. See Batch Purge |
Upon pressing <Enter> with this field blank, you are positioned at Field #2 to enter another batch.
The following table indicates the types of control totals and actual totals that are maintained per Process ID.
| Package | Process ID | Total 1 | Total 2 | Total 3 |
|---|---|---|---|---|
|
A/P |
Payables |
Number of vouchers |
Total cash paid (manually paid) |
Total invoice amount |
|
A/P |
Recurring payables |
Number of vouchers |
Total invoice amount |
N/A |
|
A/P |
Process checks |
Number of checks |
Total cash paid |
Total invoice amount |
|
A/P |
Void checks |
Number of checks |
Total cash paid |
Total invoice amount |
|
A/R |
Cash receipts |
Number of cash receipts |
Total cash received |
Total amount credited |
|
A/R |
Invoices |
Number of invoices |
N/A |
N/A |
|
A/R |
Miscellaneous charges |
Number of transactions |
Total misc charges amount |
N/A |
|
A/R |
Recurring bills |
Number of invoices |
N/A |
N/A |
|
A/R |
Returned checks |
Number of return checks |
Net credit to bank |
Charge to Accts Receivable |
The List function on the Batch totals menu enables you to print or display a list of all batches on file, whether they are posted or open.
Select
Batch total from the CTL menu, then select List from that menu.
Only a printer selection screen displays because the list is printed in its entirety whenever requested. This is not an audit trail report and may be displayed on the screen or printed to disk as desired.
The Control register function enables you to print or display an audit log of posted batches on file. This shows the effects of activity on installed packages.
Select
Batch totals from the CTL menu, then select Control register from that menu.
No selection screen displays because the list is printed in its entirety whenever requested. You may however be asked to select a printer.
Despite its name, this report is not a register in the auditing sense, and may be displayed on the screen as desired.
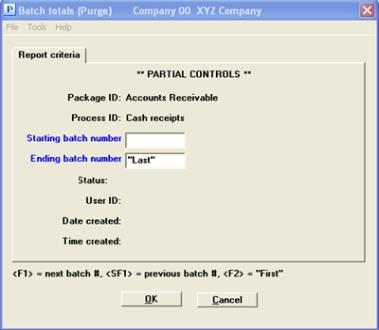
The Purge selection enables you to delete a range of batch records.
Purging operates on a single process of a single package at a time. Batches whose number lies within the specified range are purged only if:
| 1. | they have already been posted, and |
| 2. | they belong to this process. |
Select
Purge from the Batch totals menu.
Screens similar to Batch Enter display.
Package ID
If you have more than one installed package set up to use batch processing, a pop-up Package ID window displays the packages for you to select. If only one package is enabled for the batch processing, this pop-up window does not display and the default package is listed. Otherwise, select the desired package by using <Up> or <Down> to highlight a selection, then press <Enter>. Your selection displays automatically in Field #1.
The screen now displays as follows. In this example A/R has been selected.
Graphical Mode
Character Mode
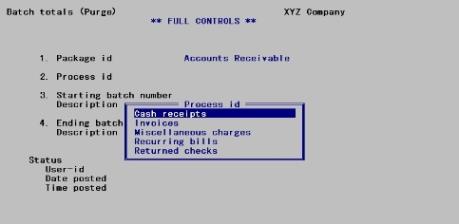
Process ID
This pop-up Process ID selection window enables you to select the process for the chosen package. Use the arrow keys to highlight the desired process, then press <Enter>. Your selection displays automatically in Field #2. In this example, Cash receipts has been selected.
Enter the batch number of where the purge should begin. The description displays automatically.
Options
You may also use one of the options:
|
<F1> |
For the next batch number. |
|
<SF1> |
For the previous batch number. |
|
<F2> |
For the First batch number that is, the lowest-numbered batch number on file |
|
Format |
999999 |
|
Example |
Type 101 |
Enter the batch number where the purge should end. The description displays automatically.
Options
You may also use one of the options:
|
<F1> |
For the next batch number. |
|
<SF1> |
For the previous batch number. |
|
<F2> |
For the <Last> batch number. |
|
Format |
999999 |
|
Example |
Type 101 |
Status
User ID
Date created
Time created
These fields display automatically. No user entry is required.
Make any needed changes. Upon pressing <Enter> with this field blank, processing occurs and deletes all of this process’s posted batch records within the entered range.
Reset lock count enables an authorized user to reset the lock count numbers so as to accurately reflect the number of users accessing a batch.
Any operator who is processing a batch is said to lock the batch; that is, he prevents it from posting. For each batch, the system maintains a count of how many operators have locked that batch (batches like doors can have more than one lock). So long as this lock count is anything other than zero, posting the batch is not allowed.
Occasionally, this lock count may not accurately reflect the current number of people accessing a batch. This could happen if a power outage or hardware error occurred, causing processing to terminate before the program has a chance to decrease the count.
Note that data entry into a batch is not prevented when the count is wrong. This means that you may not notice the problem until some time after the hardware failure has occurred. The difficulty is that posting is prevented: the operator tries to post at a time when no one is using the batch, but the system mistakenly believes that one or more users are doing so.
Note also that in order to reset the lock count it is not required that everyone currently using the batch stop doing so. You only have to enter an accurate count of those currently using the batch.
To block a user from entering data after posting has occurred, the lock count is set to 99 at that point and may not be changed thereafter.
Select
Batch totals from the CTL menu, then select Reset lock count from that menu.
The following screen displays:
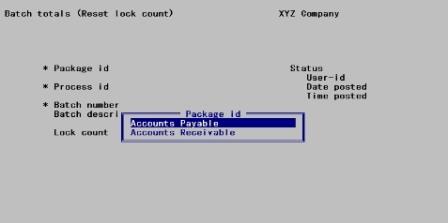
If batch controls are enabled, a pop-up window lists the Package ID’s that are set up to use batch processing. this screen is bypassed if you are only using batches with one package. Use <Up> or <Down> to highlight the desired package (assumed in this example to be Accounts Receivable), then press <Enter>. If only one package uses batch controls, then the pop-up window does not display; instead, the default Package ID automatically displays in the input field.
The following Process ID pop-up window displays:
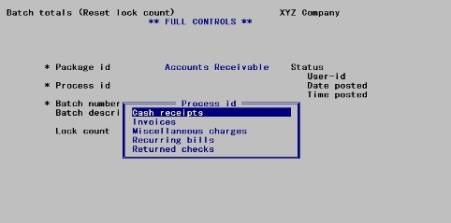
Select the Process ID in order to reset the lock count. Use <Up> or <Down> to highlight the desired process (assumed in this example to be Cash receipts), then press <Enter>.
The following screen displays:
Graphical Mode
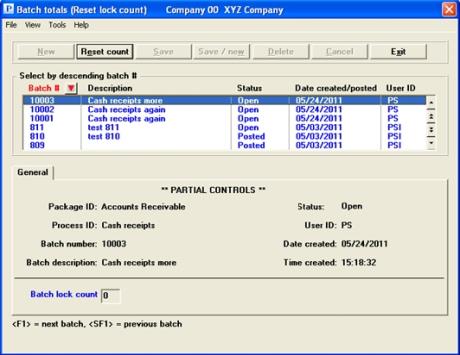
Using the list box, select the batch you want to reset. See Batches List Box for how to use the list box.
After you find the batch, select this button to reset the count.
Character Mode
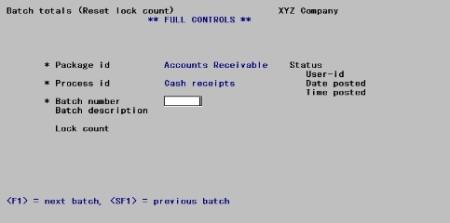
Enter the following information:
Enter the batch number of the batch whose lock count is being changed. This must be an existing batch, which has not been posted, purged, or deleted.
Options
In character mode you may also use one of the following options:
|
<F1> |
For the next batch number. |
|
<SF1> |
For the previous batch number. |
|
Format |
999999 |
Batch description
The batch description displays automatically.
To reset the displayed lock count number, enter a new value between 0 and 89. Ensure that this is in fact the number of users currently accessing this batch.
You may also ask all users to exit the batch and then reset the count to zero.
|
Format |
99 |
Status
User ID
Date created
Time created
These fields are display only.
In character mode, accepting the default of Y allows you to enter a new number in the Lock count field. N returns control to the Select Package ID screen for selecting additional packages, if applicable.
Whenever a selection is under batch control, several batches at a time can exist for that selection, with a different operator using each one. While he is using a batch, each operator sees it as being the only batch in the system.
This requires that the operator identify, at the beginning of a session, which batch to use.
| • | Do so on a batch selection screen, which displays after the desired function has been selected from the menu, but before making the first entry. |
| • | Subsequent entries are assumed to belong to the same batch, until the operator ends the session by clicking on the Exit button. (using character mode by pressing <Esc> from within the first field of the first screen of the selection). |
| • | To switch batches, the operator must return to the menu and re-enter the selection. |
Except for the batch selection screen, data entry into any function works the same way whether or not batch controls are used. For that reason, and because the appearance of the batch selection screen is much the same in all processes and packages (Module), that screen is not illustrated in the A/P and A/R User documentation.
Batches can be used even in a single-user environment. In a multi-user environment, several operators can be working in the same batch at the same time.
The package and process identification display automatically. This example, like the previous ones in this chapter, assumes that you are using the Cash receipts process of the Accounts Receivable package. In this example A/R Control information is setup with Partial control of batches. When you first access the batch screen it will look something like this:
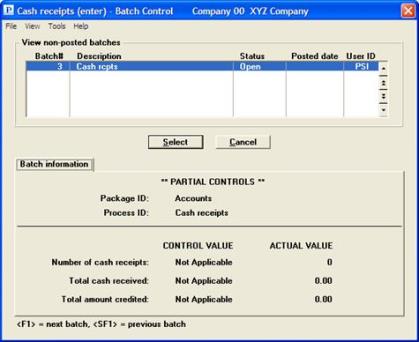
Because it is partial control, the CONTROL VALUE fields display as Not Applicable.
Select a batch using the list box.
Batch Control List Box
The list box displays up to 6 existing batches at a time. You may sort the list by batch number in ascending or descending order. Click on the column name or the arrow to the right of the column name to change the sort or use the View options. Only column names in red may be sorted.
To find a batch via the list box, the focus must be on the box (the data displays as blue). To locate a batch, start typing the number. You may also use the up/down arrows, Page up, Page down, Home and End keys to locate a batch. The <F1> and <SF1> keys function the same as the up/down arrow keys.
Batches that display in the list box are available for selection.
The batch’s description and status displays on the screen, as well as the current actual value and control value of each control total defined for this process. The Control value displays as Not Applicable if Partial controls are used.
Click on the Select key to use the batch or click on Cancel to return to the menu.
Exception: If this is a Post function, and Full batch controls are in effect, you will not be allowed to post unless the actual values and the control values are equal to one another.
Menu Selections
At the top left of the screen, a variety of menu selections are available. Most of these are the similar from screen to screen. If a menu selection is grayed out, you will not be able to access it. The selections that are unique to this screen are explained here:
Under Options, you may select Batch totals (Enter). This provides easy access to enter a new batch for the menu selection that you just accessed. As an example, if you just accessed Cash receipts (Enter) from the A/R menu, then you may enter a new Cash receipts batch via this selection. However, you may not enter a Miscellaneous charges batch when accessing Cash receipts. You may do that under Miscellaneous charges. All the available batches can be entered at Batch controls (Enter) under CTL.
Batch number
In character mode, select the batch number of the batch to be processed. This must be an existing batch, which has not been posted, purged, or deleted.
Options
You may also use one of the following options:
|
Down arrow or <F1> |
For the next batch number. |
|
Up arrow or <SF1> |
For the previous batch number. |
|
Format |
999999 |
The batch’s description and status displays on the screen, as well as the current actual value and control value of each control total defined for this process.
Exception: If this is a Post function, and Full batch controls are in effect, you will not be allowed to post unless the actual values and the control values are equal to one another.