This chapter contains the following topics:
As a job progresses, costs accumulate for each cost item and must be applied to the job. There are two ways of doing this:
| • | You can use this Costing selection at intervals to enter the costs for the relevant cost items. |
| • | You can import those costs from other PBS modules to which you may be linked, using the Get costs selection. See the Get Costs chapter. |
For example:
In Payroll, paying an employee creates a cost for the jobs on which the employee works.
In Inventory Control, releasing a unit for job usage creates a cost for the job in which it is used.
Costs imported in this way can be examined in this selection.
Wherever they come from, costs must be posted before they appear on any job reports.
Your actual use of this selection depends on which other PBS modules you are using, as follows:
| • | If you are using the Passport Business Solutions Accounts Payable, Payroll, and General Ledger modules, you cannot enter direct costs here. You must enter them through these other modules. |
| • | For Accounts Payable and Payroll, use Get costs to transfer these costs into Cost Transactions. This is described in greater detail below. |
| • | The General Ledger module posts directly to Job Cost. You can enter costs only for non-direct cost types (such as profit) through G/L General journal. |
| • | If you are using some but not all of the three modules (A/P, PR, and G/L), you must enter some costs via Costing, and other costs via Get costs. |
| • | If you are not using A/P, PR, and G/L, you will enter all costs with this selection, except that: |
| • | If you are using I/C, you can enter material costs through I/C. |
|
Note |
The information you enter during this selection depends on some of the options specified in J/C Control information. Refer to the J/C Control Information Options section of the Getting Started chapter for details. |
If a field below depends on the change order option being chosen in J/C Control information, the paragraph will be marked (CO). If a field depends on the retainage option being chosen in J/C Control information, the paragraph will be marked (RET). These notations appear in this manual for your information only, and are not displayed on the screen.
Depending on the modules you have installed you may use this selection to enter some or all of your job costs. You will enter costs and then post them to your jobs.
After posting (but not before), these costs will appear on the reports you print about your jobs.
Before posting, you can change any of these costs except for those transactions created by Get costs. Once posted, the only way to change them is to enter and post one or more adjusting entries.
A cost, which has already been posted, cannot be deleted directly. To delete a posted cost, enter and post a correcting entry, which reverses the effect of the incorrect entry.
If you are using any of the Passport Business Solutions A/P, PR, or I/C modules, you will transfer the job costs from those modules via Get costs.
When you use Get costs, new costs are actually placed automatically into Cost Transactions, just as if you had entered them directly. You can then use Costing to examine, print, or post these transactions. You can delete them but not (except for retainage) change them. These costs are special and are described further below.
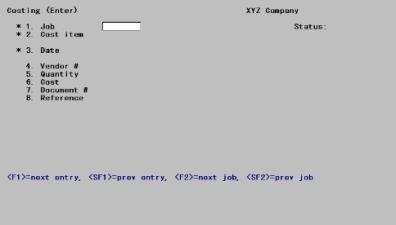
Select
Enter from the Costing menu.
The following screen displays:
From this screen you can work with both new and existing costs. When working with existing entries imported via the Get costs selection, be aware that although such entries can be examined or deleted, they cannot be changed (with the single exception of Field #9, Retainage). Also, these entries do not have any distributions (distribution has already occurred in the originating module).
* 1. Job
Options
Enter the number of the job for the cost. The job must exist and must be an active job. You can also use one of the options
|
<F1> |
For the next unposted cost entry (which can be for a different job than is currently displayed) |
|
<SF1> |
For the previous cost entry |
|
<F2> |
For the next active job |
|
<SF2> |
For the previous active job |
|
Blank |
To restore the number of the last job entered to this field. Press <Enter> again to select that job. This option is not available on the very first entry of a session. |
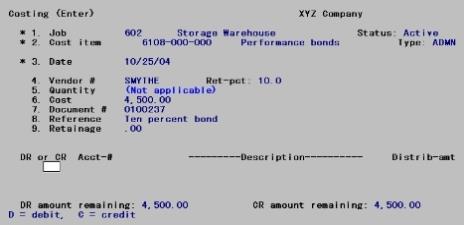
Upon selection of a job, its title and status display on the same line.
|
Format |
7 characters |
|
Example |
Type 602 |
* 2. Cost item (CO)
Enter the complete designation of this cost item in segments as follows:
|
Step |
Description |
|
1 |
Enter the cost category segment first. This cannot be the number of a group category. |
|
2 |
Enter the sub-job number for this cost item. If the job does not use sub-jobs, this segment is set to zero automatically. |
|
3 |
Enter the change order number for this cost item. If this cost item is not part of a change order, leave this field blank. If you have chosen (in Control information) not to use change orders, this segment is not present at all |
The cost item must already have been defined for the job.
Options
You can also use one of the options instead
|
<F1> |
For the next cost item for the current job |
|
<SF1> |
For the previous cost item |
Using either of these options displays the cost item designation. It does not fill the screen with information about an existing entry, even if one (or more) unposted entries for that cost item are present. In the next field you will be able to select among existing entries for this category, or enter a new one.
As you scan through the cost items, each entry’s number and description appear. Once you select a cost item (by answering Y to the question Right cost item ?), the following also displays:
|
In Field #2 |
The cost type and unit (if any). |
|
In Field #4 |
The retainage percent, if applicable. |
|
In Field #5 |
The rate, if applicable. |
|
Format |
9999999 (For the cost category #) 999 (For the sub-job #) 999(For the change order #) |
|
Example |
Press <F1> for 6108-000-000 Performance bonds |
* 3. Date
This date will be used for all postings of the cost entry, including posting to the G/L accounts (when Job Cost is interfaced to G/L through Get distributions from G/L).
Options
Enter a date if you wish to create a new entry. If you wish to access an existing entry, use one of the options:
|
<F1> |
For the next unposted cost entry for this job and cost item |
|
<SF1> |
For the previous cost entry |
|
Format |
MMDDYY The default is the same date you entered in the previous entry. If this is the first entry of a session, the system date appears as the default. |
|
Example |
Type 60105 |
|
Note |
A cost is identified by a combination of its job, its cost item, and its date. This does not mean that two separate costs cannot apply to the same cost item on the same date (though this rarely happens). When it does happen, entering valid values into Fields #1 through 3 will display the first entry. To see any others, use the option key. |
4. Vendor # or Employee #
The caption for this field displays as Employee # when this is a labor cost item, and as Vendor # otherwise.
If the cost item is for Profit, or for a user-defined non-direct cost type (such as overhead), this field displays as (Not applicable) and cannot be changed. Otherwise:
If this is for an employee, enter the employee number. This field is optional.
Options
If this is for a vendor, enter the vendor number. Vendor number is optional and if present need not correspond to any entry in A/P Vendors. You can also use the option:
|
<F2> |
For the default vendor for this cost item (provided that one has been defined in Cost items for jobs) |
|
Format |
999999 (If entering employee number) 6 letters (If entering vendor number; lower-case is converted to upper |
|
Example |
Type Smythe |
5. Quantity
If no units display in the upper right corner of the screen, this field displays as (Not applicable) and cannot be changed.
Otherwise, enter the quantity of material or work done. Zero is a valid entry.
|
Format |
99,999,999.9- |
|
Example |
This field displays (Not applicable) |
Default rate
This field is informational and cannot be changed. It displays only when you are adding a new entry, and then only if you are using Cost Categories and have provided a unit and a nonzero default rate in the Categories selection.
|
Format |
99,999,999.999 |
|
Example |
[Does not appear in this example] |
6. Cost
Enter the cost amount for this entry.
Options
If a nonzero quantity displays in Field #5 and a nonzero default rate to its right, the program multiplies the two together, displays the product, and offers you the option:
|
<F1> |
For the calculated cost amount |
|
Format |
999,999,999.99- |
|
Example |
Type 4500 |
7. Document #
Enter the document number, if any, associated with this cost entry. This could be the vendor’s invoice number or the check number of the employee’s paycheck.
|
Format |
8 characters |
|
Example |
Type 0100237 |
8. Reference
Enter any description of the cost you wish. This field is optional.
|
Format |
25 characters |
|
Example |
Type Ten percent bond |
9. Retainage (RET)
This field is present on the screen only if:
| • | You have chosen (in Control information) to use this feature, and |
| • | This is neither a labor cost nor an entry for a non-direct cost type (such as overhead or profit). |
If the cost (Field #6) is positive, this field must be positive as well. If the cost is negative, the retainage must also be negative. The absolute amount of the retainage cannot be greater than that of the cost.
Enter any amount you are retaining from the vendor.
Options
If a nonzero cost displays in Field #6 and a nonzero retainage percentage to the right of Field #4, the program multiplies the two together, displays the product, and offers you the option:
|
<F1> |
For the computed retainage |
|
Format |
999,999,999.99- |
|
Example |
Press <Enter> to default to .00 |
9. Labor hours
This field is present on the screen only if the entry is for labor. Its number is the same as that of the preceding, but there can be no conflict since they are mutually exclusive.
|
Format |
999,999.99- |
|
Example |
[Does not occur in this example because this is not a labor cost item.] |
Field number to change ?
Options
Make any needed changes. If this is an existing entry, you can also use one of the options:
|
<F1> |
For the next cost entry on file (which can be for a different job) |
|
<SF1> |
For the previous cost entry |
|
<F2> |
For the next active job on file |
|
<SF2> |
For the previous active job |
|
<F3> |
To delete this cost entry |
|
<F5> |
For a correcting entry. |
<F5> is available only if you answered Y (in G/L Control information) to the question Allow correcting transactions ?. Good accounting practice requires that transactions submitted merely to correct earlier erroneous entries should be identified as such. This avoids artificially inflating your apparent cash flow.
What happens when you press <Enter> with this field blank depends on whether or not this cost item has direct costs. For those that do (labor, materials, subcontracts, and those cost types you have defined as direct), the direct cost must be distributed.
| • | If there are no direct costs, your new or existing entry is accepted, the data is cleared from the screen, and the cursor is positioned at Field #1 for the next entry. |
| • | If this is an existing entry, which has been transferred from another module via Get costs, the distributions have already occurred (in the originating module) and cannot be changed. |
| • | If there are direct costs and this is an entry originating in this module (whether a new entry or an existing one), additional fields now appear on the screen for distribution. |
The screen now displays as follows:
The new fields are organized as a table of several rows and columns. Each row represents a debit or credit distribution to a single account. You must distribute the full amount of the entry to G/L accounts for both the debit and the credit distributions. You can have as many as five distributions, or as few as two (one for credit and one for debit).
You always work in the first row, and as each new distribution is entered, it is scrolled downward. Unfortunately there is only room for the two most recently-entered distributions plus the one currently being worked on. A distribution that has scrolled off the screen must be accepted on faith even though no longer visible.
The debit and credit amounts remaining to be distributed are shown continuously at the bottom of the screen. Each is originally equal to the full amount of the entry.
For a new entry
After you enter each distribution, you are asked Any change ?. If you respond Y, you are allowed to change the amount (but nothing else).
For an existing entry
If you have changed the cost (Field #6) and/or the retainage amount (Field #9) before entering the distribution process, the former distributions are ignored and you must re-enter them in full, exactly as though this were a new entry. You are warned that you must do so and are not given the option of viewing the existing distributions.
If you have not changed the cost, the distributions currently on file can be retained or changed, at your option.
| • | You can retain the existing distributions by pressing <Esc>. |
| • | You can enter one or more new distributions, just as though this were a new entry. Choosing to enter distributions this way does not mean that the existing distributions are superseded. any new distributions that you add are in addition to the ones already on file. |
If the account number you enter already exists, the distribution amount already on file for that account will appear and you will be asked Any change ?.
If not, you will be asked Distribution not on file. Do you wish to add it ?. Answer Y to add the new distribution or N to correct the account number.
| • | You can view each existing distribution entry by pressing <F1>. As long as another distribution entry exists it will be displayed and you will be asked Any change ?; otherwise you will be informed that there are no more distributions on file for this entry. |
If you discover that a distribution is wrong after you have moved on to another one, simply enter the same account number as though it were a new distribution. You can then change the amount.
| • | In doing this you do not create two distributions with the same account number (even though the two entries may appear on the screen simultaneously); rather, the later entry replaces the earlier. |
| • | You can do this even if you have already entered five distributions. A sixth entry is accepted for correction purposes only. |
| • | You can do this for both new and existing entries. |
To delete a distribution, set the amount to zero. This is the only case in which a zero amount is accepted. You are informed that the distribution has been deleted. You might use this feature if you had mistakenly split an amount between two different accounts when it should have gone entirely to one of the two.
You cannot change the account number of a distribution, but you can delete an existing distribution in this way, then enter a new one for the same amount but for a different account number.
After entering all the distributions, you are positioned to enter the next (even if five distributions have already been entered). Press <Esc> at this point to exit from distributions and proceed to the next entry.
If you do this at a point where the amounts remaining are zero (both debit and credit), the entry is completed and you can proceed to the next.
If not, you will be asked, Are you sure you wish to cancel the entire entry ?.
| • | Answer N to go back to entering distributions. |
| • | If you answer Y and this is a new entry, the entire entry is canceled and you must begin again. |
| • | If you answer Y and this is an existing entry, the entire entry is restored to what it had been before. Note that this means not only the distributions, but the numbered fields as well (even it the price has not changed). |
Note that reducing both debit and credit amounts to zero does not automatically exit the distribution process even if the maximum number of five entries has been reached. You must still press <Esc>.
For each distribution, enter the following information:
DR or CR
For each distribution, you must first enter whether it is a debit or a credit. Enter either D for debit or C for credit.
Options
You can also use one of the options:
|
<Esc> |
To exit from distributions |
|
<F1> |
For the next distribution (if this is an existing entry whose cost has not changed) |
These options are explained in greater detail in the introduction to this section.
|
Format |
One letter, either D or C. There is no default. |
|
Example |
Refer to Entering Sample Data below |
Acct-#
Options
Enter the G/L account number of the distribution. In most cases a default account displays at the bottom of the screen, and you can use the option:
|
<F2> |
For the default account from the table below |
Where a retainage amount is present, two defaults are generally available as indicated in the Which time? column.
|
Type |
Default Account |
||
|
Debit |
Credit |
||
|
Which time? |
|
||
|
Labor |
Cost account from Cost items for jobs |
|
No default. Use Wages payable or Cash |
|
Materials or Subcontract |
Cost account from Cost items for jobs |
1st |
A/P account from Control information |
|
2nd |
Retainage payable account from Control information |
||
|
User-defined direct cost types, e.g., rent |
A/R account from Cost items for jobs |
1st |
A/P account from Control information |
|
2nd |
Retainage payable account from Control information |
||
This table assumes that the cost (and retainage, if any), are positive. If they are negative (as might happen for a cost adjustment), interchange the debit and credit columns.
|
Format |
Your standard account number format, as defined in Company information. |
|
Example |
Refer to Entering Sample Data below |
Distrib-amt
The debit and credit amounts remaining to distribute are always displayed at the bottom of the screen. They both start off equal to the full cost. They both must be zero before you are allowed to exit from entering distributions.
This is the amount of the debit or credit distribution. The following rules apply to this amount:
| • | It cannot be negative. |
| • | It cannot exceed the amount remaining to distribute. |
| • | It can be zero only if you are correcting an existing distribution and wish to delete it. |
Options
Enter an amount, or use the option:
|
<F2> |
For the full debit or credit amount remaining, as displayed on the screen. Exception: If retainage is present and you press <F2> at either the first debit distribution or the first credit distribution, you will get the full amount less the retainage. |
|
Format |
999,999,999.99 |
|
Example |
Refer to Entering Sample Data below |
Any change ?
Answer N to accept this distribution. This distribution, and any others you have already entered, will scroll down one line, and the cursor will be positioned at the beginning of the same line to enter the next distribution.
Answer Y to change the distribution. You can change only the amount. To change the account number, refer to the introduction to this section.
Entering sample data
If you are using this manual as a tutorial, proceed to enter the distributions shown on the following screen:
You should always print an edit list of all of your costs before posting and review them to see that they are correct and complete.
You may view a sample Costing Edit List in the Sample Reports appendix.
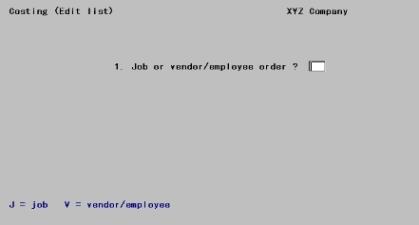
Select
Edit list from the Costing menu or select Costing edit list from the Reports menu.
The following screen displays:
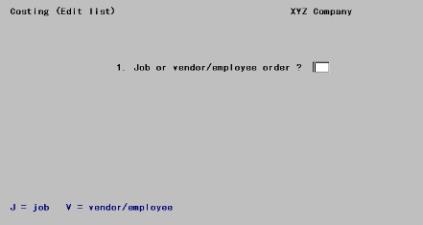
Enter the following information:
1. Job or vendor/employee order ?
If you chose to print the costs in job number order, all costs for a job will appear in sequence, in order by cost item number within the job.
Options
You can also choose to print the costs in vendor number or employee number order. You might do this, for example, if you wanted to see if you had entered all costs for a particular employee. Enter either:
|
J |
Job number order |
|
V |
Vendor/employee order |
If you print in job number order, all unposted costing entries (within the range selected) will appear on the Edit List. If you print in vendor or employee order, only those costing entries will appear on the Edit List which have a non-blank vendor or employee number (respectively).
|
Format |
One letter from the list above. There is no default. |
|
Example |
Type J |
At this point the remainder of the screen will appear, but its format will depend on your answer to the previous question. We illustrate each case separately, beginning with job number order, since that is the example.
Job number order
The following screen displays:
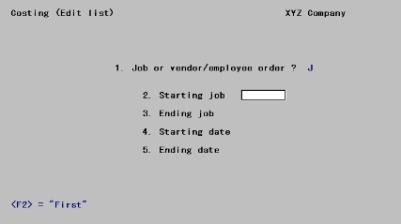
2. Starting job and
3. Ending job
Enter the range of jobs for the costs you wish to show. Follow the screen instructions.
|
Format |
7 characters for each field. |
|
Example |
Press <F2> at each field for First through Last. |
4. Starting date and
5. Ending date
Enter the range of dates for the costs you wish to show. Follow the screen instructions.
|
Format |
MMDDYY |
|
Example |
Press <F2> at each field for Earliest through Latest. |
Field number to change ?
Make any needed changes. Upon pressing <Enter> from a blank field, the Costing Edit List will be printed.
Vendor / employee order
The following screen displays:
2. Vendor or employee ?
Options
Use one of the options to select which to show (but not both):
|
V |
Vendors |
|
E |
Employees |
|
Format |
One letter from the list above. There is no default. |
|
Example |
[Does not occur in this example because you chose to print the report in job sequence.] |
Once you have selected vendors or employees, the remainder of the screen will appear:
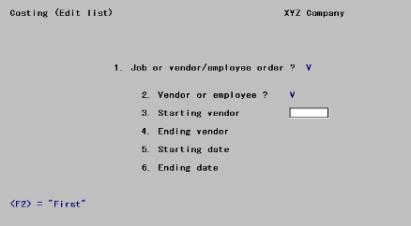
3. Starting vendor or Starting employee and
4. Ending vendor or Ending employee
Enter the range of vendors or employees whose costs you wish to show. Follow the screen instructions.
|
Format |
6 characters for vendors 999999 for employees |
|
Example |
Does not occur in this example because you chose to print the report in job sequence.] |
5. Starting date and
6. Ending date
Enter the range of dates for the cost entries you wish to show.
|
Format |
MMDDYY |
|
Example |
[Does not occur in this example because you chose to print the report in job sequence.] |
Field number to change ?
Make any needed changes. Upon pressing <Enter> from a blank field, the Costing Edit List will be printed.
When you post your costs, the period-to-date and job-to-date costs are updated, as well as other files/tables. Be certain that your costs are correct before you post.
Select
Post from the Costing menu.
The following screen displays:
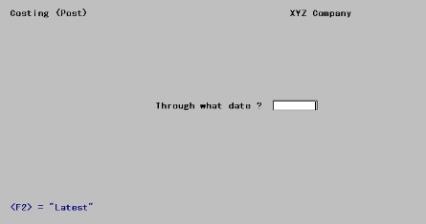
Enter the following information:
Through what date ?
Enter the date through which you wish to post costs. None of the cost entries after this date are posted, but they remain in Cost Transactions to be posted at a later time.
Options
If you wish to post all cost entries, use the option:
|
<F2> |
To set the cut-off date to Latest. This takes less time than entering the date of the latest cost entry. |
|
Format |
MMDDYY There is no default. |
|
Example |
Press <F2> for Latest |
Any change ?
Answer Y to re-enter the screen, or N to post the transactions. The Costing Register will print, showing all cost entries posted. A running display of the cost item currently being processed will appear:
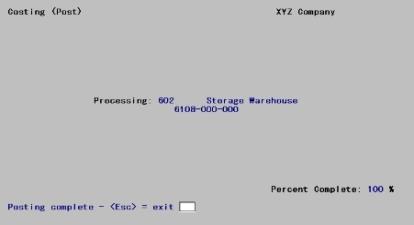
When complete, press <Esc> to return to the menu. Processing may continue for a brief period even after printing has terminated.