This chapter contains the following topics:
If you are using the Passport Business Solutions Accounts Payable, Payroll, or Inventory Control with Job Cost, you must use this selection to update your jobs with costs entered in these other modules. You would probably do this each month, to update your jobs with all costs entered that month. You could also run this selection every week or every day, if you need an up-to-date or up-to-the-minute record of job costs.
If J/C is interfaced to neither A/P, PR, nor I/C, skip this chapter.
These are the ways that you transfer costs from Accounts Payable, Payroll, or Inventory Control into Job Cost:
Follow the steps below to transfer costs from Accounts Payable.
|
Step |
Description |
|
1 |
Enter a vendor’s invoice through Payables in the A/P module. Distribute the amount of this invoice to one or more jobs. |
|
2 |
Post this invoice in A/P. Posting puts an entry record into Job Cost for every distribution to a job entered in Step 1 above. |
|
3 |
Check these entries now or at any other time by using Reports as described in the chapter of that name. Select the Payables by job # report under Reports. Print this report, showing only costs not yet interfaced to J/C. Check it for correctness and completeness. It shows all costs that have come from A/P that are not yet entered into your job costs. |
|
4 |
Run Get costs as described here. This creates a job cost entry for every A/P entry in Job Details not previously processed by Get costs. |
|
5 |
Run Costing (from the Job Cost menu). Using this, you can print an edit list of these costs, and you have a last chance to alter or delete them. |
|
6 |
When you have reviewed your work and checked to see that the costs are OK, post them to the jobs by using the Post selection from Costing. |
Once you have completed these steps, the A/P entries are designated as having been interfaced and cannot be used to update your job costs a second time. You can keep them indefinitely, save them in a holding file, or purge them completely from J/C.
Follow these steps to transfer the entries generated by Payroll to J/C.
|
Step |
Description |
|
1 |
Make time entries for employees through Time worked in Payroll. Distribute employee hours to one or more jobs |
|
2 |
Print and post checks for the employees handled in Step 1. As the checks are posted to Payroll, J/C receives a record for each distribution to a job made in Step 1. |
The remaining steps are the same as the steps for Accounts Payable above, except you will print the Payroll by job # report instead of the Payables by job # report.
|
Note |
Additional entries can be made for jobs through PR Adjustments. As far as J/C transfers are concerned, this selection operates like Time worked except that in step 2, the detailed entries are put into J/C when the adjustments are posted in Payroll |
Follow the steps below to transfer the entries from Inventory Control to J/C.
|
Step |
Description |
|
1 |
Run Inventory in the I/C module. This selection allocates material to jobs from inventory and returns material from jobs back to inventory. There is an inventory entry (transaction) type for material transfers to or from a job. |
|
2 |
Post these inventory entries in I/C. |
The remaining steps are the same as the steps for Accounts Payable, except that you will print the Inventory report instead of the Payables by job # report.
Before you use this selection, print the entry report that corresponds to the system you are interfacing with J/C.
From the J/C menu, select Reports.
There are three reports that apply to interfacing:
| • | If you want to get costs from Accounts Payable entries, select Payables by job #. |
| • | If you want to get costs from Payroll entries, select Payroll by job #. |
| • | If you want to get costs from Inventory Control entries, select Inventory. |
After you have selected the appropriate report, make the following selections from the screen that displays:
1. Starting job and
2. Ending job
Enter the range of jobs to be processed. Follow the screen instructions.
|
Format |
7 characters at each field |
|
Example |
[You are not using this selection because you specified in J/C Control information that you were not interfaced to either I/C, PR, or A/R.] |
3. Sub-job
If you have selected more than one job to show, this field is automatically set to All. If you have selected only a single job and that job has no sub-jobs, this field is automatically set to Not applicable.
Options
Otherwise, enter the sub-job number here to show cost items for a single sub-job, or use the option:
|
<F5> |
For All sub-jobs |
|
Format |
999 |
|
Example |
[You are not using this selection because you specified in J/C Control information that you were not interfaced to either I/C, PR, or A/R.] |
4. Change order (CO)
Sub-job and change order automatically default to All if starting and ending jobs are set to First and Last.
|
Format |
999 |
|
Example |
[You are not using this selection because you specified in J/C Control information that you were not interfaced to either I/C, PR, or A/R.] |
5. Starting category and
6. Ending category
|
Format |
9999999 at each field |
|
Example |
[You are not using this selection because you specified in J/C Control information that you were not interfaced to either I/C, PR, or A/R.] |
7. Starting date and
8. Ending date
Enter the starting and ending dates of the period you want to work with. Follow the screen instructions.
|
Format |
MMDDYY at each field. There is no default. |
|
Example |
[You are not using this selection because you specified in J/C Control information that you were not interfaced to either I/C, PR, or A/R.] |
9. Cost types to print
Options
Enter the cost type to print, or use the option:
|
<F5> |
For All cost types |
|
Format |
One character |
|
Example |
[You are not using this selection because you specified in J/C Control information that you were not interfaced to either I/C, PR, or A/R.] |
10. Show only entries not interfaced to jobs ?
|
Format |
One letter, either Y or N. |
|
Example |
[You are not using this selection because you specified in J/C Control information that you were not interfaced to either I/C, PR, or A/R.] |
Field number to change ?
Make any needed changes.
The resulting report shows you only those entries in Job Details which have not yet been interfaced to Job Cost for the system for which you are running the entry report.
Before running this selection, make sure you have read the section above.
Select
Get costs from the Utility menu.
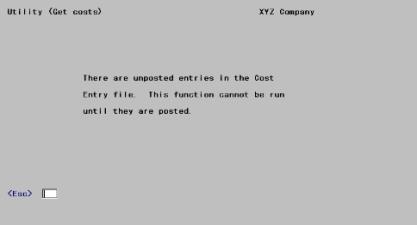
What Get costs does is create new entries in the Costing selection, and it expects to find no entries present there already. If it does, you will receive the following error message:
[Cost Entries is another name for Cost Transactions.]
If you get this screen, use Costing to post or delete unposted entries before proceeding with Get costs. Refer to the Costing chapter.
Otherwise, the following screen displays:
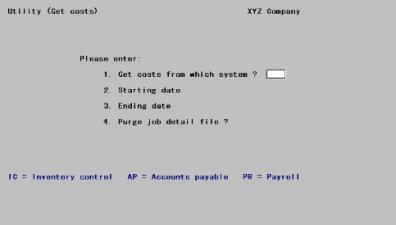
Enter the following information:
1. Get costs from which system ?
Type IC for Inventory Control, AP for Accounts Payable, or PR for Payroll.
Options
You may also use the option:
|
<F5> |
For All systems |
|
Format |
Two letters from the list above. There is no default. |
|
Example |
[You are not using this selection because you specified in J/C Control information that you were not interfaced to either I/C, PR, or A/R.] |
2. Starting date and
3. Ending date
Enter the range of dates for the period you want to interface. Follow the screen instructions. For the starting date, you can safely use the Earliest option, because only entries not yet interfaced will be processed, so no entries will be duplicated.
|
Format |
MMDDYY for each field. |
|
Example |
[You are not using this selection because you specified in J/C Control information that you were not interfaced to either I/C, PR, or A/R.] |
4. Purge job detail file ?
Answer Y to remove the detailed entry records from Job Details as they are interfaced to Cost Transactions.
Answer N to retain these records in Job Details.
| • | Records so retained are marked as interfaced entries so they will not be processed again by a subsequent execution of this selection. This also excludes them from the Job Entry reports described in the previous section. |
| • | The records remain until either the detail records or the job as a whole is either purged or saved, as described in the Utility chapter. |
|
Format |
One letter, either Y or N. |
|
Example |
[You are not using this selection because you specified in J/C Control information that you were not interfaced to either I/C, PR, or A/R.] |
Field number to change ?
Make any needed changes. Upon pressing <Enter> with this field blank, the selected costs from the interfaced module will be transferred to Job Cost. This may take a few minutes. The identification of the transactions being transferred will be displayed on the screen with a percent advances report. Once processing is complete you will be so informed and may press <Esc> to return to the menu.