This chapter contains the following topics:
Introduction to the Utility Selection
This chapter discusses several options within the Utility selection, relating to closing, re-opening, saving, restoring, and purging jobs and parts of jobs.
If you are using menu-bar, you will find more than four options in this selection. The others are discussed in their own chapters.
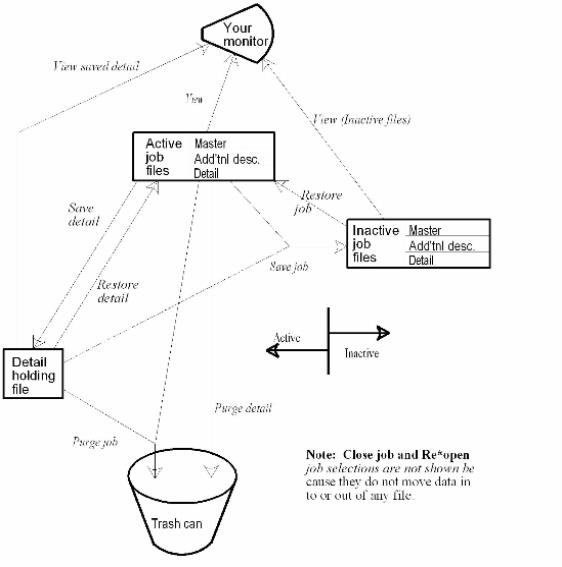
To understand these selections it helps to have a clear picture of the three different types of files involved:
Active files
The Active files contain the jobs you are currently working on. They contain all the information that displays on most reports and screens. These actually consist of three files, but you need not concern yourself with that except for Pathfinder and file backups.
Detail Holding file
The Detail Holding file is a single file into which you can keep detail information which you do not want to appear on current reports—for instance, phases of the job which have already been completed.
Inactive file
The Inactive files contain closed jobs, which you are not yet ready to purge. They are basically mirror images of the active files, so there are three of them.
What you get when you use the View and Report selections depends on whether the system is focusing on the active files or the inactive ones.
The chart on the preceding page shows the files and the selections referred to in this chapter. The arrows indicate movement of data to and from the files; dashed lines indicate that this data movement is optional.
Four uses of the word active should be carefully distinguished:
| • | When speaking of a job’s status, active means that the job has been activated but has not yet been closed. Not every job in the active files is an active job in this sense. |
| • | Active as opposed to inactive refers to the files you see when you start up the module in active-file mode. |
| • | Detail Holdings are sometimes contrasted to the active data. Information in this file is inactive in the sense of not appearing on most screens or reports. Since you can continue to apply transactions to these jobs, and since the data can be viewed or restored at will without having to start up the module in inactive-file mode, this file is nevertheless included amongst the active files. |
| • | Completion estimate transactions were formerly called activity transactions, but vestiges of this usage are now confined to internal program and file names. |
If you are content to purge jobs soon after closing them, you may not need to use the Inactive files at all. Use this feature only if there are some jobs you do not want to appear on your current reports and that take up space in your active files, and yet you do not want to purge. This might happen because:
| • | The jobs are seasonally inactive. |
| • | You want to save them to copy from. |
| • | You want them available for auditing. |
Jobs in the Inactive files can be restored to the active files, but while they are inactive, no costs, billings, or payments can apply to them.
Jobs must be closed before they can be saved to the Inactive files, but this does not prevent you from temporarily storing a job there—you need only re-open it after restoring it.
Even though you have answered N to the question Access Inactive files ? (in Control information), you can still save jobs to, and restore them from, the Inactive files. You will just not be able to use the View, Job status report, or Reports selections for those inactive jobs.
Jobs cannot be purged from the Inactive files (at least, not without first restoring them). The only way to prevent these files from eventually becoming too large is to initialize them occasionally (after backing them up first). See the File Initialization appendix for this.
The primary purpose of this file is to reduce clutter in your reports, not to save disk space. If your jobs usually finish quickly, you may not want to bother with this file at all.
Only the details of a job are contained in this file. The job itself remains available, and transactions can continue to apply to it.
With the availability of very large disk drives, regaining disk space may not be an issue for you. But you may run this function to recover disk space.
The P options of the Purge/save/restore detail selection and the Purge/save/restore jobs selection do not physically reduce the size of their files, they merely make the data logically inaccessible. To actually regain the physical disk space in the respective files, you must use export and restore from an export file features of the File Recovery utilities. See the chapter of that name in the PBS Administration documentation for further details.
Available requirements
If you choose to maintain either the Inactive files or the Detail Holding file offline, you should know when each file must be physically present:
| • | The Detail Holding file needs to be available only while using the selections described in this chapter. |
| • | The Inactive files need to be available whenever you are in the inactive file mode. |
| • | One selection, Purge/save/restore jobs, requires both files to be available simultaneously. |
After all costs, billings, and payments have been posted to a job and the job is complete, use this selection to close the job.
Select
Close or re-open jobs from the Utility menu.
In order for a job to be closed it is not necessary for it to be complete in the technical sense that every cost item has an estimated completion of 100%. If you do not expect to incur any more costs, close it. This changes the job status to Closed and sets the date of closing. You can always re-open the job later if you resume work on it.
A job must be closed before it can be purged or saved to the Inactive files.
After a job has been closed, and until it is either purged or saved, billings and payments (but not costs) can continue to apply to that job. When this happens, the job remains closed (that is, it does not revert to the active or to the unreconciled status).
You can close a job even though some or all of its details have been moved to the Detail Holding file.
If you use neither the Inactive files nor the Detail Holding file, this section is the only section in this chapter that you need be concerned with.
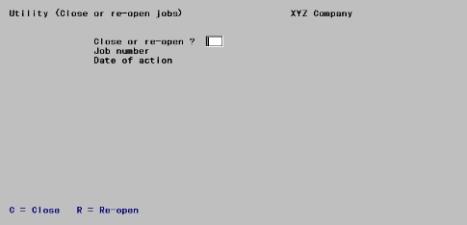
The following screen displays:
Enter the following information:
Close or re-open ?
Answer C if you are closing a job, or R if you are re-opening a job.
| • | You can close a job only if its status is active and it has no unposted costs or billings. |
| • | You can restore a job only if has previously been saved. |
|
Format |
One letter |
|
Example |
Type C |
Job number
Enter the number of the job you are closing or re-opening.
|
Format |
Up to 7 numbers |
|
Example |
Type 602 |
Date of action
Enter the date the job is being closed or re-opened.
|
Format |
MMDDYY The system date displays as the default. |
|
Example |
Press <Enter> to accept the default. |
Any change ?
Answer Y to re-enter the information, or N to continue.
If the job has unposted transactions, you will be informed of the fact and will not be able to continue until these are posted.
If you are closing a job that is not complete, you will be told, Job is not marked as 100% complete - continue ?. (For an explanation of completeness, refer to the Completion Estimates chapter). Answer Y to close the job anyway, or N to cancel the closing.
Options
Some people keep careful track of each cost item’s completion status, and do not mark a job as complete until each cost item has completed. Others mark the job as complete when it is finished, and save themselves the trouble of plodding through each detail item individually. If you encounter one of the latter jobs, you will be told, One or more cost items not marked as complete. Use one of the following options:
|
<F1> |
To view the unclosed cost items (in the same format as for the View (cost items) selection). |
|
<F2> |
To close the job anyway. |
|
<Esc> |
To cancel the closing. |
Select
Purge/Save/Restore detail from the Utility menu.
When you post costs, billings, and payments during your normal day-to-day processing, the file that stores them (called the Job Detail file) will grow and require more and more disk space. Posting will be slower as this file grows larger.
This selection removes detailed entries from this file and either saves them in a holding file or purges them completely from the system. You can later use this selection to restore them from that file back to the Job Detail file.
If a job is still open, its details can be saved but not purged.
You cannot save or purge any detail entries deriving from the Passport Business Solutions A/P, PR, or I/C (by way of Get costs) until they have been posted in Costing.
Cost items saved via the S option of Purge/save/restore detail cannot subsequently be purged by using the P option of the same selection. They must be restored first. This is seldom necessary, since those details will be removed from the Detail Holding file when the entire job is eventually saved or purged (via Purge/save/restore jobs).
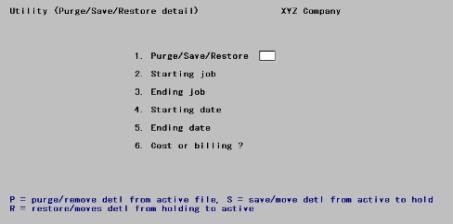
The following screen displays:
Enter the following information:
1. Purge/Save/Restore
Answer P for purge, S for save, or R for restore.
|
Format |
One letter from the list above. There is no default. |
|
Example |
Type P |
2. Starting job and
3. Ending job
Enter the range of jobs to be processed. Follow the screen instructions.
|
Format |
7 characters at each field. |
|
Example |
Type 102 at each field. |
4. Starting date and
5. Ending date
Enter the range of dates for the entries you wish to purge, save, or restore. Follow the screen instructions.
|
Format |
MMDDYY for each field. |
|
Example |
Press <F2> at each field for Earliest and Latest |
6. Cost or billing ?
Options
Enter the type of entries to process, using one of the following:
|
C |
Costs only |
|
B |
Billings and payments only |
|
Blank |
Both types |
|
Format |
One letter from the list above. The default is Blank. |
|
Example |
Type B |
Field number to change ?
Make any needed changes. Upon pressing <Enter> with this field blank, the requested action will occur.
If you have specified a range of jobs, a running display of the job currently being processed will appear on the screen. Jobs within the range but not eligible to be processed will be bypassed without your intervention.
If you are purging, a Job Detail Purge Log will be printed.
Select
View saved detail from the Utility menu.
After you have saved some job detail into the Detail Holding file (using the selection above), you may want to look at this detail before the job is closed. This selection lets you do so without having to restore the entries to the Job Detail file. You can look at all [unpurged] entries (costs, billings, or payments).
You cannot use this selection to view jobs saved via Purge/save/restore jobs—only to jobs (or parts of jobs) saved via Purge/save/restore detail. To view saved jobs, use the Inactive files selection.
The View saved detail selection works exactly like the View (Costs by job) selection.
The following screen displays:
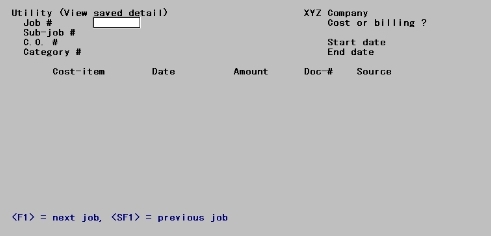
Enter the following information, specifying the range of entries to view:
Job #
Options
Enter the job number whose entries you wish to view, or use one of the options:
|
<F1> |
For the next job on file |
|
<SF1> |
For the previous job |
|
Format |
Up to 7 numbers |
|
Example |
Type 602 |
Sub-job #
Enter the number of the sub-job you wish to view.
If this job does not use sub-jobs, this field is automatically set to Not applicable and cannot be entered.
If the job uses sub-jobs and bills for them, a valid sub-job number is required.
If the job uses sub-jobs but does not bill them:
| • | To view costs, enter a valid sub-job number. The Cost or billing ? field will automatically be set to C and the cursor will bypass it. |
| • | To view billings/payments, leave this field blank. The Cost or billing ? field will automatically be set to B and the cursor will bypass it. |
|
Format |
999 |
|
Example |
[In this example, this field displays as Not applicable.] |
C.O. #
This is the change order number. If you have chosen (in Control information) not to use change orders at all, this field is automatically set to Not applicable and cannot be entered.
If the entries you want to view are for a change order, enter the number of that change order.
Otherwise, leave this field blank and press <Enter>.
|
Format |
999 |
|
Example |
Press <Enter> to leave this field blank. |
Category #
Options
Enter the category number of the cost item for which you want to start viewing entries, or use the option:
|
Blank |
To start from the first cost item, or to view billing entries. |
If you enter an explicit category number, the Cost or billing ? field will automatically be set to C and the cursor will bypass it.
|
Format |
9999999 |
|
Example |
Press <Enter> to leave this field blank. |
Cost or billing ?
Enter C if you want to look at cost entries, or B if you want to look at billing, payment, and profit recognized entries.
This field may be set automatically, depending on the sub-job or category number entered. These cases are described above.
|
Format |
One letter, either C or B. There is no default. |
|
Example |
Type C |
Start date and
End date
Enter the range of dates for the entries you wish to view. Follow the screen instructions.
|
Format |
MMDDYY There is no default. |
|
Example |
Press <F2> at each field for Earliest through Latest. |
The following screen displays:
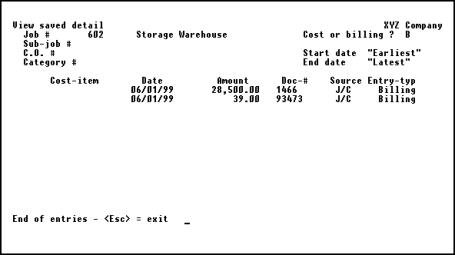
Options
Up to 13 entries will appear, starting with the first one selected to be viewed, and you can use the option:
|
<F1> |
To display the next 13 entries on file (if any). In this way you can scan through all entries that match your selections. |
After all entries for the cost item you selected are displayed, entries for successive cost items will be displayed. However, all entries displayed will always be for the same job and date range.
|
Format |
[Only option key input is accepted at this point.] |
|
Example |
Press <Esc> |
Select
Purge/Save/Restore jobs from the Utility menu.
You can use this selection to remove the job from the active job files. You can either save it into the inactive job files, or you can purge it from the system altogether.
This selection applies only to closed jobs, and operates only on one job at a time.
A saved job can be restored the active files, allowing you to either re-open it or copy it (creating a new job). Until this happens, the only thing you can do with the job is to view it or to include it in reports. You cannot even purge it. You can, however, initialize the Inactive Job files if desired. Refer to the Initializing Data Files appendix.
The following screen displays:
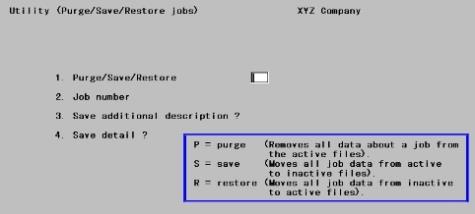
Enter the following information:
1. Purge/Save/Restore
Answer P for purge, S for save, or R for restore.
|
Format |
One letter from the list above. There is no default. |
|
Example |
Type S |
2. Job number
Enter the number of the job you wish to purge, save, or restore. This must be a closed job.
|
Format |
Up to 7 numbers |
|
Example |
Type 102 |
3. Save additional description ?
This field applies only to saves. If you are doing a purge or a restore, it displays as Not applicable and cannot be entered.
Answer Y if you want to save any additional description you have entered for the job or cost items of the job.
If you answer N to this, all additional description will be purged and not saved.
|
Format |
One letter, either Y or N. There is no default. |
|
Example |
Type Y |
4. Save detail ?
This field applies only to saves. If you are doing a purge or a restore, it displays as Not applicable and cannot be entered.
If you answer Y to this, your detail entries (cost, billing, and payment) will be saved, along with the header and cost item information for the job. This includes those in the Detail Holding file as well as those in the Job Detail file. The system does not remember which details came from which file, so if the job detail is subsequently restored everything will go into the Job Detail file.
If you answer N, job information (and additional description, if requested) will be saved, but details (whether in the Job Detail file or the Detail Holding file) will be purged.
|
Format |
One letter, either Y or N. There is no default. |
|
Example |
Type Y |
Field number to change ?
Make any needed changes.
If you have specified a range of jobs, a running display of the job currently being processed will appear on the screen. Jobs within the range but not eligible to be processed are bypassed. No pause occurs in the processing.
No report is generated by this selection, even for a purge.