This chapter contains the following topics:
Use this function to maintain Job Masters for orders to be costed, the related Shop Orders, and Shop Order cost estimates. The entry of a Job Master record determines if cost estimates and actual costs may be entered and reported for related Shop Orders.
A Job may consist of one or more Shop Orders. Each Shop Order is identified by a Shop Order Number, optional Release Number, and an Item Number. The Job Master record identifies the basic six character Shop Order Number. Therefore, job costs and hours may be summarized for a number of related items (e.g. assembly, subassemblies and parts), or for several shop order lot releases for the same item, where the same basic Shop Order Number is assigned to all releases. Shop Order costs are summarized and reported for the individual shop orders within the job, and for the total Job.
This program allows you to maintain Job Masters, Shop Orders, and Shop Order cost estimates for costed jobs. Job masters may also be created with other PBS manufacturing modules or programs that add Shop Orders.
The sequence to follow in setting up Job Masters with Job Numbers, Shop Orders, and related records is somewhat dependent on how you use other PBS manufacturing modules.
If you use PBS Customer Order Processing, any Sales Order to be referenced in a Job Master record should be entered in Customer Order Processing before you use this program to add the Job Master. Referencing a valid Sales Order Number in the Job Master allows automatic posting of billings for that order to Job Costings. You may optionally create new Shop Orders and related Job Masters in Customer Order Processing when you add a Sales Order line item, in which case the Job Number will match the Sales Order Number.
If you use Customer Order Processing but you don't create Shop Orders with the Sales Order Entry program, a Sales Order Number referenced in the Job Master does not need to match the Job Number.
You may use Inventory Management or Shop Floor Control to enter Shop Orders for costed jobs before you add the Job Master in Job Costing. In this case you need to manually assign the Job Number so that it matches the previously entered Shop Order Number. You may optionally create the Job Master immediately upon adding the Shop Order with another package.
If you want this program to automatically assign Job Numbers from M/J Control Information, then it is best to also add all related Shop Orders with this program, after you enter the Job Master.
Select
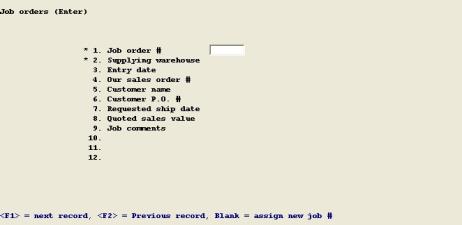
Enter from the Job orders menu. The following screen displays:
Enter the following fields:
1. Job order #
Entry Format: Up to 6 alphanumeric characters, or Blank = assign new Job Number from M/J Control Information, or <F1> to retrieve next Job Number.
Supplying warehouse
Entry Format: Up to 2 alphanumeric characters, or <F1> = "Any" (if Shop Orders for the job will be manufactured in several warehouses)
If the Job Number matches a Job Master, it's Warehouse displays as the default.
Validation: The number of open and closed Shop Orders that match the Job Order Number and Warehouse entries are then displayed. If you are adding a new Job Master and matching closed Shop Orders are on file, a message informs you about this condition, the program cancels your input, and the cursor returns to Job Order Number.
3. Entry date
Entry Format: 6 numeric digits in MMDDYY format, the System Date is the default.
4. Our sales order #
Entry Format: Up to 6 numeric digits, or Blank = "None".
Comments: If SBS Customer Order Processing is installed, this entry must match an open Customer Sales Order. If it is a valid Sales Order Number, the program asks:
Post all billings to job ?
Answer Y or N.
Comments: A Y answer will cause the Post Invoices program in Customer Order Processing to automatically post all billings (except freight charges) for the designated Sales Order to Job Costing data.
If the Sales Order includes other line items that are unrelated to this job, answer N. If you want billing information on reports for this job, you may use the Process Job Billings function to enter selective billings for this job.
Fields 5 through 8 are requested only when you enter a Sales Order Number. If Customer Order Processing is installed, fields 5 through 7 are automatically entered from the specified Sales Order.
5. Customer name
Entry Format: Up to 25 alphanumeric characters. When entered, spaces are not allowed.
6. Customer P.O. #
Entry Format: Up to 15 alphanumeric characters, or Blank.
7. Requested ship date
Entry Format: 6 numeric digits in MMDDYY format, or <F1> = Hold, or <F2> = Split, or Blank.
8. Quoted sales value
Entry Format: Up to 8 numeric digits plus 2 decimals, or Blank = Not specified.
9.-12. Job comments
Entry Format: Up to 4 lines of 30 alphanumeric characters each.
If you press <F3> to delete a record, the program will warn you that any Shop Order estimates or actual cost data for the job will also be deleted.
Enter - Shop Orders
If you answered Y to "Enter S.O.'s or cost estimates ?" this second screen displays for Shop Orders.
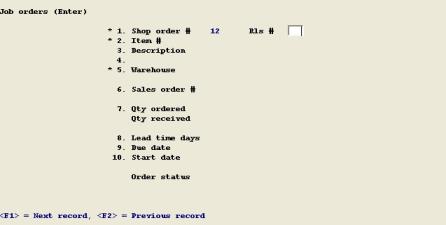
The fields you enter are:
1. Shop order #
Entry Format: Not entered, displayed from previous Job Order screen.
Rls #
Entry Format: Up to 2 numeric digits, or default of space.
Comments: Use of Release Numbers is optional, allowing Shop Order Numbers with multiple releases for different due dates.
2. Item #
Entry Format: Up to 15 alphanumeric characters.
Validation: The Item Number must match an Item Master.
Comments: Enter spaces to select by description if you want to search for an Item Number by entering any portion of the first 30 characters of its Description.
Press <F1> to consecutively display Parent Item Numbers with the Shop Order Number and Release Number you have entered.
3. and 4. Description
Entry Format: Up to 30 alphanumeric characters for each line.
Default: The Item Master description fields are automatically entered when you first add a Shop Order. You may later modify that description from "Field number to change ?".
5. Warehouse
Entry Format: Up to 2 alphanumeric characters, or default.
Default: If the Job Master designates a specific Supplying Warehouse, that code is automatically entered to this screen from the Job Master.
If the Job Master designates "Any" Warehouse, either the Item's Primary Warehouse code, or the Warehouse code in the first Shop Order that matches the order identifier entries in Fields 1 and 2, is displayed as the default.
If this entry together with Shop Order Number, Release Number, and Item Number matches a Shop Order record the remaining data fields will display.
6. Sales order #
Entry Format: Up to 6 numeric digits, or spaces.
Default: If a Sales Order Number is in the Job Master, that number is automatically entered to the Shop Order and cannot be changed in this program.
7. Qty ordered
Entry Format: Up to 8 numeric digits, without a minus sign.
Comments: The item's Inventory Unit Of Measure displays to the right of this entry.
Qty received This field is displayed only, since it may only be updated by other programs. It is initialized to zero when an order is added.
8. Lead time days
Entry Format: Up to 3 numeric digits without a minus sign.
Default: The displayed default is Lead Time Days from the Item Master record.
9. Due date
Entry Format: 6 numeric digits in MMDDYY format.
Validation: Must not match a date in Schedule Exception Dates.
Comments: If you change the Due Date of a Shop Order, the program asks "Reschedule other items with same S.O. # and Rls # by same number of days ?". Answer Y or N.
If you change the Start Date, or another entry that causes a new Start Date to be calculated, the program asks "OK to change date of S.O. material reqts ?". Answer Y or N.
For jobs comprised of multiple Shop Orders, these rescheduling options may be used to make consistent changes to Due Dates and Material Requirements dates for all related Shop Orders.
10. Start date
Entry Format: 6 numeric digits in MMDDYY format.
Default: The displayed default is automatically calculated from Lead Time Days and Due Date, using Schedule Exception Dates to exclude exception dates.
Validation: This entry must not match a date in Schedule Exception Dates.
Order status
Comments: Order Status is displayed. For new orders, this code is automatically set to O (Open) and is updated by other applications; it cannot be modified in Enter Shop Orders. Status codes are:
Order-Status Explanation
O = Open Added to Shop Orders, but not exploded.
E = Exploded Shop Order Material Requirement records for components are on file for the Shop Order. Status is changed to E by the Explode Shop Orders program or by the "Shop order materials" function.
I = Issued Some or all required components are issued to the Shop Order. Status is changed to I by the I/M "Inventory transactions" function.
C = Closed Order has been closed by the Close Shop Orders program and its record can no longer be modified by using Enter Shop Orders.
Close Shop Orders in the Close Job Orders function to remove the detail, before you delete the Shop Order.
If the order Status is E or I, you must first use Close Shop Orders to close the order, which removes Material Requirement and cost detail, before you delete the order. You may also use Purge Closed Shop Orders in Inventory Management to delete all Shop Orders that were closed on or before a date that you specify. A Shop Order will not be purged if a related Job Cost Master has not been closed and deleted.
If I/M Control Information indicates you use Shop Order Comments, press F6 at "Field number ot change ?" to enter:
1.-99. S.O. comments
Entry Format: Up to 99 lines of 45 alphanumeric characters each, in groups of 10 lines per screen.
Comments: If the answer is "N" to "Use shop order comments" in I/M Control Information, you will not be prompted to add S.O. comments.
If you do you use comments, when you are adding or changing comments, press <F1> to put spaces in a comment field and in subsequent fields in the same group of 10. To delete all comments for a group of 10, press <F1> when the cursor is at the top comment field.
You may also press <F2> at the first comment field to copy the item master comments, if any.
If the Shop Order is not closed, the program asks "Enter shop order cost estimates ?". Answer Y to proceed with cost estimates entry.
You are only allowed to delete a Shop Order with an Order Status of O (Open) or C (Closed). You can delete an order with status O (Open) only if there is no related cost estimate or actual cost detail on file. If related cost detail records exist, you must delete those detail records, or use
Enter - Estimated Costs
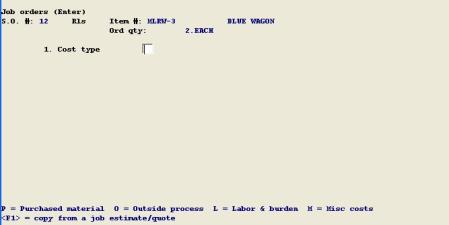
If you answered Y to "Enter S.O. cost estimates ?" this third screen displays for Estimates.
If you use SBS Shop Floor Control, you may optionally create order cost estimates with the "Release routing operations" program.
The data you enter are:
1. Cost type
Entry Format: P = Purchased material, or
O = Outside process, or
L = Labor & burden, or
M = Misc costs, or
<F1> = copy from a job estimate/quote
If you press <F1> at Cost Type, you are prompted to enter:
Estimate/quote #
Entry Format: Up to 6 numeric digits.
If you enter a valid number, the program displays the first line item for the Estimate/Quote and asks "Right estimate item ?". Answer Y or N, or press <F1> to display the next estimate item. If you answer Y to this question, estimated unit costs to be copied are displayed and the program asks "OK to copy item estimate ?".
Validation: The Estimate/Quote Number must be in Estimate/Quotes.
You are not allowed to use this copy feature if detail estimates for labor or miscellaneous costs are already on file for the Shop Order. You may alter estimate records created from Estimate/Quotes after the data is copied.
Purchased Material
(Cost Type = P):
2. Unit cost/
Entry Format: Up to 7 numeric digits plus 4 decimals.
If there is a Bill of Material for the Shop Order Item Number, the following entry option displays on the screen:
<F1> = calculate from item bill of material.
Validation: When you use the <F1> option to calculate this cost from the item's bill, a message tells you how many purchased components were used in the calculation and how many of those components have been assigned a unit cost.
Comment: A message displayed tells you that "Material unit cost entered should be total cost per parent of purchased components added at this manufacturing level". Purchased Material Cost, calculated by this program from the item's Bill of Material, includes average or standard costs of purchased components in the single level bill.
Outside Process
(Cost Type = O):
2. Unit cost/
Entry Format: Up to 7 numeric digits plus 4 decimals, or default.
Default: If This Level Standard Outside Cost in the Item Master record for the Shop Order Item Number is greater than zero, it is the displayed default which you may override by pressing <F1>.
Labor & Burden
(Cost Type = L)
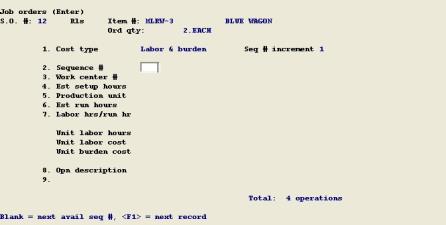
Seq # increment
Entry Format: Up to 2 numeric digits, or ENTER for 1.
If there is a Routing for the Shop Order Item Number and the Labor Reporting Method in the M/J Control information is Routing Operation, the following entry option displays on the screen:
<F1> = copy direct labor operations from item routing.
Validation: When you press <F1> to copy Routing operations, you are not allowed to use this option if detail estimates for labor and burden are already on file for the Shop Order. You may modify Routing operations after they are copied.
Comments: Each Labor/Burden Detail record for a Shop Order Item is assigned a sequence number. This entry specifies the increment between sequence numbers to be automatically assigned by the program.
2. Sequence #
Entry Format: Up to 3 numeric digits, or Blank = next avail seq #, or
<F1> = next sequence number.
3. Work center #
Entry Format: Up to 6 alphanumeric characters.
Validation: The Work Center Number must match a record in Work Centers, in which case various Work Center fields will display.
If the Labor Estimating/Reporting Method in M/J Control Information is Work Center, you are only allowed to enter one Labor/Burden estimate for each Work Center used for the Item.
4. Est setup hours
Entry Format: Up to 2 numeric digits plus 3 decimals, or zero.
Press <F1> if you want to enter the time in minutes, after which the program will convert the value entered to hours.
Default: If Average Setup Hours is specified in the Work Center record, it displays as the default which you may accept by pressing ENTER or override by pressing <F1>.
5. Production unit
Entry Format: Up to 4 alphanumeric characters.
Default: If you are adding a record, Stock Unit of Measure from the Item Master displays.
Comments: Production Units may be different than inventory Stock Units produced at machine operations that make multiple inventory units per machine cycle. For example, Stock Unit could be EACH, but Production Unit related to the machine run time standard could be HIT or CYC (for Cycle).
If the Production Unit differs from the item's Stock Unit of Measure, you must enter:
Stk/prod ratio
Entry Format: Up to 4 numeric digits, specifying the Stock Units per Production Unit. E.g. 4 EACH/HIT.
6. Est run hours
Entry Format: Up to 3 numeric digits plus 3 decimals, or zero.
Press <F1> if you want to enter the time in minutes, after which the program will convert the value entered to hours.
Comments: If the operation is machine paced, enter the machine hours standard. This may not be the same as run time labor hours, but you will enter the Labor Hours/Run Hours conversion ratio.
If you enter a non-zero value for Run Time Hours the program asks for:
per
(per quantity, related to run time hours)
Entry Format: Up to 4 numeric digits, or accept the displayed default of 1.
Comments: If the run time hours is for 1 unit of production, enter 1. Otherwise enter the number of production units related to the run time.
7. Labor hrs/run hr
Entry Format: Up to 1 numeric digits plus 2 decimals.
Default: If you are adding a record, 1.00 displays as the default entry.
Comments: If a machine is used for the operation, it may require several people (e.g. 2.00 labor hours per run hour), or may require less than a full time person (e.g. 0.50 labor hours per run hour) if one person simultaneously tends several machines.
The program calculates and displays Unit Labor Hours, Unit Labor Cost, and Unit Burden Cost from the values you entered and the Work Center rates.
8.-9. Opn description
Entry Format: 2 lines of up to 30 alphanumeric characters each. Second line is optional.
When you display a Labor & Burden estimate record previously entered, the Work Center rates used to calculate the labor & burden costs may have been changed. In that case, the new costs will be displayed to the right of the old costs in a column labeled "Recosted:". You will be asked if you want to use these new recosted values. Answer Y if you wish the recosted values to replace the old costs, or N to leave the old estimate unchanged.
Misc Costs
(Cost Type = M)
2. Misc cost code
Entry Format: Up to 5 alphanumeric characters.
Validation: The Misc Cost Code must match a record in Misc Cost Codes, in which case the records description is displayed followed by the Misc Cost Code "Charge P.O.'s ?" field.
3. Misc units reqd
Entry Format: Up to 6 numeric digits, zero not allowed.
Comments: This is the total number of misc units required for the Shop Order.
4. Misc unit cost
Entry Format: Up to 5 numeric digits, plus 4 decimals, or <F1> to enter Total Misc Cost.
Default: When adding a new record the Misc Cost Code standard cost is displayed as a default if it is not zero.
Comments: The Total Misc Cost is automatically calculated and displayed when Misc Unit Cost is entered.
5. Total misc cost
Entry Format: Up to 6 numeric digits, plus 2 decimals.
Comments: The Misc Unit Cost is automatically calculated and displayed, if this field is entered.
When you have finished entering estimates, press ESC (or TAB) at cost type. An estimate summary screen will then display indicating the total unit costs at this level for Material Cost, Outside Cost, Labor Cost, Burden Cost, Misc Cost, and Direct Labor Hours. After this display you will be asked "Enter more estimates for this shop order ?". Enter Y to return to Enter Estimates or N to return to Enter Shop Orders.
The Explode Shop Orders program appears on this menu as a convenience. You may optionally enter and explode Shop Orders with SBS Inventory Management, and use this package to enter Job Masters and Shop Order cost estimates.
This program explodes Shop Orders into Shop Order Material Requirements records, using Product Structures (bills of material) maintained in Product Definition & Costing. This process also increases the Quantity Allocated in Item Master or Branch Warehouse Item records for the components.
Shop Order Material Requirement records are the detail of a component item's total Quantity Allocated at a Warehouse, and are subsequently used to record actual issue quantity vs. required (planned usage) quantity for each controlled component used in making the parent item.
The program provides a multiple level explosion option which automatically creates Shop Orders as well as Material Requirements records for lower level manufactured components. Component orders are created only if available Quantity On Hand does not cover the new requirement; when created, they are assigned the same Shop Order and Release Numbers as the parent order being exploded.
Select
Explode shop orders from the Job orders menu. The following screen displays:
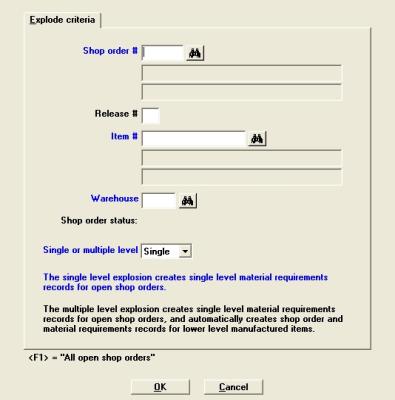
When you select this program a message informs you that:
The single level explosion creates single level material requirement records for open shop orders.
The multiple level explosion creates single level material requirement records for open shop orders and automatically creates shop order and material requirement records for lower level manufactured items.
Enter the following fields:
Entry Format: Up to 6 alphanumeric characters, or <F1> = "All open shop orders" for a warehouse.
If you use the "All open shop orders" option, the entries for Release Number and Item Number are automatically bypassed.
Entry Format: Up to 2 numeric digits, or default of space.
Validation: Shop Order Number and Release Number must match a Shop Order record.
Entry Format: Up to 15 alphanumeric characters, or press <F1> to consecutively display Item Numbers with the Shop Order Number and Release Number you have entered.
Comments: The combination of Shop Order Number, Release Number, and Item Number must match a Shop Order.
Entry Format: Up to 2 alphanumeric characters, or default.
Default: Warehouse code in the first Shop Order matching your Shop Order Number, Release Number, and Item Number entries is displayed as the default.
Comments: At this point, if you have requested explosion of a specific Shop Order, the program checks to see that Order Status is O (Open) for the order matching your entries. If current Order Status is not "Open", the program informs you that the order cannot be exploded and returns you to the Shop Order Number entry position.
Entry Format: Drop down list box with the choices of Single Level Explosion or Multiple Level Explosion.
Component Effective Dates and Component Fit Times in Product Structure records are used in determining what components are required and the component requirement due dates. Due dates in component Material Requirement records are set equal to the Start Date of the parent order plus any Component Fit Time Days in the component's Product Structure record.
This explosion will "blow through" any component coded as a Transient (Purch/Mfg code in the component Item Master). The components of the Transient are allocated directly to the exploded parent order, and will appear on the parent order pick list.
The Shop Order Explosion Audit List will automatically print when the explosion is completed after which the program returns you to the Shop Order Number entry position.
This report verifies the explosion of the Shop Orders you have selected and lists any exceptions such as "Bill of material not found - Order not exploded".
The audit list for a multiple level explosion will also show any automatically created Shop Orders for manufactured components, or may inform you "Inventory applied - Order not Required" for the lower level manufactured item. If a parent Shop Order is made at a branch warehouse and its manufactured component is supplied by the primary warehouse, "Supplied by primary warehouse - Order not created" will appear for that component on a multiple level explosion audit list.
Another possible exception message on the Explosion Audit List also pertains to the automatic creation of component Shop Orders in a multiple level explosion. The explosion program cannot create a component Shop Order with an identifier (Shop Order Number, Release Number, Item Number, and Warehouse) that matches a Shop Order record already on file. In this situation a message "Duplicate record on file- Order not created" is listed with the required additional order quantity for the manufactured component item.
The duplicate Shop Order condition can occur if a manufactured component appears more than once in the indented bill of the parent item being exploded through multiple levels. To remedy this situation, you may wish to close the first Shop order created for the manufactured component and then add a shop order for the total requirement quantity.
These documents are printed from P/D Routings, not from the Shop Order labor estimate records maintained with this package.
The source of information printed on Shop Order Routings and optional barcoded reporting documents is P/D Routings and Shop Orders. Therefore, before you can print an order routing with this program, you must have previously defined the item's operations in Routings and entered the Shop Order.
If you have installed the Bar Code Print Utilities, this program also allows you to print bar coded routing documents used to simplify shop floor reporting of employee production and labor.
Select
Print S.O. routing from the Job orders menu. The following screen displays:
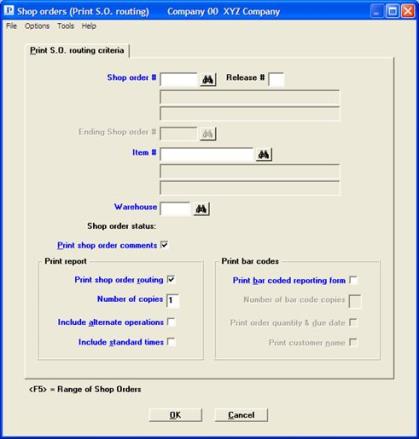
Enter the following fields:
Up to 6 alphanumeric characters.
Up to 2 numeric digits, or default of space.
Shop Order Number and Release Number must match a Shop Order record.
Up to 15 alphanumeric characters, or press <F1> if you wish the program to consecutively display Item Numbers with the Shop Order Number and Release Number you have entered
Or, press <F2> to default to printing routings lists for "All" manufactured items to be made on the Shop Order Number and Release Number you entered.
If you enter an Item Number, it and the preceding entries must match a Shop Order.
Up to 2 alphanumeric characters, or default.
Warehouse in the first Shop Order matching the Shop Order Number, Release Number, and Item Number entries displays as default.
Check box where checked is yes and unchecked is no.
If I/M Control Information indicates you use Shop Order Comments, you may optionally print them on the routing and barcode reports.
Check box where checked is yes and unchecked is no.
Leave unchecked if you only want to print barcoded forms, in which case entries for Number of copies, Include alternate operations and Include standard times are bypassed.
One numeric digit (1-9).
Check box where checked is yes and unchecked is no.
Check box where checked is yes and unchecked is no.
If you wish to print a barcoded reporting document, answer Y to the following question:
Print bar coded reporting form
Check box where checked is yes and unchecked is no.
One numeric digit (1-9).
Entry is bypassed if the answer to the preceding question is N.
Print order quantity & due date
Check box where checked is yes and unchecked is no.
Pertains to barcoded document.
If you use the C/O package and the Sales Order reference in the Shop Order matches an open Customer Order, the program asks:
Check box where checked is yes and unchecked is no.
Pertains to barcoded document.
Select OK to print or Cancel to return back to the menu without printing.