This chapter contains the following topics:
Introduction to Master Schedules
Display or Print Master Schedules - Common Options
This function allows you to shift schedule periods, display or print Master Schedules with related order action messages. If you use firm planned orders for master planning, you may also maintain or purge firm planned orders.
Each time that you run a program to display or print master schedules, the demand and supply information is regenerated from current data files at the time of your request. This differs from the MRP explosion process, where a separate explosion program is run to generate new report files that are later viewed or printed with other programs.
Master Schedule display or print options include single level explosion of Level 0 (top level) items to Level 1 gross requirements. This allows calculation of total demands and complete master scheduling of supply orders at the top two levels of your bill of material structure. Other lower level items at Level 2 and below, such as forecasted service parts, may appear on Master Schedule reports, but the Master Schedule programs will not plan orders for those lower level items. The complete MRP explosion process is required to develop lower level requirements.
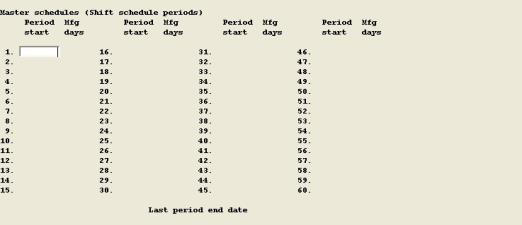
After you have initialized Schedule Periods, you may use this program to easily drop one or more of the earliest periods and to add one or more periods at the end of the schedule horizon, as you start a new planning cycle.
Select
Shift schedule periods from the Master schedules menu.
Enter the following fields:
Schedule Periods are displayed on the screen, and you are prompted to enter the number of periods to drop. The default value displayed will cause the beginning schedule period, after the shift, to coincide with the current date. If you enter zero or press ESC (or TAB), you exit the program. Otherwise, the screen redisplays with the periods shifted, excluding the number of periods you requested to be dropped. You then must enter the new periods at the end of the schedule horizon, including the Start Date of each new period and the End Date of the last Schedule Period.
If you have also defined Forecast Periods and some of the new Schedule Periods entered are incompatible with existing Forecast Period Start Dates, you are warned that inaccurate allocation of forecast quantities may occur. This does not mean that every Schedule Period Start Date must coincide with the beginning of a Forecast Period. It means that each Forecast Period Start Date within the Schedule Periods horizon should match the Start Date of one of the Schedule Periods.
Each time that you run a program to display or print master schedules, the demand and supply information is regenerated from current data files.
Select
Display master schedules or Print master schedules from the Master schedules menu.
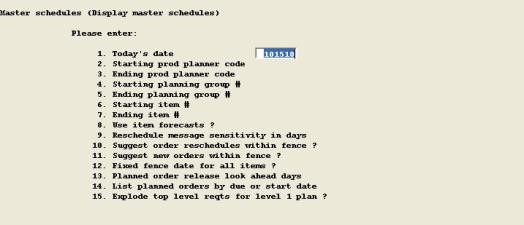
Enter the following fields:
1. Today's date
Enter in MMDDYY format, or use the displayed System Date default.
2. Starting prod planner code
Up to 3 alphanumeric characters, or <F1> for "All", or <F2> to default all remaining entries on this screen to the previous report (or display) values, saved from a preceding run. Each time you run the program, it asks if you wish to save your entries.
3. Ending prod planner code
Up to 3 alphanumeric characters, or Blank to default to Starting code.
4. Starting planning group #
Up to 6 alphanumeric characters, or <F1> for "All".
5. Ending planning group #
Up to 6 alphanumeric characters, or Blank to default to Starting group.
6. Starting item #
Up to 15 alphanumeric characters, or <F1> for "All".
7. Ending item #
Up to 15 alphanumeric characters, or Blank for Starting item.
8. Use item forecasts ?
Y or N. Default from M/S Control Information.
Comments: A Y answer will cause the planning program to access Shipment Forecast information on file to develop item forecast requirements.
If you maintain item forecasts, you may occasionally want to generate a short range plan without using the forecasts, only considering customer order backlog. You can change this default to N when you run the planning program.
9. Reschedule message sensitivity in days
A single numeric digit, from 1 to 9. Default from M/S Control Information.
Comments: This factor controls the generation of order reschedule messages. If the due date of a supply order needed to cover a net requirement is this number of schedule days (+ or -) from the requirement due date, an order reschedule action message will be created. A lower number of sensitivity days generates more messages.
10. Suggest order reschedules within fence ?
Y or N. Default from M/S Control Information.
Comments: A Y answer allows suggested rescheduling of supply orders to dates within an item's firm schedule time fence, applying the reschedule sensitivity factor.
A N answer prevents suggested rescheduling of supply orders to due dates within the firm schedule time fence. If an order with a due date beyond the firm schedule period is needed to cover a net requirement within the firm schedule fence, the program will suggest reschedule to the first schedule day beyond the fence.
11. Suggest new orders within fence ?
Y or N. Default is from M/S Control Information.
Comments: A Y answer allows suggested planned orders to be recommended with due dates that are within the firm schedule fence period.
A N answer prevents suggestion of new planned orders with due dates inside the fence period. Planned orders needed to cover net requirements within the fence will be suggested for a due date that is one schedule day beyond that firm schedule period.
12. Fixed fence date for all items ?
Y or N.
Comments: A Y answer allows you to define a fixed firm schedule time fence that applies to all master schedule Group Items. This defined fixed fence date will override the Firm Schedule Days factor in related Item Masters.
If you answer Y, you are prompted to enter:
Fence date
Enter in MMDDYY format. This is the first date outside the firm schedule period. All preceding dates are within the firm schedule fence.
13. Planned order release look ahead days
A single numeric digit, from 1 to 9. Default is from M/S Control Information.
Comments: If the Start Date of a Suggested Planned Order is this number of schedule days from the current date, an order release action message will be generated. If you replan weekly and have 5 schedule days/week you would need 5 "look ahead" days to assure timely release of all orders.
14. List planned orders by due or start date
D = Due date, or S = Start date. Default is from M/S Control Information.
Comments: This controls the placement of planned order quantities into time buckets on the timephased item summary reports. Planned order records will always carry both dates, and suggested planned order release action messages will always be based on Start Date, so this is just a summary reporting elective.
Other MRP systems have traditionally listed suggested planned orders by Start Date period, to show the release period and lead time offset. However, this is sometimes confusing because all of the other timephased requirements and orders data listed for an item are by Due Date.
15. Explode top level reqts for level 1 plan ? Y or N.
Comments: If you answer Y, gross requirements for any Group Items at Level 1 will be exploded from Level 0 item supply orders (open and planned orders for the parents of the Level 1 items). This allows complete demand and master schedule supply order planning for the top two levels of your Bills of Material. If you answer N, complete master schedules are only generated for Level 0 items.
Group Items at lower levels will appear on output screens or reports with a message indicating the total net requirements or available inventory are not known to the Master Scheduling function.
Note that only defined Planning Group Items will be included on the Master Schedule display or printed outputs.
See Display Master Schedules next or skip to Print Master Schedules.
This program regenerates and displays summarized Master Schedule information for a requested range of Production Planners, Planning Groups, and Group Items. The summary display allows you to "zoom in" on more detail information about requirements by source or the order action messages for the item you are viewing.
You may minimize the processing delay that occurs before you are allowed to view schedules by restricting the range of groups and items selected for any schedule display run.
Select
Display master schedules from the Master schedules menu.
If you have altered entries from the last time this program was used, you will be asked if you want to save the values just entered. Answer Y or N. There will be a period of processing while the program generates the Master Schedules. When this is completed, you are prompted to enter:
Review sequence
I = Item #, or P = Planner, group, & item #
If you review by Item Number, enter:
Item #
Up to 15 alphanumeric characters, or <F1> for the next Item Number.
If you review by Planner, Group, & Item, enter:
Prod planner code
Up to 3 alphanumeric characters, or <F1> for the next item in this sequence.
A specific Production Planner Code entry requires you to enter:
Plan group
Up to 6 alphanumeric characters.
Item #
Up to 15 alphanumeric characters, or <F1> for the next Item Number within the Group.
The program will then display the Master Schedule summary information for the Item selected. Press <F1> if there are more periods for display; enter A for a display of Order Action messages, if any; enter R tor display a more detailed display of Requirements by Source, if any.
The Master Schedule summary screen displays the following date and timephased quantity information:
Schd-pd
Schedule period.
Gross-reqts
Gross requirements.
Open-ords
Open orders.
Net-avail
Net available. These are timephased forecasts of Inventory available from On Hand and cumulative Open Orders, after subtracting the cumulative Gross Requirements. These values are based on the existing due dates of Open Orders, without considering suggested reschedules.
FP-ords-to-start
Firm planned orders to start (if displayed by start date)
or
FP-ords-due
Firm planned orders due (if displayed by due date)
SP-ords-to-start
Suggested planned orders to start (if displayed by start date)
or
SP-ords-due
Suggested planned orders due (if displayed by due date)
Total-ords-by-due-date
Total orders by due date. This is a summary of open orders, firm planned orders, and suggested planned orders by period due.
The following Order Action data displays in a window:
Ord-type
Order type of Purchase, Shop, Firm Planned ,or Suggested Planned.
Ord-# Rls
Orrder Number and Release Number.
Qty-due
Order quantity balance due.
Due-date
Due date.
Resched
Suggested reschedule date, for Open or Firm Planned orders.
Start
Start date; only shown for Suggested Planned.
Action-message
Action message of Expedite, De-expedite, Cancel, or Open/release.
The Requirements by Source window displays the breakdown of period total gross requirements quantities by the following sources:
Br-bklog
Branch warehouse customer order backlog.
Br-matl
Branch warehouse shop order material
Pr-bklog
Primary warehouse customer order backlog
Fcst-bal
Forecast balance.
Exploded
Exploded parent requirements.
Safety-stk
Safety stock.
This program regenerates and prints the Master Schedules By Period summary, with Order Action messages, for a requested range of Production Planners, Planning Groups, and Group Items. You may optionally request to print the action messages separate Order Action List, and to print the Master Schedule Detail By Date report of requirements and orders by type and date.
You are requested to make the same entries described in the preceding section about the common options for Master Schedule displays or reports.
Select
Print master schedules from the Master schedules menu.
The following entry is only requested if you answered Y to "Suggest new orders within fence ?".
16. Use option to convert suggested planned orders within schedule fence to firm planned orders ?
Y or N. If you answer Y, the program will ask you to confirm this decision after the report prints.
When you have completed these entries, a second entry screen is displayed:
You are prompted to enter:
1. Print separate order action list ?
Y or N, or <F1> to default all remaining entries on this screen to the previous report (or display) values, saved from a preceding run. Each time you run the program, it asks if you wish to save your entries.
2. Print master schedule detail by date list ?
Y or N.
If you answer Y to "Print master schedule detail by date list?", you are prompted to enter:
3. Detail through schedule period starting
Enter in MMDDYY format, or press <F1> for next Schedule Period starting date on file.
4. Detail list to include:
Backlog reqts by warehouse ?
Y or N.
Forecast balances reqt ?
Y or N.
Shop order material reqts ?
Y or N.
Open shop or purchase orders ?
Y or N.
Firm planned orders ?
Y or N.
Suggested planned orders ?
Y or N.
If you have altered the entries from the last time this program was used, you are asked if you want to save the values just entered. Answer Y or N. There will be a period of processing while the program generates the Master Schedules before printing the report(s).
If you selected the option to convert all suggested planned orders within the schedule fence to firm planned orders, the program asks you to confirm this decision after the report is printed. Answer Y to convert those planned orders, or answer N to cancel the conversion to firm planned orders. If you answer Y, a Firm Planned Orders Release Audit List is printed.
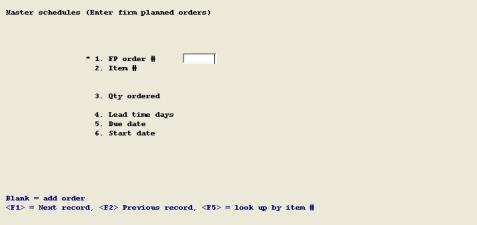
Use this program to maintain Firm Planned Orders if you use Firm Planned Orders in your master scheduling procedures. Unlike Shop Orders, Firm Planned Orders are not used by the Inventory Management package. They are used by Master Scheduling & MRP and Capacity Requirements Planning programs.
Select
Enter firm planned orders from the Master schedules menu.
The fields you enter are:
1. FP order #
To add a Firm Planned order, you must enter spaces to assign the next available Firm Planned Order Number from the M/S Control File.
2. Item #
Up to 15 alphanumeric characters.
3. Qty ordered
Up to 8 numeric digits.
4. Lead time days
Up to 3 numeric digits, or press ENTER to accept the Item Master default value displayed.
5. Due date
6 numeric digits, in MMDDYY sequence.
Validation: Must not match a date on the Schedule Exception Dates file.
6. Start date
6 numeric digits, in MMDDYY sequence.
Default: The displayed default is automatically calculated from Lead Time days and Due Date, using the Schedule Exception Dates file to exclude exception dates.
Validation: Must not match a date on the Schedule Exception Dates file.
This program provides a convenient method of deleting multiple Firm Planned Orders for one or all items, through a specified date.
Select
Purge firm planned orders from the Master schedules menu.
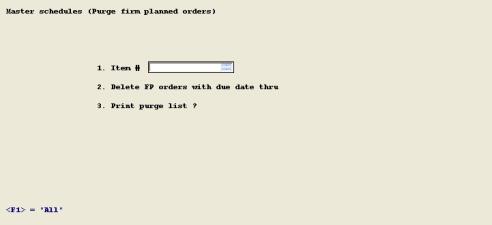
The fields you enter are:
1. Item #
Up to 15 alphanumeric characters, or <F1> = "All".
2. Delete FP orders with due date thru
6 numeric digits in MMDDYY sequence, or <F1> = "All".
3. Print purge list ?
Y or N.
The program then asks "Are you sure". Answer Y when you are ready to begin purging records in the specified range. If you answered Y to the print purge list question, the records to be purged will print. The records in the requested range are then deleted.