This chapter contains the following topics:
Running an MRP Explosion and Basic Use Tutorial
This document assumes you have set up the M/S module previously. If you haven’t, please see the document that covers setting up the M/S module.
There’s no place in the system that “junk in - junk out” pertains more than in the Master Scheduling & MRP module. In other words, your MRP will only be as good as the data available at the time of the MRP explosion. If your settings aren’t good, you have incorrect or inaccurate orders/forecast the resulting reports will be printing inaccurate recommendations.
The PBS Manufacturing’s Master Scheduling & MRP module is what is called a Regenerative MRP, which means that in order to change/update your MRP recommendations you must regenerate (explode) your MRP. It is also considered a “bucketless” MRP system. This means we’re making precise recommendations based on actual dates as opposed to making recommendations for a “bucket” or broader time period. This leads to a more accurate schedule allowing you to more precisely meet your customer’s demand.
As you may have noted during setup, there are time periods for both scheduling and forecasting, but these are solely for more logically organizing high level information on some reports and displays. The actual recommendations (order action messages) will be precise to the need. In other words, if a sales order has a required ship date of 8/1/14 we will plan to have the item(s) available in order to ship on 8/1/14 as opposed to the week that this ship date falls into, which would be the case in a bucketed MRP system.
How often should you re-explode your MRP?
That is completely up to you and should be determined based on how you plan your inventory in your plant. For some companies, once or twice per month is sufficient while others will run their MRP Explosion once or twice per week. The choice is yours. Just understand that each time you regenerate your MRP, you will need to have exclusive access to the PBS Manufacturing database. That means nobody should be in entering orders of any kind, performing inventory transactions or any other activity in the inventory database. The good news is that in most cases, the MRP Explosion process takes just a few short minutes as opposed to the hours. The overall time is dependent on the amount of data you have in your system and the speed of your hardware and network.
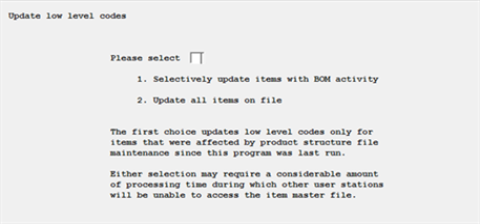
If this is your first time using the MRP module, we recommend you get everyone out of the manufacturing system, go to P/D, Update Low Level Codes, and run the update on all items (#2 below):
This will run for a short period of time (depending on the number of item and product structure records in your database). If you’ve done this previously, we recommend performing this task prior to trying to run your MRP explosion and select #1. This should be done prior to your explosion each time.
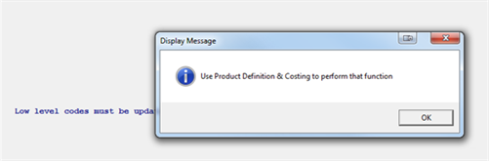
Once done, proceed to the M/S module. Run M/S, Explode Requirements > MRP Explosion. If you failed to run the prior step, you may see the following message and should return to step 1:
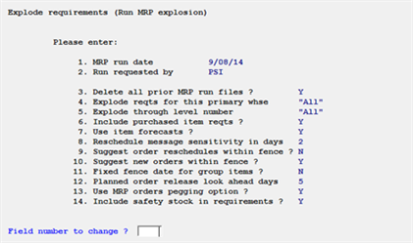
Otherwise, you will be presented with the following screen. After you’ve set up your M/S Control information properly you will be able to accept the defaults by pressing Enter for each of the field with the exception of #11. If you are using a “fixed fence” to prevent planning within that time period, you should say Y here and enter the fixed date in the next field. If not, which is more typical, then enter N here and proceed accepting or overriding your defaults the rest of the way:
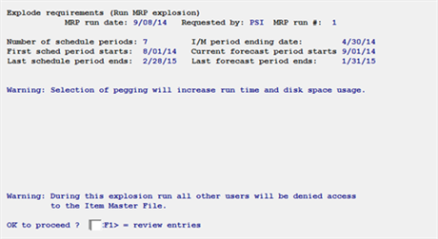
At field number to change, review your settings prior to pressing Enter. If changes are needed make them now or proceed by pressing Enter. You will then be presented with a screen showing a few settings and a warning or two. You may review. If you decide you need to make changes to the prior screen before proceeding, press <F1> and move back to it. Otherwise, when you are ready to proceed enter Y and press the Enter key.
Finally, you will be asked if you’d like to start your MRP Explosion now or if you’d like to set a time to run this later, you can do so now by entering Hour and Minute for your start time. Choosing to run later is a great option unless someone happens to forget to get out of the inventory system. Should that occur, the MRP run won’t be able to execute at the allotted time. If you wish to run immediately, press <F1> and confirm you wish to continue.
The system will begin the explosion process and will continue until it’s done. You’ll know it’s done when you’re asked for a printer to send the audit report. The audit report will show the settings you used for the explosion, some statistics on the explosion, and finally, if it noticed any problems they will appear at the bottom. For instance, if it finds an item coded as a manufactured item that didn’t have a bill of material, you will be notified of this condition. This won’t prevent MRP from completing.
Once you’re done, your staff can begin using the inventory system again. MRP has just taken a snapshot of the orders, inventory, and forecasts and created a series of records for generating order action reports within MRP. It makes no changes to the orders or inventory during this process.
Now that the MRP explosion is complete, you can begin running reports and reviewing what it is MRP is recommending you do. Below is but one way you may choose to use these report, though it’s also a fairly typical approach:
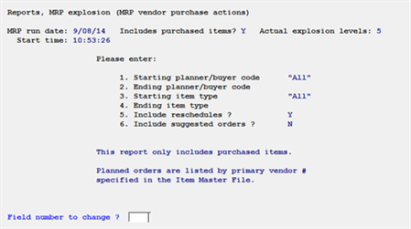
Review Purchased Requirements By Vendor
There are several action reports available to you, one of which is called the MRP Vendor Purchase Actions and is found under M/S, Reports > MRP Explosion. This report focuses solely on goods coded as Purchased and it organizes this information by primary vendor, as defined in the Item Master file. If no primary vendor is defined, an order action will appear under a section labeled “Undefined” which will require the user to make a determination as to where they wish to purchase the material.
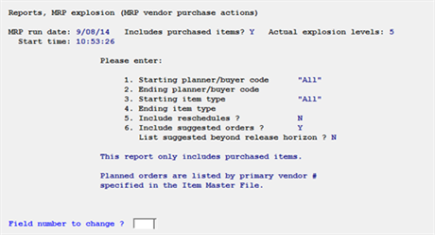
Again, there is more than one way to use this but for the purpose of this tutorial, we’re going to assume you have a single planner/buyer, and wish to see all item types. With that in mind, we typically recommend running this report twice and working each one separately. Doing so allows you to work more efficiently as you can isolate all new order actions, in other words, each recommendation to place a new order, separate from the reschedule actions. That means you can place all of your new orders, then proceed to start contacting vendors about rescheduling existing ones separately. You may opt to do this differently. Here are the typical settings to use this approach:
Reschedules:
New Order Actions:
The resulting reports will provide you with all of the MRP order actions for the respective settings above. We recommend you carefully review these and then enter new orders or start rescheduling existing ones accordingly.
For manufactured goods, we recommend using the M/S, Reports, MRP explosion > MRP order actions. This report is similar to the Vendor purchase actions, though it can be run for purchased goods (no vendor grouping in this report), manufactured goods, or both. In this case, we’re going to use the report to target specifically manufactured goods.
This report can be run by Item or by Planner Buyer. Changing the selection here may change the options during the report execution. We’re going to use the same assumption as the prior report. We have a single buyer but we wish to target manufactured goods only. To achieve this use the settings below:
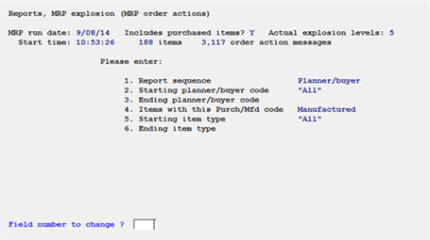
The resulting report will provide you with a complete list of actions required by you to make your supply meet your demand. At that point you can begin entering new shop orders, or delete, adjust or reschedule existing ones accordingly.
The above reports are the bottom line reports you will use to do your planning. However, there may be times you wish to research an item to learn more about why a recommendation is being made. You can use the IM, Displays > Inventory availability display to do some research on an item. However, you must remember, the MRP module took a snapshot of all of your inventory related information as of the moment the explosion was run so the numbers may be different.
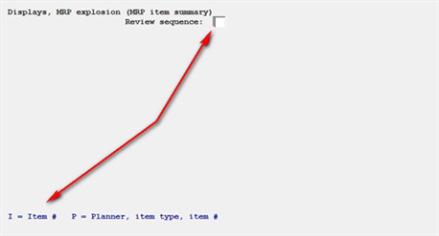
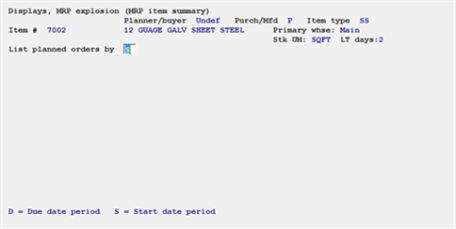
That said, you can use the M/S, Displays, MRP explosion > MRP item summary to quickly see information on a given item as of the moment of the explosion. This can often help you determine why a recommendation was made.
This display can be used many ways, though we’ll cover a few basics here. Assuming you are simply working your MRP report and wish to see more information on an item you are questioning. Go into the display and select the Item # as the review sequence:
On the next screen, enter the item number you wish to review and press Enter, confirm this is correct, then choose how you wish to view the data (by due date period or start date, the default from the control file should appear):
You will then be presented with the screen below. At the top of the display, you see any rules that were taken into account during the explosion (defined in the item master file) such as order minimum, order multiple, and order up to. You will also see how much was on hand at the time of the explosion as this may have changed since.
The data at the bottom is grouped by schedule period that will include information like open orders for the period, net available (a running value from period to period), FP or Firm Planned Orders you may have entered into MRP, SP or Suggested Planned Orders MRP may have made (these would be your order action suggestions), and then total orders by due date:
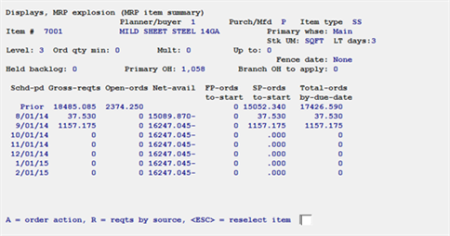
Take note at the bottom of the screen, you can drill in and get more information about this particular item in this display such as a list of your order actions (image 1 below) or you can review your requirements by source (second image below):
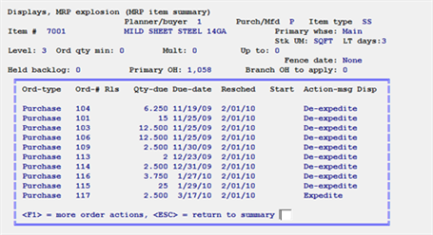
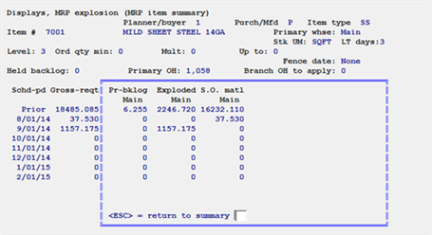
The order actions are self-explanatory. They should match what you are seeing on your order action reports. The requirements by source section will provide you with information you can’t see on those reports though. In this example, you will see that the information aligns with it’s proper period. Each period will have its own requirements breakdown. In the image below, we’ve isolated the center of the display, the one that was presented when you chose to review the requirements by period:
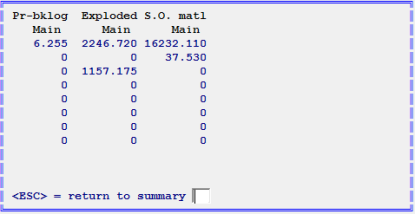
Note, the first column provides you with a list of all of the requirements being driven by the backlog (open sales order requirements) in your primary warehouse.
The second column provides you with a summary of requirements that were created by exploding a planned parent. In other words, MRP saw a need for a parent item, suggested creating an order for that parent item, and did a virtual explosion of it. During the virtual explosion, it saw the need for this material in order to meet the virtual demand for the parent item.
The last column (and there could be more for requirements drive by Safety Stock for instance), includes all actual requirements against real shop orders that were entered prior to the MRP explosion.
This highlights a great deal of information for you and will typically tells you enough information to determine why MRP made an order action suggestion.
In the above example, you will note that most of our requirements are coming from prior periods or are actually overdue. This data is from a demo system which has older information in it. At the same time, you’ll see that in the first actual planning period, we have several requirements against real shop orders which are driving demand in that period. The next period contains a good deal of demand that was generated by higher level recommendations the MRP is making for us.