
This chapter contains the following topics:
Introduction to Product Structures
The Product Structures define each bill of material relationship between a parent item and component item (raw material, part or subassembly) used directly on that parent. It is used by many other functions in Product Definition & Costing and in other PBS Manufacturing packages. For example, Product Structure records are used together with related Item Master records by programs that print or display product bill of material lists and component where used lists. These records are also used to explode parent orders into component requirement quantities in the Inventory Management and Master Scheduling & MRP packages.
Multiple level bills of material are defined by constructing several single level bills for the final product and for its manufactured subassemblies and manufactured parts. For example, an Item Number that is a component subassembly within the single level bill of material for a parent final assembly will appear as the parent Item Number in another single level bill for that subassembly.
Product Structure records also indicate engineering change implementation Status (Current, Future, or Obsolete) of each component, and the Effective Date of that component's use or obsolescence in manufacturing the parent item. This component "effectivity" information allows the retrieval of a parent bill of material configuration as of any specific calendar date - past, current, or future. The current and pending component effectivities are used by other PBS Manufacturing systems that explode component material requirements. Past bill of material configurations for a parent item may also be retrieved if Product Structure records for previously obsolesced components have not been deleted.
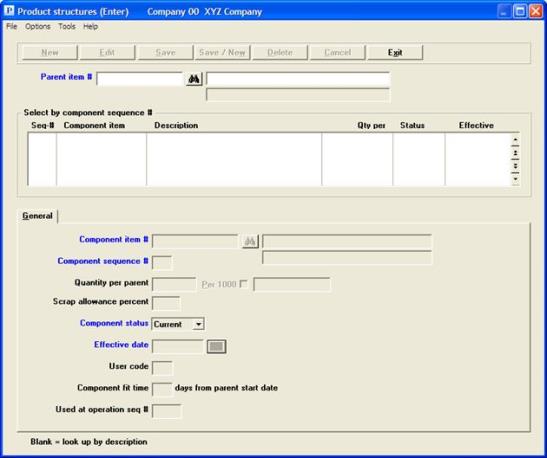
Product Structures (Enter) is where you begin to link your items together to create product trees or bills of material. PBS Manufacturing supports single and multiple level product structures. Creating product structures is a very simple process. You are asked for a Parent Item. This is the item you are trying to build. Let's use a birdhouse as an example. A bird house is made up of 1 roof, 4 walls and 1 floor. This represents our bill of material. The bird house is the parent item. The items mentioned are the component items.
When you are entering a bill of material in PBS Manufacturing you will type in BIRDHOUSE as the parent item number. You will then type ROOF in the component item number field. This is the first component we will add to the bill. The system will automatically assign the sequence number. Now you enter in how many of the component is needed to build one BIRDHOUSE. 1 is the appropriate answer in this example. Depending on how you've set up P/D will determine what your asked next. In this instance, we will take the default answers for the rest of the fields as they don't really pertain in this example (see the P/D section of the manuals for information on the remaining fields). Pressing <Enter> at field number to change will return you to the top. Press <Enter> to accept the same parent item number. Now enter in another component such as WALL. When asked for the quantity per enter 4. You get the point. It's that easy to structure a single level bill.
That leads to the question "How do I enter a multiple level bill?" Let's use the birdhouse example. In the example we referenced several parts. Each of those parts had to be either purchased or manufactured. Use the walls as our example. The wall is a manufactured item. It's made out of wood. So, using the same method as above, you will enter the bill of material with WALL as the parent item. It's component would be WOOD in a quantity of 1 Sq Ft. That's it, you've just created an Indented Bill of Material! Really, all you are ever doing is building single level bills of material. However, through the product relationships, you are actually building complete product trees. The following is a graphical representation of our bill:
Select
Enter from the Product structures menu.
The following screen displays:
Graphical Mode
The value set in P/D Control Information is accepted as the default automatically and will be used for data entry. Should you wish to change this default for this one routing, you may do so by selecting Options menu, and choosing Sequence Numbers. This will allow you to do a one-time override to the default sequence.
Character Mode
When you select the program, you are first prompted to enter the Component sequence # increment default value that you wish to use for the structure records to be added. In graphical mode, you must select Sequence numbers from the options menu. A message displayed under this entry explains that:
The component sequence number will default to the last used sequence number plus the value of the above increment.
Press ENTER to accept the increment number displayed from P/D Control Information, or enter another value. If you need to modify your entry, answer OK to "Any change ?", or answer Cancel to proceed.
Enter the following fields:
Entry Format: Up to 15 alphanumeric characters.
Default: If not the first entry, previous Parent Item Number entered displays as default for next structure record.
Validation: Must match an Item Master record.
Comment: If you enter a Parent Item Number or a Component Item Number that is not in Item Masters, the program informs you of this condition and asks Want to add item ? A N answer will return you to re-enter another Item Number; a Y answer will conveniently take you directly into the Item Masters entry program where you may add one or more new Item Master records. Then when you exit from Item Masters, you will be returned directly to the Product Structures entry screen.
Entry Format: Up to 15 alphanumeric characters.
Validation: Must match an Item Master record.
Comment: You may optionally press ENTER to find a record by its Component Sequence No., rather than by Component Item Number.
Entry Format: Up to 3 numeric digits.
Default: When adding a record, the program displays a value equal to last sequence number used in the parent bill of material plus the Component Sequence No. Increment.
Validation: Must not equal Component Sequence No. of another component in the same single level bill.
Comment: Sequence numbers determine the order in which components will be listed on bill of material displays or prints.
Entry Format: Up to 3 numeric digits plus 4 decimals.
Defaults: Press ENTER for 1.0000, or <F1> for "As reqd".
Comments: The "As reqd" (<F1> key) option actually places zero in this field and should only be used for non-controlled or non-inventoried components (e.g. engineering prints), that you wish to include on bill of material lists.
Stock unit of measure for the component and the parent are displayed to the right of this entry.
If in P/D Control Information the answer is Y to "Use option to define product structure component qty per 1000 parent units ?", you are prompted to enter a parent quantity code (M for 1000 or space for 1 parent units) just before the parent's stock unit of measure.
If the component's Unit of Measure is FT, you have the option of entering the Quantity Per Parent in FT or IN (inches); if the component's Unit of Measure is LB, you have the option of entering the Quantity Per Parent in LB or OZ (ounces). In these two situations, the program will ask you to enter your Input unit of measure after you enter the Quantity Per Parent.
If you are prompted to enter Input Unit Of Measure, press ENTER to accept the default Unit of Measure displayed, or enter IN or OZ. If you enter IN, the program will convert your preceding quantity entry from inches to feet. If you enter OZ, the program will convert your preceding quantity entry from ounces to pounds.
You may define a negative quantity in the BOM which allows you to create a negative allocation. This allows you to configure an order. You may add and subtract items from an existing assembly, at least from an inventory perspective.
Entry Format: Up to 3 numeric digits plus 1 decimals, or zero.
Comments: Enter as a percent (e.g. 5.5 for 5.5%) which will be internally converted to a decimal by other programs. Programs that use this factor to explode component requirements increase the Quantity Per Parent by this percentage.
If you answered N to 2. Product structure scrap allowance used ?in the P/D Control Information, the program will bypass this entry and set scrap allowance percents to zero.
Entry Format: Drop down list choices of Current, Future, or Obsolete.
Default: Current
Entry Format: 6 numeric digits in MMDDYY format.
Default: System Date, displayed.
Comments: The effective date of the Component Status.
If a component is currently used in the parent and there are no plans to discontinue its use, enter Current in Component Status and the current date, or a past effective date, in Effective Date.
If a component is currently used in the parent but will be obsoleted for the parent as of a future date, enter Obsolete in Component Status and the future obsolescence date in Effective Date.
If a component is not currently used in the parent but will be at some future date, enter Future in Component Status and the future starting date of use in Effective Date.
Entry Format: Up to 3 alphanumeric characters or space.
Comments: If you answered N to "Product structure user code entered ?" in P/D Control Information, the program will bypass this entry.
Entry Format: Up to 3 numeric digits, or zero.
Validation: If a non-zero value entered exceeds the Item Master Lead Time Days of the parent Item Number, you are requested to re-enter a lesser value.
Comments: If you answered N to 3. Product structure component fit lead time used ? in the P/D Control Information, the program will bypass this entry and set component fit times to zero.
Enter the estimated number of lead time days from the parent start date that the component will be added to the parent. Programs that compute component required dates will subtract this value from the parent total lead time days. The component due date will be offset from the parent due date by the resultant number of days (Parent Total Lead Time Days minus Component Fit Time Days). Zero fit time means the component is required on the day that the parent is started.
(Used at operation sequence number)
Entry Format: Up to 3 numeric digits.
Default: Blank = "First".
Validation: Any non-zero value entered must match a Routing operation sequence number for the Parent Item Number.
Comments: The program will bypass this entry if you answered N to
"Identify routing operation for components in product structure file ?"
in the P/D Control Information, or if the parent is not a manufactured item.
Entry Format: Up to 99 lines of 45 alphanumeric characters each, in groups of 10 lines per screen.
Comments: If you answered N to "Product structure references to engineering drawings used ?" in P/D Control Information, you will not be prompted to add references.
If you do use references, when you are done adding or changing references, press F1 to put spaces in a reference field and in subsequent fields in the same group of 10. To delete all references for a group of 10, press <F1> when the cursor is at the top reference field.
The program allows revision to any field except Parent Item Number. Component Item Number or Sequence Number changes cannot duplicate a value in another component structure record for the same Parent.
Use this program to delete all component Product Structure records for a single level bill of material with one entry.
You are requested to enter Parent Item Number for the bill to be deleted, after which the program will display that item's description. If there are no Product Structure records for the Parent Item Number you enter, the program will inform you of this. Otherwise, the program asks:
OK to delete product structure records ?
Answer Y to delete all structure records that define the single level bill of material, or answer N to leave the bill.
This program allows you to copy the bill of material for one Parent Item Number to another Parent Item Number, provided that no Product Structure records have previously been setup for the new parent.
This function does not delete the original parent's Product Structure records from which component structure records are automatically created for the new Parent Item Number. To copy a bill, you are requested to enter:
Select
Copy single level bill from the Product structures menu.
The following screen displays:
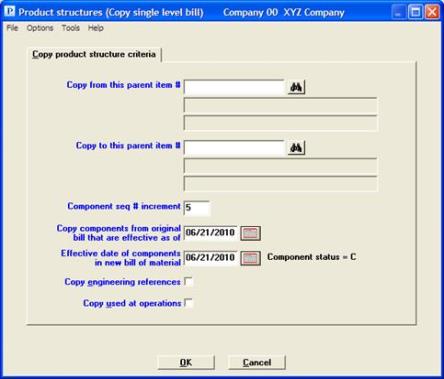
Enter the following fields:
Entry Format: Up to 15 alphanumeric characters.
Validation: Product Structure records must be on file for this Parent Item Number.
Entry Format: Up to 15 alphanumeric characters.
Validation: Product Structure records must not already be on file for this Parent Item Number.
Entry Format: Up to 2 numeric digits.
Default: Product Structure Sequence No. Increment from P/D Control information.
Comment: Component structures for the new bill will have this "spacing" between each Sequence Number.
Copy components from original bill that are effective as of
Entry Format: Up to 6 numeric digits, in MMDDYY format.
Default: System Date, displayed.
Comments: All structure records for the new parent are created with a Component Status of C (Current).
Effective date of components in new bill of material
Entry Format: Up to 6 numeric digits, in MMDDYY format.
Default: System Date, displayed.
Entry Format: Check box, checked is yes and unchecked is no.
Default: Unchecked.
Entry Format: Check box, checked is yes and unchecked is no.
Default: Unchecked.
Select OK to proceed with the copy or Cancel to return to the menu without copying the product structure.
You may use this program to mass replace any Component Item Number in Product Structure records with another Item Number that you designate to be the replacement component.
The original component Item Number is replaced in all Product Structure records in which it appears. There is only one exception to this replacement logic; the old Component Item Number is not replaced if this would cause the new Component Item Number to be structured directly to itself, as both the Parent and the Component Item Number in the same structure record.
The data you enter are:
1. Mass replace component item #
Entry Format: Up to 15 alphanumeric characters.
Validation: Product Structure record(s) must be on file for this Component Item Number to be replaced.
2. With this component item #
Entry Format: Up to 15 alphanumeric characters.
Validation: Must be in Item Masters or left blank.
Comment: If left blank, this will delete the component previously specified from all product structures. It's recommended you first print a where used list to see which product structures will be effected.