This chapter contains the following topics:
A purchasing address is the address to which you send the voucher or purchase order authorizing the buy. It may be different from the vendor address (the address to which you send payment).
Use this selection to enter addresses for those vendors who have one or more purchasing addresses distinct from their vendor address.
The P/O Purchasing addresses selection is identical to the selection of the same name in A/P. There are not two sets of data but only one, accessible from either module.
Select
Purchasing addresses from the Master information menu.
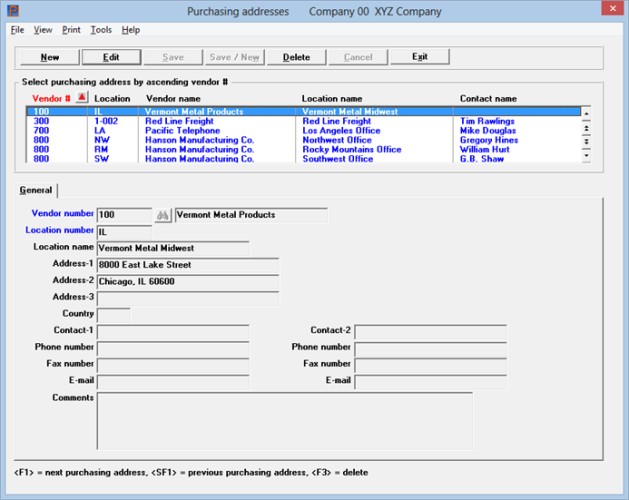
The following screen lets you work with both new and existing purchasing addresses:
You select an existing purchasing address for editing or viewing using the list box.
The list box displays up to 6 purchasing addresses at a time. You may sort the purchasing addresses by vendor number in ascending or descending order. Only column names in red may be sorted. Click on the column name or the arrow to the right of the column name to change the sort or use the View options.
To locate a purchasing address, start typing the vendor number. You may also use the up/down arrows, Page up, Page down, Home and End keys to locate an item. The <F1> and <SF1> keys are the same as the up/down arrow keys.
Purchasing addresses that display in the list box are available for changes or deletion. The fields for the selected purchasing address display in the lower part of the screen.
When a purchasing address is found, you may select the <Enter> key or Edit button to start editing.
You may select a button or keyboard equivalent for editing, deleting or adding a new purchasing address:
| Button | Keyboard | Description |
|
New |
Alt+n |
To enter a new purchasing address |
|
Delete |
Alt+d |
To delete the purchasing address selected in the list box. You may also use the <F3> key |
|
Edit |
Alt+e |
To edit the purchasing address selected in the list box |
|
Save |
Alt+s |
To save a new purchasing address or changes to an edited purchasing address |
|
Save/New |
Alt+w |
Same as Save button plus the New button |
|
Cancel |
Alt+c |
To cancel adding or editing a purchasing address |
|
Exit |
Alt+x |
To exit the screen. You may also use the <Esc> key |
Menu Selections
At the top left of the screen menu selections are available. Most of these are the same from screen to screen. Some of these selections may be restricted. If the menu selection is grayed out, then you will not be able to access it. The selection that is unique to this screen is explained here:
Selecting the Print menu accesses the Purchasing address list.
Character Mode
This is the character mode screen:

Enter the following information:
Enter the vendor number.
Options
Using character mode you may also use one of the options:
|
<F1> |
For the next purchasing address (regardless of vendor) |
|
<SF1> |
For the previous purchasing address |
|
<F2> |
For the next vendor |
|
<SF2> |
For the previous vendor |
|
Format |
Six characters |
|
Example |
Type: 300 |
Upon selection of a valid vendor number, its vendor name displays adjacent to it.
Enter a number to identify this purchase location. Location code is required.
Do not confuse this location code with the deliver-to location code.
Each one of a vendor’s locations must have a different location number, but the same location number can be used for different vendors if desired.
|
Format |
Five characters |
|
Example |
Type: 1-002 |
Location name is optional and may be left blank. Enter the name of the company at this purchasing address, or press <F1> to use the vendor name as the location name.
|
Format |
25 characters |
|
Example |
Press <F2> |
Address-2, and
Address-3
Enter the address. The vendor’s name and address will be printed on the purchase order exactly as you enter it, for use in window envelopes.
Each address line is optional. State and zip code are not separate fields and are not validated; you can enter them in any of the address lines.
|
Format |
25 characters for each field |
|
Example |
Type: Building 4-D |
|
|
Type: 1000 Industrial Park Rd. |
|
|
Type: Los Angeles, CA 92251 |
|
Format |
Three characters |
Enter the name of the contact person at this purchasing address.
|
Format |
15 characters |
|
Example |
Type: Tim Rawlings |
Enter the name of the contact person at this purchasing address.
|
Format |
15 characters |
Enter the phone number of the contact person for this purchasing address.
|
Format |
12 characters |
|
Example |
Type: 213-555-9933 |
Enter any comments about this purchasing address. Comments are optional.
This field uses Passport’s text editing function. You enter text in much the same way as most word processing programs, using the <Enter>, <Up>, <Down>, <Left>, <Right>, and <Delete> keys. When you are finished entering text, press <Esc> and follow the screen instructions.
If you wish to use the more powerful text editing commands which are included in this editor, refer the Text Editing appendix in the System User documentation.
When you press <Esc> from the comments window, the standard options appear (as described in the System User documentation).
Graphical Mode
Select Alt+s to save the entry.
Character Mode
Field number to change ?
Make any needed changes.
See a Purchasing Addresses list example in the Sample Reports appendix.
Select
Purchasing addresses from the Reports menu.
The following screen appears:
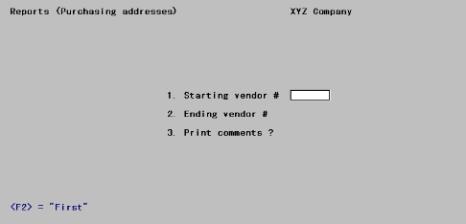
Enter the following information:
Ending vendor #
Enter the starting and ending vendors. Follow the screen instructions.
|
Format |
6 characters |
|
Example |
Press <F2> at both fields. |
Your answer here determines whether comments will be printed.
|
Format |
Graphical mode: Check box where checked is yes and unchecked is no. Use the mouse or the space bar to select Character mode: One character, either Y or N. The default is N. |
|
Example |
Answer Y |
Select OK to select a printer for printing the report or select Cancel to not print the report and return to the menu.
Field number to change ?
Make any needed changes. Upon pressing <Enter> with this field blank, the Purchasing Addresses list will print.