This chapter contains the following topics:
Introduction to Purchase Orders
Use this function to maintain and print Purchase Orders. Blanket Purchase Order releases, and regular purchase orders, may be entered and printed with this function. You are only allowed to enter a new Blanket P.O. release if there is a matching P.O. Number in Blanket P.O.s.
Purchase orders are considered to be "open" as long as a P.O. header record is on file. P.O.'s are normally closed after all line items have been received complete and invoiced. Line items are "closed" when received complete, but remain on file. After P.O. invoice processing is completed, the P.O. may be closed with the Close Purchase Orders function. However, Line Items for closed P.O.'s remain on file until you use another program to purge closed P.O. item history.
Select
Transfer checks/deposits from the Purchase orders menu.
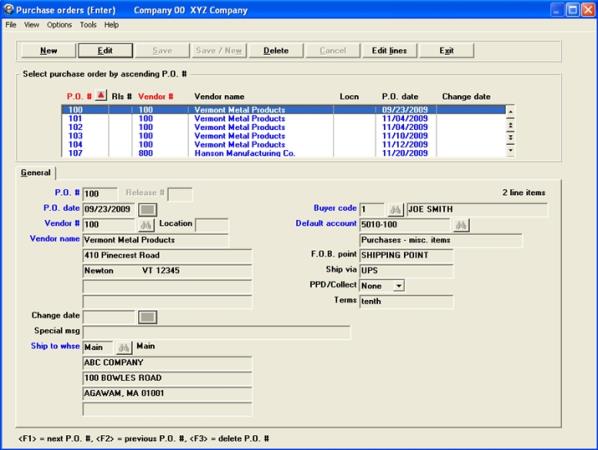
The following screen displays:
Entry Format: Up to 6 numeric digits, or space to add a new P.O. Number.
If you enter space, the program will assign the next P.O. Number from Control Information.
If you enter the number of an existing P.O., the order is displayed. You may press <F1> to display consecutive P.O. Numbers until the order you want appears.
If the number entered matches a Blanket P.O. or a Blanket Release, you are prompted to enter a Release Number.
(Blanket Release Number)
Entry Format: Up to 2 numeric digits, or space to add a new Blanket Release.
If the number entered and the P.O. Number match an existing Blanket Release, the order is displayed. You may press <F1> to display consecutive Releases until the order you want appears.
Entry Format: 6 numeric digits in MMDDYY format.
Default: The System Date displays as the default entry, which you may override.
Entry Format: Up to 6 alphanumeric characters, or enter spaces to lookup the vendor by name.
Validation: Must match a record in Vendors, in which case the vendor name and address displays.
Comments: If you enter space to lookup the vendor by name, the cursor moves to the Vendor Name position. Enter a name, or any portion thereof, up to 25 alphanumeric characters.
The program will then display the first Vendor name that matches your entries, if any, and ask "Right vendor ?". Answer Y or N, or press <F1> to find the next Vendor record that matches your name entry. If you enter space in the Vendor Name field, the cursor returns to Vendor Number.
If answer to "Use purchasing addresses ?" is Y in P/P Control information, you are prompted to enter:
Entry Format: Up to 5 alphanumeric characters, or press <F1> to display the next Purchasing Address for the Vendor, or Blank to default to the Vendor Remit-To address in Vendors.
Validation: Any entry that is not blank, must match a record in Purchasing Addresses.
Entry Format: 5 lines of up to 30 alphanumeric characters each.
Default: The name and address in the Vendor record are automatically entered, but may later be modified by using "Field number to change ?".
Comment: These fields are each 5 characters longer than the corresponding fields in Vendors, so that P.O. addresses may be expanded.
Entry Format: 6 numeric digits in MMDDYY format, or space for "None". The last date the P.O. was changed.
Default: Automatically entered as "None", but may later be modified using "Field number to change ?".
When first changed, the System Date displays as the default entry which you may override.
(Special message)
Entry Format: Up to 40 alphanumeric characters, or space.
Default: If you enter a Change Date, defaults to: "** CHANGE ORDER replaces previous order **", which you may override.
Comment: When the P.O. is printed, this message prints near the top of the page, above the Vendor Name.
Entry Format: Up to 2 alphanumeric characters, or space for "Main".
Validation: Must match a record in Warehouses, in which case the Ship-to Name and Address will display.
(Ship to warehouse name and address)
Entry Format: 4 lines of up to 30 alphanumeric characters each, or spaces in any line.
Default: The name and address in the Warehouse record are automatically entered, but may later be modified by using "Field number to change ?".
Entry Format: Up to 3 alphanumeric characters. Space not allowed.
Validation: Must match a record in the Planner/Buyer Codes, in which case the Buyer Name will display.
Entry Format: Up to the number of digits specified in Company information for Main Account Number optionally followed by a Sub-account Number, or spaces if you do not wish to specify an account number for P.O. invoice distribution.
Default: The default distribution account in the Vendor record, if any, displays as the default for this entry.
Comments: An Account Number entered here will display as a default distribution account for the P.O. when you use the "Purchase order invoices" function. It can be changed when processing P.O. invoices.
Sometimes P.O. items may need to be distributed to multiple accounts. In that situation, you may use P.O. line comments fields, also displayed when P.O. invoices are processed, to pre- designate account distribution instructions.
Entry Format: Up to 15 alphanumeric characters, or spaces.
Default: The default F.O.B. point displayed, if any, is from Control Information.
Comment: This description of the "Free On Board point" prints on the purchase order, to indicate the location from which any freight charges to your company will be determined. "Shipping point" is a commonly used F.O.B. description.
Entry Format: Up to 15 alphanumeric characters, or spaces.
Default: The default Ship Via description, if any, from P/P Control Information will display as the default entry, which you may override.
Comment: This optional description of the carrier name or type of freight carrier you want the vendor to use prints on the purchase order.
(Prepaid or Collect)
Entry Format: Drop down list box with the choices of Prepaid, Collect, or None.
Comment: Optional designation of how any freight charges will be billed to you by the vendor, which prints on the purchase order.
Entry Format: Up to 15 alphanumeric characters, or spaces.
Default: The vendor's billing Terms description, if any, from Vendors will display as the default entry, which you may override.
When you are deleting a P.O. and there are non-zero receipt quantities posted to the line items, you are told you cannot delete the P.O. You must either use the "Close orders" function to close the P.O., or negate the receipts quantities with the " Receipts & returns" function before deleting the order. If the answer to "Use P.O. change log ?" is Y in P/P Control Information , you are also prompted to enter a Change Log Comment for line items to be deleted.
The line item screen displays when you are finished with the above entries.
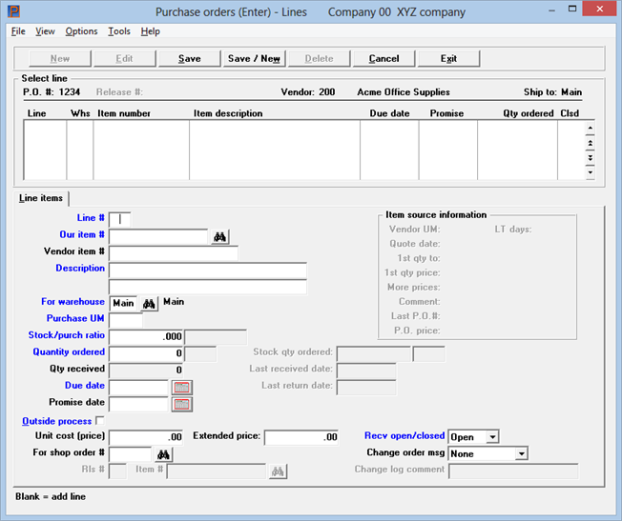
The fields you enter are:
Entry Format: Enter spaces to add a line item, enter up to 3 numeric digits to display a previously entered line, or press <F5> to get a review display of all lines already entered on for the order.
Entry Format: Up to 15 alphanumeric characters.
If you want to enter a non-inventory item for which there is not an Item Master record, type "/" as the first character in the Item Number.
Validation: If the first character of Item Number is not "/", the number must match an existing Item Master in which case the item description fields are automatically displayed.
If the Item Number matches an Item Master that is coded as a Manufactured item, the program warns you about this and asks if you want to continue.
If you are entering a Blanket Release and the Item Number does not match an Item number on the Blanket P.O., the program warns you about this and asks if you want to continue.
Comments: If the combination of Item Number and Vendor Number matches a record in Item Sources, quotation and last P.O. information displays in the upper right section of the screen.
Change to Item Number is not allowed for a previously entered line item. This can only be accomplished by closing or deleting the line and adding another line for the desired Item Number.
Entry Format: Up to 20 alphanumeric characters, or spaces.
Comments: If the combination of Item Number and Vendor Number matches a record in Item Sources and there is a Vendor Item Number in the Item Source record, that number is automatically entered in this field.
Entry Format: Up to 2 lines of 30 alphanumeric characters each.
Comments: If the Item Number matches an Item Master, the Item Master description is automatically entered.
For a non-inventory item, with "/" as the first character of Item Number, you must enter at least part of the first description line.
Entry Format: Up to 2 alphanumeric characters that match a record in I/M Warehouses, or space for "Main".
Default: When you first add a P.O. line, the P.O. Ship-to Warehouse code is automatically entered to this field, but you may modify it from "Field number to change ?".
Comments: Change is not allowed for a previously entered line item. This can only be accomplished by closing or deleting the line and adding another line for the desired warehouse.
You may enter line items for different warehouses on the same P.O., but the P.O. will only designate one Ship-to address. For inventory items, the Quantity On Order is updated for the warehouse specified by this entry.
(Purchase Unit of Measure)
Entry Format: Up to 4 alphanumeric characters. Spaces not allowed.
Default: May display from a matching Item Source record, or from a matching Item Master record.
Entry Format: Up to 4 numeric digits plus 3 decimals. Zero not allowed.
Default: Automatically defaults to 1.000 and is not changeable if the item is a non-inventory item (first character of Item Number is "/"), or if Purchase Unit of Measure is the same as the Stock Unit of Measure in the Item Master record.
Entry Format: Up to 8 numeric digits, or up to 6 numeric digits plus 3 decimals, or space for 1.
Comment: This value is calculated and displayed only if the Purchase Unit of Measure does not match the Item Master Stock Unit of Measure. It is the Quantity Ordered multiplied by the Stock/Purchase Ratio.
Qty received
Comment: This displayed value is updated by the Process Receipts & Returns function, and cannot be modified with this program. It is the total quantity received to date for the line item.
Entry Format: 6 numeric digits in MMDDYY format, or <F1> for "Hold".
Default: The Due Date of the just previously added line for this Purchase Order is the default.
Entry Format: 6 numeric digits in MMDDYY format, or <F1> to default to the Due Date, or spaces.
Comments: If you indicated in P/P Control Information that you measure on time delivery performance to Promise Dates, you should enter a date, or later use the "Post promise dates" program to enter Promise Dates before the order is received.
Entry Format: Y or N.
Default: N, or the answer in a matching Item Source record, displays as the initial default entry
Comments: Indicates whether order is for an outside processing operation on your material.
Entry Format: Up to 6 numeric digits plus 4 decimals, or Blank to bypass this entry and enter Extended Price, or press <F1> for a No Charge item, or for an inventory item you may press <F2> to default to the Item Master unit cost.
Default: When you enter Blanket Releases, Blanket P.O. unit price will display as the default.
Entry Format: Enter up to 7 numeric digits plus 2 decimals.
If you pressed <F1> or entered zero at Unit Price, zero displays in this field.
If you entered a non-zero value in Unit Price, this value is automatically calculated from Quantity Ordered and Unit Price.
Entry Format: Up to 6 alphanumeric characters, or space to bypass entry.
Validation: If a Shop Order Number is entered, it must match a Shop Order record.
Comment: Optional entry, allowing identification of a specific shop order for which material or processing is ordered.
You are prompted to enter the following additional shop order identifiers only if you entered a Shop Order Number:
Entry Format: Up to 2 numeric digits, or default of space.
Validation: Shop Order Number and Rls Number must match a Shop Order record.
Comments: Use of Rls Numbers is optional, allowing Shop Order Numbers with multiple releases for different due dates.
(Shop order item to be made)
Entry Format: Up to 15 alphanumeric characters.
Validation: The combination of Shop Order Number, Rls Number, and the shop order's Item Number must match a Shop Order.
Use the <F1> key to search if you wish the program to consecutively display Item Numbers from Shop Order records matching the Shop Order Number and Rls Number entries.
(Receiving open or closed)
Entry Format: Drop down list box with the choices of Open or Closed.
Default: Automatically entered as Open when you first add a line item.
Comment: If you later change the entry to Closed, the System Date displays as the Closed Date.
This field is also updated by the Process Receipts & Returns function.
Entry Format: Drop down list box with the choices of Add, Change, Delete/Cancel, or None.
Default: When you add a line item to a new order, defaults to space and is bypassed.
When you add a new line item to a previously entered order, Add is the displayed default.
When you change Quantity Ordered, Due Date, Unit Cost, or Open/Closed status for a previously entered order line, Change is the default.
Comment: The word displayed will print in the Change Type column of the P.O. when it is next printed. The program that prints the orders clears this field for all lines, after the order is next printed.
If P/P Control Information indicates that you use the P.O. Change Log and you change Quantity Ordered, Due Date, Unit Cost, or Open/Closed status for a previously entered order line, you are also prompted to enter:
Entry Format: Up to 20 alphanumeric characters. All spaces not allowed.
Comment: The comment (or your own reason code) entered here is recorded in the P.O. Change Log for reference when the Change Log is printed.
If the Item Number is in Item Masters, its Quantity Ordered balance is updated for the primary or branch warehouse.
If you have just added a line item, the program then asks "Add another schedule for same line ?". If you want to enter another split delivery quantity and due date for the same Line Number, answer Y and the cursor will return to the Quantity Ordered position where you may complete entries for another Due Date.
You may also add more scheduled deliveries for a previously entered Line Number, by pressing <F5> at "Field number to change ?" when an existing schedule for that line is displayed.
If you want a canceled item to print on a change order, you may close the line but don't delete it until after you print the change order with the line item Cancel message.
The cursor returns to the Line Number entry position, where you may continue adding, changing, or deleting line items, or may press ESC to proceed to the P.O. summary screen.
Entry Format: Up to 99 lines of 45 alphanumeric characters each, in groups of 10 lines per screen.
Comments: If the answer is "N" to "P.O. line comments used ?" in P/P Control Information, you will not see the prompt to press F6 for comments.
If you do you use comments, when you are adding or changing comments, press <F1> to put spaces in a comment field and in subsequent fields in the same group of 10. To delete all comments for a group of 10, press <F1> when the cursor is at the top comment field.
You may also press <F2> at the first comment field to copy the Item Master comments, if any.
Summary information displayed on the final entry screen includes counts of total schedule lines, schedule lines closed for receiving, no charge lines, lines invoiced complete, lines with a change order message, and lines not priced, if any. The total P.O. value, for priced line items is also shown. These counts may exceed the number of Line Numbers, if there are split delivery schedules for some lines. Use this screen:

The fields you enter are:
Comments with optional P.O. Comment Code entry
Entry Format: When at the Code position, you may type up to 2 alphanumeric characters matching a record in P.O. Comments to automatically enter a pre-defined comment.
If you enter spaces in Code, the cursor moves to the Comment description where you may enter any comment, up to 40 alphanumeric characters, or space.
If you are adding a new order, you may skip entry of all remaining Comments by pressing <F1> when at at the Code position.
Entry Format: Check box, checked is yes and unchecked is no.
Comments: If you check the box, the order will be printed the next time that you use "Print purchase orders" to print orders for the Ship-to Warehouse. If you uncheck it, the order will not be printed. If the order has been printed previously, you may check this box to have it printed again.
Print only lines with change messages
If there are line items with change messages, a checked box will cause the program to ask "Print only lines with change messages", to which you must Check the box for yes and unchecked it for no. That is, Change Order printing can include all line items with some items marked as Add or Change or Cancel, or can just include those change message items.
Entry Format: Check box, checked is yes and unchecked is no.
Comments: If you check the box, prices will be printed on the P.O. the next time it is printed. Otherwise, prices will be suppressed the next time that you use Print Purchase Orders to print the order.
Default: A checked box displays as the default answer when you add a new P.O. or new release.
Select Save or Alt+s to save the purchase order.
Use this program to print an edit list of P.O.'s for a specified range of orders.
See a Purchase Order Edit List example in the Samples Reports appendix.
Select
P.O. edit list from the Purchase orders menu.
The following screen displays:
The fields you enter are:
1. List sequence
P = P.O. #, or V = Vendor #.
2. Ship to warehouse
Up to 2 alphanumeric characters, Blank = "Main", or <F1> = "All".
3. Buyer code
Up to 3 alphanumeric characters, or
<F1> = "All".
4. Starting P.O. date
6 numeric digits in MMDDYY format, or <F1> = "All".
5. Ending P.O. date
Blank = Starting value.
6. Starting vendor #
Up to 6 alphanumeric characters, or <F1> = "All".
7. Ending vendor #
Blank = Starting value.
8. Starting P.O. #
Up to 6 numeric digits, or <F1> = "All".
9. Ending P.O. #
Blank = Starting value.
10. Print P.O. line comments ?
Y or N (Asked only if P/P Control Information indicates P.O. line comments are used.)
As explained in the P.O. entry procedures, selection of a P.O. for printing is done on the P.O. summary screen. When you use this program, it prints all P.O.'s which are selected for printing and are for the specified Ship-to Warehouse.
Select
Print purchase orders from the Purchase orders menu.
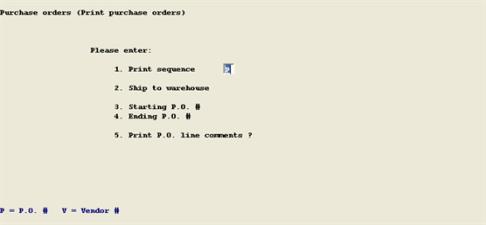
The following screen displays:
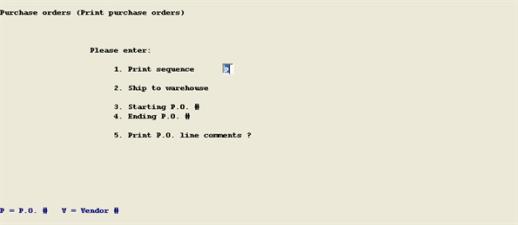
The fields you enter are:
1. Print sequence
P = P.O. #, or V = Vendor #.
2. Ship to warehouse
Up to 2 alphanumeric characters, Blank = "Main", or <F1> = "All".
3. Print P.O. line comments ?
Y or N (Asked only if P/P Control Information indicates P.O. line comments are used.)
If there are orders to print for the selected warehouse, the program prompts "Mount forms on printer & type DONE when ready". Type DONE to proceed, or press ESC to exit the program.
The program asks "Print alignment ?". Answer Y to print alignment characters on one form, or answer N to print the P.O.'s. After P.O.'s are printed, the program asks "Purchase orders printed OK ?". If you answer Y, the program changes the "Print P.O. ?" answer to N in all related order records and clears any change order messages in the order line item records. If you respond N to the printed OK question, you are given the option to reprint the orders immediately or to exit to the menu and the order records are not changed.
This program provides an efficient method of posting P.O. line item Promise Dates obtained from vendors after P.O.'s have been entered.
Select
Post promise dates from the Purchase orders menu.
The following screen displays:
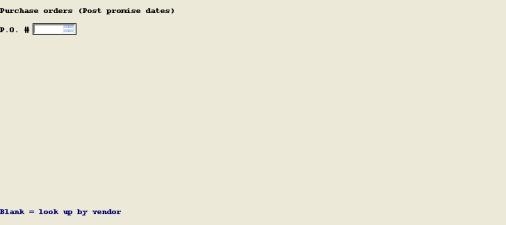
The fields you enter are:
P.O. #
Up to 6 numeric digits, or space to find P.O.'s by Vendor. If you enter a P.O. number with a Blanket Release on file, you are prompted to enter:
Rls
Up to 2 numeric digits.
If the P.O. Number or Release is not on file, or all of its line items are closed, you are prompted to enter another number.
If you enter space in P.O. Number, the program requests:
Vendor #
Up to 6 numeric digits, or space to find the Vendor by name. The name lookup option works like the procedure described for the Vendor entry in the "Purchase orders" entry program.
If there are P.O.'s for the Vendor, the first P.O. Number displays with the Ship-to Warehouse and P.O. Date, and the program asks "Right order ?". Answer Y to proceed, or press <F1> for the next P.O., or answer N to return to P.O. Number.
The program then asks for:
Line #
Up to 3 numeric digits, press <F1> to display the next line record for the P.O., or press <F2> to display all open lines.
Depending on the Line Number entry option selected, one or more open line records display and the cursor moves to the first Promised Date. Enter a date in MMDDYY format, press <F1> to default to the Due Date, press <F2> to erase an existing Promise Date, or press ENTER to leave the date unchanged.
If more than one open line record was displayed by using <F2>, the cursor moves to the Promise Date for the next line.
When you complete Promised Date entries, the program asks "Any change ?". Answer Y to make changes or N to proceed. If there are more open lines than could be displayed on one screen with the <F2> key, the program asks if you wish to "Review more P.O. lines ?" for the same P.O.
When you answer N, the cursor returns to the P.O. Number position, where you may request more P.O.'s, or press ESC to exit.
This program allows you to re-enter a header record for closed P.O. line items, thereby reopening the order. You may then open, add, or change P.O. line items for the order.
When you use "Close orders", the P.O. header records for completed orders are deleted, but closed line items remain until you delete them with the "Purge closed P.O. items" program. Before the closed line items for a P.O. are purged, you are allowed to reopen the order.
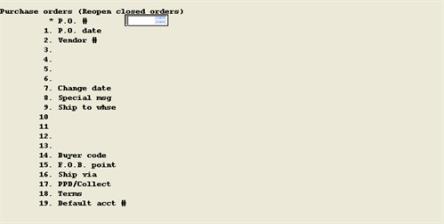
Enter the P.O. Number of the P.O. or Blanket Release that you wish to reopen. To reopen a Blanket Order Release, the blanket order must be in Blanket P.O.s.
Other data entry procedures are the same as described for a new Purchase Order, except that the Vendor Number on the first closed P.O. Item record will be automatically entered on the first screen and any closed line items do not need to be re-entered. You may change the Receiving Open/Closed status of some line items to Open, and add or change line items.
This function appears on the menu only if the answer is Y to "Use P.O. change log ?" in P/P Control Information. You may use it to print a history of changes to P.O. line item quantities, due dates, and prices for a range of P.O. Numbers, Change Dates, and Vendor Numbers that you specify. You may also elect to purge the change log records in the designated range, with or without printing the change history.
Select
Print P.O. change log from the Purchase orders menu.
The following screen displays:

The fields you enter are:
1. Ship to warehouse
Up to 2 alphanumeric characters, Blank = "Main", or <F1> = "All".
2. Starting P.O. #
Up to 6 numeric digits, or <F1> = "All".
Rls
Up to 2 numeric digits or blank.
3. Ending P.O. #
Blank = Starting value.
Rls
Up to 2 numeric digits or blank.
4. Starting change date
6 numeric digits in MMDDYY format, or <F1> = "All".
5. Ending change date
Blank = Starting value.
6. Starting vendor #
Up to 6 alphanumeric characters, or <F1> = "All".
7. Ending vendor #
Blank = Starting value.
8. Print report ?
Y or N.
9. Purge file ?
Y or N.