
This chapter has the following topics:
One-step Orders (Invoice Type)
Quotes, Loans, Rentals and RMAs
Use this selection to enter orders, invoices, credit memos, quotes, loans, rentals, and RMAs.
Order processing allows either a two-step or a one-step billing procedure.
In two-step billing, orders (designated as an order type) are entered in the first step. In the second step, items on an order are selected for billing and an invoice is prepared later through Select for billing and Invoices (Print).
In one-step billing, orders (designated as an invoice type) are entered and automatically selected for billing. Later, an invoice is prepared through Invoices (Print).
One-step billing requires that there is adequate stock in inventory to fill the complete order, because specific items are not selected for billing in a separate step.
You may print an invoice type immediately after entering the invoice based on an O/E Control information setting. For information on immediate invoice printing see the Default invoice form ID field in the Control Information chapter.
Credit memos are similar to the invoices type in that they follow the one-step billing procedure; they are entered and automatically selected for billing. The Invoices (Print) selection is used to print credit memos.
Quotes are entered in a manner similar to the orders type, and RMAs (Return Merchandise Authorizations) are entered in a manner similar to credit memos.
However, quotes and RMAs are not billed. To be invoiced, a quote or RMA must first be converted to an order or credit memo. The unposted balance for a customer is not updated when a quote is initially entered, but it is updated for a new RMA.
Loans and Rentals are entered similarly to orders. Loans are not posted and do not affect inventory or Accounts receivable. Rentals must be selected, printed, and posted.
When line items are entered on an order, invoice, credit memo or RMA, the quantity committed is updated for the items in the appropriate warehouse. Commitments are also updated for any serial numbers and lot numbers entered for serialized and lot-controlled line items.
Quantities are not committed for quotes, and entry of serial numbers and lot numbers is not allowed until the quote has been converted to an order.
Electronic Data Interchange (E.D.I.) is the electronic exchange of business documents using computers. Data is exchanged between trading partners. Using E.D.I. reduces resources required to manually process orders, invoices, etc. by enabling an Import feature into the accounting application. Additionally, an Export feature is available by which invoices can be sent out of the system in a readable format. Since all the data is transferred electronically, clerical errors are reduced. E.D.I. also reduces inventory costs because there is a shorter order cycle time.
Trading partners may have legacy computer systems making document portability difficult. E.D.I. uses standard data formats and protocols when sending and receiving business documents. The data is processed in a standard format at the source and destination permitting seamless integration into (and out of) a legacy system.
PBS Version 12.06 E.D.I. Layout Changes
Starting with PBS version 12.06 the customer and ship-to name, address 1, address 2, city, state, zip and apply-to invoice fields were expanded when using either the E.D.I. import or export. New fields were added including address 3, address 4 and county. You will need to take these changes into account when interfacing to your external system.
The Import function reads an E.D.I. order and processes the imported data as if the data were manually entered. The application will validate the data against the existing master files / tables, provide for inventory commitment, and other appropriate accounting functionality.
For a list of fields and requirements for the E.D.I. import, see the E.D.I. Import\Export Layout appendix.
The Export function exports invoice data for E.D.I. capable customers.
The E.D.I. Audit Trail Trigger File produces the export version (DIORDEXP.TXT) of the sequential file containing only confirmed (changed and directly entered) or deleted orders. The export sequential file DIIVCEXP.TXT contains only invoiced orders.
An E.D.I. integration starts with the customer entering purchase orders. The data for these orders are exported and converted to a general format readable by an intermediate software. Your customer then creates an export file and sends it to you. You will probably need a software tool that will read the file and convert the data to a format that PBS can import. There may be third-party software providers that will have this tool. If not, contact PBS for more information. Once the data is converted into a format that PBS will read, then you can import the file and the orders are created in Order entry.
Fixed format data is imported into the application, processed, and then exported out of the application in a fixed format. A CSV file format is not supported. Contact your PBS provider or Passport if you need a specific output format.
If you do not have the E.D.I. option activated, you can skip this section.
The following lists a typical scenario for processing E.D.I. files:
|
Step |
Description |
|
1 |
Import E.D.I. orders |
|
2 |
Process E.D.I. orders |
|
3 |
Export E.D.I. orders |
|
4 |
Invoice E.D.I. orders |
|
5 |
Export E.D.I. invoices |
|
6 |
Post E.D.I. orders |
|
7 |
Report E.D.I. orders |
The following contains details about each step:
Step One
|
Step |
Description |
|
1 |
Verify the name and date of the latest import file. |
|
2 |
Perform the import procedure. |
|
3 |
Verify and correct any import errors when necessary. Use the error report which is printed to disk. |
|
4 |
Verify the imported data. Use the import report. You have the option when importing orders to have them automatically flagged selected for billing or unselected. Deleted orders are removed from the Audit file unless they have an invoice history. Any remaining order data is deleted (i.e. header, line items, and notes). |
Step two
|
Step |
Description |
|
1 |
Perform the necessary corrections to any tracked or back ordered imported line items, as required. |
|
2 |
Delete any orders that require changes (other than the above) and re-add them (using a new order number) making use of the add a new E.D.I. order function. Make sure the E.D.I. document number used is the original from the deleted order. |
Step three
| • | Export E.D.I. orders when the orders imported are no longer identical to the orders in the external system. This process is used to synchronize the two systems. |
Step four
| • | Invoice E.D.I. orders in the same manner as non-E.D.I. orders. |
Step five
| • | We recommend that you try to export E.D.I. invoiced orders before they are posted. Certain information such as order notes will not be exported from posted orders. |
| • | Unposted invoices may be exported as often as required. To re-export an unposted invoice select the correct Exported order ? option. |
| • | Posted invoices may be exported as often as required. |
Step six
| • | Post E.D.I. orders in the in same manner as non-E.D.I. orders. |
We recommend that you export E.D.I. orders before they are posted. Certain information such as order notes will not be exported from posted orders.
Step seven
| • | Use the E.D.I. status report to review the current and previous status of all E.D.I. orders. See E.D.I. Status Report |
You can generate a report at any time during the processing cycle.
|
Note |
If you plan to import E.D.I. data, refer to the Importing E.D.I. Orders section before proceeding any further. |
There are five entry modes for entering an order:
| 1. | Order mode is used to enter two-step orders, one-step invoice orders, and credit memos. Order mode is the default mode when you initially select to enter orders. |
| 2. | Quote mode is used to enter quotes or to convert quotes into orders. |
| 3. | The RMA mode is used to enter RMAs or to convert RMAs into credit memos. RMA is an abbreviation for Return Merchandise Authorization. |
| 4. | Loan mode is used to document loans of items. Loans are not billed. When a loan is no longer needed it may be deleted. |
| 5. | Rental mode is used to track rentals of items. |
Entering two-step orders (order type) is explained below, followed by entry of one-step orders (Invoice type) and Credit Memos.
Quotes mode is then illustrated by entry of a quote and conversion of the quote to an order.
RMA mode is then shown by entry of an RMA and conversion of the RMA to a credit memo. Loans and rentals are described next.
Orders (both Order and Invoice types), credit memos, quotes, loans, rentals, and RMAs are entered in the same manner. Header information is entered on the first screen, then each item is entered on a separate line item screen, then totals for the document are entered on the final Totals screen. More information is requested on the Totals screen for one-step documents (invoice type, credit memos, and RMAs) than for type orders or quotes. Frequency information is requested for rentals.
Most of the fields on each screen can be automatically skipped if you have specified in Control information to use automatic defaults. Refer to the Fields automatically defaulted for Orders (Enter) section.
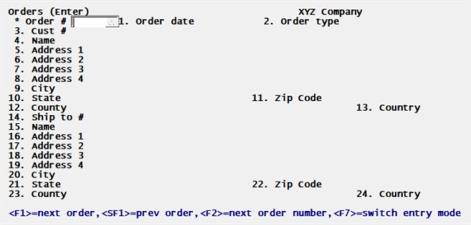
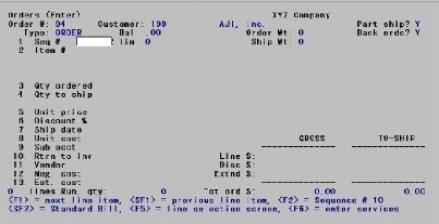
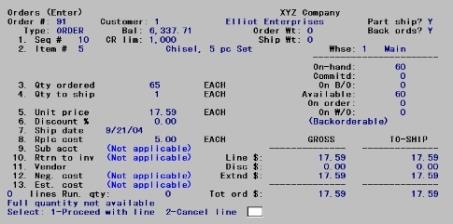
There are three main screens for entering an order. The first is the header, then the order lines and then the order totals.
Select Enter from the Orders menu.
From this screen you can work with both new and existing orders.
The first screen to enter, header information, appears similar to this:
The list box displays up to 6 orders at a time. You may sort the orders by order number, warehouse number, customer number, user ID or order date all in ascending or descending order. Click on the column name or the arrow to the right of the column name to change the sort or use the View options. Only column names in red may be sorted.
To locate an order, invoice or credit memo, start typing the order number, warehouse number, customer number, user ID or order date, depending on which sort field is selected or use the up/down arrow keys, <PgDn>/<PgUp>, and <Home>/<End> keys to find the order. The <F1> and <SF1> work the same as the down/up arrow keys.
There are five different entry modes; Orders Quotes, RMAs, Loans and Rentals. The list box works the same for each mode.
You have the following options with the buttons and keyboard equivalents:
| Button | Keyboard | Description |
|---|---|---|
|
New |
Alt+n |
To enter a new order. |
|
Edit |
Alt+e |
To edit an existing order. |
|
Save |
Alt+s |
To save the new order or changes to an existing order. |
|
Save/New |
Alt+w |
To save changes to an existing order and then start a new order |
|
Delete |
Alt+d |
To delete an existing order. Per the O/E Control information You may be restricted from deleting an order. |
|
Cancel |
Alt+c |
To cancel adding a new order or editing an existing order. |
|
Line items |
Alt+l |
To add lines to a new order or edit lines for an order selected in the list box. See Order Line Items. |
|
Exit |
Alt+x |
To exit the screen back to the menu. |
Menus
Under the Print and Options menu selections there are several selections that are unique to graphical mode. They include the following:
| Print Menu | Description |
|---|---|
|
Edit List |
To print an edit list of orders. |
|
Invoices |
To print invoice type orders, credit memos and selected orders. |
|
Reprint |
To reprint invoices from invoice history. |
|
Switch entry mode |
For entering Quotes, Loans, Rentals and RMAs or to switch back to Orders. See Quotes, Loans, Rentals and RMAs |
|
Order notes |
For entering order notes. |
| Options Menu | Sub Menu | Description |
|---|---|---|
|
View inventory control |
Inventory history |
To view the history for an item. |
|
View inventory control |
Items |
To information about items including. |
|
View inventory control |
Lot numbers |
To view lot information about a lot item. |
|
View inventory control |
Serial history |
To view the serial number history or a serialized item. |
|
View inventory control |
Serial numbers |
To view serial number information about existing items. |
|
View inventory control |
Work order history |
To view the work order history or kits. |
|
View inventory control |
Work orders |
To view open work orders. |
|
View accounts receivable |
Customer open items |
To view the open items for the selected customer. |
|
View accounts receivable |
Customer invoices |
To view A/R invoices for the selected customer. |
|
View accounts receivable |
Customer invoice history |
To view invoice history for the selected customer. |
|
View accounts receivable |
Customer history by date |
To view customer history for the selected customer. |
|
View accounts receivable |
Customer history by doc # |
To view customer history for the selected customer. |
|
View order entry |
Full order inquiry |
To search for open and invoiced orders. |
|
View order entry |
Orders for an item |
To find orders by item. |
|
View order entry |
Invoice history by customer |
To view invoice history by customer. |
|
View order entry |
Invoice history by invoice |
To view invoice history by invoice number. |
|
View order entry |
Invoice history by item |
To view invoice history by item. |
|
Switch entry mode (you may also use <F5>) |
N/A |
For entering Quotes, Loans, Rentals and RMAs or to switch back to Orders. See Quotes, Loans, Rentals and RMAs. |
|
Order notes (you may also use <F6>) |
N/A |
To access, add or edit notes for the selected order. See Using Notes |
|
Convert order (you may also use <F7>) |
N/A |
To convert the existing transaction. |
Character Mode
Character mode is the classic style of screens used in the early days of PBS and as originally designed by RealWorld.
If an order has already been entered for the order number you specify, it appears and is available for changes or deletion. There are two screens for entering header information in character mode. When you have the first screen to enter order header information, it appears similar to this:
The second screen looks similar to this:

While in order mode, if you enter the number of an existing quote or RMA, you are asked if you wish to switch the entry mode. Answer Y to change the entry mode to process the quote, RMA, loan, or rental. (You can also press <F7> at Order # to change entry modes.)
Enter header information that applies to the entire order as follows:
For new orders using graphical mode
The order number is automatically assigned.
Once you have selected to add an order the cursor will be on the Order # field. The order number defaults to the next available order number as specified in the O/E Control information. You may use that number or enter a different number and then enter the new order. You may also enter the number for a existing open order or you may use the lookup to find an existing order, which selects it to be edited.
For new orders using character mode
In character mode you must enter an order number.
|
Format |
999999 |
You may also use on of the following options:
| <F1> | To access the next order on file. |
| <SF1> | To access the previous order. |
| <F8> | To access a list of orders from a lookup. You may select the order from the lookup. |
|
<F2> |
To use the next available order number as specified in the O/E Control information. |
|
<F7> |
To switch to a different entry mode. |
Both Graphical and Character Modes
If, after using <F2> to assign an order number, you press <Esc> to cancel entry of the order, you will have an unused order number. If cancellation occurs on the first screen of Orders, that number is re-used the next time <F2> is pressed to assign an order number. However, if you cancel entry of the order from the second Orders screen (where you enter line items), this order number is no longer available as a default.
Entering new E.D.I. Orders
E.D.I. orders can be entered and later exported to be processed in an external system.
If you are using E.D.I, as indicated in the O/E control information, you will get the following message after you select <F2> to assign a new order number:
Add this Order/Invoice to the E.D.I. audit file ?
If you select No, then the cursor will move to the Order date field. If you select Yes, then the following message will display.
Enter the document # associated to this order:
Enter a document number for the Audit file. This number is free form text of up to 12 characters. The number you enter must be acceptable by the external system.
Any change ?
Select Yes to make a change or No to continue with the E.D.I. order.
For existing orders
Enter the order number.
Options
You may also use on of the following options:
|
<F1> |
To scan through each order, invoice order, and credit memo. |
|
<SF1> |
To scan through previous orders, invoice orders and credit memos. |
|
<F7> |
To switch to a different entry mode |
You cannot change Order type, customer number, or warehouse (if any).
When an existing order is displayed, make any changes to the order header information.
Options
You also have these options:
|
<F3> |
To delete the entire order. Per the O/E Control information Require Admin login to delete orders field, you may be restricted from deleting an order. |
|
<F6> |
To view or delete notes for this order. |
|
<F7> |
To convert this order into a quote. |
If you press <F7> to convert an order containing serial numbers and/or lot numbers into a quote, a message displays to advise you that the serial numbers and lot numbers will be removed.
When you press <Enter> at Field number to change ? on the header screen, you are then asked Do you wish to change the lines ?. If you answer N, you are returned to the top of the screen to enter another order.
If you answer Y, the line selection screen is displayed to allow you to select a line to be changed. The Line Selection Screen is described later in this section.
If you wish to see information on the last Orders screen (the Totals screen), answer Y and then press <Esc> at the line selection screen or at the Seq # field on the line item entry screen. The totals screen appears.
Enter the order date or press <Enter> to use the current date.
|
Format |
MMDDYY |
From the drop down list select the order type, either:
|
Order |
Order (for two-step billing) |
|
Invoice |
Invoice order (for one-step billing) |
|
CR memo |
Credit memo |
You may press <Enter> to use the displayed type (Order) for the first order entered. For subsequent orders, the order type defaults to the order type previously entered.
|
Format |
1 character |
If you enter CR memo for Credit memo, an additional field appears:
|
Format |
9999999 |
Enter the original invoice number to which this credit memo is to be applied. When the invoice is located in Invoice History, you will be given the option to pull:
| • | all of the line item and header information. |
| • | only the header information. |
| • | none of the original information from the original invoice. |
For a blank Apply to number press <Enter>. The word OPEN displays. The credit memo will post as an open credit to Accounts Receivable.
You may not be allowed to enter a blank (Open) apply-to for two reasons:
| • | The setting of the Allow blank apply-to field in Control information. |
| • | If using PBS Multi-payment/Credit Card processing, you must enter an apply-to number. You cannot apply a credit memo to *Open*. You may read more about Multi-payment feature in the PBS Multi-payment/Credit Card Setup appendix in the A/R User documentation. |
You may read more about Credit memos in the Credit Memo Type section.
Standard Bills
Standard bills that contain inventory items and/or AR services may be imported into O/E orders. Standard bills that contain AR goods may not be imported into O/E orders. When entering a line there is an option to select Standard bill on the Line type field.
Also, Order Entry allows the import of notes lines from a standard bill. Order Entry allows text entry up to 25 characters and will import the first 25 characters on a notes line in a standard bill.
|
Format |
12 characters |
The customer is two fields: customer number and customer name. You may only enter the customer number when adding a new order. You may edit the customer name field when adding a new order or when changing an order.
Options
Enter the customer number or use one of the options:
|
<Enter> |
To look up the customer by name or once on the name field to lookup by customer number. |
|
<F1> |
To scan through the customers. When on the number field it scans in number order and when on the name field it scans in name order. |
|
<SF1> |
To scan for a previous customer. When on the number field it scans in number order and when on the name field it scans in name order. |
|
<F6> |
After entering an order, to use the last customer entered. |
|
<F8> |
To lookup a customer on either the number or name field. You may also access the lookup by clicking on the binoculars. For a list of lookup options, see below: |
The lookup has several options. These options are available as buttons. Some of them are available from the Options menu. Here is an example of the lookup:
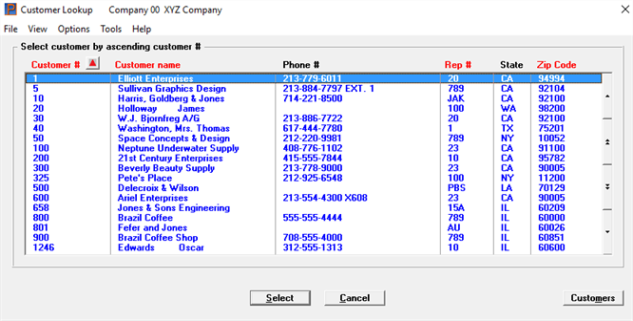
The lookup options include:
Select
This returns the customer to the customer number (and name) field.
Cancel
This puts the focus back to the screen without returning a customer number.
Customers
This button allows you to go to the A/R Customers (Enter) program where you may view, edit, add or delete customers. If the button is grayed out you do not have permission to access A/R Customers (Enter).
View invoice history from Options Menu
This menu selection allows you to access the A/R View > Invoice history selection.
This customer is not on file — would you like to add it ?
This question appears when you enter a customer number (regular or miscellaneous) that is not already entered in customers. Select No to correct an erroneous entry, or Yes to add the new customer on-the-fly.
If you select Yes, a window similar to the following appears:
The fields for this screen are documented in the A/R Invoices chapter. Look for the Adding Customer On-The-Fly section.
From this screen you can work with new entries only. The result is you are accessing the Customers (Enter) data file to enter a new customer. This is the case even though your password may not authorize you to use that selection.
Be aware that not every field on the Customers (Enter) screen appears on this screen. Note these points:
| • | Some fields, such as Contact-2, are omitted altogether. |
| • | The Stmnt cycle, Cus type and Bal Method fields default to the A/R Control information Customer on the fly defaults. The A/R account also default A/R account field in A/R control information. |
| • | Other fields will be supplied automatically from your entries in the remainder of this invoice. These include: terms code, ship-via code, tax code, sales representative, and cost center. |
| • | The credit limit is automatically set to zero, but this invoice does not set off the credit limit check. The next invoice for this customer will. |
If necessary, you can access A/R Customers (Enter) to change the settings for the new customer added here.
Modify any of the information (except the customer number) and select OK to save or Cancel to return to the customer number field.
The billing name and the billing address appear automatically for a regular customer, or you may type them in for a miscellaneous customer.
You may change the address when adding a new order or when editing an existing order.
|
Format |
50 characters for customer name 60 characters for address 1 through 4 45 characters for city 23 characters for state 15 characters for zip code 45 characters for county 3 characters for country |
Enter the number of the ship-to address for this customer (if you specified in the O/E Control information on the Use separate ship-to file field that separate ship-to addresses are used).
|
Format |
8 characters |
Options
If you are using ship-to addresses you may also use one of the options:
|
<F1> |
To scan through the ship-to addresses for this customer. This function is not available is not are not using ship-to addresses per O/E Control information. |
|
<F2> |
To enter the customer's shipping address |
|
<F8> |
In graphical mode you may also click on the binoculars button. This displays a list of existing ship-to addresses for this customer. Find the ship-to location and hit the <Enter> key to select it. This function is not available is not are not using ship-to addresses per O/E Control information. For adding a ship-to location and more see Ship-to Location Lookup below. |
|
<Enter> |
To use the customer's billing address as the ship-to address. |
Entering a Ship-to Location
There are two ways to enter a new ship-to location that gets stored on file:
| • | Via the ship-to location lookup. See Ship-to Location Lookup below. |
| • | Selecting <F2> to enter an address on the fly. |
Selecting <F2> allows you to enter the address on the order ship-to fields. When you are finished entering the address you will be asked to Save the address. If you select yes the program will assign the first available numeric number for the ship-to number and store the data in the ship-to locations. If you want to use alphabetic letters for the ship-to number you must add it via the location lookup. If you select No to not permanently retain the ship-to address it is used for this order only.
To access the ship-to location lookup select the <F8> key from the ship-to # field. If you are using graphical mode you may also click on the binoculars. A screen like this displays:

You may click on the Locations button to access a window where you can enter new, edit, change or delete any ship-to addresses. This is the same screen that you can access from A/R Master information > Ship-to addresses. If you do not have access to the A/R Master information > Ship-to addresses, C/O Ship-to addresses and P/S Master information > Ship-to addresses menu selections this button is grayed out and inaccessible. If either C/O or P/S is not installed then you do not have access to their menus.
If you pressed <Enter> or selected a ship to address at the Ship to # field, the ship to name and address of the customer appear here automatically. If you pressed <F2> at the Ship to # field, you may enter a ship to address for this order.
|
Format |
50 characters for ship-to name 60 characters for address 1 through 4 45 characters for city 23 characters for state 15 characters for zip code 45 characters for county 3 characters for country |
Enter the ship via code for the order, as defined in A/R Ship vias or use one of the options:
|
<F1> |
To use the next ship via as entered in Ship via under the A/R Master information menu. |
|
<SF1> |
To use the previous ship via. |
|
<F2> |
To use <F2> to use the ship via code entered for this customer in the A/R Customers. |
|
Format |
Three characters |
The date entered here is used as the default shipping date when a shipping date is entered for each line on the line items screen.
For orders and invoices, enter a date.
|
Format |
MMDDYY |
Options
You may also use one of the options:
|
<F1> |
To set the default shipping date to ASAP |
|
<F2> |
To use the system date |
|
<Enter> |
(as soon as possible) |
For Credit Memos, the shipping date is not applicable and entry is not allowed.
You may access this field if you have General Ledger and the G/L Control information field Allow correcting entries is Y.
Check this box if this is a correcting entry. You can read more about the correcting entry feature in the Control information chapter of the G/L documentation.
|
Format |
Check box where checked is yes and unchecked is no. The default is unchecked. |
An entry in this field is allowed only if the Inventory Control Control information specifies that you are using multi-warehousing.
|
Format |
Two characters |
Options
Enter a warehouse or use one of the options:
|
<F1> |
For the first order, to use the warehouse entered in the |
|
<SF1> |
For the previous warehouse. |
|
<F5> |
For "All" warehouses (if "All" is entered, a warehouse must be entered for each line item) |
|
Blank |
For the Central warehouse |
Any warehouse entered must exist in the I/C Warehouses.
If you enter a specific warehouse, all line items for this order must be shipped out of that warehouse. If you enter "All" for the warehouse code (by pressing <F5>), you are allowed to assign a specific warehouse to each line item, so that you can ship different line items out of different warehouses.
You may enter a cost center (or sub account) only under these conditions:
| 1. | Your Company information specifies that cost centers are used, and |
| 2. | The O/E Control information specifies that multiple cost centers are used in O/E, and |
| 3. | Cost centers (or sub accounts) are not assigned by inventory item, as specified in the O/E Control information. |
Options
Enter a cost center (or sub account) or use the option:
|
<F1> |
For the first order, to use the cost center (or sub account) entered in the O/E Control information. For subsequent orders, to use the cost center (or sub account) entered for the prior order. |
If you specified in the O/E Control information that cost centers (or sub accounts) are assigned by order, this cost center (or sub account) is used for all line items on this order.
If cost centers (or sub account) are assigned by line item, this cost center (or sub account) becomes the <F2> default when entering line items for this order.
Enter the sales rep for this order or press <F2> to use the sales rep entered for this customer in the A/R Customers or if a ship-to address is used, select <F2> to use the sales rep from the ship-to address location.
A sales rep cannot be entered if you specified in the O/E Control information that sales reps are not used.
|
Format |
Three characters |
Enter the customer's purchase order number. This number is for information only, and is later transferred to Accounts Receivable. You can press <Enter> to skip this field.
|
Format |
30 characters |
The system can verify if the purchase order number is required for a customer or check existing data to find a duplicate purchase order number.
Required Purchase Order Number
A purchase order number entry is required if the Accounts Receivable customer record field PO Required (field 20 in character mode) specifies that this customer requires a purchase order number.
Checking for a Duplicate Purchase Order Number
A user can accidentally enter the same order more than once. The way to prevent this is to have the program check the system for a duplicate purchase order number. You must specify in the O/E Control informationCheck for duplicate P.O.'s field to check for duplicate purchase order numbers on existing orders and in invoice history. Then the following happens:
When you enter a duplicate purchase order number for the same customer being entered, you will get a window that displays one of these messages:
Duplicate Purchase Order Number in Invoice History.
or
Duplicate Purchase Order Number on an Order.
The program will not check history or open orders for a ‘blank’ duplicate (nothing entered in the P.O. number field). If there is more than one duplicate, it will only display the first one found.
After an order or invoice is found with a duplicate P.O. number, information displays in a window; such as the customer number, customer name, invoice number (only if from history), invoice date (only if from history), order number, order date, the duplicate purchase order number and order status (only if an order).
One of two questions will display below the window, depending on where the duplicate was found, with the ‘999999’ representing the actual number:
PO number has been used on invoice # 9999999. Would you like to use it again?
or
PO number has been used on order # 999999. Would you like to use it again?
If the message has the word ‘invoice’ the record was found in A/R history header. If the message has the word ‘order’, then the record was found in O/E order headers.
Select Yes to accept the duplicate purchase order number for this customer or No to enter a different purchase order number.
For an open item customer, enter the terms code that applies to this order or use one of the options:
|
<F1> |
For the next terms code. |
|
<F2> |
To use the terms code entered for this customer in Customers. |
|
Format |
Three characters |
If you enter a terms code, it must exist in A/R Codes.
If the customer is a balance forward customer, the terms for the customer are automatically displayed and changes are not allowed.
Enter a tax code or press <F2> to use the tax code entered for the ship-to address (if an address from Ship-to locations is being used), or to use the tax code entered in Customers (if an address from Ship-to's is not being used).
|
Format |
Three characters |
The tax code entered for this order must exist in the A/R Codes.
For a new order
In graphical mode when you click on Save or select <Alt+S> the line item entry screen displays.
In character mode when you press <Enter> at Field number to change ? on the second screen, the line item entry screen is displayed to allow you to enter the line items for the order.
For an existing order
In graphical when you click on Line items button the line item entry screen is displayed to allow you to edit an existing line or enter new lines for the order.
In character press <Enter> at Field number to change ?, you are asked Do you wish to change the lines? If you answer N, you are returned to the top of the screen to enter another order. If you answer Y, the line selection screen is displayed to allow you to make changes to the order's line items. The line selection screen is described in the Line Selection Screen section, following the Line Items section.
If this is an E.D.I. order, you will be prompted with the following:
This is an E.D.I. order - continue with changes ?
Enter Y to make a change or N to continue without making any modifications to this record. Keep in mind that if you already exported the E.D.I. order, then changes to the order will no longer match what was previously exported.
Graphical Mode
For a new order, after you click on Save or select <Alt+S> a screen similar to the following will appear:
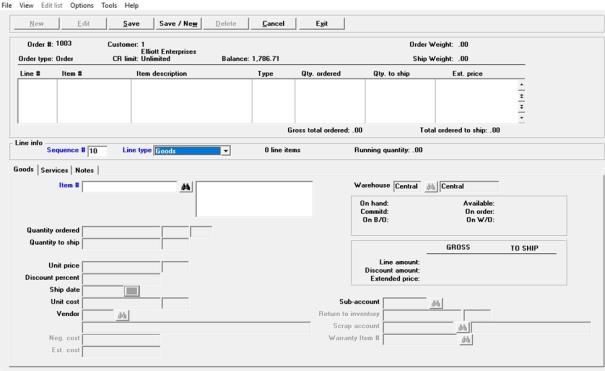
You may edit an existing line or add a new line. All the field names display. In most cases at least some of them will be grayed out and inaccessible for entry due to the type of transaction, type of line and control information settings.
Menu
You may print the orders edit list under the Edit list selection. Under the Options menu selection there are several selections that are unique to graphical mode. They include the following:
| Options Menu | Sub Menu | Description |
|---|---|---|
|
View inventory control |
Inventory history |
To view the history for an item |
|
View inventory control |
Items |
To information about items including |
|
View inventory control |
Lot numbers |
To view lot information about a lot item |
|
View inventory control |
Serial history |
To view the serial number history or a serialized item |
|
View inventory control |
Serial numbers |
To view serial number information about existing items |
|
View inventory control |
Work order history |
To view the work order history or kits |
|
View inventory control |
Work orders |
To view open work orders |
|
View accounts receivable |
Customer invoices |
To view A/R invoices for the selected customer |
|
View accounts receivable |
Customer invoice history |
To view invoice history for the selected customer |
|
View accounts receivable |
Standard bills |
To view standard bills as entered in A/R |
|
View order entry |
Full order inquiry |
To search for open and invoiced orders |
|
View order entry |
Orders for an item |
To find orders by item |
|
View order entry |
Invoice history by customer |
To view invoice history by customer |
|
View order entry |
Invoice history by invoice |
To view invoice history by invoice number |
|
View order entry |
Invoice history by item |
To view invoice history by item |
|
Lot assignments |
N/A |
To access a window where you may edit and view the lot information for lot controlled items only |
|
Serial assignments |
N/A |
To access a window where you may edit and view the serial numbers for serialized items only |
|
Warranty assignments |
N/A |
To edit and view the warranty information for warranty items only |
|
Temporary item information |
N/A |
To access a window where you may edit and view temporary item information |
|
Comments |
N/A |
To view the previously entered temporary item comments |
Character Mode
For a new order, after you press <Enter> at Field number to change ?, the screen that appears looks similar to this:
Enter the information as follows:
Graphical Mode
When adding a new line in graphical mode, this field is filled in automatically in increments of 10 and skipped.
On a new entry, if you want to change this field, the either click on it or select <Shift+Tab> to move to it from the Line type field.
If you want to add a line item between two other line items, assign the new line item a sequence number that falls between the other two items. For example, to insert a line item between #10 and #20, assign it a sequence number from 11 to 19.
|
Format |
99999 |
Character Mode
Note: You have an option to enter a standard bill by pressing <SF2>. The user can specify a quantity multiplier for the standard bill which is used to determine the quantity of each component good or service line in the standard bill.
|
Format |
99999 |
Enter the sequence number for this line item, or use one of the options:
|
<F1> |
To scan through existing line items, if any |
|
<F2> |
To assign sequence #10 to the first line |
|
<F5> |
To switch to the line selection screen |
If you press <F5> and line items have already been entered, the Line Selection Screen displays. Refer to the Line Selection Screen section for more information.
If you use <F2> for the first line item, you can use <F2> later to assign sequence #20 for the second item, #30 to the third, and so on. This number sequence is useful if you want to insert other line items later, between two line items already entered.
The sequence number is a temporary number that determines the order in which the line items are printed. When you print the order, each line item is automatically assigned a new number in the same relative order. For example, when printed, line items with sequence numbers 10, 20, 14, 30, and 16 appear in the sequence 10, 14, 16, 20, 30, and are numbered 1, 2, 3, 4, 5.
If you want to add a line item between two other line items, assign the new line item a sequence number that falls between the other two items. For example, to insert a line item between #10 and #20, assign it a sequence number from 11 to 19.
Select the type of line. The choices are Goods, Services, Notes and Standard bill.
|
Format |
Drop down list |
|
Format |
15 characters (item #) |
|
|
20 characters (bar code) |
|
|
25 characters (description) |
Options
Enter the item number or bar code, or use one of the options:
|
<F1> |
To scan through the items in the inventory Items |
|
<F2> |
To look up an item by a keyword. See Keyword Search. |
|
<F5> |
To enter text, rather than an item (see Entering Text below) |
|
Blank |
To look up the item by its description |
If you leave the item number blank to look up the item by description, type in the item's description (or any portion of it beginning with the first character). The first item with a description that matches the characters you entered appears, and you are asked if this is the right item. You may press <F1> to show the next item.
After an item number is entered, you may change the description or press <Enter> to accept the description shown. (Any change to the item description is for this order only. The item description in Items is unchanged.)
An item number that starts with an asterisk (*) signifies a miscellaneous item. A miscellaneous item is one for which no quantities are tracked, and whose description and price are not considered permanent.
Miscellaneous items allow you to set up catch-all inventory items to represent a variety of different items for which you do not wish to create separate item records. For example, a miscellaneous item could be used to track such things as service, handling or kit construction charges. Quantities on hand are not monitored by the system for miscellaneous items.
When Miscellaneous items are used costs are used to generate the appropriate G/L transactions. Thus posting a sale of these items is financial ONLY – no updates to inventory (quantity) are done.
You may enter a temporary item number which is actually a new item and must not be in Items. The number must be in O/E Control information Temporary item number field. This field is incremented each time an item is added on the fly.
After an order with a temporary item is entered and before the order is printed you should go into I/C Items and convert a temporary item into an active item. This step is not mandatory, but if don't convert it you will not be able to track in I/C the sold items.
Run this conversion in I/C by adding a new item and when on the item number field select the <F2> function key for a list of temporary items. Enter a new item number, description and other fields as needed. Enter a status for the item that matches the warehouse used in O/E. Saving the new I/C item will update the item number and description on the order.
If you press <F2> to look up an item by a keyword, you are then asked to enter a keyword or description (or any portion, beginning with the first letter) for the item.
Options
Enter the search information, or use one of the options:
|
<F2> |
To select a different search method |
|
<Esc> |
To return to Item # without entering search information |
The keyword search methods that are available are those that were selected in the I/C Control information selection. If you are using the keyword search feature for the first time, it is recommended that use the I/C data utilities to rebuild the item keywords.
After entering the search information, the first eight items that match the characters you entered are displayed, along with their categories and other pertinent information, depending on the search method.
Use the arrow keys to select an item, or enter the line number of the item.
Options
You may also use one of the options:
|
<PgDn> |
To view the next eight items that match the characters entered |
|
<PgUp> |
For subsequent pages, to view the previous eight items |
|
<Esc> |
To stop the search process without selecting an item. You may enter different search information, or press <Esc> again to return to Item #. |
In graphical mode, at the Line type field you may select to enter notes.
Graphical Mode
The Notes tab looks similar to this:

Up to 25 characters of text may be entered on each line, or you may enter an item number to use the Description for that item from Items as your text.
When finished entering the notes, click on the Save button or select <Alt+s>. If you finished editing and you want to enter a new line, the click on the Save/New button or select <Alt+w>.
Options
You may also use one of the options:
|
<F2> |
To look up an item by a keyword, in order to use its description as text (refer to the discussion of searching by keyword: Keyword Search) |
|
<F5> |
In character mode only, to switch to normal line item entry |
When entering text, each pair of text lines is automatically assigned the next available default sequence number.
If "All" warehouses was specified on the header screen, the warehouse of the last field entered is assigned to the text lines.
Character Mode
Up to 25 characters of text may be entered on each line, or you may enter an item number to use the Description for that item from Items as your text.
In character mode, if you press <F5> at Item # to enter text, the field Item # changes to Text and field numbers 3 - 10 clear from the screen.
After entering each pair of text lines, use Field number to change ? to correct errors in the text or to change the warehouse.
When completed entering text, press <F5> to return to the Item # field or press <Esc> to return to the Seq # field.
This field displays only if you are using multi-warehousing and you entered "All" as the warehouse on this order's header screen.
If you entered a specific warehouse on the header screen, this is automatically used as the warehouse for the line item and changes are not allowed.
|
Format |
Two characters |
If you entered "All" warehouses on the header screen, enter the warehouse for this line item.
Options
You may also use the option:
|
<Enter> |
For the first line item, to use the warehouse entered in the O/E Control information. For subsequent line items, to use the warehouse entered for the previous line item. |
The warehouse entered must exist in I/C Warehouses, and the item must be stocked at this warehouse in an I/C Status.
Customer Products provides a cross reference of the item number to the customer’s product number. This helps the customer identify the product they are receiving which makes it easier to restock. See the Customer Products chapter for entering new customer products.
After you enter an item number or item description, if you previously entered a customer product number for the item, the Customer product # displays. Otherwise this field is blank.
When entering the line if you only have the customer product number, enter that number in this field and the item number and description automatically display.
Entering a Customer Product # On-the Fly
When entering the order, if the customer provides a product number and you do not have one entered for the item, you may enter it. If it is not in the customer product file/table the program will ask Customer product not on file. Would you like to add it? Select Yes and the customer product is added. Otherwise select No and it is not added.
Finding the Item with the Customer product Number
When entering a new line, the focus goes through the item number, item description and product number fields. you may skip the item number and item description fields and find the item by entering the customer product number.
This field is for your information. It does not print on the invoice or edit list.
|
Format |
99999999.99999- |
There are several possible choices here:
| 1. | Press <Enter> to default to a quantity ordered of 1. |
| 2. | Enter the quantity ordered for this inventory item. (Decimal quantities are not allowed for serialized items.) |
| 3. | Enter a negative qty ordered to specify returned goods on a type O or type I order. As part of the entry for the returned goods, you are asked to enter the quantity returned to inventory. If this quantity is less than the quantity returned entered here, then you are asked to enter a scrap account to which the value of the quantity not returned to inventory will be updated during posting. |
| 4. | Press <F1> if the item is to be drop shipped directly from your vendor. (On a drop-ship order, the goods go directly from your supplier to your customer. The goods don't go through your inventory.) You are then asked to enter the quantity to be drop shipped. The customer is billed for the items, but the quantity on-hand in your inventory is not affected. |
| 5. | Press <F2> to select a different selling unit, if at least one alternate unit has been defined for the item. |
| 6. | Press <F5> to display alternate items for this inventory item. If alternate items exist for this item, a screen is displayed that shows the alternates and their availability at the current warehouse. You may select an alternate item, in which case the item number and description fields shown on the screen are changed to that item number and description. You can then enter the quantity to be ordered of the alternate item. |
| 7. | If this order can be shipped from more than one warehouse (as specified on the order header screen by entering All for the warehouse code), you may use <F6> to display the availability of the item at the other warehouses at which it is stocked. If you choose a different warehouse, the data for the item at that warehouse is displayed, and you can then enter the quantity to be ordered of the item from the new warehouse. |
If back order control is used (as specified in the I/C Control information), and the quantity ordered is greater than the quantity available at the warehouse from which the item is to be shipped, a window displays where you are informed of this fact and given the following options:
If you choose to proceed with entering the line item, you must specify how to handle the fact that the quantity to be shipped is greater than the quantity available at the warehouse.
Options
You have the following options:
|
Back order balance |
The quantity to ship is set to the quantity available for the item, and the balance is back ordered. |
|
Back order all |
The quantity to ship is set to zero and the entire quantity is back ordered. |
|
Override |
The quantity to ship is set to the full quantity ordered. This results in a negative quantity available of the item. |
|
Ship in stock |
The quantity to ship is set equal to the available quantity and the balance of the quantity is designated on the invoice as being out of stock. |
|
OK or Exit |
Select OK to accept your selection or Exit back to the line. |
|
Note |
In character mode, if the item is backorderable, then options (1), (2), and (3) appear first, and option (4) appears only if you press <F1> for other options. If the item is not backorderable, then options (3) and (4) appear first, and options (1) and (2) appear only if you press <F1> for other options. |
If you choose to cancel the line, the line item is deleted and the screen is redisplayed for you to enter another line item.
Alternate items are optional setup in I/C items. There may not be any alternate items setup for this item.
Select this radio button to choose an alternate item.
This option is only available if you are set up for multiple warehouses in I/C and if on the first screen you select <F5> for multiple warehouses for this order.
Select a different warehouse to find the quantity needed to fill the order.
Select OK to accept your back order choice or Cancel to return to the Quantity ordered field.
This field is displayed automatically when adding a line. You can change it using Field number to change ? when it displays.
|
Format |
99999999.99999 |
For an invoice and order Order type, if the quantity ordered is positive and the quantity to ship is changed to a quantity that is less than the quantity ordered, then you must specify how to handle the quantity that is not shipped.
Options
The options are:
|
Back order balance |
The difference between the quantity ordered and the quantity shipped is back ordered. |
|
Ship in stock |
The difference between the quantity ordered and the quantity shipped is considered to be out of stock and is not back ordered. |
|
Note |
The backorder status (backorderable, not backorderable, or no back order control) for the item is displayed. If there is no back order control for the item, you can still back order the balance; however, the Qty on back order field in Items is not updated for the item. |
Enter the unit price or press <F1> to default to the automatically calculated unit price, based on the selling unit and price code assigned to that unit.
|
Format |
9999999.99999 |
|
Note |
Special rules apply if an item with ascending prices is assigned a price code type 7. If price-2 is higher than price-1, price-2 is not selected during price calculation. If price-3 is higher than price-2, price-3 is not selected. |
If a warehouse-specific price is for the item at the current warehouse, that price is used in the calculation.
If a sale price is active for this item or its category or sub-category, that sale price is used for the <F2> default.
If a contract price is active for this customer and this item or the item's category or sub-category, the contract price is used for the <F2> default.
If both a sale price and contract price are in effect for this item, either the contract price or the lower price is used, based on how the contract price has been defined.
If no price code is assigned to the selling unit for the item, if a warehouse-specific price does not exist, and no sale price or contract price is in effect, Price-1 in Items is displayed as the <F2> default.
Select the <F3> key for a lookup that displays invoices from history where the customer paid for this item. To select a price from history, put the focus on the historical invoice and select the OK button. That price is used for this order.
|
Note |
If the unit price is zero, you are asked Is this OK ?. |
Enter any discount percent for this line item only. This discount is in addition to any discount that may be entered on the totals screen for the entire order. The order discount, which is taken for all lines, is calculated after the line discount is taken for each individual line.
Enter a discount percent or press <Enter> for no item discount.
|
Format |
99.999 |
The Gross and To-ship amounts appear. The Gross extended price is calculated using the quantity ordered, the unit price, and the line's discount percent. The To-ship extended price is calculated the same way, but uses the quantity to ship instead of the quantity ordered.
|
Format |
MMDDYY |
Options
Enter the ship date for this line item or use one of the options:
|
<F2> |
To use the ship date entered for the order |
|
<Enter> |
For ASAP |
If the quantity ordered is less than zero (for a credit), or if the order is a credit memo, entry of a ship date is not allowed. (Picking tickets allows you to print picking tickets at any time for items up to a cut-off ship date.)
A unit cost can be entered only when entering a credit memo, a miscellaneous item, a drop shipped item, or when a negative quantity ordered has been entered for an O or I type order. (The unit cost is required in these cases to keep costing analysis accurate.)
|
Format |
9999999.99999 |
Otherwise, Rplc Cost, Std cost, or Avg cost (depending on the valuation method specified in I/C Control information) is automatically displayed instead of Unit cost and changes are not allowed.
Enter the unit cost or press <F2> to use the replacement cost (LIFO method), standard cost (standard method), or average cost (average or FIFO method)
Purchase order automation provides an inventory quantity link between an O/E line and Purchase Order module. It allows distribution companies to hold less on-hand stock reducing the carrying cost of inventory.
|
Note |
If the Purchase Order module is not installed or not being used, you can ignore Purchase Order Automation as well as the Vendor, Neg. (negotiated) cost and Est. (estimated) cost fields when entering an O/E line. |
If Purchase Order is installed there are two processes you may use for purchase order automation:
| 1. | Automated Purchase Orders. It automatically creates a purchase order and purchase order line from an O/E line. |
| 2. | Pre-Purchase Orders and Purchasing Advice. With this option you enter an O/E line and go through the P/O Pre-purchase order and purchasing advice functions. |
An advantage to automated purchase orders is the reduction in the number of steps to create a purchase order. To activate this feature and to learn more about it, see the Automate P.O. field in O/E Control information.
Pre-purchase Orders and Purchasing Advice
The advantage to pre-purchase order with purchasing advice is greater control over who creates your purchase orders. If you do not want your O/E personal automatically generating purchase orders and purchase order lines this is the option for you. The item needs to be out of stock when generating a pre-purchase order.
The Vendor, Neg. cost and Est. cost fields are used in the Purchase Order module when running the Purchasing Advice report. Optional purchase comments may also be entered.
When the P/O Purchasing Advice report is run, for each O/E line item, the item-number is used to read the pre-purchase order data in P/O. If a pre-purchase order record is found for that item, the order vendor number field is not blank and either the Neg. cost or Est. cost fields are not zero and the order to which that line item belongs is a valid order, a pre-purchase order record is updated in the following manner:
| • | If the negotiated cost is not zero and not greater than the pre-purchase order cost, the order line Vendor, Neg. cost and Item number are used to rewrite the pre-purchase order record. In this case * NEGOTIATED COST * displays on the P/O Pre-purchase orders > Enter line. |
| • | If the estimated cost is not zero and not greater than the pre purchase order cost, the order line Vendor, Neg. cost and Item number are used to rewrite the pre purchase order record. In this case *ESTIMATED COST * displays on the Pre-purchase orders > Enter line. |
| • | If both fields are entered the lowest cost is used as long as one or both is less than the cost in the pre-purchase order record. |
Pre-purchase orders may be used to auto-create purchase orders in P/O. See the Pre-purchase Processing chapter in the Purchase Order user documentation for more information.
See the Purchase Order Automation section above for an explanation of how this field is used. Enter the vendor number for this line or use the option:
|
<F2> |
To use the vendor entered in Items (Enter) |
|
Format |
6 characters |
Enter the negotiated cost for the item.
See the Purchase Order Automation section above for an explanation of how this field is used.
|
Format |
999999.99999- |
Enter the estimated cost for the item. See the Purchase Order Automation section above for an explanation of how this field is used.
|
Format |
999999.99999- |
Enter the comments for the pre purchase order entry. See the Purchase Order Automation section above for an explanation of this field.
|
Format |
Five lines of 30 characters each |
Select OK to save your comments or Exit to not save them.
You may enter a cost center (or sub account) only under these conditions:
| 1. | Your Company information specifies that cost centers (or sub accounts) are used, and |
| 2. | O/E Control information specifies that multiple cost centers (or sub accounts) are used in O/E, and |
| 3. | Cost centers (or sub accounts) are assigned by line item, as specified in O/E Control information |
Options
Enter a cost center (or sub account) or use one of the options:
|
<F1> |
For the cost center (or sub account) entered on the header screen for this order |
|
<F2> |
For the cost center (or sub account) entered in Items for this item (if cost centers (or sub accounts) are assigned to inventory items per I/C Control information) |
An entry is allowed in this field only when entering a credit memo or when a negative quantity ordered has been entered for an O or I type order.
|
Format |
99999999.99999 |
The quantity returned to inventory cannot be greater than the quantity ordered. For example, if the quantity ordered is -5, the quantity entered here must be positive and not greater than 5.
If this is not a credit memo or an O or I type order with a negative quantity ordered, Not applicable appears.
If the quantity returned to inventory is less than the quantity ordered, an additional field appears:
Enter the scrap account number (the G/L account to which the quantity not returned to inventory will be debited). The scrap account entered in O/E Control information is the default.
Running Totals
Running totals appear at the bottom of the screen, showing the number of lines on the order and the quantity of all items ordered.
After you enter all fields for this line item, the customer's credit is checked to see if the purchase of this item at its extended price puts the customer over his credit limit. If it does, you are informed of that fact and the date and amount of his last payment are shown. When the customer has a credit on account this amount is added to the credit limit.
Options
You are given these options:
|
Cancel order |
Cancel the entire order and remove it. The first screen of Orders appears to enter a new order. You may be restricted from canceling an order. You may not be able top cancel the order at all or you may be asked to enter a User ID and password in order to cancel the order. |
|
Cancel line |
Cancel this line item. A new line item can then be entered. The credit check is performed on each later line item entered. |
|
Change ship date/continue |
Accept the line item. You are asked to enter a new shipping date for this line, in the event you wish to delay shipment until an expected payment is received from the customer. Further credit checking is suspended for the rest of this order. |
|
Ignore |
Accept the line item. Credit checking is suspended for the rest of this order. |
|
Example |
Enter another line item as shown in the following screen: |
|
Example |
After you enter the quantity ordered, the message Full quantity not available appears because there is insufficient stock on hand. You have four options. Select option 1 (Proceed with line). |
Further options display for this item. Because there is a partial quantity on hand for this item, select option 1 (Backorder balance).
The next few pages explain entry of serial numbers for serialized line items and entry of lot numbers for lot-controlled line items.
While the example order does not include either of these type of items, you should review this information so that you are ready to enter serial numbers and lot numbers in the example for an I type order.
If you enter an item number that has a tracking method in Items of serialized, a window appears for you to enter a serial number for each serialized item being shipped (or returned to inventory).
A serial number must be specified for each item to be shipped or returned to inventory. For Order types, the serial numbers must be entered prior to completing selection of the shipped quantity for billing. For invoice types, credit memos, and RMAs, the serial numbers must be specified when the document is initially entered.
For order and invoice type orders, each serial number entered must be unsold and available (not committed or on loan) if the item is shipped from your warehouse.
If a serialized item is drop shipped, enter a serial number that is not already in the Serial data.
After you click on Save or select <Ctrl+s> for a serialized item, the following screen displays:
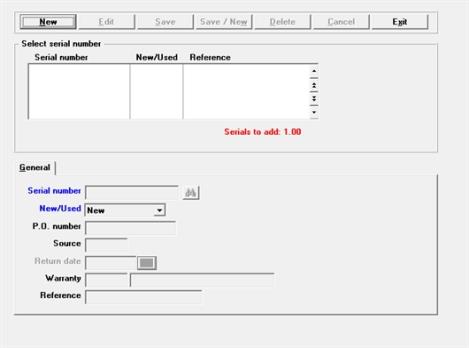
The number of serial entries that must be added displays below the list box.
Click on the New button or select <Alt+n> to add a serial number record.
If you are editing an existing entry, then locate the serial number in the list box using the arrow keys, <PgUp>/<PgDn> and <Home>/<End> keys. With the line highlighted, click on the Edit button or select <Alt+e> and make your changes.
Click on the Delete button or select <Ctrl+d> to remove an existing serial number record.
When finished adding or editing a record see Finished with Entry.
Character Mode
The serial number entry window looks like this:
![]()
Enter serial number information for each serialized item to be shipped, as follows:
|
Format |
15 characters |
Enter the serial number of the item.
Options
For Order and Invoice type orders, you may also use one of the options:
|
<F2> |
To default to the oldest available serial number at the specified warehouse. |
|
<F1> |
In character mode only, for the next serial number. |
|
<F5> |
In character mode, to search all serial numbers. |
|
<F8> |
In graphical mode, to search all serial numbers. |
|
<F6> |
To assign serial numbers in serial number order based on what is available in inventory. When you are selling multiple quantities of a serialized item this feature will automatically find serial numbers and enter them, reducing data entry.
This option only displays when selling at least two serialized items, this is the second or more serial number to be entered and you have defined in O/E Control information Serial # automatic assignment (field 43 in character) to automatically assign sequential serial numbers. This function provides the entry of a search value that indicates how many numbers will be skipped when searching for the next serial number.
When the next serial number is equal to or less than the allowable search span then it will automatically enter the serial number. |
|
<Exit> |
To exit serial number entry for the line item. |
Graphical Mode
Enter the warranty or accept the default.
Enter any reference text you wish for this lot number.
|
Format |
20 characters |
In graphical Mode, once you have finished entering the lot information, you have the following button options:
|
Save |
Alt+s |
To save the record |
|
Save/New |
Alt+w |
To save your record and start entering another one |
|
Cancel |
Alt+c |
To cancel the entry |
|
Exit |
Alt+x |
To exit the screen after saving the record or to cancel the entry and exit the screen |
Finished with Entry - Character Mode
If you press <Esc> to exit serial number entry for the line item prior to specifying a serial number for each item to be shipped, a message displays to inform you that all serial numbers have not been entered.
Options
You are then given these options:
|
Continue |
Resume serial number entry for this line item. |
|
Exit |
Terminate entry without specifying a serial number for each serialized item. This option is not available for always serialized items when entering a type I order, credit memo, or RMA. |
|
Cancel |
Cancel entry of this line item. The line item is deleted from the order. |
If you enter an item that has a tracking method in Items of lot-detail, a window appears for you to enter lot numbers for the quantity being shipped (or returned to inventory).
Graphical Mode
After entering a lot item and clicking on the Save button or selecting <Alt+s>, a screen similar to the following displays:
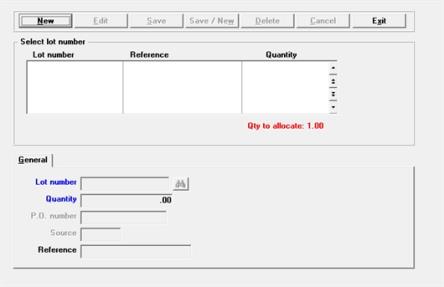
Click on the New button or select <Alt+n> to add an lot record.
Click on the Delete button or select <Alt+d> to remove an existing lot entry.
If you are editing an existing entry, then locate the lot in the list box using the arrow keys, <PgUp>/<PgDn> and <Home>/<End> keys. With the line highlighted, click on the Edit button or select <Alt+e> and start making your changes.
When finished with the lot entry, see Finished with Entry for more information.
Character Mode
Enter lot number information for the quantity to be shipped, as follows:
The quantity to be shipped or returned to inventory must be entirely allocated to one or more lot numbers. For type O orders, the quantity must be fully allocated prior to completing selection of the shipped quantity for billing. For type I orders, credit memos, and RMAs, the lot allocation must be specified when the document is initially entered.
|
Format |
15 characters |
For a returned lot-controlled item, if the quantity returned to inventory is less than the quantity credited, only one lot number may be specified and the entire quantity is automatically allocated to that lot number.
For a returned or drop shipped lot-controlled item, you may enter a lot number that is not already on file.
Enter the first lot number of the item.
Options
For O and I type orders, use one of the options:
|
<F2> |
To default to the oldest lot number for the item at the specified warehouse |
|
<F1> |
For next lot number |
|
<Esc> |
To exit lot number entry for the line item |
If you press <Esc> to exit lot number entry for the line item prior to fully allocating the quantity to be shipped, a message displays to inform you that lot allocation is incomplete.
Options
You are then given these options:
|
Continue |
Resume lot number entry for this line item. |
|
Exit |
Terminate entry without fully allocating the quantity to be shipped. This option is not available when entering a lot-controlled item on a type I order, credit memo, or RMA. |
|
Cancel |
Cancel entry of this line item. The line item is deleted from the order. |
|
Format |
99999999.99999 |
Enter the quantity of the lot number that has been sold or returned, or press <F2> to default to the remaining quantity to allocate.
The Qty to allocate figure is updated after entry of each lot quantity.
Enter any reference text you wish for this lot number.
|
Format |
20 characters |
Options
You may also use one of the options:
|
<F1> |
To use the existing reference text for the lot number (if lot number is on file). |
|
<F2> |
After the first lot number is entered, to use the reference text entered for the prior lot number |
|
<Enter> |
To skip entry of reference text |
Once you have finished entering the lot information, you have the following button options:
|
Save |
Alt+s |
To save your entry |
|
Save/New |
Alt+w |
To save your entry and start entering another one |
|
Cancel |
Alt+c |
To cancel your entry |
|
Exit |
Alt+x |
To exit the screen after saving the record or to cancel the entry and exit the screen |
Service items must be entered in A/R Goods and services before they can be entered on this screen.
If you selected a Line type of services, then enter the following fields:
Enter the service number.
|
Format |
3 characters |
Enter the service description or select the <Tab> key accept the default.
<Enter> key will move the line down.
|
Format |
4 lines of 25 characters |
|
Format |
99999999.99999- |
Enter the unit price or press <F2> to default to the unit price assigned in A/R Goods and services.
|
Format |
9999999.99999 |
Enter any discount percent for this line item only. This discount is in addition to any discount that may be entered on the totals screen for the entire order. The order discount, which is taken for all lines, is calculated after the line discount is taken for each individual line.
Enter a discount percent or press <Enter> for no item discount.
|
Format |
99.999 |
The Gross and To-ship amounts appear. The Gross extended price is calculated using the quantity ordered, the unit price, and the line's discount percent. The To-ship extended price is calculated the same way, but uses the quantity to ship instead of the quantity ordered.
|
Format |
MMDDYY |
Options
Enter the ship date for this line item or use one of the options:
|
<F2> |
To use the ship date entered for the order |
|
<Enter> |
For ASAP |
Check each box the boxes as needed to determine what sales taxes will be applied to this service.
|
Format |
Check box where checked is yes and unchecked is no. |
Check the box if this service pays a commission.
|
Format |
Check box where checked is yes and unchecked is no. |
Enter the sales account number or press <F2> to use the default sales account. The default is a combination of the main account enter in the A/R Control information Default sales accounts field and the sub account/cost center from O/E Control information.
Select the Save button to save the service line or Save/New to save the service line and start entering a new line.
The line selection screen is only available in character mode. For selecting a line in graphical mode use the list box at the top of the screen.
When initially entering the line items for a new order, you may use <F5> to display the line selection screen. This screen is also displayed when you answer Y to Do you wish to change the lines ? on the order header screen for a previously entered order.
If you press <F5>, a screen similar to this displays:
Options
You may use one of the following options:
|
<Enter> |
To select the line for editing |
|
PgUp |
For earlier line items |
|
PgDn |
For later line items |
|
Up and down arrow keys |
To highlight a different line item (then press <Enter> to modify the line item) |
|
J |
Jump to a different line item by sequence number, item number, or item description |
|
<F1> |
Insert an item between two other line items |
|
<F5> |
Switch to line item entry screen |
|
<F7> |
Switch between viewing Qty-ordered/ Qty-to-ship information and Extended ordered price/Extended shipped price information |
When the line item entry screen is displayed, press <F5> to switch to the line selection screen. Press <F5> again to return to the line item entry screen.
When you have completed entering or changing line items for the order, press <Esc> at Seq # on the line item entry screen or while the line selection screen is displayed. The totals screen then appears.
After you have completed the screen for order totals, it appears similar to this:
Graphical Mode
All the field names display. In most cases at least some of them will be grayed out and inaccessible for entry due to the type of transaction and control information settings.
Create payment using AR terms ?
You will only see this question if you are using Multi-payment/Credit card processing. Select Yes to use the terms as assigned to the customer in Customers. For more information see PBS Multi-payment/Credit Card Processing.
When finished with your entry, select the Save button to save button to save the order.
Menu
There are several standard menu selections that are available from any graphical window. In addition to these you may also select one of the following:
| • | Edit list to print the orders edit list. |
| • | Options > Order notes to edit or view notes. |
| • | Options > Sales tax distributions to edit sale tax. If your sales tax has only one line of tax, then this will not apply to you. |
| • | Options > Prepayments applied if you are using the prepayment features and pre payments have been applied. |
Character Mode
For a type O order, fields 2 through 6 cannot be entered or changed until the order is selected for billing through Billing. Field numbers 9 through 12 can only be entered using Field number to change ?.
Enter the information as follows:
|
Format |
99.999 |
Options
Enter the discount percentage that applies to the entire order, or use one of the options:
|
<F2> |
To use the customer's trade discount percentage from Customers |
|
<Enter> |
For .00 (no order discount) |
This discount percentage is applied to the total amount of the order after any individual line item discounts are given.
For an order type order, the cursor moves directly to field # 7.
Enter the number of shipping labels to be printed.
|
Format |
99 |
If zero is entered for this field, shipping labels can still be printed using individual shipping label printing, which allows entry of an order number and the number of labels to be printed for the order.
Entry in this field is allowed only for order types O and I. For a type O order, you can access this field only using Field number to change ?.
The order weight is calculated based on the accumulated weights of the items on the order.
The total order weight entered here may be printed on the form including a picking ticket.
|
Format |
9999999.99 |
The actual shipping weight may be different that the calculated order weight.
Enter the shipping weight of the order, or press <Enter> to set the weight at .00. The weight entered here is printed on the picking ticket for the order.
The total ship weight entered here may be printed on the form including a picking ticket.
|
Format |
9999999.99 |
When using multi-payments, this field is labeled Pmts authed (payments authorized). Otherwise it is Cash received.
If multi-payments are used:
| • | Payment entry is only allowed in the PBS Multi-payment/Credit Card Processing window. |
| • | Before the transaction can be saved, the amount in this field must equal the Billed total. |
| • | The billed-total can be split into multiple payment types. |
| • | This field is not editable. It can only be changed by entering an amount in the multi-payment processing window. |
| • | For applying terms you may also use the multi-payment window. |
If multi-payments are not used:
| • | Entry in this field is allowed only for transaction types order, invoice, rental and loan. |
| • | For rental and loan type transactions, this is an memo information field only. In character mode, for a loan or rental type, you can access this field only using Field number to change ?. |
| • | Your answer to Post cash receipts for in O/E Control information determines whether amounts entered on order or invoice transaction types automatically generate Cash receipts transactions and distribution account entries while posting the invoice, or whether they are treated as informational only. If used as an memo information field the payment must be entered manually into A/R, using the Cash receipts selection on the A/R menu. |
Enter the amount of any payment received with the order, or press <Enter> if no cash was received.
|
Format |
999999999.99 |
If you have selected 2 Invoice and prepaid or 3 Invoice order & prepaid to the O/E Control information field Post cash receipts for, and you have entered and posted Non-A/R prepaid cash (N type) that is in open items, then you can apply up to three prepaid cash amounts to an order or invoice.
In order to use PBS Multi-payment/Credit Card processing, you must have a PBS license file (RW.LIC) that includes a subscription to the PBS Multi-payment features. If it is not available on your system, contact your PBS provider for instructions.
If PBS Multi-payment with credit card processing is not configured, see the PBS Multi-payment/Credit Card Setup appendix in the Accounts Receivable user documentation.
PBS Multi-payment/Credit Card Processing allows you to setup and select payment types of cash, check and credit card(s). You may also apply all or some of the total order amount to A/R terms. You may use one or more payment types for each order. Examples:
| • | Part of the order may be paid via check and the remainder can by applied to A/R terms. |
| • | An invoice may be paid with two credit cards. |
In all cases the order total amount must be fully accounted for in order to exit the payment window.
PBS Multi-payment is required on invoice (I type) and credit memo (C type) transactions. The entry of a payment on an order (O type) transaction in Orders (Enter) is optional. It depends on the Allow cash/check on orders setting in A/R Control information. When an order is selected for billing, if the payment was not entered previously, the entry of a payment type is required.
Credit Card Processing
When using a credit card as a payment method, the system interfaces to a credit card processor which is either Payment Innovators using PI Plus software or Open Edge using XCharge software. Payment Innovators is Passport's recommended processor.
The customer's credit card number and expiration information can be entered per order. Optionally, in order to provide greater security and performance, the entry of credit card information can be stored in a virtual vault on the service providers server for reuse. This is linked to PBS with a token that is stored in PBS. Later, when entering a new order with a credit card payment for the same customer, you select the token record which links to the processor server and the payment is made. As the credit card information is stored remotely and accessed when you select the token the payment is made without entering any credit card information. The data is securely kept on the remote server and the process is faster because you do not have to re-enter the credit card information for new orders. The credit card data is encrypted during transfer.
When entering a credit card payment for order type transactions in Orders (Enter), a credit card payment is pre-authorized. Later, when the order is selected for billing, the credit card purchase is fully authorized.
Posting and History
During posting payment information is written to cash history, to payment history and to A/R open items. Cash history includes all payment types, including credit cards. The cash history data is then available for generating a deposit. Following that, the deposit can be transferred to Check Reconciliation. The payment history can be viewed in A/R View - Invoice history.
Payments Window
|
Note |
In order to finish the entry of an invoice and credit memo you must enter at least one payment type or apply the invoice to terms. But, if you are not finished with entering the invoice, you may edit it later and add, delete or change any terms, cash or check payment. Credit card payments can be deleted but not changed. Deleting the credit card payment either voids or refunds the payment depending on the status of the payment with the credit card provider. |
After selecting the Payments button, a screen similar to the following displays:
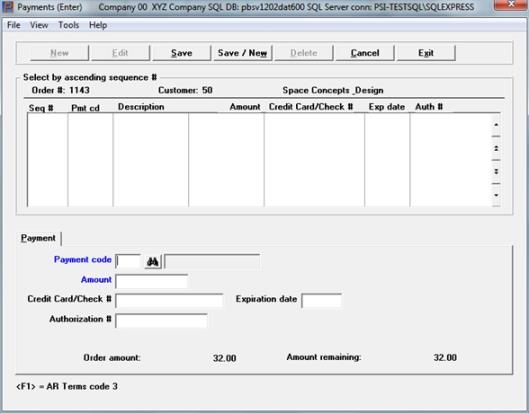
Character Mode
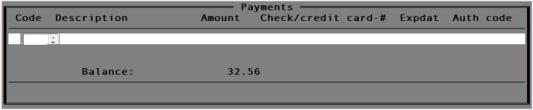
Using graphical mode, there are two display-only fields. They are near the bottom of the screen:
Order amount:
This is the amount that must be fully paid.
Amount remaining:
This is the amount that has not been paid. This number will reduce when payments are entered. The amount remaining must be zero before you can exist the payment window.
Enter these fields:
Enter the payment code. The choices are determined by what you entered in Payment codes found under Setup menu in CTL. For entering these codes see the Payment Codes chapter in the System user documentation.
If you select a payment code that is a credit card type the Credit Card Token Selection Lookup displays where you may enter a new credit card token, select an existing token or enter a credit card without saving a token.
You may also use the option:
|
<F1> |
To apply the whole or remaining amount to the customer's A/R terms. |
Enter an amount or use the <Enter> key for the remaining balance.
After entering the amount, what happens next depends on the payment type used:
| • | If you selected A/R terms or a payment code of cash you are finished and you may save the entry. |
| • | If the payment code is a check type, you must enter the check number next. |
| • | If the payment code is a credit card type, the Approval window displays and X-charge is called to process the payment. At this point you are done with the credit card payment. If there is an error with the credit card an error message will display indicating the problem. |
If there is an amount remaining you must enter another pay code for the remainder.
This field can only be entered if you are paying by check.
If you are paying by credit card, the credit card token entry/selection window opens first. After that, this field is filled in automatically.
Expiration date
This field is display only. If you are paying by credit card, the credit card token entry/selection window opens. After that this field is filled in automatically.
This field can only be entered if you are paying by check and you are required to enter an authorization number based on the payment code setup.
If you are paying by credit card, the credit card token entry/selection window opens. After that this field is automatically filled in.
After you have finished entering the payments you may exit and then save the order, invoice or credit memo. When you exit the payments window, the Cash received amount becomes a total of the cash, check and credit card payments made.
If the payment amounts do not match the total invoice amount then a message indicates that "Balance amount remains - cannot exit!". You must enter another payment or put the remaining amount to terms.
Credit Card Token Selection Lookup
From this window you may:
| • | Skip entering a token to enter a one time use credit card. See No Token - Credit Card Entry Only |
| • | Initiate the process of entering and using a new credit card token. |
| • | Select an existing token to use for the payment. |
This is an example of the token credit card entry window where no tokens have been entered for the customer:
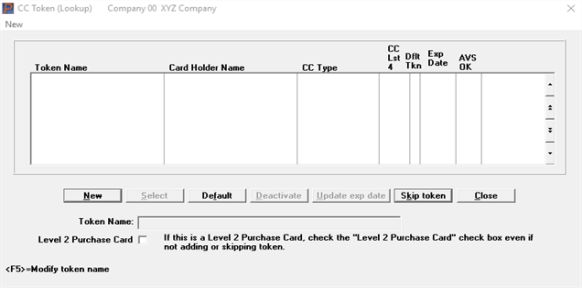
Select this button or hit Alt+n to display the token entry window where you enter the information for a new credit card. See Credit Card Token Entry.
If a token exists and it is the one you want to use, click on the Select button or Alt+s. After selecting an existing token you are returned to the Amount field.
Sets the currently selected token as the default. When entering a payment for the customer's O/E order or invoice, you will be prompted to make the payment with the default token.
If the card is no longer being used for purchases, select this button.
If the expiration date requires updating select this button.
If the credit card information does not have to be stored as a token for later use, select this button. If this field is checked, the
When a credit card transaction takes place, along with the usual credit card information, the invoice P.O. number, destination zip code, and tax amount are also included.
This field is not saved. Every time an eligible Level 2 Purchase is made with a card, this field must be checked manually.
Along with additional security, interchange fees are usually lower with a corporate card. For additional explanation in the A/R documentation, see Level 2 Credit Cards Supported in the Multi-payment Setup appendix.
To return to the payment window and enter a different payment type.
PI Plus
With PI Plus processing enter the credit card token name and card holder name:

Enter the token name and card holder name. Click OK to continue. This window displays:
Enter the card number, the expiration date and select Process. The data is encrypted during transfer. The system creates a new token record locally linking to the credit card information on the service provider's system. An Approved message displays. Select Finish.You will be back to the Payments screen. Select the Enter key on the amount field and the credit card is automatically processed. Exit the payment window, you are returned to the O/E miscellaneous screen where you select the Save button to complete the order.
As the token links to the customer's credit card information, it can be used for the customer's future orders with credit card payments.
XCharge Token Entry
After you select the Skip Token button on the Credit Card Token Selection Lookup, the following screen displays:

After entering the information and selecting (F12) Process, the verification screen displays. Select Yes if the credit card information is okay. The credit card is processed. After that you are taken to the Pmts authed field.
No Token - Credit Card Entry Only
Selecting to skip the token will bring the focus to amount field on the Payments window.
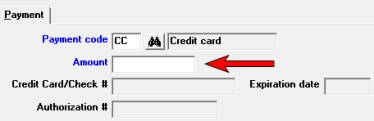
Enter an amount or select the Enter key to pay the entire Billed total.
PI Plus Payment
The PI Plus purchase Window displays:
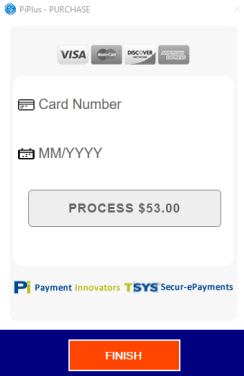
Enter or scan the credit card number and expiration. Select the Process button to pay the invoice. If the payment is accepted, select the Finish button. The payment screen is filled in automatically. Exit the payment screen that then save the order/invoice. You are finished with that order/invoice.
If the payment is not authorized, verify the card information.
XCharge Payment
Enter the credit card and other information.
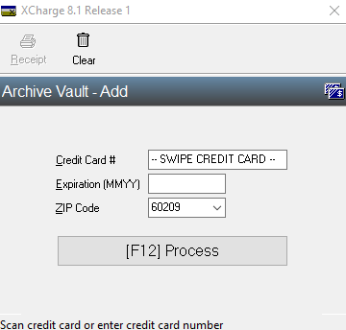
Select the F12 to process the payment.
After that you are taken to the Pmts authed field.
Credit Card Payments and an Order Total Change
The order billed total can change if you entered new lines or modified existing lines, modified the shipping charges or miscellaneous charges and so forth. If you have a credit card payment, you have these choices for handling the change in payment amount when there is a change in the billed total:
| • | If the amount remaining is a positive number, enter a new credit card payment, apply some other payment type or select <F1> for A/R terms. |
| • | The amount remaining can be a negative or positive number. |
Whether the amount remaining is a negative or positive number, you may delete the original credit card payment. Depending on the status of the credit card payment, deleting it either voids or refunds the payment with X-charge. Then you may enter a new credit card payment, use any of the other payment options or put the remainder on A/R terms.
The Process prepaid cash field in A/R Control information must be turned on for this feature to be available. Also, the Post cash receipts for field in O/E Control information must be set to allow the application of prepayments.
Prepayments are entered in A/R Cash receipts and are posted to A/R open items.
For an Invoice with an Existing Prepayment
You may apply prepayments to orders (O type) or invoices (I type). You may choose to edit the lines on an existing invoice. As a result, if an I type invoice Billed total is less than the prepayment amount, you must alter the prepayment amount to be the same or less than the Billed total.
Entering a New Prepayment
When there is a prepayment in A/R Open items for the customer, the following question displays:
Prepaid balance: 999.99
Apply prepaid cash?
The prepaid balance amount displays just above this question.
If you select No, the cursor goes back to the Cash received field. Select Yes and the Select Prepaid Document window displays which is similar to the following:
Graphical Mode
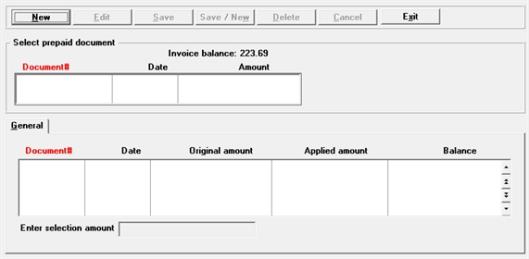
Select the New button to start the prepaid amount application or select Exit to return to the Cash received field.
To edit an existing prepaid application, select the Edit button.
Select the Delete button to remove an existing prepaid application. After deleting a prepaid application, it will remain in open items and will be available for applying to another order or invoice later.
To save the prepayment selection, select the Save button. To save the prepayment selection and enter a new one, select the Save/New button.
To cancel entry, select the Cancel button.
The prepaid amounts from A/R Open items display in the lower list box. After selecting a prepaid amount and saving it, the document number, date and amount display in the upper list box. Up to three prepayments may be applied to one order or invoice.
The amount in this field either defaults to the invoice total, or if less, the maximum prepaid amount available. After you have applied a prepayment, the amount defaults to the amount remaining to be paid.
Character Mode

Enter an amount or accept the default amount. The default is the prepaid cash amount remaining for the first available prepaid amount.
Enter selection amount: 250.50
After entering an amount and selecting the Enter key, the following question will display:
Find another prepaid item?
If you have more than one prepayment amount in Open items, you may select another to pay the order or invoice.
If you select Y, then the program looks for another prepaid amount in Open items for the customer. You may continue this process until you find the correct prepaid cash receipt.
If you select N, then the program will not look for another prepayment.
Once you have selected three documents the message "A maximum of 3 payments have been selected" displays.
When you are finished or when there are no more prepaid amounts to choose from, the following message displays:
Selections completed - do you wish to reselect ?
You may select Y to reselect or N to complete the selection process.
Once you are finished with the selection process, the Check # and Bank route # fields are skipped.
* * PREPAID * *
Prepaid cash has been applied
Do you want to reselect prepaid amounts ?
If you select the Cash received field from Field Number to Change ?, the above question displays. Select Y to re-enter prepaid amounts or N to enter a manual amount.
If the amount of cash received is not zero, enter the check number or press <Enter> if currency was received instead of a check.
If no cash was received, this field is automatically skipped.
|
Format |
99999 |
If you applied a prepayment amount to the order or invoice the order number will be written to this field. This field is skipped and will contain the order number if you entered a prepayment in the Cash received field.
This field displays cannot be entered for Credit memos, RMAs and quotes.
If the payment received is zero, or if you received payment in cash, this field is skipped and is left blank.
Otherwise, enter the routing number that is on the check. This is usually in the lower left-hand portion of the check and looks something like 99-999/999. This field is informational only and may be left blank.
|
Format |
15 characters |
|
Example |
Press <Enter> to leave this blank. |
If you applied a prepayment amount to an order or invoice, the word
* * PREPAID * *
displays in this field. See the Cash received field for an explanation of prepayments.
If you entered cash received on this screen, enter the cash account number to which the cash received is to be distributed.
Options
You may also use one of the options:
|
<F1> |
To use the default cash account entered in O/E Control information |
|
<F2> |
To scan through the cash accounts |
If no cash was received, this field is automatically skipped.
Enter any comments you want to appear on the invoice. If you leave this field blank, default comments you enter in the Invoices (Print) selection will be printed on the invoice for this order.
|
Format |
5 lines of 30 characters each |
For an order type the only fields that may be changed are 1, 7, and 9 through 14. If a cash received amount is entered in field # 10, you must enter fields 11 through 13.
You can enter an unlimited number of notes about this order by pressing <F6> or selecting Item notes from the Options menu.
Order notes are not retained in invoice history following the posting of invoices.
Each note is given a date/time stamp so that you can browse through the notes in time sequence later. (These notes are never printed on orders, so the customer will never see them.)
Graphical Mode
The notes screen looks something like this:
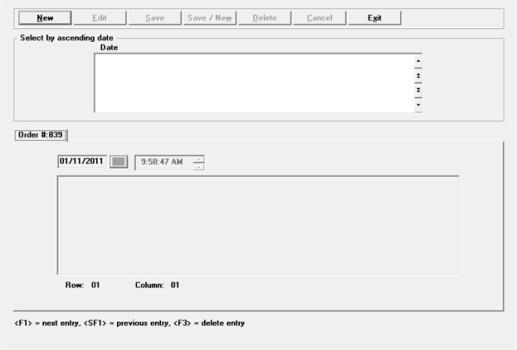
Existing notes display in the list box. With the list box highlighted, you may use the up/down arrow keys, Page Up/Page Down and Home/End keys to locate an existing note.
To edit an existing note click on the Edit button or select <Alt+e>. To delete an existing note click on the Delete button or select <Alt+d>.
Use these fields to enter the date and/or time of a note.
The date and time are defaulted to now, however you may change them.
After you select the New button <Alt+n>, the cursor is positioned for you to enter the first line of the text of the note.
|
Format |
10 lines of 77 characters each |
When you are finished, select the Save <Alt+s> button to save your changes or select the Cancel button to not save them. You may also select the Save/New button or enter <Alt+w> to save it and begin entering a new note.
To exit the screen click on the Exit button or select <Alt+x>.
Character Mode
To browse through existing notes, use the keys as shown at the bottom of the screen (<PgUp>,<PgDn>, <Home>, <End>, and <F1>).
This selection uses the text editing functions. You enter text in much the same way as most word processing programs, using <Enter>, arrow keys, <Delete>, or <Esc> when done, etc. When you are finished entering text, press <Esc> and follow the screen instructions.
When you select File options, you have these choices:
|
File |
Save what was just entered or changed, and clear the screen for entry of the next note. (Like pressing <Enter> at Field number to change ? in other selections.) |
|
Save & continue |
Save what has been entered or changed, but leave the information on the screen for further work. |
|
Abandon changes |
Do not save what has been entered or changed and clear the screen for entry of a new note. (Like pressing <Esc> at Field number to change ? in other selections.) |
|
Delete |
Delete this entire note from the file and clear the screen for entry of the next note. (Like Delete in other selections.) The software will ask you to confirm the deletion with an OK to delete ? message. |
If you wish to use the more powerful character mode text editing commands that are included in this editor, see the Text Editing appendix of the PBS System documentation.
When you are through using notes, press <Esc>.
A type I order is used to prepare invoices directly. This is the one-step billing procedure. Information is entered on a type I order in the same way as for a type O order. In addition, information can be entered for miscellaneous charges, freight, sales tax, commission amount, and COD labels.
As you enter a one-step order, the screens appear similar to the following four examples:
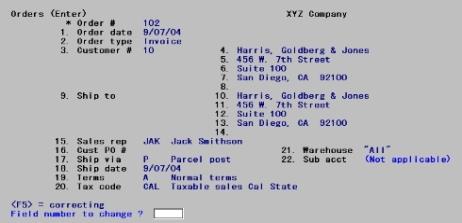
On the following screen, after entering information into field # 3, answer 1 (Proceed with line), then 3 (Override) to the messages that display.
When the serial number entry window appears, press <F2> to assign the oldest serial number.
Use the <F5> option to search and assign serial numbers for the remaining items. When completed, press <Esc> to return to the Seq # field. Press <Esc> again to display the Totals screen.
Enter the amount of any miscellaneous charges for the order.
|
Format |
99999999.99- |
If A/R Control information specifies that miscellaneous charges are to be distributed, you are asked to enter the miscellaneous charges account number. Otherwise, the miscellaneous charges are automatically distributed to the default miscellaneous charges account specified in A/R Control information.
Enter the account number or press <F2> to use the miscellaneous charges account entered in A/R Control information.
This field will not display if the A/R Control information indicates that the miscellaneous charges are not taxable.
Check this box to apply sales tax the Miscellaneous charges and leave it unchecked to not apply sales tax.
Enter the freight charges for this order.
|
Format |
9999999.99- |
If A/R Control information specifies that freight charges are to be distributed, you are asked to enter the freight account number.
Enter the account number or press <F2> to use the default freight account specified in A/R Control information.
The sales tax amount is automatically calculated and displayed, using the tax code entered on the first screen of order information, the taxable items on the order, the freight charges (if you checked the box to Sales tax calculated on (Freight) in the A/R Control information), and the taxable status of miscellaneous charges also in A/R Control information.
|
Format |
99999999.99- |
If you elected to calculate tax by line, as determined by the tax code setup, it may have an effect on the tax amounts. For an example of this type of taxation see the Sample tax calculation section of the Tax codes chapter in the Accounts Receivable documentation.
If you select to change this field, then change your mind, you can press <F1> to return to the amount that was automatically calculated.
If you enter an amount different than the calculated sales tax, a window displays for you to distribute the sales tax if:
| • | You enter a sales tax amount that is different from the displayed calculated tax |
| • | The amount entered is not 0 |
| • | The tax code that applies to this sale specifies distribution to more than one account. |
If $10.00 had been entered for the sales tax, the window would look like this:
Graphical Mode
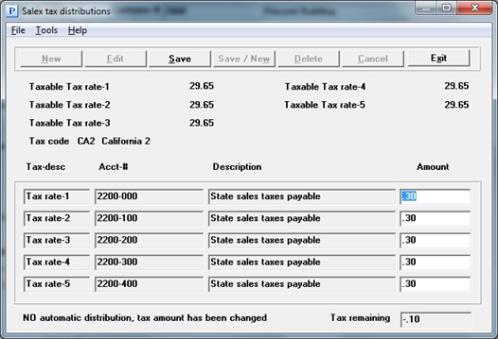
Character Mode
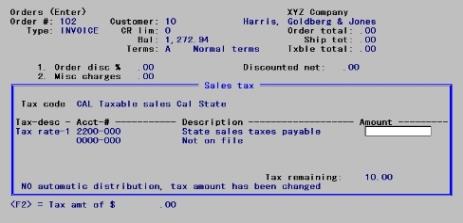
Enter the distributions as follows:
Amount
Enter the amount to be distributed to the account or press <F2> for the first tax amount, to distribute the tax according to the various percentages in the tax code for this customer.
|
Format |
999999999.99 |
This option is only available if each tax to be distributed is based on a single percentage on an amount over $0.00.
For the second (or third) tax amount, to distribute the entire amount remaining.
Before exiting from this window, the entire sales tax amount must be distributed.
If O/E Control information specifies that commissions are not used, this field cannot be entered.
|
Format |
99999999.99 |
The commission amount is automatically calculated and displayed, based on the commission codes for the inventory items on the order, if you specified in O/E Control information that commissions are to be used. If an item has no commission code, then the commission percentage associated with either the sales rep or customer is used to calculate the commission on the item, as per the setting in A/R Control information.
If you assign a commission code to an item with ascending prices, the commission for that item is calculated using either the commission rate associated with Price-1 (if the item sales price is price-1 or greater), or the commission rate associated with an override (if the item sales price is below price-1).
If you change this field and later change your mind, you can press <F2> to return to the amount that was automatically calculated.
If the commission code for one or more of the inventory items specifies a commission based on margin (gross profit), or one or more inventory items have no commission code and the commission percentage associated with the sales rep or customer (as per the A/R Control information setting described above) is on margin, and standard costing is not used by I/C, the message Comm calculated during posting is displayed. You can override this by changing the commission amount using Field number to change?.
If the O/E Control information specifies that commissions are not used, this field cannot be entered.
The commission percent displays as .00. You may enter an actual commission percent. The commission amount is then automatically calculated based on the discounted net.
The defaults for the commission percent and method (on price or on margin) come from one of two sources:
| • | Customers, if you specified in A/R that commissions are calculated based on customers. |
| • | Sales Reps, if you specified in A/R that commissions are calculated based on sales reps. |
If the message Comm calculated during posting is initially displayed, you may still enter a commission percentage. In this case, the percentage you enter is used to determine the commission on the order, rather than the commissions associated with the individual line items.
If you specify that the commission percentage is to be based on margin, then the commission amount will be calculated during posting using the percentage that you enter here.
|
Format |
99.99 |
|
Note |
The commission percentage and method used to calculate the commission for items that do not have commission codes are based upon what is in the Customer record or Sales Rep record at the time the line item is entered in O/E. Later changes to the Customer record or Sales Rep record, or changing the sales rep for the order, do not affect the commission amounts for these line items. |
Enter the number of COD labels to be printed.
|
Format |
99 |
Note that the terms are displayed on the totals screen so that you can determine whether COD is relevant to the entire order, or just the freight amount, etc.
If this field is left at zero, COD labels can still be printed using individual COD label printing, which allows entry of an order number and the number of labels to be printed for the order.
If you specify that one or more COD labels are to be printed, an additional field appears:
Check this box if only cash is acceptable for the COD (that is, checks are not accepted).
Cash received
Enter the amount of any payment received with the invoice.
|
Format |
999999999.99 |
Press <Enter> if no cash was received. If you press <Enter> or enter zero, the Check # and Cash account fields are skipped.
The cash received can be automatically posted to Cash Receipts in A/R when you post invoices (if you answered 1 Invoice only, 2 Invoice & prepaid, 3 Invoice, order & prepaid, 4 Invoice & order or 5 Order only to Post cash receipts for in the O/E Control information). For more information on these options, see the Post cash receipts for field. Otherwise, no cash receipts are generated and posted in A/R.
PBS Multi-payment
See the PBS Multi-payment/Credit Card Processing section for more information.
If there is a prepayment in Open items for the customer then the following question will display:
Apply prepaid cash?
The prepaid balance will display just above this question.
If you select N, then the cursor will go back to the Cash received field. If you select Y, then the Select Prepaid Document window will display and will be similar to the following:

Enter an amount or accept the default amount. The default is the prepaid cash amount remaining for the first prepaid amount on file.
Enter selection amount: 250.50
After entering an amount and selecting the Enter key and the following question will display:
Find another prepaid item?
If you have more than one prepayment amount in Open items, you may select another to pay the order or invoice.
If you select Y, then the program will look for another prepaid amount in Open items for the customer. You may continue this process until you find the correct prepaid cash receipt.
If you select N, then the program will not look for another prepayment.
Once you have selected three documents the message "A maximum of 3 payments have been selected" displays.
When you are finished or when there are no more prepaid amounts to choose from the following message displays:
Selections completed - do you wish to reselect ?
You may select Y to reselect or N to complete the selection process.
Once you are finished with the selection process the Check # and Bank route # fields will be skipped.
* * PREPAID * *
Prepaid cash has been applied
Do you want to reselect prepaid amounts ?
If you select the Cash received field from Field Number to Change ? then this above will display. Select Y to re-enter prepaid amounts or N to enter a manual amount.
When you have completed entering information on this screen, the customer's credit is again checked to see if the additional charges have put him over his credit limit (unless you chose to ignore an over credit-limit warning while entering earlier parts of this order).
If the customer is over the credit limit, you are informed of this and shown the amount and date of his last payment. You are then given these options: Cancel order, Cancel line, Change date/Continue or Ignore. The Change date/Continue option may be useful if you are expecting a payment.
In order to print an invoice immediately you must enter the default invoice form type in the Control information Default invoice form ID field.
Graphical Mode
If you are using immediate invoice printing, the following window displays:
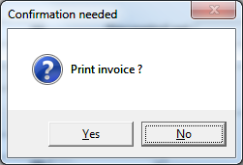
|
Yes |
For printing the invoice immediately |
|
No |
To not print the invoice now. No is the default |
If you get an index of out bounds error message this means that the printer is not set up properly in O/E Control information.
Character Mode
You will have the following option in Character mode:
|
I |
For printing the invoice immediately |
|
Enter |
To not print the invoice now |
If you are using a PDF printer the PDF invoice displays.
PDF Forms Designer Forms
The PDF Forms Designer technology works with three printer types:
| • | -PDF-: If set as a -PDF- printer only the form displays. |
| • | -PDFP-: If set for as a -PDFP- the program asks for the number of copies, the form displays and prints. |
| • | Windows printer: If Windows printer the program asks for the number of copies, prints and displays the PDF invoice. |
Page labels and collating cannot be used with PDF Forms Designer forms.
Classic Forms
When you select to print multiple copies to a Windows or Company information printer (except with -PDFP-) and there are more line items than will fit on one page, the program collates the printed pages. For each copy page two follows page one, page three follows page two and so on.
If the starting invoice number has already been used in invoice history or in another I type order that has not been posted, the program looks for the next available invoice number and uses that.
When needed you may reprint an invoice (I type) that was immediately printed using Invoices (Print invoices). The invoice number is stored on file and will be used again when reprinting.
E-mailing can be done after the O/E invoice immediate printing.
If you are e-mailing an invoice you must have:
| • | The OK to e-mail invoices field checked in O/E Control information. |
| • | Setup e-mailing per the E-mailing Requirements and Setup section in Control information chapter. |
After immediately printing a PDF invoice, the following screen displays to e-mail that invoice:
![]()
Character mode

E-mail invoices(s) now or Stack invoice(s) to e-mail later
Select the radio button that applies. In character mode enter Y to the question that applies.
If you select to e-mail the invoice now you must be prepared to enter your e-mail password.
You may also stack the invoice. Stacking the invoice to e-mail later is done on the E-mail/view printed PDFs selection found under the CTL PDF form file options selection.
Ok or Cancel
Selecting OK, depending on the radio button that is checked, will either e-mail the invoice now or stack the invoice for e-mailing later. Selecting Cancel will do neither.
After selecting OK to e-mailing now, the program displays a window for entering your e-mail password. You must enter the password that matches the e-mail address of the user ID when you logged onto PBS.
If the password you enter is not correct, the program will let you know and ask if you want to retry. Enter Y to retry or N to not retry. The PDF invoice files are created regardless. They can be emailed later.
If you selected to stack the invoice for e-mailing later, you must e-mail it from the E-mail/view printed PDFs selection found under the CTL PDF form file options selection.
A credit memo is used to credit a customer's account for all or part of the charges that appeared on a previous invoice. Most of the information you enter for a credit memo is the same as that for an invoice. The differences are shown on the sample screens below.
|
Note |
Enter positive quantities on a credit memo, even though credit is being issued to the customer. The function properly interprets positive quantities as credits. |
Credit Memo Header
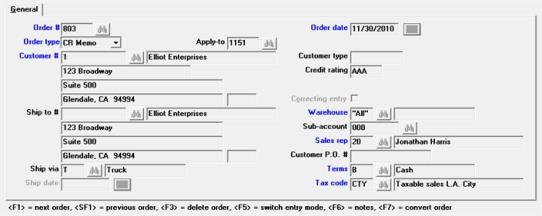
Credit Memo Lines
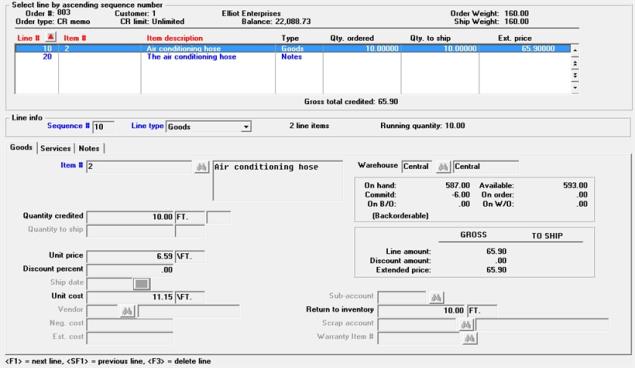
|
Note |
When crediting items previously purchased you may enter a negative quantity on an order or invoice. However this quantity cannot be applied to a previously posted invoice. In this case, when using PBS multi-payment with credit cards, the order or invoice total must be a positive number. |
Credit Memo Totals
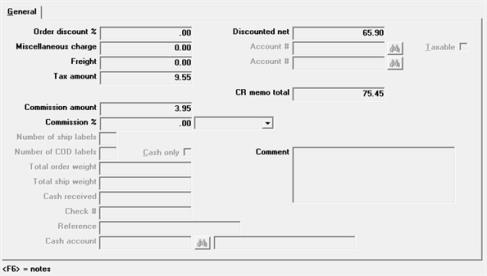
PBS Multi-payment
See the PBS Multi-payment/Credit Card Processing section for information.
The Orders menu selection also allows the entry of Quotes, Loans, Rentals and Return Merchandise Authorizations (RMA) transaction entry modes.
Graphical Mode
In order to access these modes, you may select <F5> or select Switch entry mode from the Options menu to access them from the window:
Use the right/left arrow keys or the mouse to select the mode and then click on OK. Select Exit to retain the mode you are in.
Character Mode
In order to access these modes, you must select <F7> to access them from the following menu:
![]()
Use the Up/Down arrow keys to highlight one and the <Enter> key to select it. Use the <Esc> key to retain the mode you are in.
To switch back select <F7> again and select Orders.
Quotes can be entered initially as quotes, or existing orders can be converted to quotes. Quote forms print using the quote form type. See the Forms chapter.
Here are the graphical and character examples:
Graphical Mode
To enter a new Quote, select <F5> to display a window for selecting one of the additional entry modes. Select Quote and the letters Q U O T E display in red at the top of the tab:

Character Mode
To enter a new quote, press <F7> at the Order # field and select the Quotes entry mode. The field Order # changes to Quote #, and the word "Q U O T E" displays at the top of the screen and is also shown as the order type. This is an example:

Options
While at Quote #, you may enter the quote number or use one of the character mode options:
|
<F1> |
To display the next quote |
|
<SF1> |
To display previous quote |
|
<F2> |
To use the next available quote number or order number, as specified in O/E Control information |
|
<F7> |
To switch to a different entry mode |
Unposted Balance and Committing Quantities
Quotes are entered and edited in the same way as type Orders. However, item quantities are not committed for quotes, and entry of serial numbers and lot numbers is not allowed until the quote has been converted to an order. In addition, the customer's Unposted balance is not updated until the quote is converted to an order.
Conversion to Order or Invoice
To convert a previously entered quote to an order, search for it in the quotes list box or enter the quote number at the Quote # field. When the header screen for the quote is displayed, press <F7>.
You are then asked if you wish to convert the quote to an order (type O) or an invoice (type I). Answer O if you wish to select specific line items for billing or if any serialized or lot-controlled items exist on the quote. Answer I if there are no serialized or lot-controlled items on the quote, and you wish to invoice all of the items. If notes are entered for the quote they are also converted.
When using PBS Multi-payment/credit card processing, you may only convert a quote to an order. Invoices require a payment which are not entered on a quote. Payments are not required for an order.
Convert Order to a Quote
To convert an existing order to a quote, display the order and press <F7>. If serial numbers or lot numbers have been entered on the order, you are warned that they will be removed if the order is converted. You are then asked OK to convert to Quote ?. Answer Yes to convert the order to a quote, or answer No to cancel the conversion.
Printing and E-mailing a Quote
You can print a quote if you set the form type in Control information in one of the user form fields. See : User form (1 through 4) - description . Enter the form type and enter a printer of either -PDF-, -PDFP- or Windows printer.
The e-mailing setup is the same as other O/E forms. See E-mailing Requirements and Setup. The process is similar to e-mailing invoices. See Billing and Invoicing.
Loans are entered similarly to Orders. Loan forms print using the loan form type. See the Forms chapter.
Printing and E-mailing a Loan
You can print a loan if you set the form type in Control information in one of the user form fields. See : User form (1 through 4) - description . Enter the form type and enter a printer of either -PDF-, -PDFP- or Windows printer.
The e-mailing setup is the same as other O/E forms. See E-mailing Requirements and Setup. The process is similar to e-mailing invoices. See Billing and Invoicing.
Graphical Mode
To enter a new Loan, select <F5> to display a window for selecting one of the additional entry modes. Select Loan and for all entered loans the letters L O A N display in red at the top of the tab:

Character Mode
To enter a new Loan, press <F7> at the Order # field and select the Loan entry mode. The field Order # changes to Loan #. The Order type changes to Loan, and the letters L O A N displays at the top of the screen.

Loans
Loans remain until deleted, and are never posted. Inventory Control quantities and Accounts Receivable amounts are not affected by Loans. When you want to remove a Loan entry, delete it by using <F3> or selecting the Delete button. Note that you may be restricted from deleting loans or any other order type.
Conversion to Order or Invoice
You can convert a loan to an Order or Invoice as needed. During the conversion it changes the loan number to an order number and the loan is no longer available.
Rentals are entered similarly to Orders, however a rental has an additional screen for entering frequency information. Rental invoices print using the rental form type. A rental may be converted to an order.
See the Forms chapter for information on creating a rental type form.
Graphical Mode
To enter a new Rental, select <F5> to display a window for selecting one of the additional entry modes. Select Rental and the letters R E N T A L display in red at the top of the tab:

Character Mode
To enter a new Rental, press <F7> at the Order # field, and select the Rental entry mode. The field Order # changes to Rental #. The word “R E N T A L” displays at the top of the screen.

Rental entries, like Orders, consist of header, line item, and total screens. An additional screen for entry of frequency information is required.
Graphical Mode
The frequency screen looks similar to this:
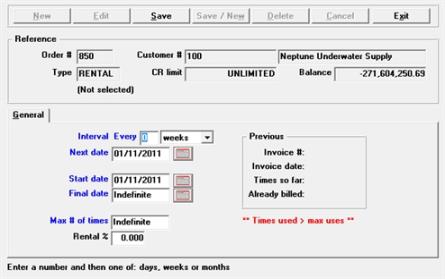
Character Mode
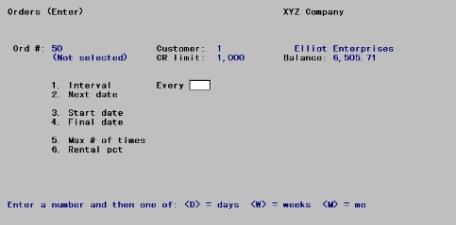
The frequency information is similar to Recurring Orders, except that the Rental % field prompts for the depreciation percentage.
Specify how frequently the rental is charged to the customer. Enter a number, then enter the one of the following time period codes:
| Character | Graphical |
|---|---|
|
D |
days |
|
W |
weeks |
|
M |
months |
The first number specifies the quantity of that time period. For instance, 3 weeks is billed every three weeks.
You may not leave this field blank, but this does not mean that you cannot use recurring bills for services or goods invoiced at irregular intervals (e.g., snowplowing). Simply specify an interval long enough that the bill will never be selected by date, and a group code distinctive enough that you can select only your irregular bills when you want to.
Enter the next date the rental is due.
Provided that other selection criteria (such as group code) are met, automatic selection will select this entry whenever the specified next date falls due — unless that is earlier than the specified start date or later than the specified final date. It will also calculate a new next date to be ready for the next cycle.
The next date is automatically advanced by the time interval specified each time an invoice is created from this rental (by running Select rentals on the Billing menu). Thus if your billing cycle is a few days late or early, this does not upset the schedule for the next cycle.
When calculating the next date by day or by week, the interval specified is projected forwards without regard to day of month. When calculating the next date by month, this month’s calendar date is projected forwards into the next month, except for necessary adjustments due to variations in the length of months.
If you are billing on schedule, the calculated next date will normally be a future date. However, if you skip a billing cycle the system may calculate a next date which is actually in the past. It does not add the interval twice so as to force the next date into the future. This means that if you skip one cycle and compensate by billing double on the next, the rental will be out of sync by one cycle until you adjust it manually.
Options
Enter the date on which you want to start charging this rental to the customer, or use the option:
|
<F2> |
For the system date |
Enter the date after which you want to stop charging this rental to the customer, or use the option:
|
<F2> |
For Indefinite |
After this date, this entry will not automatically be selected for use when you select by date; however, it still remains until you explicitly delete it.
Options
Enter the number of times you want to charge this rental to the customer, or use the option:
|
<F2> |
For Indefinite |
Enter the rental percentage or select the <F2> option to use the default rental percentage from O/E Control information Rental percent field. This is multiplied against the unit price.
Click on the Save button or select <Alt+s> to save the rental record. In character mode, select the <Enter> key at Field number to change.
Select for Billing and Posting
Rentals must be selected for billing from the Billing menu prior to printing and posting. See the Selecting Rentals for Billing section of the Billing and Invoicing chapter.
When rentals are posted, they generate a Miscellaneous / Drop Ship Item Register and Sales Journal.
Rental entries remain after posting so that they can be reused based upon the frequency information originally entered.
Return Merchandise Authorizations (RMAs) can be entered initially as RMAs, or existing credit memos can be converted to RMAs. RMA forms print using the RMA form type. See the Forms chapter.
Graphical Mode
To enter a new RMA, select <F5> for a window that displays the additional entry modes. Select RMA and the letters R M A display in red at the top of the tab like this

Character Mode
To enter a new RMA, press <F7> at the Order # field and select the RMAs entry mode. The field Order # changes to RMA #, and the letters R M A display at the top of the screen like this:

Options
While at RMA #, you may enter the RMA number or use one of the options:
|
<F1> |
To display the next RMA |
|
<F2> |
To use the next available RMA number or order number, as specified in O/E Control information |
|
<F7> |
To switch to a different entry mode |
RMAs are entered and edited in the same way as credit memos. However, item quantities are not committed until converted to a Credit memo. Commitments are also not updated for any serial numbers and lot numbers entered for serialized and lot-controlled line items.
The customer's Unposted balance is updated when the RMA is entered.
For lot-controlled items
The quantity to be returned to inventory must be fully allocated prior to converting the RMA to a credit memo. In addition, if the quantity to be returned to inventory is less than the quantity credited, only one lot number may be specified and the entire quantity is automatically allocated to that lot number.
Printing and E-mailing an RMA
You can print an RMA if you set the form type in Control information in one of the user form fields. See : User form (1 through 4) - description . Enter the form type and enter a printer of either -PDF-, -PDFP- or Windows printer.
The e-mailing setup is the same as other O/E forms. See E-mailing Requirements and Setup. The process is similar to e-mailing invoices. See Billing and Invoicing.
Conversion to Credit Memo
To convert a previously entered RMA to a credit memo, enter the RMA number at the RMA # field. When the header screen for the RMA is displayed, press <F7>. If serial number entry or lot allocation is incomplete, you are advised of this and the conversion is not allowed. If there is no incomplete serial or lot information on the RMA, you are asked OK to convert to Credit memo ?. Answer Yes to complete the conversion.
Convert Credit Memo to RMA
To convert an existing credit memo to an RMA, display the credit memo and press <F7> at Field number to change ? . You are then asked OK to convert to RMA ?. Answer Y to convert the credit memo to an RMA, or answer N to cancel the conversion.
You can print a list of the orders, quotes, and RMAs that exist.
See an Order Edit List sample in the Sample Reports appendix.
Select Edit list from the Orders menu.
Graphical Mode
The following screen displays:
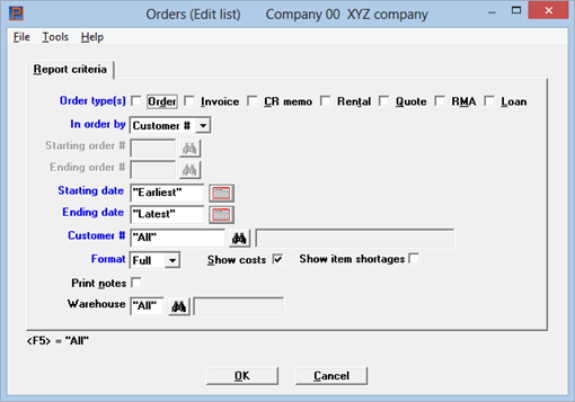
Character Mode
A screen appears for you to enter the following information:
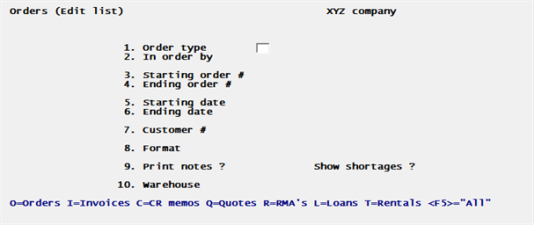
In graphical mode you may select up to seven types of orders to be included when printing the edit list. In character mode enter up to four types of orders to be included, pressing <Enter> after each type.
The choices are:
| Character | Graphical |
|---|---|
|
O |
Order |
|
I |
Invoice |
|
C |
CR memo |
|
L |
Loan |
|
Q |
Quote |
|
R |
RMA |
|
T |
Rental |
|
Format |
One choice from the list above. |
You can also press <F5> to include "All" order types on the edit list.
Enter the order in which you want the edit list printed, either by Order #, or by Customer #.
If you enter Order #, the Customer # field is skipped, because orders for all customers falling within the order range will be printed.
If you enter Customer #, the Starting and Ending order # fields are skipped, because all order numbers falling within the customer range will be printed.
|
Format |
Drop down list |
Ending order #
Enter the range of orders to print on the list.
You may optionally select <F2> for "First" or <F2> for "Last" for the Starting and Ending order number fields respectively.
|
Format |
999999 for both fields |
Ending date
Enter the range of order dates to print.
You may optionally select <F2> for "Earliest" or <F2> for "Latest" for the Starting and Ending date fields respectively.
|
Format |
MMDDYY |
Enter the customer number for the orders you wish to print or press <F5> to print orders for "All" customers. The default is "All".
If you selected to print by order number for the In order by field, this field cannot be entered.
|
Format |
12 characters |
Select the format in which to print the edit list, either Full for full format or Brief for brief format. The default is Full.
The brief format does not show cost center, warehouse, addresses, quantity back ordered, line discount percent, unit cost, scrap account, comments, totals, or serials or lot numbers.
|
Format |
One character |
If you select the full format, an additional field appears:
Check this box if you wish to show costs on the edit list. The default is checked.
When checked the edit list provides a warning for each line item that has over-committed quantities. The warning is a "??" printed between the Quantity to ship and the Item number. The edit list header also prints Shortages are indicated by ?? to the left of the item number.
The "??" indicator lets you know when an item is not sufficiently stocked and the quantity to ship has been overridden during entry. This will occur during entry when the message Full quantity not available displays and the user selects to Proceed with line. Then a second message Full quantity not available displays and the user selects Override.
The "??" warning will print on lines for Orders, Invoices, Rentals and Loans. It will not print for Quotes, Credit Memos and RMAs.
Check this box to print notes for each order. Leave it unchecked to not include notes. The default is unchecked.
This question can only be entered if you selected to use multi-warehousing in I/C Control information.
The edit list program uses the warehouse entered on the header (first order screen), not the order lines.
|
Format |
Two characters, there is no default in character mode, the default in graphical mode is "All" warehouses |
Options
Enter the warehouse code for the orders you wish to print or use one of the options:
|
<Enter> |
To print orders for the Central warehouse |
|
<F5> |
To print orders for "All" warehouses. Orders that are marked "All" in the warehouse field are included only if you select "All" here. |
Select OK to print the report or Cancel to return to the menu.
The Import function reads an E.D.I. order file and processes the imported data as if the data were manually entered.
The application will validate the data against the master data, provide for inventory commitment and other appropriate accounting functionality. E.D.I. Import creates orders, line items, and notes and creates entries in the E.D.I. Audit data with a status of IMPORTED.
The Import function uses the import sequential file named DIORDIMP.TXT. See the E.D.I. Import\Export Layout appendix for the layout required for the import. This file layout is used for orders to be imported.
An EDI Import Report is printed to disk during the import process. If errors are found in the file during the import process, an EDI Import Error Report is also printed to disk. Review this report for the errors found.
Deleted orders require two processing steps:
| 1. | If the order is not an imported deleted order, perform the O/E E.D.I. Order Export. |
| 2. | To remove deleted orders, the Purge option on the E.D.I. Status Report must be used. |
Imported orders can be imported as selected or not selected for billing.
Line items must always have an item number when importing.
|
Note |
Always backup your import files prior to importing them with this program. After the import has completed, the file is left with zero bytes. |
Select E.D.I Order Import from the Orders menu.
Graphical Mode
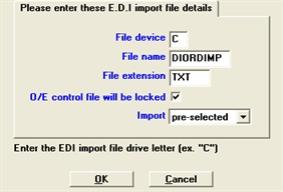
Character Mode
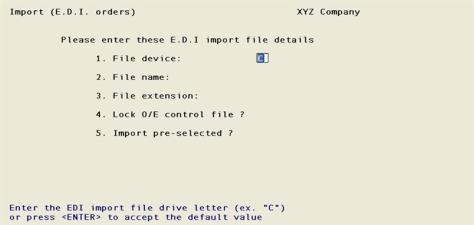
Enter the device where the import file resides. The default is drive C. It is customary to place the files to be imported in the PBS top-level folder (directory). You can also import a file from another drive. In this case, you enter the appropriate drive letter.
Enter the name of the file to be imported. Note that both the file name and file extension will have leading and embedded spaces edited out. This also applies to the Order/Invoice Export function. The default file name is DIORDIMP.
Enter the optional file name extension. The default is .txt (text file). However, you could use .001, .002, or some other site-dependent naming convention.
O/E control file will be locked
Check this box to lock the file or uncheck it to not lock the file.
If the box is checked, then other users in O/E are not allowed to enter any order until the import function has completed. This enables the system to properly synchronize the incoming order numbers. Otherwise, there is a possibility that the imported order numbers will be out of sequence. This option is site dependent. In any case, the resultant Import Status Report will reflect the order numbering scheme.
Use pre-selected to import orders so that all the lines are automatically selected-for-billing or use unselected and do the select-for-billing later.
Regardless of your choice here, lot number items and serial items are always imported as unselected for billing. You must manually assign lot numbers and serial numbers before they can be selected.
When you click on OK on the header screen, you are then asked Do you wish to change the lines?. If you select No, (the default), you continue with the import function.
If you select Yes, the line selection screen is displayed to allow you to select a line to change.
If the file being imported is processed with no errors, the following prompt displays:
E.D.I. import has finished. Please verify the Import Report.
The prompt Printing to disk, please wait displays. Upon completion, verify that all imported data is valid.
From the CTL menu, select Print reports from disk. Find and select the E.D.I. Import Report. You can then display the report, or output the report to a printer.
We recommend that you do not use the Reports option from the O/E menu, as this will display the data in a different format, as well as all other orders.
If the imported file has errors, a report will be automatically printed to disk. From the CTL menu, select Print reports from disk, find and select the E.D.I. Import Error Report. From this report, you can determine the errors generated and fix them as needed.
See a sample E.D.I. Import Error Report in the Sample Reports appendix.
If you receive the prompt Import file is empty, press <Enter>. You are probably attempting to import a file with zero bytes. This can happen if you have previously imported this file.
If the file cannot be found, you will be prompted with the following prompt:
Unable to find import file
Select the OK button. Verify that the file is named correctly and in the top-level PBS folder.
The Export process creates a file that is similar to PBS Export Data Utility processing. The file contains headers, lines and may also contain notes and comments.
The Export function creates a sequential file DIORDEXP.TXT which contains exported invoices. The Export function validates added and deleted E.D.I. orders, creates an order export file, prints any associated Error and Export reports, and updates the E.D.I. Audit status of the E.D.I. orders processed as EXPORTED.
Export E.D.I. orders when the orders imported are no longer identical to the orders in the external system and then synchronize the two systems. This synchronization may not be possible with some external systems.
The export file layout is the same as the import file layout with a few exceptions. See the E.D.I. Import\Export Layout appendix.
Use this selection for exporting orders. For information on exporting invoices, see the E.D.I. Invoice Export section of the Billing and Invoicing chapter.
Select E.D.I. order export from the Orders menu.
Graphical Mode
Character Mode
Enter the E.D.I. export file drive letter. The default is drive C.
Enter a file name, or press <Enter> to accept the default.
Enter the file extension for the export file, or press <Enter> to accept the default.
If you want to create a new Export file, select Create new export file. If you want to append data to an existing export file, select Add to existing export file.
Select Don't include imported orders to not export orders that were imported. Select Include imported E.D.I. orders if you want to export orders that were previously imported.
Exported orders
This field cannot be entered here. It is only used when exporting invoices. For information on exporting invoices see the E.D.I. Invoice Export section of the Billing and Invoicing chapter.
Enter the starting order #, or press <F2> to use the first E.D.I. Order number of a deleted or added E.D.I. order.
Enter the last order number, or press use the option <F2> to use the last order number of a deleted or added E.D.I. order.
Enter the starting E.D.I. document number, or press <F2> to use the first E.D.I. document number of a deleted or added E.D.I. order.
Enter the ending E.D.I. document number, or press <F2> to use the last E.D.I. document number of a deleted or added E.D.I. order.
When you press <Enter> at Field number to change? on the header screen, you are then asked Do you wish to change the lines?. If you answer N, (the default), you continue with the export function.
If you answer Y, the line selection screen is displayed to allow you to select a line to change.
If the Export program processes with no errors, do the following:
| • | From the CTL menu, select Print reports from disk. Select the E.D.I. Export Report. You can display the report, or output the report to a printer. |
| • | If the Export program processes with errors, the following prompt displays: E.D.I. export has errors, please verify the Export Error Report. Press <Enter>. |
| • | From the CTL or System Manager menu, select Print Reports from Disk. Select the E.D.I. Export Error Report. You can then display the report, or output the report to a printer. |
Use the E.D.I. Status to confirm an order as an E.D.I. type order during processing.
The report displays E.D.I. orders by status type, details of posted invoices that are available, and provides totals by the various processing operations performed. If an order has been imported, invoiced, posted, and exported, it will be accumulated once per each operation performed. The status also allows for a purge of deleted or completed records with no invoice history. Status processing uses the E.D.I. Audit file and the Invoice History file. Note that Purged entries are deleted from the E.D.I. Audit file.
Select E.D.I. status report from the Orders menu.
Graphical Mode
Character Mode
Enter a starting E.D.I. order number or press <F2> to use the first order number of an E.D.I. order.
Enter a ending E.D.I. order number or press <F2> to use the last order number of an E.D.I. order.
Enter a starting ED. document number or press <F2> to use the first document of an E.D.I. order.
Enter a ending E.D.I. document number or press <F2> to use the last document number of an E.D.I. order.
Check the boxes of the status types you want to include.
Check the "All" box to include all status types. Uncheck it to select specific status types. Specific status types include the following date types:
| • | Imported |
| • | Added |
| • | Deleted |
| • | Invoiced |
| • | Posted |
| • | Completed |
| • | Exported |
Select the sequence type, either:
| Character | Graphical |
|---|---|
|
O |
Order # |
|
D |
E.D.I. document |
Print the history details for each order
Check this box to print the history details for each order. Leave it unchecked to suppress the history details.
Purge "Deleted/Completed" audit records with no order history
Check this box to purge Deleted/Completed audit records. Leave it unchecked to suppress this action.
Select OK to print the report and purge records if the last field is checked. Select Cancel to return to the menu.